Tabla de contenido
Publicidad
Idiomas disponibles
Idiomas disponibles
Enlaces rápidos
24-bit USB Audio/MIDI Interface
Quick Start Owner's Manual
BOX CONTENTS
•
IO|2 USB AUDIO/MIDI INTERFACE
•
USB CABLE
•
QUICK START OWNER'S MANUAL
•
IMPORTANT SAFETY INSTRUCTIONS
Manual de inicio rápido para el usuario
CONTENIDO DE LA CAJA
•
INTERFAZ DE AUDIO/MIDI USB IO|2
•
CABLE USB
•
MANUAL DE INICIO RÁPIDO DEL USUARIO
•
INSTRUCCIONES IMPORTANTES DE SEGURIDAD
Manuel d'utilisation du propriétaire
CONTENUE DE LA BOÎTE
•
IO|2 AVEC INTERFACE USB AUDIO/MIDI
•
CÂBLE USB
•
GUIDE D'UTILISATION SIMPLIFIÉ
•
CONSIGNES DE SÉCURITÉ
Kurzbedienungsanleitung
INHALT DER VERPACKUNG
•
IO|2 USB AUDIO/MIDI INTERFACE
•
USB KABEL
•
KURZBEDIENUNGSANLEITUNG
•
WICHTIGE SICHERHEITSHINWEISE
Manuale rapido di utilizzo
CONTENUTO DELLA CONFEZIONE
•
INTERFACCIA AUDIO/MIDI IO|2 USB
•
CAVO USB
•
MANUALE RAPIDO DI UTILIZZO
•
IMPORTANTI ISTRUZIONI DI SICUREZZA
Publicidad
Tabla de contenido

Manuales relacionados para Alesis IO 2

Resumen de contenidos para Alesis IO 2
- Página 1 24-bit USB Audio/MIDI Interface Quick Start Owner’s Manual BOX CONTENTS • IO|2 USB AUDIO/MIDI INTERFACE • USB CABLE • QUICK START OWNER’S MANUAL • IMPORTANT SAFETY INSTRUCTIONS Manual de inicio rápido para el usuario CONTENIDO DE LA CAJA • INTERFAZ DE AUDIO/MIDI USB IO|2 •...
- Página 2 This page intentionally left blank.
- Página 3 IO|2 Quick Start User’s Guide (English)
- Página 4 Introduction Congratulations on your purchase of the Alesis IO|2 audio/MIDI interface! We’re proud of this interface and we’ve taken a great deal of care in making the IO|2 the best sounding, most rugged and easy to use audio interface on the market.
-
Página 5: Key Features
Key Features Your IO|2 features the following: • 24-bit recording and playback • Balanced XLR and ¼” inputs with adjustable gain • Switchable phantom power • TRS inserts • High quality mic preamps • Comprehensive 4-segment input metering • Low latency ASIO/WDM/Core Audio drivers •... -
Página 6: Product Registration
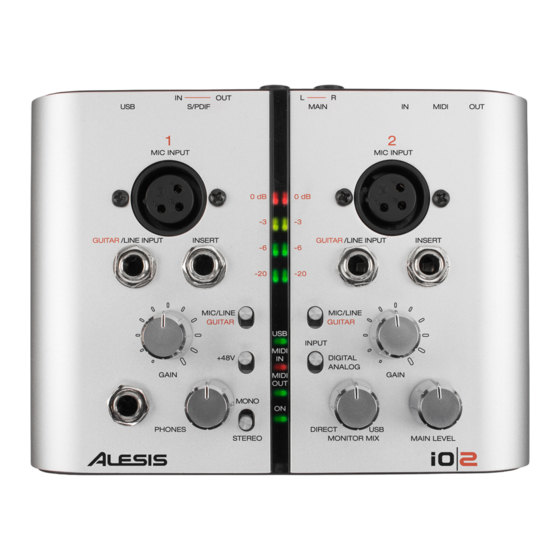
Product Registration Please go to http://www.alesis.com and register your new IO|2. Registering helps us to keep you up-to-date on any last minute product issues and driver updates. If you would like, we can also send you information on other products that might interest you. - Página 7 Top Panel Connections 1. Mic Input - Connect a microphone to this input. Audio Inputs 2. Guitar/Line Input- Connect a guitar or line-level Do not use the Mic and instrument to the IO|2 using this connector. Make Guitar/Line inputs at the sure the “Mic/Line Guitar”...
-
Página 8: Back Panel Connections
Back Panel Connections 1. MIDI Out Connector - Use a five-pin MIDI cable to connect the MIDI out of the IO|2 to the MIDI input of an external MIDI device. 2. MIDI In Connector - Use a five-pin MIDI cable to connect the output of an external MIDI device to the MIDI IN of the IO|2. -
Página 9: Status Lights
Status Lights Setting Gain Levels 1. +48V – Lights up when phantom power is engaged. The 4-segment input meters 2. MIDI Out – Flashes whenever MIDI data is sent out of are there to help you know how loud your inputs are. the IO|2. -
Página 10: Hookup Diagrams
Hookup Diagrams The following setup will work well for most guitarist/singers: 1. Guitars – Plug guitars into the Guitar/Line input and make sure the “Mic/Line Guitar” switch is set to “Guitar” to ensure best recording quality. 2. Microphones – Plug microphones into the XLR input of the IO|2. Make sure that the “Mic/Line Guitar”... - Página 11 The following setup will work well for most keyboard players: 1. Keyboards – Connect the outputs of your keyboard into the “Guitar/Line” inputs of the IO|2. If your keyboard only has one output, go ahead and connect to whichever channel of the IO|2 you prefer. When connecting keyboards, be sure to set the “Mic/Line Guitar”...
- Página 12 Our drivers will yield significantly lower IO|2 latency and better performance. To install the IO|2 on Windows XP, simply insert the supplied Alesis CD-ROM and wait for the following menu to pop up: SysEx Transfers When performing large SysEx transfers over...
- Página 13 Troubleshooting: Symptom Cause Solution USB light does not The IO|2 is not Make sure you are connecting your IO|2 turn on. receiving power or directly to your computer’s USB connector and USB connection is not into a USB hub. If this does not solve the not being made to problem, double check your driver installation your computer...
- Página 14 Specifications Interface: IO|2 24-bit audio/MIDI interface Features: Stereo, 24-bit inputs and outputs. Sample-rate adjustable up to 48 kHz. Separate gain knob and mic/line switch for each input. All balanced inputs and outputs. Stereo ¼” headphone jack. S/PDIF and MIDI I/O. Mic/line inputs Audio I/O SNR 95dB (A-weighted) minimum -- 97dB typical...
- Página 15 IO|2 Guía de inicio rápido del usuario (Español)
-
Página 16: Introducción
Introducción ¡Felicitaciones por su compra de la interfaz de audio/MIDI Alesis IO|2! Estamos orgullosos de esta interfaz y hemos tomado los mejores recaudos para hacer que la IO|2 sea la interfaz de audio más sonora, robusta y fácil de usar del mercado. -
Página 17: Características Principales
Características principales Su interfaz IO|2 ofrece lo siguiente: • Grabación y reproducción en 24 bits • Entradas XLR y de ¼” balanceadas con ganancia ajustable • Alimentación fantasma conmutable • Inserciones TRS • Preamplificadores de micrófono de alta calidad • Medición completa de la entrada con 4 segmentos •... -
Página 18: Registración Del Producto
Registración del producto Vaya a http://www.alesis.com y registre su nueva interfaz IO|2. La registración nos ayuda a mantenerlo actualizado acerca de las novedades de última hora sobre el producto y las actualizaciones de los drivers. Si desea, también podemos enviarle información de otros productos que le puedan interesar. -
Página 19: Conexiones Del Panel Superior
Conexiones del panel superior 1. Entrada XLR de micrófono – Conecte un Entradas de audio micrófono al IO/2 usando esta entrada. No utilice la entrada de 2. Entrada de guitarra o instrumento – Conecte micrófono y guitarra ( Mic una guitarra o instrumento al IO/2 usando este and Guitar/line ) al mismo tiempo en el mismo canal. - Página 20 9. Conmutador de monitoreo mono/estéreo – Le permite conmutar sus auriculares a mono. Este conmutador es útil para situaciones de monitoreo con latencia cero en las que no es conveniente que sus entradas se desplacen fuertemente a izquierda y derecha en sus auriculares. 10.
-
Página 21: Conexiones Del Panel Trasero
Conexiones del panel trasero 1. Conector de salida MIDI – Use un cable MIDI de cinco pines para conectar la salida MIDI de la interfaz IO|2 a la entrada de un dispositivo MIDI externo. 2. Conector de entrada MIDI – Use un cable MIDI de cinco pines para conectar la salida de un controlador MIDI externo a la entrada MIDI de la interfaz IO|2. -
Página 22: Luces De Estado
Luces de estado Cómo ajustar los niveles de ganancia 1. +48V – Se enciende cuando se acopla la alimentación fantasma. Dispone de los medidores de entrada de 4 segmentos para 2. Salida MIDI – Destella toda vez que se envían datos hacia ayudarle a conocer el nivel afuera de la interfaz IO|2. -
Página 23: Diagramas De Conexión
Diagramas de conexión La siguiente configuración funciona bien para la mayoría de los guitarristas/cantantes: 1. Guitarras – Conecte las guitarras a la entrada de “Guitar/Line” y asegúrese de que el switch esté colocado en “Guitar” para una mejor calidad de grabación. 2. - Página 24 4. Salidas principales – La interfaz IO|2 soporta cables de ¼” balanceados “TRS” y desbalanceados “TS”. Si sus altavoces (o mezclador) soportan cables balanceados, úselos puesto que le brindan una mejor performance y menor ruido. 5. Cable USB – Enchufe su cable USB directamente a su computadora y evite usar un hub USB.
- Página 25 La siguiente configuración funciona bien para la mayoría de los ejecutantes de teclados: 1. Teclados – Conecte las salidas de su teclado a las entradas de “Guitar/Line” del IO/2. Si su teclado tiene una sóla salida, conéctela a cualquier canal del IO/2 que ud.
-
Página 26: Conexión Plug-And-Play A Una Computadora
Nuestros drivers proporcionan una latencia significativamente inferior y una mejor performance. Para instalar la interfaz IO|2 en Windows XP, inserte simplemente el CD-ROM de Alesis provisto y espere que aparezca el siguiente menú emergente: SysEx Cuando realice transferencias de SysEx... -
Página 27: Solución De Problemas
Solución de problemas: Síntoma Causa Solución La luz USB no se La IO|2 no tiene Asegúrese de que está conectando su IO|2 enciende. alimentación o no se directamente al conector USB de su hizo la conexión computadora y no a un hub USB. Si esto no USB a su resuelve el problema, haga una doble computadora... -
Página 28: Datos Técnicos
Datos técnicos Interfaz: Interfaz de audio/MIDI IO|2 de 24 bits / 48 K Características: Entradas y salidas estéreo de 24 bits. Frecuencia de muestreo ajustable hasta 48 kHz. Perilla de ganancia y conmutador de micrófono/línea independientes para cada entrada. Entradas y salidas todas balanceadas. - Página 29 IO|2 Guide d’utilisation simplifié (Français)
- Página 30 Introduction Félicitations pour l’achat de votre interface IO|2 USB audio/MIDI d’Alesis. Nous sommes fier de cette interface et nous avons tout fait pour que l’IO|2 soit la meilleure, la plus robuste et la plus facile l’interface à utiliser sur le marché.
-
Página 31: Caractéristiques Principales
Caractéristiques principales Les caractéristiques principales de l’IO|2 sont: • Enregistrement et lecture 24 bits/48 kHz • Entrées XLR et de ¼ po symétriques à gain réglable • Alimentation fantôme commutable • Connecteurs TRS • Préamplis micro de haute qualité • Vumètres d’entrée stéréo à... -
Página 32: Enregistrement Du Produit
Enregistrement du produit Veuillez visiter le site internet http://www.alesis.com pour enregistrer votre IO|2. L’enregistrement nous permet de vous informer sur les toutes dernières nouveautés concernant les produits et la mise à jour des pilotes. Si vous le désirez, nous pouvons également vous faire parvenir de l’information sur d’autres produits qui pourraient vous intéresser. - Página 33 Connexions du panneau supérieur 1. Mic Input - Utilisez cette prise pour connecter un Entrées audio micro au IO|2. Ne pas utiliser les entrées 2. Guitar/Line Input - Connectez une guitare ou un Mic et Guitar/Line en même instrument line-level au IO|2 en utilisant cette prise. temps sur un canal.
- Página 34 9. Sélecteur mono/stéréo du casque d’écoute - Permet de sélectionner le mode mono du casque d’écoute. Réglage très utile durant la pré écoute du signal d’entrée sans latence et lorsque vous ne voulez pas que le panoramique du signal du casque soit complètement à gauche ou complètement à droite. 10.
-
Página 35: Connexions Arrière
Connexions arrière 1. Connecteur de sortie MIDI - Branchez un câble MIDI doté de cinq broches de raccordement à la sortie MIDI de l’IO|2 et l’extrémité du câble à l’entrée d’un appareil MIDI externe. 2. Connecteur d’entrée MIDI - Branchez un câble MIDI doté de cinq broches de raccordement à... -
Página 36: Voyants De Fonctionnement
Voyants de fonctionnement Réglage du niveau de gain Les vumètres d’entrée stéréo à 4 segments indiquent le niveau d’entrée. Lorsque vous effectuez le réglage du 1. Voyant +48 V - S’allume lorsque l’alimentation fantôme est gain pour chaque canal, activée. essayez de régler les niveaux au maximum sans toutefois 2. -
Página 37: Schéma De Raccordement
Schéma de raccordement L’installation suivante convient à la plupart des guitaristes/chanteurs: 1. Guitares - Brancher les guitares dans l’entrée Guitar/Line et s’assurer que le commutateur “Mic/Line Guitar” est ajusté sur “Guitar” afin de permettre la meilleure qualité d’enregistrement. 2. Microphones - Brancher les micros dans l’entrée XLR du IO|2. S’assurer que le commutateur “Mic/Line Guitar”... - Página 38 L’installation suivante convient à la plupart des claviéristes: 1. Claviers - Branchez votre clavier sur la prise “Guitar/Line” du IO|2. Si votre clavier n’a qu’une sortie, vous pouvez utiliser n’importe quel canal sur votre IO|2. En branchant votre clavier, assurez-vous d’ajuster le commutateur “Mic/Line Guitar”...
- Página 39 Windows, il se peut que vous ayez à augmenter la taille de la mémoire tampon en conséquence. Cliquez sur « Install Alesis Audio Driver » pour commencer Autrement, Windows peut ne l’installation du pilote. Durant l’installation Windows XP, pas effectuer le transfert vous recevrez l’invite de commande suivante:...
- Página 40 Dépannage: Symptôme Cause Solution Le voyant USB est L’IO|2 n’est pas Assurez vous que l’IO|2 est branché éteint. alimenté ou la directement au connecteur USB de votre connexion USB ne ordinateur et non à un répéteur USB. Si cela ne se fait pas fonctionne pas, vérifiez l’installation pilote de l’ordinateur et assurez vous que les pilotes de...
-
Página 41: Fiche Technique
FICHE TECHNIQUE Interface: Interface IO|2 audio/MIDI 24 bits/48 kHz Caractéristiques: Stéréo, entrées et sorties 24 bits. Fréquence d’échantillonnage réglable jusqu’à 48 kHz. Chaque canal possède son propre réglage du gain et un commutateur micro/ligne. Toutes les entrées et les sorties sont symétriques. Prise stéréo ¼ po pour casque d’écoute. - Página 42 IO|2 Kurzbedienungsanleitung (Deutsch)
- Página 43 Einführung Wir beglückwünschen Sie zu Ihrem Alesis IO|2 Audio/MIDI Interface! Wir selbst sind sehr stolz auf das IO|2, haben wir doch mit großer Sorgfalt versucht, ein professionell klingendes, extrem widerstandsfähiges und einfach zu bedienendes Interface zu erschaffen. In dem Bemühen, uns in dieser Anleitung wirklich kurz zu halten bitten wir Sie jedoch, die Beschreibungen sorgfältig zu lesen.
-
Página 44: Systemanforderungen
Wichtige Eigenschaften Ihr IO|2 besitzt die folgenden Features: • 24-Bit Aufnahme und Wiedergabe • Symmetrische XLR und 6,3mm Klinkeneingänge mit einstellbarem Gain • Einschaltbare Phantomspeisung • 6,3mm Insertanschlüsse • Professionelle Mikrofonvorverstärker • Aussagekräftige 4-Segment Eingangspegel-Meter • Verzögerungsarme ASIO/WDM/Core Audio Treiber •... - Página 45 Produktregistrierung Registrieren Sie Ihr IO|2 auf http://www.alesis.de. Ihre Registrierung hilft uns, Sie über die neuesten Produktthemen und Treiberupdates auf dem Laufenden zu halten. Auf Ihren Wunsch hin können wir Ihnen auch Informationen zu anderen interessanten Produkten zukommen lassen. Mit Ihrer Registrierung lassen Sie uns wissen, welche anderen Geräte Sie verwenden (oder von welchen Sie träumen).
- Página 46 Anschlüsse der Oberseite Audioeingänge 1. Mic Eingang – Verbinden Sie diesen Eingang des IO|2 mit Ihren Mikrofonen oder anderem XLR Verwenden Sie die Mic und Equipment. Guitar/Line Eingänge eines Kanals nicht gleichzeitig. 2. Guitar/Line Eingang – Schließen Sie Ihre Dadurch könnten Sie den Gitarren oder andere hochohmige Kanal übersteuern, wodurch Instrumentenausgänge an.
- Página 47 7. Kopfhörer Ausgangsbuchse -– Schließen Sie hier Ihren Kopfhörer an. 8. Kopfhörer Lautstärkeregler – Stellen Sie mit diesem Regler die Kopfhörerlautstärke ein. 9. Mono/Stereo Monitoring Schalter – Hiermit aktivieren Sie den Monobetrieb Ihrer Kopfhörer. Dieser nützt besonders in Zero-Latency Monitoring Situationen, bei denen Sie die beiden Eingänge nicht nur links und rechts verteilt im Kopfhörer hören möchten.
- Página 48 Anschlüsse der Rückseite 1. MIDI Out Buchse – Mit Hilfe eines fünfpoligen MIDI-Kabels können Sie den MIDI-Ausgang des IO|2 mit dem MIDI-Eingang eines externen MIDI-Gerätes verbinden. 2. MIDI In Buchse – Verwenden Sie ein fünfpoliges MIDI-Kabel, um den MIDI-Ausgang eines externen MIDI-Gerätes mit dem MIDI IN des IO|2 zu verbinden.
- Página 49 Leuchtanzeigen Signale richtig aussteuern 1. +48V – Leuchtet bei aktivierter Phantomspeisung. 2. MIDI Out – Blinkt, wenn MIDI-Daten den IO|2 Die 4-Segment Eingangsanzeigen helfen verlassen. Ihnen festzustellen, wie laut 3. MIDI In – Blinkt, wenn MIDI-Daten von einem externen Ihre Eingangssignale sind. MIDI-Gerät eintreffen.
- Página 50 Anschlussübersichten Der folgende Aufbau sollte sich für die meisten Gitarristen/Sänger eignen: 1. Gitarren – Verbinden Sie Gitarren mit dem Guitar/Line Eingang und setzen Sie den “Mic/Line Guitar” Schalter auf “Guitar,“ um die bestmögliche Signalqualität zu erhalten. 2. Mikrofone – Schließen Sie Mikrofone an den XLR Eingang des IO|2 an und stellen Sie den “Mic/Line Guitar”...
- Página 51 4. Summenausgänge – Der IO|2 unterstützt sowohl symmetrische als auch unsymmetrische Klinkenkabel. Wenn Ihre Lautsprecher (oder Ihr Mixer) symmetrische Anschlüsse besitzen, sollten Sie diese auf Grund besserer Audioqualität und geringerem Rauschpegels auch verwenden. 5. USB Kabel – Stellen Sie eine direkte Verbindung zwischen dem IO|2 und Ihrem Computer her und verwenden Sie zum Anschluss keinen USB Hub.
- Página 52 Das folgende Setup sollte für die meisten Keyboarder das Passende sein: 1. Keyboards – Schließen Sie die Audioausgänge Ihres Keyboards an die “Guitar/Line” Eingänge des IO|2 an. Sollte Ihr Keyboard nur einen Ausgang besitzen, ist es egal, welchen Kanal Sie am IO|2 verwenden. Beachten Sie, dass bei der Verwendung von Keyboards der “Mic/Line Guitar”...
- Página 53 USB-Kabel an - und schon kann es losgehen. Auch unter Windows XP muss man keine Treiber installieren, da das IO|2 die systemeigenen Audiotreiber unterstützt. Wir legen Ihnen aber nahe, die Alesis Audio Treiber zu installieren. Unsere Treiber ermöglichen eine niedrigere Latenz und eine bessere Performance.
- Página 54 Fehlerhilfe: Symptom Ursache Lösung USB Licht geht nicht Das IO|2 empfängt Vergewissern Sie sich, dass Sie das IO|2 direkt keine Spannung oder mit einem USB-Ports des Computers die USB Verbindung verbunden haben und kein USB Hub zum Computer dazwischen geschaltet wurde. Besteht das wurde nicht Problem fort, überprüfen Sie nochmals Ihre hergestellt...
- Página 55 Specifications Interface: IO|2 24-Bit Audio/MIDI Interface Eigenschaften: Stereo, 24-Bit ein- und Ausgänge. Einstellbare Sample Rate bis 48 kHz. Getrennte Gain Regler und Mic/Line Schalter für jeden Kanal. Alle Ein- und Ausgänge sind symmetrisch ausgeführt. 6,3mm Stereokopfhörerbuchse. S/PDIF und MIDI I/O. Audio: Mic/Line Eingänge Rauschabstand 95dB (A-bewertet) Minimum -- 97dB...
- Página 56 IO|2 Guida rapida di utilizzo (Italiano)
- Página 57 Introduzione Congratulazioni per aver acquistato la vostra nuova interfaccia Audio/MIDI Alesis IO|2! Siamo orgogliosi di questa interfaccia e abbiamo prodigato moltissime cure per rendere l’IO|2 l’interfaccia audio dal suono migliore, la più robusta e la più facile da usare tra tutte quelle presenti sul mercato.
-
Página 58: Caratteristiche Principali
Caratteristiche principali L’IO|2 presenta quanto segue: • registrazione e riproduzione a 24-bit • Ingressi bilanciati XLR e a ¼” con guadagno regolabile • Alimentazione phantom commutabile • Prese TRS • Preamplificatori mic di alta qualità • Misuratore d’ingressi globale a 4 segmenti •... -
Página 59: Registrazione Del Prodotto
Registrazione del prodotto Recarsi sul sito http://www.alesis.com per la registrazione del vostro nuovo IO|2. La registrazione ci aiuta a mantenervi aggiornati su qualsiasi prodotto nuovo e aggiornamenti dei driver. Se desiderato, possiamo inoltre inviarvi informazioni ad altri prodotti che potrebbero essere di vostro interesse. - Página 60 Collegamenti pannello superiore 1. Mic Input - Collegare un microfono al IO|2 usando quest’ingresso. Ingressi Audio 2. Guitar/Line Input - Collegare al IO|2 una Non usate gli ingressi Mic e chitarra o uno strumento musicale con uscita a livello Guitar dello stesso canale di linea usando quest’...
- Página 61 9. Interruttore di monitoraggio mono/stereo - permette di far passare le cuffie in mono. Questo è utile in casi di monitoraggio a latenza zero in cui si potrebbe non desiderare gli ingressi pannati a sinistra e adestra in cuffia. 10. Manopola monitor mix - mescola qualsiasi quantità di segnale a latenza zero dagli ingressi mic/line con l’uscita del computer.
- Página 62 Collegamenti pannello posteriore 1. Connettore MIDI Out - servirsi di un cavo MIDI a cinque poli per collegare l’uscita MIDI out dell’IO|2 all’ingresso MIDI di un dispositivo MIDI esterno. 2. Connettore MIDI In - servirsi di un cavo MIDI a cinque poli per collegare l’uscita di un dispositivo MIDI esterno al MIDI IN dell’IO|2.
- Página 63 Luci indicatrici di stato Impostazione dei livelli di 1. +48V – si accende quando è attivata l’alimentazione guadagno (gain) phantom. I misuratori d’ingressi a 4 2. MIDI Out – lampeggia ogniqualvolta vengono inviati dati segmenti sono lì per MIDI fuori dal IO|2. permettervi di sapere quanto 3.
-
Página 64: Schemi Di Collegamento
Schemi di collegamento Le seguenti impostazioni sono ottime per la maggior parte dei chitarristi/cantanti: 1. Chitarre – Collegate la vostra chitarra all’ingresso Guitar/Line e controllate che il selettore “Mic/Line Guitar” sia settato su Guitar in modo da assicurare una qualita`di registrazione ottimale. 2. - Página 65 L’impostazione seguente è ottima per la maggior parte dei tastieristi: 1. Tastiere – Collegate le uscite della vostra tastiera al IO|2 usando l’ingresso “Guitar/Line”. Se la tastiera in questione dispone di una sola uscita, collegatela pure all’ingresso che preferite. Quando collegate una tastiera, assicuratevi di settare il selettore “Mic/line Guitar”...
- Página 66 USB e si è pronti a partire. L’installazione del driver non è richiesta su Windows XP in quanto l’IO|2 supporta i driver audio predefiniti, ma raccomandiamo di installare ugualmente i driver audio Alesis. I nostri driver comporteranno una latenza significativamente inferiore e garantiranno migliori prestazioni.
-
Página 67: Risoluzione Di Problemi
Risoluzione di problemi: Sintomo Causa Soluzione La luce USB non si L’O|2 non riceve Assicurarsi di collegare l’IO|2 direttamente alla accende. l’alimentazione porta USB del vostro computer e non a livello oppure non è stato di un hub USB. Se questo non risolve il effettuato il problema, ricontrollare l’installazione del driver collegamento USB al... -
Página 68: Specifiche Tecniche
Specifiche tecniche Interfaccia: Interfaccia audio/MIDI IO|2 a 24-bit Caratteristiche: Ingressi e uscite stereo a 24-bit. Frequenza di campionamento regolabile fino a 48 kHz. Manopola di guadagno e interruttore mic/linea separati per ciascun ingresso. Tutti gli ingressi e le uscite bilanciati. Jack cuffie stereo da ¼”. S/PDIF e MIDI I/O. - Página 69 7-51-0173-E...