Tabla de contenido
Publicidad
Idiomas disponibles
Idiomas disponibles
Enlaces rápidos
Publicidad
Capítulos
Tabla de contenido
Solución de problemas

Manuales relacionados para claber 8488

Resumen de contenidos para claber 8488
- Página 1 Dual Select 8488...
- Página 2 Quick-start use - Inicio rápido Procédure rapide 1-2-3-4-5-6-8-10-12- 8-12-24 hours 15-20-30-60-90 min. 2-3-5-7 days x1...8 x1...14 3 sec. Start / Stop LINE A Start / Stop LINE B...
- Página 3 Program LINE A START Program LINE B START Program LINE A START x2...24 1...23 h Program LINE B START Exit Program LINE A-B Start A/B 3 sec. Stop A/B...
-
Página 4: Tabla De Contenido
Table of contents Introduction ..................3 Operating tips ..................3 Features ..................4-5 Batteries installation ...............6-7 Installation ..................8 Notes ....................9 Programming ................10-17 Selecting a program ..............10 Immediate start ................11 Delayed start ................12 Changing a watering program ..........13 Selection of Sequential/Overlap mode ........13 Manual watering ................15 Reset ....................15 Shutting off the timer ..............15... -
Página 5: Introduction
Introduction Thank you for purchasing Claber Dual Select water timer. Please read this instruction manual carefully before starting to program the timer, and keep it handy for future reference: each section will provide all the necessary information on how to perform the single steps correctly. -
Página 6: Features
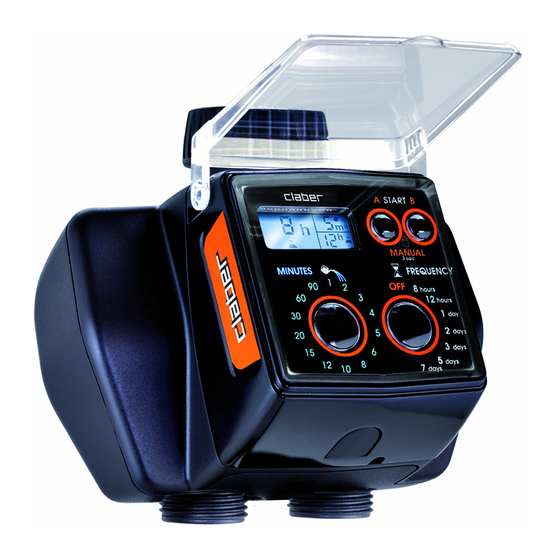
Features The timer allows to water two areas with different water requirements, selecting on each line the watering frequency with 7 options from every 8 hours to every 7 days, and the watering duration with 14 settings ranging from 1 minute to 90 minute. Each line offering 98 customized programs to cater to every watering need. - Página 7 Features fig.1 Display appearance: Countdown to the end of the current watering cycle LINE B Countdown to the ope- LINE A ning of the next watering cycle Display showing watering fre- quency selected Display showing watering du- ration selected Push-button to set watering duration Push-button to start program Legend (fig.1):...
-
Página 8: Batteries Installation
Batteries installation The timer requires 2 AA 1.5V (LR6) alkaline batteries, which normally will be sufficient for an entire dry season (assuming an average of 3 watering cycles per day). To install or replace the batteries, proceed as follows (fig.2): ➊... - Página 9 Batteries installation Notes: • Use only AA 1.5V (LR6) alkaline batteries, and replace them at the beginning of each watering season. • The battery symbol blinks on the display in two scenarios: - when program/manual settings are visible; replace batteries immediately to retain the programs.
-
Página 10: Installation
Installation Fit the timer to an outside water fig.3 tap, following these instructions (fig.3): 1. Screw the 3/4” female fitting onto the tap. Warning: hand tighten only, do not force with tools. 2. Attach the garden hoses to the 5/8”threaded connectors at the bottom of the timer. -
Página 11: Notes
Notes • When the back-light of the dispay is off, it can be switched on simply by pressing any one of the buttons. • The buttons can be used to program the timer only when the back- light is on (programming enabled). •... -
Página 12: Programming
Programming SELECtINg a PRogRam START LINE “A” LINE “B” fig.4 1. Set the watering duration by pressing the “m” button repeatedly until the required value appears in display field “D”. 2. Set the watering frequency by pressing the “F” button repeatedly until the required value appears in display field “E”. -
Página 13: Immediate Start
Programming 3. Decide, according to needs or preference, whether the first watering cycle should start immediately or have a delayed start. Immediate start Within 10 seconds of selecting a program, press the “a-StaRt” button once only to select line A, or the “B-StaRt” button to select line B: the message “0 h”... -
Página 14: Delayed Start
Programming Delayed start Within 10 seconds of selecting a program, press the “a-StaRt” button repeatedly to select line A, or the “B-StaRt” button to select line B, until the display field “C” shows the required time delay, between 1-23 hours, before the opening of the fig. -
Página 15: Changing A Watering Program
Programming Changing a watering program Repeat the programming procedure as indicated in “Selecting a program” on page 10; the new program selected will replace the previous one, with no further steps required. Selection of Sequential/overlap mode It’s preferible “but not necessary” to determine the operation mode prior to setting the timer to avoid reprogramming. - Página 16 Programming fig.5...
-
Página 17: Manual Watering
Programming maNUaL watERINg 1. Press the “a-StaRt” and “B-StaRt” buttons simultaneously and hold them for at least 3 seconds -> when the timer goes into manual mode, the word oFF will blink. 2. To activate line A, press the “a - StaRt” button -> the line will be activated for 5 minutes (which can not be modified by the user), confirmed by the symbol. -
Página 18: Delayed Start Programming Example
Programming DELaYED StaRt PRogRammINg EXamPLE At 8:30 pm you are programming your timer to water 10 minutes every 12 hours, starting from 11:30 pm. - Press the “M” button repeatedly to set the watering duration (i.e. 10 minutes) - Press the “F” button repeatedly to set the watering frequency (i.e. 12 hours) - Press the “A-START”... - Página 19 Programming LINE A 8:30 pm 8:30 pm 8:30 pm LINE B 8:30 pm 8:30 pm 8:30 pm SUMMARY OF PROGRAMS SELECTED 11:30 pm 8:30 pm 8:30 pm...
-
Página 20: Operation With Rain Sensor
Operation with Rain Sensor The timer can be connected to a wired Rain Sensor (item 90915) or to a wireless RF Rain Sensor (item 90831) + RF Rain Sensor Interface (item 8480). The sensor informs the timer whenever the rainwater collected in the cup has reached 0.17 ounces/5 mm (‘rain’... - Página 21 Operation with Rain Sensor fig.6 item 90831 item 8480 item 90915 OK!!!
-
Página 22: Rain Sensor Status Display
Operation with Rain Sensor RaIN SENSoR StatUS DISPLaY No rain sensor installed, or Watering cycles will be if installed, cup contains less activated according to the rain rain than 0.17 ounces (5 mm) selected program. rainwater. Rain sensor contains Watering is suspended un- til the rainwater in the cup at least 0.17 ounces has evaporated. -
Página 23: Cleaning And Maintenance
Cleaning and maintenance Wash the filter at beginning of every watering season and inspect it pe- riodically. To wash the filter, proceed as follows (fig.7): ➊ • Turn off the tap and loosen the the 3/4” female tap connector ( ➋... -
Página 24: Basic Troubleshooting
RF Rain Sensor is positioned no more for more than than 100 ft. (30 m) from it; 24 hours. - the RF Rain Sensor is where originally installed. For further assistance contact Claber Customer Service at 1-800-930-4566 or via email at info@claberinc.com. -
Página 25: Technical Specifications
Technical specifications Power supply: 2 x IEC AA 1.5 V (LR6) alkaline batteries Average life of batteries: 1 year Protection category: IP 20 Operating temperature: 37.4°F (3°C) - 122°F (50°C) Operating pressure: 7.3 PSI (0.5 Bar) - 174 PSI (12 Bar) Plastic materials: >ABS<... -
Página 26: Conditions Of Warranty
Indicate the serial number Conditions of warranty Claber guarantees that the product is free of material or manufacturing defects. Within a period of three years subsequent to the purchase date, any parts acknowledged to be defective will be repaired or replaced by Claber free of charge, provided that the appliance has been used under normal operating conditions, properly maintained and not tampered with or modified in any way. - Página 27 Dual Select 8488...
- Página 28 Programador de riego de dos vías Introducción ..................27 Recomendaciones ................27 Características generales..............28 Colocación de las pilas ..............30 Instalación ..................32 Notas ....................33 Programación ...................34 Seleccionar un programa .............34 Inicio inmediato ................35 Inicio retardado ................36 Modificación de un programa de riego ........37 Selección de los modos Posposición y Sobreposición ....37 Riego manual ................39 Reinicio ..................39...
-
Página 29: Introducción
Introducción Agradecemos la confianza depositada en Claber al comprar este producto. Lea atentamente este manual de instrucciones antes de empezar la progra- mación y consérvelo para poderlo consultar en cualquier momento: encontra- rá las indicaciones necesarias para realizar correctamente cualquier operación. -
Página 30: Características Generales
Características generales El programador permite regar dos áreas con diferentes requerimientos de agua, seleccionar en cada línea la frecuencia de riego con 7 opciones: desde cada 8 horas hasta cada 7 días, y la duración del riego, con 14 pro- gramas que van desde 1 minuto hasta 90 minutos. - Página 31 Características generales fig.1 fig.1 Display para visualizar: el tiempo que falta para terminar el riego LINE B el tiempo que falta para LINE A iniciar el riego siguiente Display para visualizar la fre- cuencia del riego programado. Display para visulaizar la dura- ción del riego programado.
-
Página 32: Colocación De Las Pilas
Colocación de las pilas Para funcionar, el programador necesita dos pilas alcalinas de 1,5 V de tipo AA (LR6), suficientes para toda la temporada (con una media de 3 riegos diarios). Para colocar las pilas o sustituirlas (fig.2): ➊ • Presione el botón ( ) y, al mismo tiempo, desenganche la parte ➋... - Página 33 Colocación de las pilas Nota: • Utilice exclusivamente pilas alcalinas de 1,5 V de tipo AA (LR6) y sustitúyalas al inicio de cada temporada. • El símbolo de la pila que parpadea en el display significa dos cosas: -cuando la configuración programada/manual es visible en el dis- play, sustituya las pilas lo antes posible para que el temporizador no se desprograme.
-
Página 34: Instalación
Instalación Instale el programador en una llave fig.3 doméstica según las siguientes ins- trucciones (fig.3): 1. Enrosque la abrazadera de apriete de la llave de la toma de 3/4” hembra a la llave. Aten- ción: apriete la abrazadera a mano, sin utilizar herramientas. 2. -
Página 35: Notas
Notes • Con el display apagado, es suficiente pulsar un botón cualquiera para encender la retroiluminación. • Los botones permiten programar el programador solo cuando el dis- play está retroiluminado (programación habilitada). • Para prolongar la duración de las pilas, el display retroiluminado se apaga automáticamente al cabo de 30 segundos de haber pulsado un botón. -
Página 36: Programación
Programación SELEccioNar uN programa START LINE “A” LINE “B” fig. 4 1. Programe la duración del riego pulsando varias veces la tecla “m” hasta visualizar el valor deseado en el display “D”. 2. Programe la frecuencia del riego (intervalo de tiempo entre dos rie- gos consecutivos) pulsando varias veces la tecla “F”... -
Página 37: Inicio Inmediato
Programación 3. Según sus exigencias, puede elegir si el primer riego debe iniciar de inmediato (inicio inmediato) o con retardo (inicio retardado). Inicio inmediato Al cabo de 10 segundos de seleccionar el programa, pulse una sola vez el botón “a‑STarT” para seleccionar la línea A o “B‑STarT”... -
Página 38: Inicio Retardado
Programación Inicio retardado Al cabo de 10 segundos de seleccionar el programa, pulse varias veces el botón “a‑STarT” para seleccionar la línea A o “B‑STarT” para seleccionar la línea B has- ta que en el display “c” se visualice el retar- fig. -
Página 39: Modificación De Un Programa De Riego
Programación Modificación de un programa de riego Repita la programación tal como se describe en el apartado “Seleccionar un programa” a página 34; el nuevo programa configurado reemplaza el precedente sin que sea necesario efectuar ninguna otra operación. Selección de los modos Posposición y Sobreposición Es preferible “pero no necesario”... - Página 40 Programación fig.5...
-
Página 41: Riego Manual
Programación riEgo maNuaL 1. Pulse simultáneamente los botones “a‑STarT” y “B‑STarT” durante al menos 3 segundos -> se accede al modo manual con las válvulas apagadas (OFF parpadeante). 2. Para abrir la línea A, pulse el botón “a ‑ STarT” -> el riego empieza por 5 minutos (parámetro que el usuario no puede modificar), indicado por el símbolo . -
Página 42: Ejemplo De Programación Retardada
Programación EjEmpLo DE programacióN rETarDaDa A las 8:30 p.m. desea programar la línea A para que riegue durante 10 minutos cada 12 horas a partir de las 11:30 p.m. Para ello: - Pulse el botón “M” hasta configurar la duración del riego deseada (por ejemplo, 10 min.). - Página 43 Programación LINE A 8:30 pm 8:30 pm 8:30 pm LINE B 8:30 pm 8:30 pm 8:30 pm RESUMEN DE LOS PROGRAMAS SELECCIONADOS 11:30 pm 8:30 pm 8:30 pm...
-
Página 44: Uso Con Sensor De Lluvia
Uso con sensor de lluvia Es posible conectar al programador un sensor de lluvia cableado (cód. 90915) o un sensor de lluvia por radiofrecuencia (cód. 9031) más interfaz de sensor de lluvia (cód. 8480). El sensor informa al programador cuando el agua de lluvia recogida en su interior es superior a 5 mm (estado de lluvia) y cuando dicha agua se ha evaporado (estado de funcionamiento normal). - Página 45 Uso con sensor de lluvia fig.6 cód. 90831 cód. 8480 cód. 90915 OK!!!
-
Página 46: Visualización Del Estado Del Sensor De Lluvia
Uso con sensor de lluvia viSuaLizacióN DEL ESTaDo DEL SENSor DE LLuvia No hay sensor de lluvia Los riegos se ejecutarán se- rain rain o, si está instalado, con- gún lo previsto en el progra- tiene menos de 5 mm ma seleccionado. -
Página 47: Limpieza Y Mantenimiento
Limpieza y mantenimiento Lave el filtro al inicio de cada temporada y contrólelo periódicamente. Para lavar el filtro (fig.7): ➊ • Cierre la llave y afloje la rosca de apriete ( ➋ • Extraiga el filtro ( ➌ • Limpie el filtro con un chorro de agua corriente ( Tras el lavado, móntelo todo. -
Página 48: Resolución De Problemas Básicos
Resolución de problemas básicos En la siguiente tabla se proporciona información útil para tratar con segu- ridad los problemas de funcionamiento que pueden surgir durante el uso de la instalación de riego. proBLEma SoLucioNES Las pilas están mal colocadas o se han agotado por completo El programador no funciona (dis- (para mayor información, véase el cap. -
Página 49: Características Técnicas
Características técnicas Alimentación: 2 pilas alcalinas de 1,5 V de tipo AA IEC (LR6) Duración media de las pilas: 1 año Grado de protección: IP 20 Temperatura de trabajo: 3-50 °C Presión de trabajo: 0,5 bar (7,3 psi) - 12 bar (174 psi) Materiales plásticos: >ABS<... -
Página 50: Condiciones De Garantía
Tampoco es responsable de productos no fabricados por Claber que se empleen con los suyos. El producto viaja por cuenta y riesgo del cliente. La asistenmcia la proporciona el Servicio a Clientes Claber Inc.: llame gratis al 1-800-930-4566, teléfono 847-364-4566, fax 847-364-4588, email info@claberinc.com. - Página 51 Dual Select 8488...
- Página 52 Table des matières Introduction ..................51 Recommandations ................51 Caractéristiques générales ...............52 Mise en place des piles ..............54 Installation ..................56 Notes ....................57 Programmation ................58 Sélectionner un programme ............58 Démarrage immédiat ..............59 Démarrage différé ..............60 Modifier un programme d’arrosage ..........61 Sélectionner le mode séquentiel ou le mode de chevauchement . 61 Arrosage manuel .................63 Redémarrage (Reset) ..............63 Arrêt du programmateur ..............63...
-
Página 53: Introduction
Introduction Nous vous remercions pour la confiance accordée à nos produits. Nous vous conseillons de lire attentivement cette notice d’instructions avant de commencer la programmation et de la conserver soigneusement pour toute consultation future. Chaque section comporte de l’information nécessaire sur la manière à effectuer les étapes individuelles correctement. -
Página 54: Caractéristiques Générales
Caractéristiques générales Le programmateur permet l’arrosage de deux endroits avec différentes exigences d’eau, la sélection de chaque cycle pour la fréquence d’arrosage avec 7 options toutes les 8 heures ou tous les 7 jours et la durée d’arrosage avec 14 réglages allant de 1 minute à... - Página 55 Caractéristiques générales fig.1 Afficheur fournissant les informa- tions suivantes : durée restante avant la LINE B fin de l’arrosage LINE A durée restante avant le départ de l’arrosage (du cycle) suivant Afficheur de la fréquence d’arro- sage présélectionnée Afficheur de la durée d’arrosage présélectionnée Touche de présélection de la durée Légende (fig.1) :...
-
Página 56: Mise En Place Des Piles
Mise en place des piles Le programmateur fonctionne avec 2 piles alcalines AA (LR6) de 1,5 V pendant toute une saison (avec une moyenne de 3 arrosages par jour). Pour mettre en place ou remplacer les piles (fig.2) : ➊ •... - Página 57 Mise en place des piles Remarque : • Utiliser seulement des piles alcalines AA (LR6) de 1,5 V et les remplacer à chaque début de saison. • Le symbole de la pile clignote sur l’afficheur dans deux scénarios : - lorsque les réglages programmés ou manuels sont affichés; remplacer les piles immédiatement pour conserver la programmation.
-
Página 58: Installation
Installation Brancher le programmateur sur un robi- fig.3 net d’eau domestique en suivant ces ins- tructions (fig.3) : 1. Visser la bague de serrage de 3/4 po au robinet. Attention : la bague doit être serrée à la main seule- ment et en aucun cas avec des outils. -
Página 59: Notes
Notes • Il suffit d’appuyer sur une touche quelconque pour activer le rétro-éclairage de l’afficheur lorsque celui-ci est éteint. • Les touches permettent de programmer le programmateur seulement lorsque l’afficheur est rétro-éclairé (programmation activée). • Pour allonger la durée des piles, le rétro-éclairage se désactive automatique- ment 30 secondes après le dernier appui sur une touche. -
Página 60: Programmation
Programmation SélectioNNer uN programme START LINE “A” LINE “B” fig.4 1. Présélectionner la durée d’arrosage en appuyant plusieurs fois sur la touche « m » jusqu’à faire apparaître la valeur désirée sur l’afficheur « D ». 2. Présélectionner la fréquence d’arrosage (intervalle de temps entre deux arro- sages consécutifs) en appuyant plusieurs fois sur la touche «... -
Página 61: Démarrage Immédiat
Programmation 3. En fonction de ses besoins, décider si la première mise en service doit se faire immédiatement (démarrage immédiat) ou à retardement (démarrage différé). Démarrage immédiat Dans un délai de 10 secondes après la sélection du programme, il faut appuyer 1 seule fois sur la touche «... -
Página 62: Démarrage Différé
Programmation Démarrage différé Dans un délai de 10 secondes après la sélection du programme, il faut appuyer plusieurs fois sur la touche « a-Start » pour programmer le circuit A ou sur la touche « B-Start » pour programmer le circuit B jusqu’à faire apparaître sur l’afficheur «... -
Página 63: Modifier Un Programme D'aRrosage
Programmation modification d’un programme d’arrosage Répéter la programmation comme décrit au paragraphe « Sélectionner un pro- gramme » page 58 ; le nouveau programme prédéfini remplace le précédent sans nécessiter aucune autre opération. Sélectionner le mode séquentiel ou le mode de chevauchement Il est préférable «... - Página 64 Programmation fig.5...
-
Página 65: Arrosage Manuel
Programmation arroSage maNuel Appuyer simultanément sur les touches « a-Start » et « B-Start » pendant au moins 3 secondes -> ; on accède au mode manuel avec les vannes fermées (OFF clignote). Pour ouvrir le circuit A, appuyer sur la touche « a - Start » -> ; l’arrosage démarre pendant 5 minutes (ce paramètre ne peut pas être modifié... -
Página 66: Exemple De Démarrage Différé
Programmation exemple De Démarrage DiFFéré À 20:30, vous voulez programmer le circuit A pour un arrosage de 10 minutes toutes les 12 heures, à partir de 23:30, donc : - Appuyez sur la touche « M » jusqu’à présélectionner la durée d’arrosage voulue (par exemple 10 min). - Página 67 Programmation LINE A 8:30 pm 8:30 pm 8:30 pm LINE B 8:30 pm 8:30 pm 8:30 pm SOMMAIRE DES PROGRAMMES SÉLECTIONNÉS 11:30 pm 8:30 pm 8:30 pm...
-
Página 68: Utilisation Avec Le Pluviomètre « Rain Sensor
Utilisation avec le pluviomètre « Rain Sensor » Il est possible de brancher au programmateur un pluviomètre avec câbles (« Rain Sensor » réf. 90915) ou radio (« Rain Sensor RF » réf. 90831 + Interface « Rain Sensor RF » réf. 8480). Le pluviomètre informe le programmateur lorsque l’eau de pluie qu’il a recueilli dépasse 5 mm (condition de pluie), et lorsque celle-ci s’est évaporée (condition de fonctionnement normal). - Página 69 Utilisation avec le pluviomètre « Rain Sensor » fig.6 réf. 90831 réf. 8480 réf. 90915 OK!!!
-
Página 70: Visualisation De La Condition (De L'éTat) Du Pluviomètre « Rain Sensor
Utilisation avec le pluviomètre « Rain Sensor » viSualiSatioN De la coNDitioN (De l’état) Du pluviomètre « raiN SeNSor » rain rain Aucun pluviomètre ins- Les arrosages seront exécutés tallé, ou si installé, il a selon le programme sélectionné. recueilli moins de 5 mm d’eau de pluie. -
Página 71: Nettoyage Et Entretien
Nettoyage et entretien Laver le filtre au début de chaque saison et le contrôler périodiquement. Pour laver le filtre (fig.7) : ➊ • Fermer le robinet et desserrer la bague de serrage ➋ • Sortir le filtre ➌ • Rincer le filtre sous l’eau courante Après le nettoyage, remonter le tout. -
Página 72: Dépannage
- que le pluviomètre « Rain Sensor RF » soit effectivement pré- de 24 heures sent sur son lieu d’installation. Pour une aide supplémentaire, contactez le service à la clientèle Claber en composant le 1 800 930-4566 ou par courriel à info@claberinc.com. -
Página 73: Caractéristiques Techniques
Caractéristiques techniques Alimentation : 2 piles alcalines AA (LR6) de 1,5 V Durée moyenne des piles : 1 an Degré de protection : IP 20 Température d’utilisation : de 3 °C à 50 °C Pression d’utilisation : 0,5 bar (7,3 psi) - 12 bars (174 psi) Matériaux plastiques: >ABS<... -
Página 74: Conditions De Garantie
3 (trois) ans à partir de la date de livraison au client. La responsabilité de Claber est dégagée pour tous les dom- mages dérivant d’une utilisation impropre et incorrecte ou d’une erreur d’installation et d’utilisation du produit, ainsi que pour les produits fabriqués par des tiers éventuellement utilisés en combinaison avec ses produits. - Página 76 Masters of Water Claber Inc. 191 Stanley Street Elk Grove Village, IL 60007 Ph. 847-364-4566 Fax. 847-364-4588 Toll 800-930-4566 e-mail: info@claberinc.com website: www.claberinc.com...