
Manuales relacionados para Astralpool OPTIMA PRO NEXT


Resumen de contenidos para Astralpool OPTIMA PRO NEXT
- Página 1 OPTIMA PRO NEXT INSTALLATION MANUAL HANDBUCH MANUAL DE INSTALACION MANUEL D’INSTALLATION MANUALE D’INSTALLAZIONE EM00136320 rev.2.0...
- Página 2 EM00136320 rev.2.0...
-
Página 3: Pack Contents
INSTALLATION MANUAL AND COMMISSIONING GUIDE FOR THE OPTIMA PRO NEXT SERIES DOSING PUMPS PACK CONTENTS: A. Opaque tube for connecting the output from the pump to the point of injection B. Transparent tube for connecting the bleeder valve for manual priming C. -
Página 4: Wiring Connections
READ CAREFULLY THE FOLLOWING WARNINGS BEFORE PROCEEDING TO INSTALL OR CARRY OUT MAINTENANCE ON THE PUMP. WARNING: ALWAYS DISCONNECT THE POWER SUPPLY BEFORE PROCEEDING TO INSTALL OR CARRY OUT MAINTENANCE ON THE PUMP. WARNING: WE RECOMMEND INSTALLING THE PUMP IN A VERTICAL POSITION TO ENSURE PROPER OPERATION. -
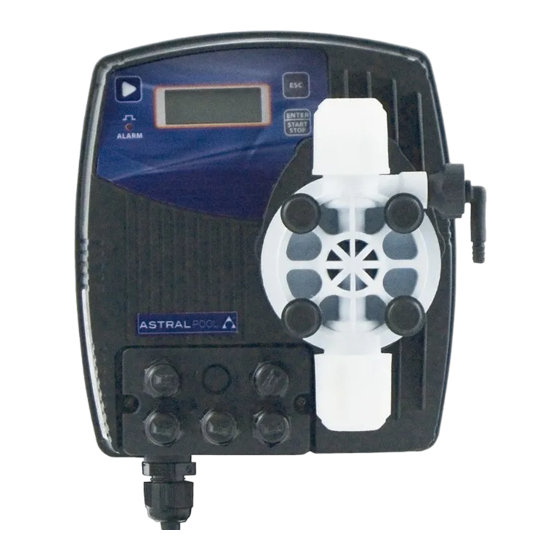
Página 5: Starting Up The Pump
Drilling template for the wall bracket After about 800 hours of operation, tighten the bolts of the pump body by using a tightening torque of 3 Nm. In making the hydraulic connections it is necessary to comply with the following instructions: The BOTTOM FILTER should be installed at a distance of about 5-10 cm from the bottom, in order to avoid clogging;... - Página 6 Control panel – OPTIMA PRO NEXT To access the programming menu. (Press and hold down simultaneously for at least 3 seconds). To start and stop the pump. To disable the display notification in case of active level alarm condition (only alarm function), flow alarm condition and memory.
-
Página 7: Electrical Connections
Electrical connections Flow sensor input 3 Not used - Frequency signal input (water meter pulse-sender) - External trigger input 7 Pole + 4-20 mA input Input impedance: 200 8 Pole 9 - Remote control input (start-stop) - Pause signal input Level control probe input Dip switch to manage the type of input frequency signal... - Página 8 OPTIMA PRO NEXT Programming Menu Press the keys for more than three seconds to access the programming mode. Press the key to scroll the menu items then press the key to access the options. Whenever a menu item is editable, it flashes.
- Página 9 Setting the language Programming Operation PROG Config. Allows you to set the language. By default the pump is set to English. Config. Press to access the item, and then press to set the language. Funct. Press to confirm and return to the main menu. Language English Paragraph 1 –...
- Página 10 Display during operation Function mode 4-20 4-20mA • P 100% Value of dosing on going Alarms and statuses (depends on unit of measure Lev = Level Alarm Pump status • selected) empty = pump in stating Flw = Flow Alarm •...
- Página 11 Display during operation Function mode 1:n (n set) • P 100% Value of dosing on going Alarms and statuses (depends on unit of measure Lev = Level Alarm Pump status • selected) Flw = Flow Alarm empty = pump in stating •...
- Página 12 Display during operation Function mode (1:c) Batch • P 100% Value of dosing on going Alarms and statuses (depends on unit of measure Lev = Level Alarm • selected) Pump status Flw = Flow Alarm • Percentage, Frequency, • empty = pump in stating •...
- Página 13 Paragraph 8 – Timed Dosage (Frequency signal input “TRIGGER” activated) Programming Operation After receiving the set Trigger signal, the pump doses a quantity that can be programmed in mL. It is possible to set a delay time before dosage (Delay) and an interval between subsequent dosages PROG (Interval) as shown on the diagram: Config.
- Página 14 Paragraph 8 – Timed Dosage (Frequency signal input “TRIGGER” not activated) Programming Operation The pump doses a programmed quantity in mL. It is possible to set a delay time (Delay) for the pump start up and an interval between subsequent dosages (Interval) as shown on the diagram: PROG Quantity Config.
- Página 15 Paragraph 9 – Weekly timed dosage PROG Config. Config. Funct. Funct. Weekly Weekly Time Weekly Weekly PROG01 00.00 PROG01 Q.ty Dos.Time MTWTFSS _______ Clock 00:00 You can program 10 dosages for the entire week. Press from “Weekly Dos.” to enter the programming mode in order to program the dosages.
- Página 16 Paragraph 10 – Setting the Maximum Flow Rate Programming Operation PROG Config. Allows you to set the maximum flow rate of the pump and the programmed mode (% or frequency) is used as the Config. Funct. standard measurement unit when displaying the flow rate. Language Press to access the item, and then press...
- Página 17 Paragraph 13 – Password Programming Operation By setting the password, the programming section can be accessed to view all the setup parameters, but every time PROG Config. you try to change the settings you will be prompted for the password. The flashing line indicates the editable number;...
- Página 18 Paragraph 15 – Level Alarm Programming Operation PROG Config. Allows you to set the pump for the level alarm activation, with dosage operation interruption (Stop), or simple activation of the alarm signal without dosage operation interruption. Alarms Level Level Stop Press to access the item, then press to set the...
- Página 19 Alarms Dislay Cause Remedy Alarm LED on End level alarm, without pump Restore the liquid level. “Lev” icon flashing operation interruption. Alarm LED on level alarm, with pump Restore the liquid level. “Lev” and “Stop” icons flashing operation interruption. “Mem” icon flashing The pump receives one or more impulses during the dosage with the Press the...
-
Página 20: Technische Merkmale
INSTALLATIONS- UND INBETRIEBNAHMEANLEITUNG FÜR DIE DOSIERPUMPE SERIE OPTIMA PRO NEXT Packungsinhalt: A. Undurchsichtiger Schlauch für den Anschluss des Pumpenausgangs an den Einspritzpunkt B. Transparenter Schlauch für die Ansaugung, für den Anschluss des Auslassventils und für die manuelle Befüllung C. Anschluss Einspitzung D. -
Página 21: Elektrische Anschlüsse
VOR DER INSTALLATION ODER WARTUNGSARBEITEN AN DER PUMPE AUFMERKSAM LESEN ACHTUNG: VOR DER INSTALLATION ODER DER WARTUNG DER PUMPE IMMER ZUNÄCHST DIE VERSORGUNG TRENNEN. ACHTUNG: WIR EMPFEHLEN DIE INSTALLATION DER PUMPE IN EINER VERTIKALEN POSITION UM EINEN ORDNUNGSGEMÄSSEN BETRIEB ZU GEWÄHRLEISTEN. ACHTUNG: DAS PRODUKT IST AUSSCHLIESSLICH FÜR DEN PROFESSIONELLEN GEBRAUCH DURCH QUALIFIZIERTES PERSONAL BESTIMMT. -
Página 22: Problembehebung
Bohrschablonen Wandbügel Nach etwa 800 Betriebsstunden die Bolzen des Pumpengehäuses mit einem Anzugsmoment von 3 Nm anziehen. Zum Durchführen der Wasseranschlüsse müssen folgende Hinweise beachtet werden: Den BODENFILTER etwa 5-10cm über dem Boden installieren, um eventuelle Ablagerungen zu vermeiden Die Installation unter dem Flüssigkeitsstand wird bei Pumpen mit sehr geringer Fördermenge empfohlen. Insbesondere für die Dosierung von Produkten, die Gase entwickeln (z.B. - Página 23 Kontrolpanell - OPTIMA PRO NEXT Um ins Menü Programmierung zu gelangen. (Drücken und halten Sie die Tasten für mindestens 3 Sekunden) Pumpe starten und stoppen. Bildschirm-Benachrichtigungen im Fall eines aktiven Level-Alarms deaktivieren (nur Alarm- Funktion), Durchfluss-Alarm und Erinnerung. Im Modus Programmierung dient der Knopf als "Enter", zum Zugriff verschiedener Menü Levels und Bestätigung von Änderungen.
- Página 24 Elektrische Anschlüsse Durchflusssensoreingang 3 Nicht verwendet - Frequenzsignaleingang (Wasserzähler Puls-Sender) - externer Triggereingang 7 Pol + 4-20 mA Eingang Eingangsimpedanz 200 8 Pol - 9 - Fernsteuereingang (Start-Stopp) - Pause Signaleingang Levelregler Sondeneingang DIP Schalter zur Bedienung des Frequenzsignaleingangs DIP Schalter und Anschlüsse für Eingabemodus der Frequenzsignale Anschlussplan für Frequenzeingabe mit DIP Schalter Position = Position ON Trockenkontakt...
- Página 25 OPTIMA PRO NEXT Menü Programmierung Drücken Sie die Tasten für mindestens drei Sekunden um in das Menü Programmierung zu gelangen.Drücken Sie die Taste um durch das Menü zu navigieren und dann die Taste um die Optionen zu öffnen. Immer wenn ein Menüeintrag blinkt kann er bearbeitet werden.
- Página 26 Sprache einstellen Programmierung Bedienung Ermöglicht die Sprache zu ändern. Die Pumpe ist standardmäßig auf PROG Englisch eingestellt. Konfig. Konfig. Drücken Sie die Taste um den Menüpunkt zu öffnen, drücken Sie PmpFunkt danach um die Sprache einzustellen. Drücken Sie die um zu Sprache Deutsch bestätigen und zurück zum Hauptmenü...
- Página 27 Display während des Betriebs Funktionsmodus 4-20 4-20mA • P 100% Wert der laufenden Dosierung Alarm and Status (abhängig von gewählter Pumpenstatus Lev = Level Alarm • Maßeinheit) Leer = Pumpe am Saugen • Flw = Flow Alarm • Prozent, Frequenz, l/h, •...
- Página 28 Paragraph 4 – Proportionen zu Externen Impulsen (Multiplikation) Programmierung Bedienung PROG Konfig. Pumpe dosiert proportional externen Signalen (z.Bsp. Wasserzähler Puls-Sender). Für jedes empfangene Signal führt die Konfig. Pumpe die programmierte "N" Nummer von Hüben aus. Die Pumpe stellt PmpFunkt die Dosierungsfrequenz automatisch nach der Zeit ein, die zwischen zwei erfolgreichen Signalen vergeht.
- Página 29 Paragraph 6 – Proportionen zu Externen Impulsen (Batch-Dosierung) Programmierung Bedienung Die Pumpe dosiert proportional zu externen Signalen (z.Bsp. PROG Konfig. Wasserzähler Puls-Sender). In diesem Fall können Sie die Menge, die zu dosieren ist, in ml und die Zeit zur Ausführung angeben. Konfig.
- Página 30 Display während des Betriebs Funktionsmodus • P 100% Wert der laufenden Dosierung Alarm and Status (abhängig von gewählter Lev = Level Alarm • Maßeinheit) Pumpenstatus Flw = Flow Alarm • Prozent, Frequenz, l/h, Leer = Pumpe am Saugen • • •...
- Página 31 Display während des Betriebs Funktionsmodus Timer Trigger Modus Timer • Tief o. Hoch • • Angegebene Alarm and Status Dosierungsmenge Lev = Level Alarm • (Bildschirm während der Pumpenstatus Flw = Flow Alarm • Leer = Pumpe am Saugen Dosierung) •...
- Página 32 Paragraph 9 – Wöchentliche Zeitliche Dosierung PROG Konfig. Konfig. PmpFunkt PmpFunkt Wochen Wochen. Zeit Wochen Wochen. PROG01 00.00 PROG01 Menage Dosierz LMMGVSD _______ 00:00 Sie können 10 Dosierungen für die ganze Woche einstellen. Drücken Sie die Taste in "Wöchentl. Dos." um in den Modus Programmierung zu gelangen und die Dosierungen einzustellen.
- Página 33 Paragraph 10 – Einstellen der Maximalen Fließrate Programmierung Bedienung PROG Erlaubt Ihnen die maximale Fließrate der Pumpe und den Konfig. programmierten Modus (% oder Frequenz) einzustellen. Diese wird als Standard-Einheit bei der Anzeige der Konfig. PmpFunkt Fließrate gebraucht. Drücken Sie die Taste um den Sprache Deutsch...
- Página 34 Paragraph 13 – Passwort Programmierung Bedienung Wenn Sie ein Passwort anlegen können Sie den Bereich PROG Programmierung und alle Setup Parameter einsehen, aber Konfig. jedes Mal wenn Sie etwas ändern möchten werden Sie aufgefordert das Passwort einzugeben. Die blinkende Reihe zeigt die editierbare Zahl an; drücken Sie die Taste um eine Zahl auszuwählen (1 bis 9), Passwort...
- Página 35 Paragraph 15 – Level-Alarm Programmierung Bedienung Erlaubt Ihnen die Pumpe für den Level-Alarm einzustellen. PROG Konfig. Dies können Sie mit einer Unterbrechung der Dosierung (Stopp) tun oder eine einfachen Alarm ohne Unterbrechung. Drücken Sie die Taste um den Menüpunkt zu öffnen, Allarm Fuellst Fuellst...
- Página 36 Alarm Anzeige Ursache Lösung Alarm LED ist an Der Level-Alarm ist zu Ende, der Stellen Sie den Füllstand wieder "Lev" Symbol blinkt Betrieb Pumpe nicht her. unterbrochen. Alarm LED ist an Der Level-Alarm ist zu Ende, der Stellen Sie den Füllstand wieder "Lev"...
-
Página 37: Introducción
MANUAL DE INSTALACIÓN Y PUESTA EN FUNCIONAMIENTO PARA BOMBA DOSIFICADORA SERIE OPTIMA PRO NEXT Contenido del embalaje: A. Manguera opaca para la conexión de la salida de la bomba hasta el punto de inyección B. Tubo transparente para la aspiración, la conexión de la válvula de purga y para el cebado manual. -
Página 38: Conexiones Eléctricas
LEA ATENTAMENTE ANTES DE REALIZAR LA INSTALACIÓN O CUALQUIER OPERACIÓN DE MANTENIMIENTO EN LA BOMBA. ATENCIÓN: ANTES DE REALIZAR LA INSTALACIÓN O EL MANTENIMIENTO DE LA BOMBA, DESCONECTE LA CORRIENTE ELÉCTRICA. ATENCIÓN: RECOMENDAMOS LA INSTALACIÓN DE LA BOMBA EN POSICIÓN VERTICAL PARA GARANTIZAR EL CORRECTO FUNCIONAMIENTO. -
Página 39: Solución De Problemas
Dime de perforación del soporte de pared Transcurridas unas 800 horas de trabajo, apretar los tornillos del cuerpo bomba aplicando un par de apriete de 3 Nm. Al hacer las conexiones hidráulicas debe seguir las siguientes instrucciones: Instalar el FILTRO DE FONDO a unos 5-10cm del fondo para evitar que se obstruya por los depósitos; LA instalación con bomba a la altura de aspiración se recomienda en bombas con caudal bajo. - Página 40 Panel de Control – OPTIMA PRO NEXT Entrar en el menú de programación. (Presione y mantenga presionado simultáneamente al menos 3 segundos). Encender y detener la bomba. Inhabilitar la notificación de la pantalla en caso de una condición de nivel de alarma activa (solo función de alarma), condición de flujo de alarma y memoria.
-
Página 41: Entrada De Control Remoto (Iniciar-Detener)
Conexiones Eléctricas Entrada de Sensor de Flujo 3 No Utilizado 4 - Entrada de señal de Frecuencia ( emisor de pulso de medidor de agua ) -Entrada de Detonador Externo 7 Polo + Entrada 4-20 mA Entrada de obstrucción: 200 ohm 8 Polo 9 - Entrada de control Remoto (iniciar-detener) - Página 42 Menú de Programación de OPTIMA PRO NEXT Presione las teclas por más de tres segundos para ingresar al modo de programación. Presione la tecla para deslizar los ítems del menú y luego presione la tecla para accesar las opciones. Cuando el menú...
- Página 43 Configuración de Lenguaje Programación Operación PROG Config. Permite configurar el lenguaje. Ya determinado, la bomba está configurada en Inglés. Config. Func Bom Presione para ingresar al ítem, y luego presione para configurar Idioma el lenguaje. Presione para confirmar y regresar al menú principal. Espanol Párrafo 1 –...
- Página 44 Visualización durante la Operación Modo de Función 4-20 4-20mA • P 100% Valor de dosificación en curso Alarmas y estados (dependiendo de la unidad de Lev = Nivel de Alarma • Estado de Bomba medición seleccionada) Flw = Flujo de Alarma empty = Estado de bomba •...
-
Página 45: Visualización Durante Operación
Visualización durante Operación Modo de Función 1:n (Configuración n) • P 100% Valor de dosificación en curso Alarmas y estados (dependiendo de la unidad de Lev = Nivel de Alarma • Estado de Bomba medición seleccionada) Flw = Flujo de Alarma •... - Página 46 Visualización durante la Operación Modo de Función (1:c) Lote • P 100% Valor de dosificación en curso Alarmas y estados (dependiendo de la unidad de Lev = Nivel de Alarma • medición seleccionada) Flw = Flujo de Alarma Estado de Bomba •...
- Página 47 Párrafo 8 – Tiempo de Dosificación (Entrada de Señal de Frecuencia“DETONADOR” activado) Programación Operación Después de recibir la configuración de señal del Detonador, la bomba dosifica una cantidad que puede ser programada en mL. Es posible configurar un tiempo de retraso antes de la dosificación (Retardo) y un intervalo subsecuente de dosis (Intervalo) como se muestra en el diagrama: PROG...
- Página 48 Párrafo 8 – Tiempo de Dosificación (Entrada de señal de Frecuencia “DETONADOR” no activado) Programación Operación La bomba dosifica una cantidad programada en mL. Es posible establecer un tiempo de retardo (Retardo) para que la bomba encienda y un intervalo entre dosis subsecuentes (Intervalo)como se muestra en el diagrama: PROG Config.
- Página 49 Párrafo 9 – Dosis Temporizado Semanal PROG Config. Config. Funzioni Funzioni Sett. Semanal Tiempo Semanal Semanal PROG01 00.00 PROG01 Qtd. TmpDeDos LMMGVSD _______ Reloj 00:00 Usted puede programar 10 dosis para la semana entera. Presione de "Weekly Dos." para entrar en modo de programación para programar las dosificaciones.
- Página 50 Párrafo 10 – Configurando la Velocidad de Flujo Máxima Programación Operación PROG Config. Permite que usted configure la velocidad de flujo máximo de la bomba y el modo de programación (% o frecuencia) es Config. usado como unidad de medición estándar cuando se Func visualiza la velocidad de flujo.
- Página 51 Párrafo 13 – Contraseña Programación Operación Configurando la contraseña, la sección de programación PROG Config. puede ser accedido para ver todos los parámetros de inicio, pero cada vez que usted cambie las configuraciones se le solicitará una contraseña. La línea parpadeante indica el número que se puede modificar, presione para seleccionar el número (de 1 a Password...
- Página 52 Párrafo 15 – Nivel de Alarma Programación Operation PROG Config. Allows you to set the pump for the level alarm activation, with dosage operation interruption (Stop), or simple activation of the alarm signal without dosage operation interruption. Alarmas Nivel Nivel Stop Press to access the item, then press...
- Página 53 Alarmas Se Visualiza Causa Remedio Alarma LED encendida Final del nivel de alarma, sin Recuperar el nivel de líquido. Ícono “Lev” parpadeando interrupción operación bomba. Alarma LED encendida Final del nivel de alarma, sin Recuperar el nivel de líquido. Ícono “Lev” y "Stop" parpadeando interrupción operación bomba.
- Página 54 MANUEL INSTALLATION ET MISE EN SERVICE POUR POMPE DOSEUSE SÉRIE OPTIMA PRO NEXT Contenu de l'emballage : A. Tube opaque pour le raccordement de la sortie de la pompe au point d'injection B. Tube transparent pour l'aspiration, pour le raccordement de la valve de purge et pour l'amorçage manuel C.
-
Página 55: Branchements Hydrauliques
LIRE ATTENTIVEMENT AVANT DE PROCÉDER À L'INSTALLATION OU AVANT L'ENTRETIEN DE LA POMPE. ATTENTION : AVANT DE PROCÉDER À L'INSTALLATION OU À L'ENTRETIEN DE LA POMPE, TOUJOURS DÉBRANCHER L'ALIMENTATION. ATTENTION : NOUS RECOMMANDONS L'INSTALLATION DE LA POMPE EN POSITION VERTICALE AFIN D'ASSURER LE BON FONCTIONNEMENT DE CETTE DERNIÈRE. -
Página 56: Résolution Des Problèmes
Gabarits perçage étrier mural Après environ 800 heures de fonctionnement, serrer les boulons du boîtier de pompe en appliquant un couple de serrage de 3 Suivre les instructions suivantes lors des branchements hydrauliques : Installer le FILTRE DE FOND à environ 5-10 cm du fond de façon à éviter des dépôts éventuels ; L’installation avec pompe sous charge d'eau est recommandée pour des pompes ayant un débit très faible. - Página 57 Panneau de configuration – OPTIMA PRO NEXT Accès au menu de programmation. (Gardez-les enfoncées simultanément pendant au moins 3 secondes). Il démarre et met en phase de Stop la pompe. En termes d'alarme de niveau (seule fonction d'alarme), de débit et de mémoire active, il désactive le signal sur l'affichage.
-
Página 58: Entrée De Déclenchement Externe
Raccordements électriques Entrées de capteur de débit 3 Non utilisé - signal de fréquence d'entrée (compteur d'eau à impulsions) -Entrée de déclenchement externe 7 Pôle + Entrée 4-20 mA Impédance 8 Pôle d'entrée: 200 ohms 9 - Entrée de télécommande (marche-arrêt) -Entrée du signal de pause 11 Entrée de sonde de contrôle... - Página 59 Menu de Programmation OPTIMA PRO NEXT En appuyant sur la touche pendant plus de trois secondes on accède à la programmation. Avec la touche, vous pouvez faire défiler les éléments du menu avec le bouton on accède aux changements. Chaque fois qu'un élément du menu est modifiable, il clignote.
- Página 60 Choisissez votre langue Programmation Fonctionnement PROG Il permet de sélectionner la langue, la pompe est réglée à l’usine à Config. l'anglais. Config. Appuyez sur pour accéder à la modification, puis en appuyant Funct. on règle la langue souhaitée. pour confirmer et revenir au Langue menu principal.
- Página 61 Affichage pendant le fonctionnement Mode de fonctionnement 4-20 4-20mA • P 100% Valeur du dosage en cours Alarmes et situations (elle dépend de l’unité de • Liv = Alarme de niveau mesure sélectionnée) • Fls = Alarme de débit Situation de la pompe Pourcentage, fréquence, •...
- Página 62 Affichage pendant le fonctionnement Mode de fonctionnement 1:n (n regler) • P 100% Valeur du dosage en cours Alarmes et situations (elle dépend de l’unité de Liv = Alarme de • mesure sélectionnée) Niveau Situation de la pompe Pourcentage, Fréquence, •...
- Página 63 Affichage pendant le fonctionnement Mode de fonctionnement (1:c) • P 100% Valeur du dosage en cours Alarmes et situations (elle dépend de l’unité de Liv = Alarme de • mesure sélectionnée) Niveau Situation de la pompe Pourcentage, Fréquence, • Fls = Alarme de débit •...
- Página 64 Paragraphe 8 – Dosage temporisé (Entrée du signal de fréquence "TRIGGER" activée) Programmation Fonctionnement Après la réception de l'ensemble de signaux de déclenchement, la pompe dose une quantité programmable en ml. Vous pouvez définir un délai avant l'essai (Retard) et la distance entre les doses ultérieures (Interval.) comme indiqué...
- Página 65 Paragraphe 8 - Temps du dosage (fréquence du signal d'entrée "TRIGGER" non activé) Programmation Fonctionnement La pompe délivre une quantité programmable en mL, vous pouvez définir un délai lorsque la pompe démarre (retard) et la distance entre deux doses ultérieures (Interval.) comme indiqué sur le schéma: PROG Config.
- Página 66 Paragraphe 9 - Dosage temporisé hebdomadaire PROG Config. Config. Funct. Funct. Hebdoma. Hebdoma. Temps Hebdoma. Hebdoma. PROG01 00.00 PROG01 Tps.Dos. LMMJVSD _______ Horloge 00:00 Vous pouvez programmer 10 doses pour toute la semaine. En appuyant sur du "Dosage hebdomadaire", je vais accéder à la possibilité...
- Página 67 Paragraphe 10 - Réglage de débit maximum Programmation Fonctionnement PROG Il permet de définir le maximum réalisable par la pompe et Config. le mode programmé (% ou fréquence) devient l'unité Config. Funct. d'affichage du débit de mesure. Appuyez sur pour Langue Francais accéder à...
- Página 68 Paragraphe 13 - Mot de passe Programmation Fonctionnement Avec la saisie du mot de passe, je peux entrer dans la Programmation et voir tous les paramètres, mais à chaque PROG fois que j'essaie de les changer il me sera demandé le mot Config.
- Página 69 Paragraphe 15 - Alarme de niveau Programmation Fonctionnement Il permet de régler la pompe lorsque l'alarme du capteur de PROG Config. niveau se déclenche, autrement dit pour bloquer la dose (Arrêt), ou simplement pour activer le signal d'alarme sans bloquer le dosage. Appuyez sur pour accéder à...
- Página 70 Alarmes Affichage Cause Interruption Voyant d'alarme fixé Alarme de fin de niveau, sans Restaurer le niveau du liquide Inscription lev clignotante interruption du fonctionnement de la pompe Voyant d'alarme fixé Alarme de fin de niveau, avec Restaurer le niveau du liquide Inscription lev et Stop clignotante interruption fonctionnement de la pompe...
-
Página 71: Caratteristiche Tecniche
MANUALE INSTALLAZIONE e MESSA IN SERVIZIO PER POMPA DOSATRICE SERIE OPTIMA PRO NEXT CONTENUTO DELL’IMBALLO: A. Tubo opaco per il collegamento dell’uscita della pompa al punto di iniezione B. Tubo trasparente per l’aspirazione, per il collegamento della valvola di spurgo e per l’adescamento manuale... -
Página 72: Collegamenti Elettrici
LEGGERE ATTENTAMENTE PRIMA DI PROCEDERE ALL'INSTALLAZIONE O AD ATTIVITÀ DI MANUTENZIONE SULLA POMPA. ATTENZIONE: PRIMA DI PROCEDERE ALL’INSTALLAZIONE O ALLA MANUTENZIONE DELLA POMPA, SCOLLEGARE SEMPRE L’ALIMENTAZIONE. ATTENZIONE: RACCOMANDIAMO L’INSTALLAZIONE DELLA POMPA IN POSIZIONE VERTICALE PER GARANTIRE IL CORRETTO FUNZIONAMENTO. ATTENZIONE: PRODOTTO DESTINATO ESCLUSIVAMENTE AD USO PROFESSIONALE, DA PERSONALE QUALIFICATO. -
Página 73: Risoluzione Problemi
Dime Foratura staffa a muro Dopo circa 800 ore di lavoro stringere i bulloni del corpo pompa, applicando una coppia di serraggio di 3 Nm. Nell’eseguire i collegamenti idraulici occorre osservare le seguenti istruzioni: Installare il FILTRO DI FONDO a circa 5-10cm dal fondo in modo da evitare che eventuali depositi; L’installazione con pompa sottobattente è... - Página 74 Pannello di controllo – OPTIMA PRO NEXT Accesso al menu di programmazione. (Tenerli premuti contemporaneamente per almeno 3 secondi). Avvia e mette in fase di stop la pompa. Nelle condizioni di allarme di livello (sola funzione allarme), di flusso e memory attive, disattiva la segnalazione sul display. In programmazione svolge la funzione “enter”, cioè...
-
Página 75: Connessioni Elettriche
Connessioni elettriche Ingressi sensore di flusso 3 Non usato - Ingressi segnale in frequenza (contatore lancia-impulsi) -Ingresso trigger esterno 7 Polo + Ingresso 4-20 mA Impedenza d’ingresso: 200 ohm 8 Polo 9 -Ingresso controllo remoto (start-stop) -Ingresso segnale Pausa Ingresso sonda controllo livello Dip switch per gestire il tipo di segnale in frequenza in ingresso Posizione dip switch e connessioni per modalità... -
Página 76: Menu Principale
Menu di Programmazione OPTIMA PRO NEXT Premendo i tasti per più di tre secondi si accede alla programmazione. Con il tasto potrete scorrere le voci del menu, con il pulsante si accede alle modifiche. . Ogni qual volta una voce di menù è modificabile, lampeggia. - Página 77 Impostazione lingua Programmazione Funzionamento Permette di selezionare la lingua, di fabbrica la pompa è impostata in PROG inglese. Config. Config. Funzioni Premendo si accede alla modifica, quindi con il tasto imposto la Lingua Italiano lingua. Con confermo e torno al menu principale. Paragrafo 1 –Dosaggio manuale Programmazione Funzionamento...
- Página 78 Visualizzazione durante il funzionamento Modo di funzionamento 4-20 4-20mA • P 100% Valore del dosaggio in corso Allarmi e stati (dipende dall’unità di misura Liv = Allarme livello • selezionata) Fls = Allarme flusso Stato della pompa • Percentuale, Frequenza, •...
- Página 79 Visualizzazione durante il funzionamento Modo di funzionamento 1:n (n impostato) • P 100% Valore del dosaggio in corso Allarmi e stati (dipende dall’unità di misura Liv = Allarme livello • selezionata) Fls = Allarme flusso Stato della pompa • Percentuale, Frequenza, •...
- Página 80 Visualizzazione durante il funzionamento Modo di funzionamento (1:c) Batch • P 100% Valore del dosaggio in corso Allarmi e stati (dipende dall’unità di misura Liv = Allarme livello • selezionata) Stato della pompa Fls = Allarme flusso • Percentuale, Frequenza, •...
- Página 81 Paragrafo 8 – Dosaggio temporizzato (Ingresso segnale frequenza “TRIGGER” attivato) Programmazione Funzionamento Dopo la ricezione del segnale di Trigger impostato, la pompa dosa una quantità programmabile in ml. È possibile impostare un tempo di ritardo prima del dosaggio (Ritardo) e la distanza tra dosaggi successivi (Interval.) come illustrato nello schema: Trigger Quantità...
- Página 82 Paragrafo 8 – Dosaggio temporizzato (Ingresso segnale frequenza “TRIGGER” non attivato) Programmazione Funzionamento La pompa dosa una quantità programmabile in ml, è possibile impostare un tempo di ritardo all’avvio della pompa (Ritardo) e la distanza tra due dosaggi successivi (Interval.) come illustrato nello schema: PROG Config.
- Página 83 Paragrafo 9 – Dosaggio temporizzato settimanale PROG Config. Config. Funzioni Funzioni Sett. Sett. Tempo Sett. Sett. PROG01 00.00 PROG01 Q.ta’ TempoDos LMMGVSD _______ Orologio 00:00 È possibile programmare 10 dosaggi per l’intera settimana. Premendo dal “Dos.settimanale” accedo alla possibilità di programmare i dosaggi. 1) Numero del programma, con il tasto posso modificarlo e con lo confermo.
- Página 84 Paragrafo 10 – Impostazione massima portata Programmazione Funzionamento PROG Config. Permette di impostare la massima portata raggiungibile dalla pompa e la modalità programmata (% o frequenza) diventa Config. Funzioni la visualizzazione della portata nell’unità di misura standard. Premendo si accede alla modifica, quindi con il tasto Lingua Italiano imposto il valore.
- Página 85 Paragrafo 13 – Password Programmazione Funzionamento PROG Config. Inserendo la password, potrò entrare in programmazione e vedere tutti i valori impostati, ma ogni volta che cercherò di modificarli verrà richiesta la password. La linea lampeggiante indica il numero modificabile, con il tasto seleziono il numero (da 1 a 9), con il tasto Password...
- Página 86 Paragrafo 15 – Allarme di livello Programmazione Funzionamento PROG Config. Permette di impostare la pompa quando si attiva l’allarme del sensore di livello, cioè se bloccare il dosaggio (Stop), oppure se semplicemente attivare la segnalazione d’allarme senza bloccare il dosaggio. Allarmi Livello Premendo...
- Página 87 Allarmi Visualizzazione Causa Interruzione Led Alarm fisso Allarme fine livello, senza Ripristino del livello del liquido. Scritta lev lampeggiante interruzione del funzionamento della pompa Led Alarm fisso Allarme fine livello, Ripristino del livello del liquido Scritta lev e stop lampeggiante interruzione del funzionamento della pompa Scritta Mem lampeggiante...