Tabla de contenido
Publicidad
Idiomas disponibles
Idiomas disponibles
Enlaces rápidos
Publicidad
Capítulos
Tabla de contenido
Solución de problemas

Resumen de contenidos para Audiovox VME 9309TS
- Página 1 VME 9309TS...
-
Página 2: Tabla De Contenido
Danke, dass Sie sich für ein Produkt von Audiovox entschieden haben. Wir hoffen, Ihnen die Funktion des Geräts mit den in dieser Bedienungsanleitung beschriebenen Anweisungen einfach und verständlich erklären zu können. Bitte nehmen Sie sich einige Minuten Zeit um sich mit der Bedienungs- anleitung zubefassen. -
Página 3: Vorbereitung
NAV-Option grau hinterlegt angezeigt. Dies zeigt an, dass die Funktion nicht zur Verfügung steht. • Rückfahrkamera An den VME 9309TS kann eine Rückfahrkamera angeschlossen werden. Bevor Sie auf die Kamerafunktionen zugreifen können, müssen Sie eine Rück- fahr-Videokamera kaufen und installieren. Nach dem Anschließen der Rückfahrkamera und bei deren ordnungsgemäßer Funktion wird der CAMERA- Modus aktiviert. -
Página 4: Achtung
HINWEIS: Wenn der VME 9309TS-Receiver in ein Fahrzeug eingebaut werden soll, das mit einem Navigationssystem ausgestattet ist, lösen Sie das Batteriekabel nicht. Anderenfalls gehen die im Speicher des Navigationssystems abgelegten Daten unter Umständen verloren. In diesem Fall sollten Sie bei der Mon- tage allerdings besonders vorsichtig sein, um einen Kurzschluss zu vermeiden. -
Página 5: Montage
Achten Sie beim Austauschen von Sicherungen darauf, dass Sie die richtige Sicherung mit der erforderlichen Amperezahl verwenden, um eine Beschä- digung des Radios zu vermeiden. Für den VME 9309TS-Receiver muss eine ATM/MIN-Flachsicherung mit 15 Ampere verwendet werden. Diese befindet sich im schwarzen Filterkasten und ist mit dem Haupt-Kabelbaum in Reihe geschaltet. - Página 6 Abschließen der Montage Nachdem Sie alle Kabel angeschlossen haben, schalten Sie das Gerät ein, um sicherzustellen, dass es betriebsbereit ist. Beachten Sie dabei, dass die Zündung eingeschaltet sein muss. Kann das Gerät nicht eingeschaltet werden, überprüfen Sie die Verkabelung, bis Sie den Fehler gefunden haben. So- bald das Gerät betriebsbereit ist, schalten Sie die Zündung aus und montieren das Chassis.
-
Página 7: Schaltbild
Schaltbild... -
Página 8: Bedienelemente Und Anzeigen
BEDIENELEMENTE UND ANZEIGEN Bedienung der Schalter 1. Öffnen/Schließen Drücken Sie diese Taste, um den automatischen Ausfahr-Mechanismus zu aktivieren, und stellen Sie die gewünschte Position des TFT-Monitors ein. Drücken Sie erneut auf diese Taste, um den TFT-Monitor wieder einzufahren. /WIDE/NAV Bei eingefahrenem Monitor wird durch die Taste der Sendersuchlauf Richtung niedrigerer Frequenzen gestartet. -
Página 10: Fernbedienung
FERNBEDIENUNG Die Fernbedienung des VME 9309TS-Receivers dient zum steuern des Grundgerätes. Tabelle 1: Funktionen auf der Fernbedienung Name Ref.nr. TUNER CD/MP3 Hauptmenü der Disk öffnen Während des VCD-Betriebs die MENU PBC-Wiedergabesteuerung ein- /ausschalten Titelmenü der Disk öffnen Die ersten 10 Sekunden jedes... - Página 11 Ref.nr. DVD TUNER Name CD/MP3 Bild während DVD-Wiedergabe Durch Liste gespeicherter PRESET Bild vergrößern Durch Listenfenster blättern vergrößern, DivX oder Foto Sender blättern Bild während der DVD-Wiedergabe Durch Liste gespeicherter PRESET Bild verkleinern Durch Listenfenster blättern verkleinern, DivX oder Foto Sender blättern Szene aus verschiedenen Bilder einer Bild-CD aus...
-
Página 12: Verwenden Des Tft-Monitors
VERWENDEN DES TFT-MONITORS Aus- und Einfahren des TFT-Monitors Ausfahren des TFT-Monitors Drücken Sie auf der Gerätevorderseite auf die Taste OPEN (1) oder auf der Fernbedienung auf die Taste (25), um den Mechanismus zum Ausfahren des Monitors in die Wiedergabeposition zu aktivieren. Einfahren des TFT-Monitors Drücken Sie auf der Gerätevorderseite auf die Taste OPEN (1) oder auf der Fernbedienung auf die Taste (25), um den Mechanismus zum Einfahren... -
Página 13: Bedienungsanweisung
Handbremsensperre • Wenn das PRK SW-Kabel an den Bremsschalter angeschlossen ist, kann auf dem TFT-Monitor nur dann ein Video anzeigt werden, wenn die Handbremse gezogen wurde. • Diese Funktion wird allerdings deaktiviert, wenn die Videoquelle in den Modus CAMERA geschaltet wird. •... -
Página 14: Setup-Menü
Zurücksetzen des Systems Um eine Systemstörung zu beheben oder einen nicht zulässigen Bedienvorgang zurückzusetzen, drücken Sie die Taste RESET (10) in der unteren linken Ecke des Geräts mit der Spitze eines Kugelschreibers. Durch das Zurücksetzen des Systems werden die Werkseinstellungen des Geräts wiederherge- stellt. - Página 15 General Sub Menu Features...
- Página 16 Optionen des Untermenüs LANGUAGE Wenn eine DVD mehrere Untertitel- oder Audiosprachen unterstützt, stehen alle verfügbaren Sprachen während der Wiedergabe zur Auswahl. Wird die ausgewählte Sprache nicht von der DVD unterstützt, wird die Standardsprache verwendet. Einstellung Optionen Funktion English Bildschirmanzeige erfolgt auf Englisch German Bildschirmanzeige erfolgt auf Deutsch Italian...
- Página 17 Optionen des Untermenüs RATING Das DVD-System verfügt über eine integrierte Kindersicherung, damit nicht berechtigte Personen keinen Zugriff auf Disk-Inhalte haben, die nur für be- stimmte Zuschauergruppen bestimmt sind. Standardmäßig ist die Kindersicherung auf die höchste Einstellung (ohne Einschränkungen) eingestellt. Die Kindersicherung kann nur durch die Eingabe des richtigen Kennwortes aufgehoben werden.
-
Página 18: Bedienung Des Radios
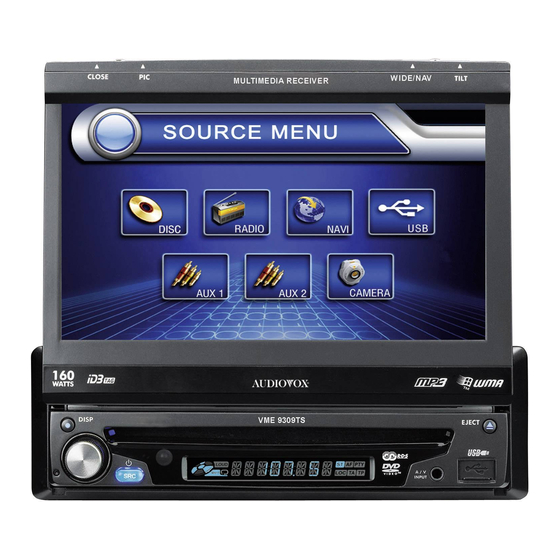
BEDIENUNG DES RADIOS 1. Anzeige des aktuell ausgewählten Radiobands 2. Anzeige der Radiofrequenz / des Sendernamens 3. Uhrzeit 4. Anzeige für Sendebetrieb in Stereo 5. Anzeige für starkes Signal lokal empfangbarer Sender 6. Gespeicherte Radiosender: Touchpunkt zum Aufrufen gespeicherter Sender 7. - Página 19 Umstellen auf Radioquelle • Berühren Sie die obere linke Ecke des Bildschirms (den RADIO-Kreis), um das SOURCE MENU anzuzeigen. Berühren Sie RADIO. • Drücken Sie auf der Gerätevorderseite die Taste SRC (6) oder die entsprechende Taste auf der Fernbedienung (8), um auf die Quelle AM/FM (UKW/MW) oder RADIO umzuschalten.
- Página 20 Manuelles Speichern eines Senders 1. Stellen Sie den gewünschten Sender (Frequenz) manuell ein. 2. Drücken Sie die Taste MEM auf dem Bildschirm, und wählen Sie die gewünschte Festsendertaste (P1 – P6). 3. Der Sender wird unter der gewählten Nummer gespeichert. 4.
- Página 21 Zugreifen auf den DVD-Modus Um den DVD-Modus zu aktivieren, wenn bereits eine Disk eingelegt wurde, drücken Sie auf der Gerätevorderseite auf die Taste SRC (6) oder auf die ent- sprechende Taste der Fernbedienung (8), bis am unteren Rand des Monitors DISC angezeigt wird. Steuern der Wiedergabe Berühren Sie den Touchscreen, um auf die Steuerungen zuzugreifen.
- Página 22 Öffnen des DVD-Menüs Drücken Sie auf der Fernbedienung auf die Taste MENU (1), um das DVD-Hauptmenü aufzurufen. Verwenden Sie die Tasten >>, <<, >>|, |<< um einen Titel aus dem Menü auszuwählen, oder berühren Sie den Titel auf dem Bildschirm. Drücken Sie auf der Fernbedienung auf die Taste TITLE (2), oder berühren Sie den Titel auf dem Bildschirm, um einen anderen Titel für die Wiedergabe auszuwählen.
- Página 23 Verwenden Sie die Taste , um Titel oder Kapitel auszuwählen oder die Zeit einzugeben. • Title (Titel): _/# • Chapter (Kapitel): _ _/## • Time (Zeit): _ _:_ _:_ _ Geben Sie den gewünschten Titel, das Kapitel/den Track oder die Zeit über den Zahlenblock auf dem Bildschirm ein, und drücken Sie ENTER. Um den Bildschirm ohne Treffen einer Auswahl zu verlassen, berühren Sie EXIT.
-
Página 25: Dvd/Cd Video/Audio-Betrieb
Die Anweisungen für die Steuerung des TFT-Monitors und zum Einlegen/Auswerfen von Medien sind für DVDs und CDs gleich. Informationen zu diesen Themen finden Sie im Abschnitt zum DVD/Video-CD-Betrieb. Der VME 9309TS-Receiver kann Musik oder Audio-Dateien von folgenden Diskmedien wiedergeben: • CD-DA •... -
Página 26: Mp3/Usb/Wma-Betrieb
Steuern der Wiedergabe Stoppen der Wiedergabe Berühren Sie auf dem Bildschirm die Taste , oder drücken Sie auf der Fernbedienung auf die Taste (20), um die Disk-Wiedergabe zu stoppen. Um die Wiedergabe fortzusetzen, berühren Sie die Taste auf dem Bildschirm. Anhalten der Wiedergabe Berühren Sie die Taste auf dem Bildschirm, um die Disk-Wiedergabe anzuhalten oder fortzusetzen. - Página 27 Ordnersuche, Dateisuche oder Ordnerauswahl folgendermaßen: Der VME 9309TS-Player erkennt nur drei Ordnerebenen und zeigt keine Ordner an, die nur andere Ordner enthalten. Im obigen Beispiel zeigt das Gerät die Ordner 3, 4, 6 und 8 aber nicht die Ordner 2 und 7 an, da diese keine Tracks enthalten. Ordner 5 wird überhaupt nicht erkannt, da er sich auf der vier-...
- Página 28 MP3 und USB-Benutzeroberfläche Im Folgenden sind die Bildschirmanzeigen und die Touchpunkte für die MP3-Wiedergabe aufgeführt. Aktueller Track und Gesamtanzahl der Tracks im Stammordner der Disk Verstrichene Wiedergabezeit/Länge des Tracks Aktuelle Uhrzeit Tracktitel ID3-Informationen II : Touchpunkt zum Starten/Anhalten der Disk-Wiedergabe DIR-: zum vorherigen Ordner >>|: Touchpunkt zum Wechseln zum nächsten Track |<<: Touchpunkt zum Wechseln zum vorherigen Track...
-
Página 29: Fehlerbehebung
FEHLERBEHEBUNG Problem Ursache Lösung ALLGEMEINES Das Gerät lässt sich nicht Die Sicherung für das Radio ist durchgebrannt Setzen Sie eine neue Sicherung des richtigen einschal- Typs und mit der richtigen Amperezahl ein Die Sicherung für die Autobatterie ist Setzen Sie eine neue Sicherung des richtigen durchgebrannt Typs und mit der richtigen Amperezahl ein Unzulässiger Bedienvorgang... - Página 30 RADIO Schwache Empfangssignale bei Die Autoantenne ist nicht vollständig Überprüfen Sie den Antennenanschluss der Sendersuche ausgefahren Die Autoantenne ist nicht korrekt Überprüfen Sie den Antennenanschluss angeschlossen Die Funktion LOCAL ist aktiviert Deaktivieren Sie die Funktion LOCAL Die Disk wird nicht wiedergegeben Die Disk ist verbogen oder verkratzt Verwenden Sie eine Disk in einwandfreiem Zustand...
-
Página 31: Pflege Und Wartung
Pflege und Wartung Verwenden Sie zur Reinigung der Gerätevorderseite oder des Monitors ein sauberes Tuch und ein neutrales Reinigungsmittel. Ein raues Tuch und ein nicht neutrales Reinigungsmittel (zum Beispiel Alkohol) können die Konsole oder den Monitor verkratzen oder die Farbe lösen. Sprühen Sie keine flüssigen Reinigungsmittel oder Wasser auf das Gerät. - Página 32 VME 9309TS...
- Página 33 Thank you for choosing a Audiovox product. We hope you will find the instructions in this owner’s manual clear and easy to follow. If you take a few minutes to look through it, you’ll learn how to use all the features of your new Audiovox VME 9309TS Mobile Multimedia Receiver for maximum enjoyment.
-
Página 34: Preparation
PREPARATION Congratulations on your purchase of the Audiovox VME 9309TS Mobile Multimedia Receiver. It’s a good idea to read all of the instructions before beginning the installation. We recommend having your Audiovox VME 9309TS installed by a reputable installation shop. -
Página 35: Optional Equipment
NOTE: If the VME 9309TS is to be installed in a car equipped with an on-board drive or navigation computer, do not disconnect the battery cable. If the cable is disconnected, the computer memory may be lost. Under these conditions, use extra caution during installation to avoid causing a short circuit. -
Página 36: Installation
ACC available, connect the ACC lead to the power supply with a switch. NOTE: When replacing a fuse, be sure to use correct type and amperage to avoid damaging the radio. The VME 9309TS uses one 15 amp mini-ATM fuse, located in the black filter box in-line with the main wire harness. - Página 37 NOTE: For proper operation of the CD/DVD player, the chassis must be mounted within 20° of horizontal. Make sure the unit is mounted within this limita- tion. 4. Attach one end of the perforated support strap (supplied) to the screw stud on the rear of the chassis using the hex nut provided. Fasten the other end of the perforated strap to a secure part of the dashboard either above or below the radio using the screw and hex nut provided.
-
Página 38: Wiring Diagram
Wiring Diagram... -
Página 39: Controls And Indicators
CONTROLS AND INDICATORS Button Operation 1. OPEN/CLOSE Press to activate the automatic mechanical system and move the TFT monitor into viewing position. Press again to close the TFT. WIDE/NAV/DISP When the monitor is retracted the station search function is started in the direction of lower frequencies by pressing button . -
Página 41: Remote Control
REMOTE CONTROL NOTE: Your remote control may differ slightly from the one pictured here. The above diagram is for illustrative purposes only. -
Página 43: Using The Tft Monitor
USING THE TFT MONITOR Open/Close TFT Monitor Open TFT Monitor Press the OPEN button (1) on the front panel or press the ( ) button (25) on the remote control to activate the mechanism that moves the display panel into the viewing position. Close TFT Monitor Press the OPEN button (1) on the front panel or press the ( ) button (25) on the remote control to load the display panel back into the compart-... -
Página 44: Parking Brake Inhibit
Parameter Adjustment Procedure 1. Enter Picture Quality Setting Mode: Press the PIC button (24) on the remote control or the BAND/PC button (4) on the monitor. 2. Select Item to Set: Press the AUDIO button (5) on the control panel to select “BRIGHT” or “CONTRAST”. 3. -
Página 45: Operating Instructions
OPERATING INSTRUCTIONS Power On / Off Press the /SRC button (6) on the unit (or the / POWER button (4) on the remote control) to turn the unit on. The buttons on the front of the unit light up and the current mode status appears in the LCD (7). You can also turn on the unit by pressing the OPEN button (1) and opening the TFT screen. -
Página 46: Setup Menu
SETUP MENU To access system settings, press the SETUP button (31) on the remote control or touch the button on the screen to enter the “SETUP” menu. The “GENERAL” sub-menu appears highlighted in blue. Accessing Menu Items Touch the sub-menu name to select a sub-menu (Language, Audio, RDS, etc.). The features available for adjustment under the highlighted sub-menu option will appear in the center of the screen. - Página 47 General Sub Menu Features...
- Página 48 Language Sub-menu Features If a DVD supports more than 1 Subtitle or Audio language, all the languages are available for selection during playback. If the selected language is not supported by the DVD, then the default language is used. Setting Options Function Unit will display Radio Data System...
-
Página 49: Exiting The System Setup Menu
Rating Sub-menu Features The DVD system has a built-in parental lock feature to prevent unauthorized persons from viewing restricted disc content. By default, the rating system is unlocked. Once setup, the parental lock is released only by entering the correct password. Once the password is entered, rating is available for setup. -
Página 50: Tuner Operation
TUNER OPERATION Tuner TFT Display 1. Current radio band indicator 2. Radio frequency indicator 3. Clock 4. Stereo broadcasting indicator 5. Strong Local signal broadcasting indicator 6. Preset radio stations: Touch to recall preset stations 7. RDS Information: PS (Program Service), PTY (Program Type), RT (Radio Text) 8. - Página 51 Switch to Radio Tuner source • Touch the top left corner of the screen (the RADIO circle) to view the SOURCE MENU. Touch “Radio”. • Press the SRC button (6) on the front panel or remote control (8) to switch to the AM/FM or RADIO source. Select FM/AM Band Touch the BAND button (15) on the screen, or press the BAND button on the unit (4) or remote control (20) to change between the following bands: FM1, FM2, FM3, AM1, and AM2...
- Página 52 Recalling and Storing broadcaster using the presets and the Automatic Storing ( AS) Function: Recalling a Station 1. Select a band (if needed) 2. Touch an on-screen button (P1- P6) to select the corresponding stored station. Manual Storing of a Station 1.
-
Página 53: Dvd/Vcd Video Operation
DVD/VCD VIDEO OPERATION NOTE: When properly installed, DVD video cannot be displayed on the main TFT screen unless the parking brake is applied. If you attempt to play a DVD while the vehicle is moving, the TFT screen displays “PARKING” with a blue background. Rear video screens, if applicable, will operate nor- mally. - Página 54 Stopping Playback Touch the stop button ( ) on the screen or press the / BAND button (20) on the remote control to stop DVD play. Pausing Playback Touch the pause button (||) on the screen (or press the >/|| button on the remote control) to suspend disc playback. Press the > button on the screen to resume disc playback.
- Página 55 Accessing the DVD Menu Press the MENU button (1) on the remote control to recall the main DVD menu. Press the TITLE button (2) on the remote control or on screen to select a different title for playback. Press the >/|| button (18) on the remote control to confirm your selection and begin playback. You can also select a title using the touch screen. Moving Through Chapters Press the >>| button (19) on the remote control or the >>| button on screen to advance to the next chapter on the DVD.
-
Página 56: Changing Subtitle Language
Touch Screen Direct Entry To select a chapter/track directly, touch the button on screen control to display the direct entry menu. • Title (Titel): _/# • Chapter (Kapitel): _ _/## • Time (Zeit): _ _:_ _:_ _ Enter the desired chapter/track using the on-screen number pad. Press the enter button (arrow) to tune to the selected station. To exit the screen without changing the station, touch Exit. -
Página 57: Playback Information
NOTE: During VCD playback, press the AUDIO button (5) on the remote control to choose between Left Channel, Right Channel, and Stereo. PBC (Play Back Control - VCD Only) For VCDs with play back functionality, play back control (PBC) provides additional controls for VCD playback. Press the MENU button (1) on the remote control to toggle the PBC function “On”/”Off”. - Página 58 Regional Coding:Both the DVD-Player and discs are coded by region. These region codes must match in order for the disc to play. If the codes do not match, the disc won’t play. This unit’s code is 2. DVD’s with other region codes cannot be played in this unit.
-
Página 59: Dvd/Cd Audio Operation
Instructions for TFT control and Insert/Eject are the same for DVD and CD operation. Please see the DVD/Disc Video Operation section for informa- tion about these topics. The VME 9309TS will play music or other audio files from the following disc media: •... - Página 60 Controlling Playback Stopping Playback Touch the button on screen or press the /BAND button (20) on the remote control to stop disc play. To resume playback, touch the button on screen or press the >/|| button on the remote control (18). Pausing Playback Touch the button on screen to suspend or resume disc playback.
-
Página 61: Mp3/Usb/Wma/Operation
Select, as shown below. The VME 9309TS player will only recognize three folder levels and does not display folders containing only other folders. In the example above, the unit will display folders 3, 4, 6, and 8, but not 2 and 7 since they do not contain any tracks directly. Folder 5 is not recognized at all since it is at the... - Página 62 MP3 User Interface The on-screen indicators and touch key areas for MP3 playback are outlined below. 1. Current track and total number of tracks on root of disc 2. Elapsed playing time, track length 3. Current time 4. Track titles 5.
-
Página 63: Troubleshooting
TROUBLESHOOTING Problem Cause Corrective Action GENERAL Unit will not power on Radio Fuse blown Install new fuse with correct rating Car battery fuse blown Install new fuse with correct rating Illegal operation Press the RESET button located in the bottom right corner of the front panel Remote control does not function Battery depleted Replace battery with new one... - Página 64 Image blurred, distorted, or dark Disc is illegally copied Use original disc PCB cannot be used during VCD playback PCB is not available on the disc No repeat or searching while playing VCD PCB is on Turn PCB off Interruption occurred during playback Disc is dirty or scratched Clean disc or replace...
-
Página 65: Care And Maintenance
Care and Maintenance 1. Use only a clean silicone cloth and neutral detergent to clean the front panel or monitor. A rough cloth and nonneutral detergent (such as alcohol) may result in scratching or discoloration. 2. Do not get water or cleaning fluids on the unit. 3. -
Página 66: Specifications
SPECIFICATIONS DVD/CD Player Compatible Disc Media: DVD + R / RW (Single and Dual Layer) and CD-R / RW Compatible Media Formats: CD-DA, MP3, WMA, VCD, SVCD, AVI, MPEG1 / 2, XviD, DivX and Kodak picture CD (JPEG). Signal to Noise Ratio: >95dBA Dynamic Range: >95dB... - Página 67 VME 9309TS...
- Página 68 Gracias por elegir un producto Audiovox. Esperamos que encuentre las instrucciones de este manual de usuario claras y faciles de seguir. Si se toma unos minutos para leerlo aprenderá a utilizar todas las funciones de su nuevo receptor móvil multimedia Audiovox VME 9309 TS para disfrutarlo al máximo.
-
Página 69: Preparacion
PREPARACIÓN Felicidades por su reciente compra del receptor multimedia Audiovox VME 9309TS. Es una buena idea leer todas las instrucciones antes de iniciar la instalación. Le recomendamos que solicite a una empresa instaladora que instale su Audiovox VME 9309TS. Características •... - Página 70 NOTA: Si desea instalar el sistema VME 9309TS en un vehículo equipado con un ordenador de abordo o navegación, no desconecte el cable de la bate- ría. Si desconecta el cable podría perderse la memoria del ordenador. Bajo estas condiciones, tenga especial cuidado durante la instalación para no causar un cortocircuito.
-
Página 71: Instalación
Al reemplazar un fusible, asegúrese de utilizar uno del tipo y amperaje correcto para evitar dañar la radio. El VME 9309TS utiliza un fusible min-ATM de 15 amperios, colocado en el cuadro negro de filtros, junto al arnés de cableado principal. - Página 72 Instalación final Después de completar las conexiones de cableado, encienda el aparato para confirmar su funcionamiento (el motor debe estar arrancado). Si el apa- rato no funciona, vuelva a comprobar todo el cableado hasta corregir el problema. Una vez instalado correctamente, apague el motor y continúe con el montaje final del chasis.
-
Página 73: Diagrama De Cableado
Diagrama de cableado... -
Página 74: Controles E Indicadores
CONTROLES E INDICADORES Funcionamiento de los botones 1. ABRIR / CERRAR Pulse este botón para activar el sistema mecánico automático y desplazar el monitor TFT a su posición de visualización. Púlselo de nuevo para cerrar la pantalla TFT. /WIDE/NAV La búsqueda de canales hacia las frecuencias bajas se inicia con el monitor dentro del compartimento y pulsando el botón 2. Con el monitor fuera del compartimento y pulsando de forma breve el botón 2 se modifica la presentación de la imagen del modo "Full"... -
Página 76: Control Remoto
CONTROL REMOTO El control remoto del VME 9309TS controla las zonas delantera y trasera. NOTA: Su control remoto podría ser ligeramente diferente del que se muestra en la imagen. El diagrama anterior tiene sólo fines ilustrativos. -
Página 77: Funcionamiento Del Control Remoto
Funcionamiento del control remoto... -
Página 78: Uso Del Monitor Tft
USO DEL MONITOR TFT Abrir/Cerrar el monitor TFT Abrir el monitor TFT Pulse el botón OPEN (1) en el panel frontal, o el botón ( ) (25) en el control remoto para activar el mecanismo que desplaza el panel de pantalla hasta la posición de visualización. -
Página 79: Instrucciones De Uso
Desactivar freno de mano • Si está conectado el cable “PRK SW” al interruptor de freno, la pantalla del monitor TFT sólo mostrará vídeo cuando el vehículo esté en marcha. • La función de freno de mano se desactivará si la fuente de vídeo es CAMERA. •... - Página 80 Reinicio de sistema Para corregir un error de sistema o alguna otra operación ilegal, utilice la punta de un bolígrafo para pulsar el botón de RESET (10) ubicado en la esquina inferior derecha del equipo. Después de realizar un reinicio de sistema, la unidad restaurará todos los valores predeterminados. NOTA: Si se reinicia el equipo durante la reproducción de un DVD, el DVD continuará...
- Página 81 General Sub Menu Features...
- Página 82 Funciones del submenú de idioma Si un DVD es compatible con más de un idioma de subtítulos o audio puede seleccionar todos los idiomas disponibles durante la reproducción. Si el idioma seleccionado no es compatible con el DVD se utilizará el idioma predeterminado. Configuración Opciones Función...
- Página 83 Funciones del submenú de calificación El sistema DVD posee una función de bloqueo paterno integrada para evitar que personas sin autorización vean contenidos restringidos. De forma pre- determinada, el sistema de calificación está configurado al nivel más alto (sin restricciones). El bloqueo paterno sólo se libera introduciendo la contra- seña correcta.
-
Página 84: Uso Del Sintonizador
USO DEL SINTONIZADOR 1. Indicador de banda de radio actual 2. Indicador de frecuencia de radio 3. Reloj 4. Indicador de emisión estéreo 5. Indicador de emisión de señal local fuerte 6. Emisoras predefinidas: toque esta opción para abrir las emisoras predefinidas 7. - Página 85 Cambia a la fuente de sintonizador de radio • Toque la esquina superior izquierda de la pantalla (el círculo de RADIO) para ver el menú. SOURCE. Toque en “RADIO”. • Pulse el botón SRC (6) en el panel frontal o el control remoto (8) para cambiar a la fuente de RADIO AM/FM. Seleccionar la banda FM o AM Toque el botón BAND (15) en la pantalla o el control remoto (20) para cambiar entre las bandas siguientes: FM1, FM2, FM3, AM1, y AM2.
-
Página 86: Uso Del Vídeo Dvd/Vcd
Almacenamiento manual e una emisora. 1. Sintonice manualmente la emisora deseada (frecuencia). 2. Presione el botón MEM en pantalla y seleccione la emisora predefinida que desee (P1 - P6). 3. La emisora se almacenará en la posición seleccionada. 4. En lugar de la frecuencia, se almacenará el identificador de servicio del programa (p. ej. BBC). Almacenamiento automático (AS) de las emisoras con señal más fuerte 1. - Página 87 Acceder al modo DVD Para cambiar al modo DVD al insertar un disco, pulse el botón SRC (6) en el panel frontal o en el control remoto (8) hasta que aparezca la palabra “DISC” en la parte inferior de la pantalla. Control de reproducción Para acceder a los controles en pantalla toque la pantalla.
- Página 88 Acceder al menú del DVD Pulse el botón MENU (1) en el control remoto para abrir el menú principal del DVD. Utilice el mando para seleccionar un título en el menú o toque el título en la pantalla. Pulse el botón TITLE (2) en el control remoto o en la pantalla para seleccionar un título diferente a reproducir. Pulse el botón ENTER (mando) para confirmar su selección e iniciar la reproducción.
- Página 89 Utilice el botón ( ) para seleccionar el título, capítulo o tiempo • Title (Titel): _/# • Chapter (Kapitel): _ _/## • Time (Zeit): _ _:_ _:_ _ Introduzca el título, capítulo/pista o tiempo que desee utilizando el teclado numérico en pantalla y pulse el botón Enter. Para salir de la pantalla sin hacer una selección, toque en el botón Exit.
-
Página 91: Uso De Audio De Dvd/Cd
Las instrucciones para el control de la pantalla TFT y la Inserción/Expulsión son las mismas que para el uso del DVD o CD. Consulte la sección de Uso de vídeos DVD para más información sobre estos temas. El VME 9309TS reproducirá música u otros archivos de audio desde los siguientes medios de disco: • CD-DA •... -
Página 92: Uso De Mp3/Wma
Control de reproducción Detener la reproducción Toque el botón en la pantalla o pulse el botón (20) en el control remoto para detener la reproducción del disco. Para continuar con la reproducción toque el botón en la pantalla o pulse el botón del mando. Pausar la reproducción Toque el botón 4 en la pantalla o pulse el botón del mando para suspender o continuar la reproducción. - Página 93 El reproductor VME 9309TS sólo reconocerá tres niveles de carpetas y no mostrará aquellas carpetas que sólo contengan otras carpetas. En el ejemplo anterior, el equipo mostrará las carpetas 3, 4, 6 y 8, pero no la 2 y la 7, ya que no contienen pistas directamente. La carpeta 5 no será reconocida dado...
- Página 94 Interfaz de usuario MP3/USB Los indicadores en pantalla y áreas táctiles del reproductor de MP3 se describen a continuación. 1. La pista actual y el número total de pistas en la raíz del disco. 2. Tiempo de reproducción transcurrido / duración de la pista. 3.
-
Página 95: Solución De Problemas
RESOLUCIÓN DE PROBLEMAS Problema Causa Acción correctora GENERAL El equipo no se enciende El fusible de radio se ha fundido Instale un fusible nuevo del valor correcto El fusible de la batería del vehículo se ha Instale un fusible nuevo del valor correcto fundido Uso ilegal Pulse el botón RESET que se encuentra en... - Página 96 TUNER Búsqueda de emisoras débiles La antena del vehículo no está completamente Conecte el cable de control de la antena del extendida vehículo correctamente La antena del vehículo no está conectada Conecte el cable de control de la antena del correctamente vehículo correctamente La función LOCAL está...
-
Página 97: Cuidados Y Mantenimiento
Cuidados y mantenimiento 1. Utilice sólo un paño de silicona y un detergente neutro para limpiar el panel frontal o el monitor. El uso de un paño duro y un detergente no neutro (como alcohol) podría provocar arañados o decoloración. 2. - Página 98 Congratulations! You have made a wise selection in becoming the owner of a AUDIOVOX Mobile Video equipment. Due to high quality AUDIOVOX products have earned an excellent reputation through the western world. And this high quality stan- dard enables us to grant a 2-years warranty for AUDIOVOX Mobile Video products.
- Página 99 ARANTIEKARTE ARRANTY Typ/ Type Serien-Nr./Serial-No. Name und Anschrift des Händlers /Stempel Name and address of the dealer/stamp Käufer/Customer Name/Name Straße/Street PLZ, Ort /City Land /Country Kaufdatum / buying date Nur gültig in Verbindung mit Ihrer Kaufquittung! No warranty without receipt!
- Página 100 Audiovox Audio Produkte GmbH Lise-Meitner-Str. 9 • D-50259 Pulheim • Germany Tel. ++49 (0) 2234 807-0 • Fax++49 (0) 2234 807-399 www.audiovox-germany.de...