
Resumen de contenidos para Gericom Mobile World EGO Serie
- Página 1 User Manual Benutzerhandbuch Manual de instrucciones Manual de l´utilisateur Manuale d´uso...
-
Página 2: Trademarks
Notice Please note that the setting diagrams or values in this guide are FOR YOUR REFER- ENCE ONLY. The model you bought may be slightly different from the illustrations and descriptions in this guide. If you are not sure about these information, such as the computer’s specification and equipment, please ask your local vendor for help. -
Página 3: Tabla De Contenido
Table of Contents ENGLISH ...........3 FRANCAIS ........11 DEUTSCH ..........19 ITALIANO .........27 ESPAÑOL ..........35... - Página 4 Introduction Thank you for purchasing your Ego Notebook PC. The Ego Notebook PC is an Intel-based mobile platfrom, implementing the latest Centrino processor to increase excellent performance and wireless Internet access. In addition, its built-in 4-in-1 card reader, high-speed optical storage drive, IEEE 1394 and USB 2.0 ports, as well as its 15"...
-
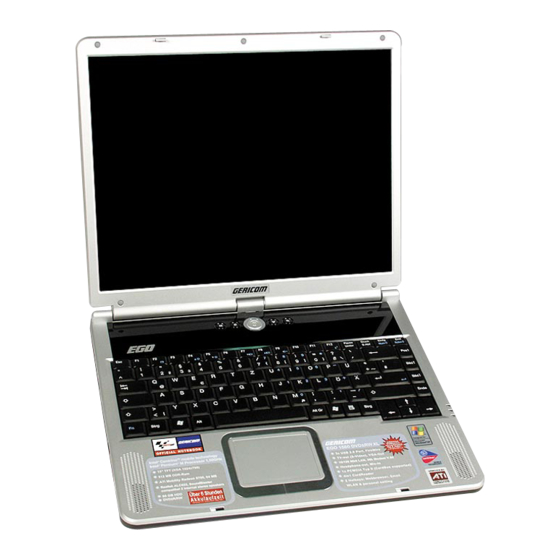
Página 5: Product View
Product View LCD Screen Power Button Quick Launch Buttons LEDs Keyboard Touchpad Speakers... - Página 6 Lock Hole Power RJ-45 S-Video Printer IEEE1394 RJ-11 Audio MiniPCI Card Memory Hard Disk Drive Battery Battery Unlock Button Card Reader LEDs PC Card Cover Button Optical Device...
-
Página 7: Installing The Battery Pack
Installing the Battery Pack Installing the battery pack Place the battery pack into the compartment. Press down the battery pack until a “click” sound. The battery pack will be locked automatically. Replacing the Battery Pack Removing the Battery Pack Confirm that the computer is turned off. Place the computer upside down gently. - Página 8 Starting Up Connecting/Disconnecting the AC Power Unpack the package to find the AC adapter and power cord. Attach the power cord to the connector of the AC adapter ( ). Plug the DC end of the adapter to the computer ( ), and the male end of the power cord to the electrical outlet ( ).
- Página 9 Turning On the Computer Make sure that the computer is connected to the AC power. Open the top cover by pressing the Cover Button. Press the Power Button. Pressing the power button Tip: Once pressed, the Power Button will light Blue to indicate that the computer is turned on;...
-
Página 10: Quick Launch Buttons
LEDs on the Computer Status LEDs Num Lock: glows Green when the Num Lock function is activated. Caps Lock: glows Green when the Caps Lock function is activated. Scroll Lock: glows Green when the Scroll Lock function is activated. Hard Disk In-use: blinks Green when the computer is accessing the hard disk drive. -
Página 11: Francais
MS-XXXX Notebook FRANCAIS... - Página 12 Introduction Merci d’avoir acheté le portable Ego. Le portable Ego est basé sur une plateforme Intel mobile, équipé du dernier processeur Centrino permettant d’obtenir d’excellentes performances ainsi qu’une connexion Internet sans fil. De plus, le lecteur de carte 4 en 1, le disque de stockage ultra rapide, les ports Fire Wire et USB 2.0 tout comme son écran 15"...
-
Página 13: Vue De Produit
Vue de Produit Ecran LCD Bouton de démarrage Quick Launch Buttons LEDs Clavier Touchpad Speakers... - Página 14 Blocage Alimentation RJ-45 S-Video Imprimante IEEE1394 RJ-11 Audio Mini carte PCI Processeur Mémoire Disque dur Batterie Déblocage batterie Lecteur de cartes LEDs Cartes PC Bouton d’ouverture Lecteur optique...
-
Página 15: Installation De La Batterie
Installation de la Batterie Installation de la batterie Placer la batterie dans le compartiment. Appuyer sur la batterie jusqu’à entendre un son “click”. La batterie se bloque automatiquement. Installer la batterie Retirer la batterie Vérifier que le portable n’est pas allumé. Retourner le portable délicatement. -
Página 16: Pour Commencer
Pour Commencer Connecter/Déconnecter l’alimentation Prendre dans la boîte l’adaptateur AC ainsi que le cordon d’alimentation. Relier le cordon d’alimentation à l’adaptateur AC ( ). Brancher l’adaptateur DC sur l’ordinateur ( ), et le câble d’alimentation sur la prise secteur ( ). Quand l’adaptateur AC est connecté, la LED verte de celui-ci s’allume ( ) pour indiquer que le portable est bien alimenté... - Página 17 Allumer l’Ordinateur Assurez-vous que le portable est bien connecté à l’alimentation. Ouvrir le portable en appuyant sur le bouton prévu à cet usage. Appuyer sur le bouton de démarrage. Bouton de démarrage Tip: Une fois que vous avez appuyé sur le bouton de démarrage, une lumière Bleue indique que le portable s’allume;...
-
Página 18: Boutons De Démarrage Rapide
Diodes du Portable Etat des Diodes Num Lock: Une lumière Verte apparaît lorsque la fonction est activée. Caps Lock: Une lumière Verte apparaît lorsque la fonction Caps Lock est activée. Scroll Lock: Une lumière Verte apparaît lorsque la fonction Scroll Lock est activée. -
Página 19: Deutsch
MS-XXXX Notebook DEUTSCH... - Página 20 Einleitung Vielen Dank für den Kauf des Ego Notebooks. Das Ego Notebook ist eine Intel basierte mobile Plattform, welche die neueste Centrino Prozessor Technologie für exzellente Performance und drahtlosen Internetzugang integriert. Zusätzlich macht diesen Computer der eingebaute 4-in-1 Kartenleser, das optische Laufwerk, IEEE 1394 und USB 2.0 Anschlüsse und insbesondere das sehr helle 15"...
- Página 21 Produktview TFT Bildschirm Ein-/Aus-Taster Schnellstart-Tasten LEDs Tastatur Touchpad Lautsprecher...
- Página 22 Lock Hole Power RJ-45 Mikrophon S-Video Drucker IEEE1394 RJ-11 Audio Mini-PCI Karte Speicher Festplatte Akku Akku-Verriegelung Kartenleser LEDs PC-Card Verriegelung Optisches Laufwerk...
- Página 23 Den Akku einsetzen Den Akku einsetzen Setzen Sie den Akku in das Fach. Drücken Sie den Akku hinein, bis er hörbar einrastet. Der Akku ist nun verriegelt. Den Akku einsetzen Den Akku entfernen Stellen Sie sicher, dass das Notebook ausgeschaltet ist. Drehen Sie das Notebook vorsichtig um.
- Página 24 Den Computer starten Anchließen und entfernen des Netzteils Packen Sie das Netzteil und das Stromkabel aus. Schliessen Sie das Stromkabel am Netzteil an ( ). Stecken Sie den Netzteilstecker an die passende Buchse am Notebook ( ), und den Netzstecker in die Steckdose ( ). Sobald das Netzteil an der Steckdose angeschlossen ist, wird das grüne Licht am Netzteil leuchten, um Ihnen anzuzeigen, dass das Notebook nun mit Netzstrom versorgt wird ( ).
- Página 25 Das Notebook das erste Mal einschalten Stellen Sie sicher, dass das Notebook mit dem Netzteil am Stromnetz angeschlossen ist. Wenn nicht, befolgen Sie die Anweisungen auf der vorherigen Seite. Klappen Sie das Display des Notebooks auf. Dazu müssen Sie das Display an den seitlichen Knöpfen entriegeln.
- Página 26 Anzeigen an Ihrem Notebook Status LEDs Num Lock: leuchtet Grün sobald der Ziffernblock auf der Tastatur aktiviert wurde. Caps Lock: leuchtet Grün sobald die Feststelltaste für Großbuchstaben aktiviert wurde. Scroll Lock: leuchtet Grün sobald die Rollen Funktion aktiviert wurde. Festplatte: blinkt Grün während das Notebook auf die Festplatte zugreift.
-
Página 27: Italiano
MS-XXXX Notebook ITALIANO... - Página 28 Introduzione Grazie per aver acquistato il Notebook Ego, notebook la cui piattaforma è basata su chipset Intel ed è dotata di tecnologia Centrino per migliorare le prestazioni del vostro PC e facilitare le connessioni wireless. Questo notebook è inoltre dotato di Card Reader 4-in-1, di drive ottico ad alta velocità, di porta USB 2.0 e IEEE 1394 e di un performante schermo LCD 15’’;...
-
Página 29: Panoramica Del Notebook
Panoramica del Notebook Monitor LCD Pulsante Power Pulsanti di avviamento rapido LEDs Tastiera Touchpad Amplificatori acustici... - Página 30 Pulsante Lock Power RJ-45 S-Video Stampante IEEE1394 RJ-11 Audio MiniPCI Card Memoria Hard Disk Drive Batteria Pulsante di apertura del vano batterie Card Reader LEDs PC Card Pulsante Cover Dispositivo Ottico...
-
Página 31: Installazione Delle Batterie
Installazione delle batterie Installazione delle batterie: Posizionare il pacchetto batterie all’interno dell’apposito vano. Premere il pacchetto batterie fino a sentire “click”. Il pacchetto batterie verrà automaticamente posizionato. Posizionare il pacchetto batterie Rimozione delle batterie: Controllate di aver spento il Notebook. Girate delicatamente il Notebook. - Página 32 Come cominciare Connettere/Disconnettere l’alimentatore AC Power Estrarre dalla confezione l’alimentatore AC Power e il cavo di collegamento. Collegare il cavo all’alimentatore AC Power ( ). Collegare la spina DC dell’alimentatore al Notebook ( ), e la spina maschio del cavo all’elettricità ( ). Quando l’adattatore AC è...
- Página 33 Accendere il Notebook Accertatevi che il Notebook sia collegato all’alimentatore AC. Aprite il Notebook premendo il pusante Cover. Premete il pulsante Power. Premere il pulsante power Nota: Una volta premuto il pulsante Power lampeggerà una luce azzurra che indicherà lo stato di accensione del Notebook, contemporaneamente un’altra luce verde lampeggerà...
- Página 34 INDICATORI Indicatori di Stato Num Lock: si accende di verde quando la funzione Num Lock è attivata. Caps Lock: si accende di verde quando la funzione Caps Lock è attivata. Scroll Lock: si accende di verde quando la funzione Scroll Lock è attivata.
-
Página 35: Español
MS-XXXX Notebook ESPAÑOL... -
Página 36: Introducción
Introducción Gracias por comprar el ordenador portátil Ego. El portátil Ego es un modelo basado en la plataforma móvil de Intel, incorpora el último procesador Centrino que incrementa las excelentes características y la conexión a Internet inalámbrica (Wireless). También incluye una ranura 4-en-1 para leer tarjetas de memoria, un lector óptico de almacenamiento de alta velocidad, conexiones IEEE 1394 (Firewire) y puertos USB 2.0 y, por último, una pantalla LCD de 15"... -
Página 37: Vista Del Producto
Vista del producto Pantalla LCD Power Button Botones de Acceso Rápido LEDs Teclado Touchpad Altavoces... - Página 38 Antirrobo Corriente RJ-45 Micrófono S-Video Impresora IEEE1394 RJ-11 Audio Tarjeta MiniPCI Memoria Disco Duro Batería Botón de desbloqueo de la batería Lector tarjetas LEDs PC Card Botón de apertura Óptico...
-
Página 39: Instalación De La Batería
Instalación de la batería Instalación de la batería: Coloque la batería dentro del compartimento. Presione hacia abajo la batería hasta escuchar un “clic”. La batería estará instalada con total seguridad en ese momento. PackInstalar la Batería Desinstalar la batería: Confirme que el portátil está apagado. Coloque el equipo boca abajo con suavidad. -
Página 40: Inicio De Uso
Inicio de uso Conectar / Desconectar el adaptador de corriente Busque en la caja el cable y el adaptador de corriente. Conecte el cable al adaptador de corriente ( ). Conecte el extremo DC del adaptador al ordenador ( ), y el macho a un enchufe eléctrico ( ). - Página 41 Encender el ordenador por primera vez Asegúrese de que el equipo está conectado a la corriente. Abra la tapa presionando el botón de apertura. Presione el botón de encendido. Pulsar el botón de encendido Información: Una vez presionado el botón, se encenderá una luz azul que indica que el portátil está...
-
Página 42: Leds Del Portátil
LEDs del portátil LEDs de estado: Num Lock: Verde cuando se activa la función Num Lock (bloqueo del teclado numérico). Caps Lock: Verde cuando se activa la función Caps Lock (bloqueo de letras mayúsculas). Scroll Lock: Verde cuando se activa la función Scroll Lock (bloqueo del scroll).