Tabla de contenido
Publicidad
Idiomas disponibles
Idiomas disponibles
Enlaces rápidos
Publicidad
Tabla de contenido

Manuales relacionados para jbc AL-A


Resumen de contenidos para jbc AL-A
- Página 1 Page English Español Auto-Feed Soldering Station Ref. AL-A...
-
Página 2: Packing List
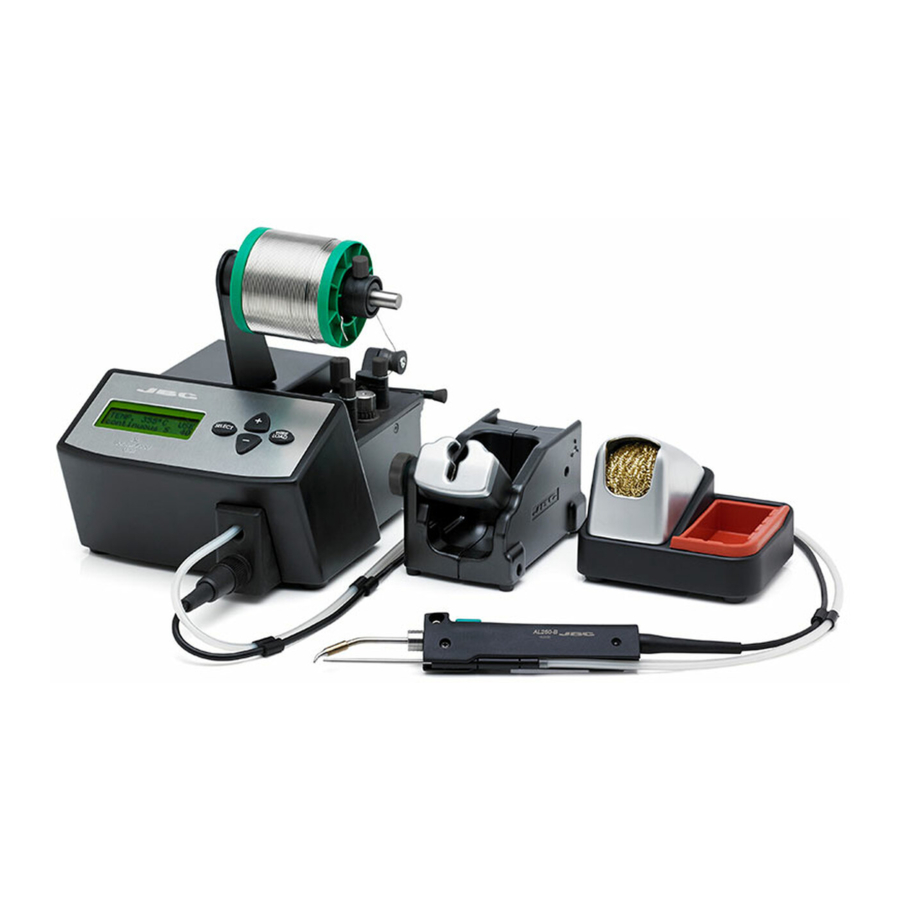
Solder Reel Stand ..1 unit Power Cord ....1 unit Manual ......1 unit Ref. 008745 Ref. 0009417 (100V/120V) Ref. 0016966 0009401 (230V) w w w.jbctools.com Auto-Feed Soldering station Ref. AL-A Allen Key 2.5mm ..1 unit Ref. 0780493 2 2 2... - Página 3 w w w.jbctools.com Features Main switch Fuse Power Socket Equipotential connection Pedal connection (optional) Stand Ref. AL-SD Auto-feed Iron Ref. AL250-B 3 3 3...
- Página 4 Reel Stand Assembly Adjusting System Assembly Guide Set 1. Open dragging mechanism. 2. Place the guide set and tighten the screws. 4 4 4...
- Página 5 w w w.jbctools.com 3. Take the solder wire from the reel until the guide tube start. 4. Close the dragging mechanism. Guide Tube Start 5 5 5...
- Página 6 5. Connect the handpiece to the station and switch it on. With the handpiece out of the stand, press the WIRE LOAD key till the solder leaves by the end of the guide tube. Fast wire dragging LOADING SOLDER WIRE Solder wire dragging button Clutch Regulation A.
-
Página 7: Control Screen
w w w.jbctools.com Control Screen Tool temperature Tool status TEMP. 230ºC disc. L 10 S 11 Working method Length of wire Speed There are 4 tool status: USE (Use). The tool is ready to work. STD (Stand). The tool is placed in the stand but still not in the sleep mode. SLP (Sleep). - Página 8 Parameters Modification of the Tool and the Station To enter into this mode, you must hold the SELECT key for 3 seconds. 8 8 8...
- Página 9 w w w.jbctools.com 9 9 9...
- Página 10 If necessary use a tool to lever it off. and replace it in the station. - Replace any defective or damaged pieces. Use original JBC spare parts only. - Repairs should only be performed by a JBC authorized technical service.
- Página 11 w w w.jbctools.com Safety It is imperative to follow safety guidelines to prevent electric shock, injury, fire or explosion. - Do not use the units for any purpose other than soldering or rework. Incorrect use may cause fire. - The power cord must be plugged into approved bases. Be sure that it is properly grounded before use.
- Página 12 Specifications AL-1A 120V 50/60Hz. Input fuse: 2A. Output: 23.5V AL-2A 230V 50/60Hz. Input fuse: 1A. Output: 23.5V AL-9A 100V 50/60Hz. Input fuse: 2A. Output: 23.5V - Weight: 5.8 Kg (12.9 lb) - Dimensions: 195 x 200 x 240 mm - Output Peak Power CD-BE: 130W - Temperature Range: 90 - 450 °C (190 - 840 °F) (±5%)
- Página 13 Estación con aportación automática de estaño Ref. AL-A...
-
Página 14: Composición
Cable de Red .....1 unidad Ref. 0016966 de estaño ....1 unidad Ref. 0009417 (100V/120V) Ref. 008745 0009401 (230V) w w w.jbctools.com Auto-Feed Soldering station Ref. AL-A Allen Key 2.5mm Llave Allen 2.5 mm ..1 unidad Ref. 0780493 14 14 14... -
Página 15: Características
w w w.jbctools.com Características Interruptor de red Fusible Entrada de Red Conexión Equipotencial Conexion para pedal (optional) Soporte Ref. AL-SD Soldador con aportación automática de estaño Ref. AL250-B... -
Página 16: Montaje De La Bobina De Estaño
Montaje de la Bobina de Estaño Montaje y ajuste del sistema Conjunto guía 1. Abra el mecanismo de arrastre. 2. Coloque el conjunto guía y apriete los tornillos. - Página 17 w w w.jbctools.com 3. Guíe el hilo de estaño desde el carrete hasta el inicio del tubo guía . 4. Cerre el mecanismo de arrastre. Inicio tubo guía 17 17 17...
-
Página 18: Regulación Del Embrague
5. Conecte el Soldador a la estación y enciéndala. Con el soldador fuera del soporte, presione el botón WIRE LOAD hasta que aparezca el hilo de estaño por el final del tubo guía. Alimentación rápida de LOADING estaño SOLDER WIRE Botón de alimentación de estaño Regulación del embrague A. -
Página 19: Control Del Proceso
w w w.jbctools.com Control del proceso Temperatura de Estado de la la herramienta heramienta TEMP. 230ºC disc. L 10 S 11 Método de trabajo Longitud del Velocidad hilo de estaño Hay 4 estados de la herramienta: USE (Use). La herramienta está lista para trabajar. STD (Stand). -
Página 20: Modificación De Los Parámetros De La Estación Y La Herramienta
Modificación de los parámetros de la estación y la herramienta Para entrar en este modo, debe mantener pesionada la tecla SELECT durante 3 segundos Presione la tecta SELECT durante 3 segundos Selección temperatura Selección temperatura Máxima Mínima MIN. TEMP y 450ºC 90ºC y MAX. - Página 21 w w w.jbctools.com PARAMETROS DE MODIFICACION DE LA HERRAMIENTA Y DE LA ESTACIÓN AL Para entrar en este modo, debe mantener presionada la tecta SELECT durante 3 segundos Sin cambios Con cambios Activar o descativar Le permite cambiar el pitido cuando el PIN.
-
Página 22: Mantenimiento
2. Sustituya el fusible y coloque de nuevo el Si lo precisa, utilice una pequeña palanca. portafusibles en su sitio. - Cambie cualquier pieza defectuosa o dañada. Utilice solamente recambios originales de JBC. - Cualquier reparación sólo se podrá realizar por un servicio técnico oficial JBC. -
Página 23: Seguridad
w w w.jbctools.com Seguridad Es necesario cumplir estas normas de seguridad para prevenir cualquier choque eléctrico, heridas, fuego o explosiones. - No utilice el equipo para otros fines que no sea la soldadura o reparación. El uso incorrecto puede causar fuego. - El cable de red debe enchufarse en bases homologadas. -
Página 24: Especificaciones
Especificaciones AL-1A 120V 50/60Hz. Fusible de entrada: 2A. Salida: 23.5V AL-2A 230V 50/60Hz. Fusible de entrada: 1A. Salida: 23.5V AL-9A 100V 50/60Hz. Fusible de entrada: 2A. Salida: 23.5V - Peso: 5.8 Kg (12.9 lb) - Dimensiones: 195 x 200 x 240 mm - Potencia máxima: 130W - Rango de temperatura:... - Página 25 w w w.jbctools.com Exploded View · Despiece...
- Página 27 w w w.jbctools.com...
- Página 28 Warranty Garantía JBC’s 2 year warranty covers Esta garantía de 2 años cubre this equipment against all este equipo contra cualquier manufacturing defects, including defecto de fabricación, the replacement of defective incluyendo la sustitución de partes parts and labour. defectuosas y mano de obra.