Publicidad
Idiomas disponibles
Idiomas disponibles
Enlaces rápidos
Installation instructions
for your new
Before you begin—Read these instructions completely and carefully.
IMPORTANT—OBSERVE ALL GOVERNING CODES AND ORDINANCES.
Note to Installer— Be sure to leave these instructions with the
Consumer.
Note to Consumer— Keep these instructions with your Built-In
Air Conditioner Owner's Manual and Installation
Instructions for future reference.
NOTE:
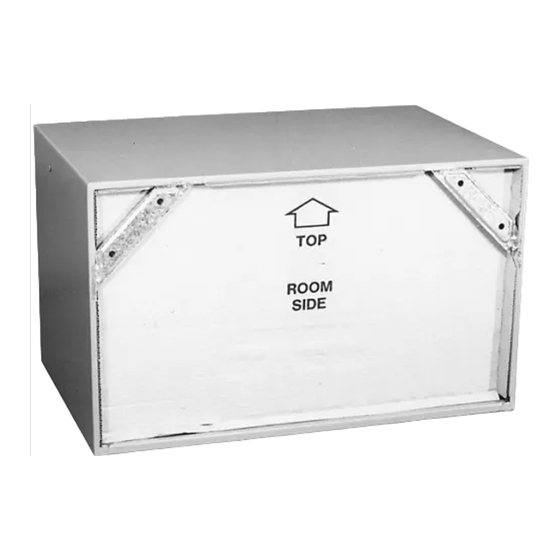
Handle the case carefully.
CRITICAL DIMENSIONS
Outside wall
"C"
NOTE:
Care should be taken in location of electrical
supply entry in relationship to wall sleeve to ensure
access to power once the unit is installed.
Printed in the United States
Ceiling
"A"
"B"
Roomside
"D"
Finished floor or top of carpet
RAB46, RAB47
and RAB48 Room
Air Conditioner Case
for AJ Series Built-In
Models
CASE LOCATION
As a general rule the air conditioner should
be located in an outside wall to ensure proper
distribution of conditioned air. It should be located
in a portion of the wall where there is no electrical
wiring or plumbing, and where there are no
obstructions immediately inside or outside.
RECOMMENDED
DIMENSIONS
INSTALLATION CLEARANCE
A
Top of case to finished ceiling—3" min.
B
Projection of case into room—1/4" min.
If more than 6" of the case projects
into the room, other support is
recommended.
C
Projection of case to outside—1/4" min.
D
Height above finished floor or top of
carpet—0" min.
E
Left/Right side of case to adjacent
wall—2" min.
INSTALL CASE LEVEL IN ALL DIRECTIONS
"E"
1
Top of case
Outside wall
31-61545 GE 09/28/09
"E"
Publicidad

Manuales relacionados para GE RAB46


Resumen de contenidos para GE RAB46
- Página 1 RAB46, RAB47 and RAB48 Room Installation instructions Air Conditioner Case for your new for AJ Series Built-In Models Before you begin—Read these instructions completely and carefully. IMPORTANT—OBSERVE ALL GOVERNING CODES AND ORDINANCES. Note to Installer— Be sure to leave these instructions with the Consumer.
- Página 2 STEP 2 STEP 1 Preparation of the case Preparation of the wall If field-supplied case angles are to be used and must The wall case should be installed during construction be installed, proceed as follows: and lintels should be used to support the block above 1.
- Página 3 STEP 3 STEP 4 Installation of the case in the wall opening Weatherproofing 1. Position the case into the wall. Refer to chart on Weatherproof gaps between the exterior and interior page 1 for roomside projection. The rear (outside) walls and the case with caulking or equivalent edge of the case should extend at least 1/4″ beyond weatherproofing material. the outside wall to be able to caulk properly and prevent sealing the drain holes in the rear flange of the case, and to facilitate easy installation of an accessory drain, if desired.
- Página 4 Rubber plug Drain fitting Cabinet NOTE: It may be desirable or necessary to install the drain kit on the case prior to installing the case into the wall. Specifications subject to change without notice A Quality Product of GE Appliances...
- Página 5 Boîtier pour climatiseur Directives d’installation autonome RAB46, de votre RAB47 et RAB48 pour modèles intégrés Avant de commencer – Veuillez lire attentivement toutes les directives qui suivent. de la série AJ IMPORTANT – OBSERVEZ TOUS LES CODES ET ORDONNANCES EN VIGUEUR.
-
Página 6: Préparation Du Mur
ÉTAPE 1 ÉTAPE 2 Préparation du mur Préparation du boîtier Le boîtier mural doit être installé pendant Si vous devez utiliser et installer des cornières la construction et il faut utiliser des linteaux pour achetées localement, procédez de la façon suivante : soutenir le bloc au-dessus du boîtier. Le boîtier n’est 1. Placez les cornières sur le dessus et les côtés pas en mesure de soutenir les briques ou les blocs du boîtier, à l’endroit voulu (de l’avant vers l’arrière), de béton. - Página 7 ÉTAPE 3 ÉTAPE 4 Installation du boîtier dans l’ouverture du mur Calfeutrage 1. Placez le boîtier dans le mur. Reportez-vous Calfeutrez les jeux entre les murs intérieur et extérieur au tableau de la page 1 pour connaître la partie et le boîtier à l’aide d’un calfeutre ou d’un matériau saillante dans la pièce. La bordure arrière d’étanchéité équivalent. (à l’extérieur) du boîtier doit dépasser le mur extérieur d’au moins 6 mm (1/4 po) afin de pouvoir calfeutrer correctement l’appareil, d’empêcher...
- Página 8 Un câblage en aluminium peut poser certains problèmes—consultez un électricien qualifié. Bouchon en caoutchouc Raccord d’écoulement Boîtier REMARQUE : Il peut être souhaitable ou nécessaire d’installer le raccord d’écoulement sur le boîtier avant d’installer le boîtier dans le mur. Les spécifications peuvent être modifiées sans préavis Un produit de qualité de GE Appliances...
-
Página 9: Rab48 Para Modelos Empotrados Serie Aj
Caja de acondicionador Instrucciones de instalación para su nueva de aire para habitación RAB46, RAB47 Antes de comenzar — Lea estas instrucciones por completo y RAB48 para modelos y con detenimiento. IMPORTANTE — CUMPLA CON TODOS LOS CÓDIGOS empotrados serie AJ Y ORDENANZAS VIGENTES. Nota al instalador— Asegúrese de dejar estas instrucciones al consumidor. N ota al consumidor — Conserve estas instrucciones con el Manual del propietario y las Instrucciones de instalación de su acondicionador de aire empotrado para referencia futura. -
Página 10: Preparación De La Pared
PASO 1 PASO 2 Preparación de la pared Preparación de la caja La caja de pared debe instalarse durante Si deben utilizarse e instalarse ángulos de la caja la construcción y deben utilizarse dinteles para proporcionados en el lugar de la instalación, proceda sostener el bloque ubicado sobre la caja de pared. - Página 11 PASO 3 PASO 4 Instalación de la caja en la abertura de la pared Resistencia a la intemperie 1. Coloque la caja dentro de la pared. Consulte la tabla Deben sellarse con calafateo o un material de la página 1 sobre proyección del lado equivalente resistente a la intemperie los espacios de la habitación.
- Página 12 Gabinete NOTA: Puede ser preferible o necesario instalar el kit de drenaje en la caja antes de instalar la caja dentro de la pared. Las especificaciones pueden sufrir cambios sin previo aviso Un producto de calidad de GE Appliances...