
Manuales relacionados para Osram POADsight 30


Resumen de contenidos para Osram POADsight 30
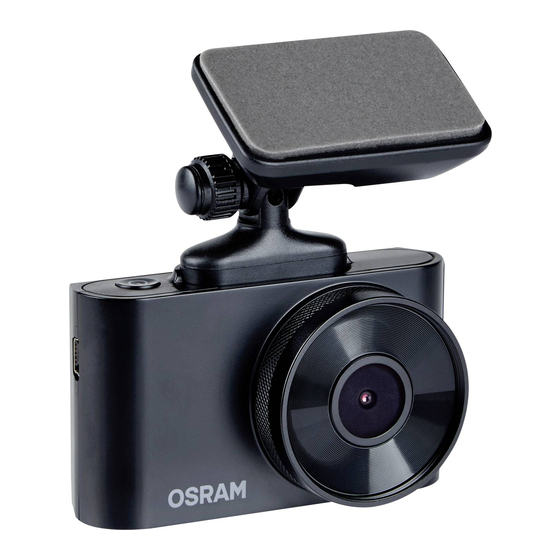
- Página 1 ROADsight Mobile connected Dashcam HD 1080p English Deutsch Français Español Italiano Dutch Polski...
- Página 2 WARNING Individual special requirements and legislation of the countries must be observed, especially concer- ning the duration of the records/use and the transfer of data. Please make yourself familiar with the data protection laws of your country and ensure that you comply with them. Please also familiarize yourself and comply with the relevant laws and regulations regarding the use and ownership of dash cameras in your country.
-
Página 3: Before You Begin
BEFORE YOU BEGIN If you haven’t already downloaded the app, do so now to get the most from your dashcamera. Download the app by searching for OSRAMconnect in the App Store (iPhone) or Google Play (Android). Open the app, follow the setup process shown and enable all necessary settings when prompted. -
Página 4: Package Contents
PACKAGE CONTENTS Dashcam Quick Start Guide Magnetic Mount USB Charging Cable Trim Removal Tool Window Sticker... - Página 5 ATTENTION! Choose the installation location in advance, as the adhesive tape on the mount is of single use. Ensure glass is dirt, dust and grease free. Warm adhesive pad part of mount in hands to ensure strong adhesion to glass. Once mount has been positioned connect dash camera to the magnetic mount.
- Página 6 To power the device and charge the battery, use only the power adapter included. Connect the power cable to the mount, and then plug the USB charger into the vehicles 12V power socket. When the vehicle’s engine starts, the device turns on automatically.
- Página 7 ADJUSTING VIEWING ANGLE ATTENTION! Adjusting the viewing angle can only be done along the vertical axis, so be sure to position the device correctly on the windshield along the horizontal axis as close as possible to the windshield’s center. While pulling or pushing the device in the holder, ensure that the camera captures the image in proportions of 30% sky / 70% road.
- Página 8 CONNECTING TO MOBILE Hold down power button to switch on dashcamera. Press UP arrow for 3 seconds to open Wi-Fi hotspot details screen. Open your phone’s Settings. Tap on Wi-Fi or Connections. Select the dashcamera hotspot and enter the password that is displayed on the dashcamera.
-
Página 9: Configuration
CONFIGURATION Power Button: Press to turn the device on. Press and hold to turn the device off. Menu Button: Use this button to switch between the video, photo and playback. Press this button during recording to take picture. Up Button: Press to move up the menu. In the VIDEO and PHOTO mode, press and hold to zoom in;... -
Página 10: Photo Mode
PHOTO MODE Stop recording and then press and hold Menu button for 2 seconds to enter Photo Mode. Press Rec to capture image. PLAYBACK MODE When in Photo Mode press and hold the Menu button for 2 seconds to enter Playback Mode. Press the Up and Down button to choose video playback or image viewer. - Página 11 INSTALLING microSD CARD Before installing a memory card, make sure the device is turned off. Insert the memory card until it clicks into place. Removing a card: press the card slightly and then remove it from the slot. WARNING! Do not apply excessive force when inserting a memory card to avoid damage to the device.
-
Página 12: Turning On / Off
TURNING ON / OFF • When the vehicle ignition is turned ON the dashcam turns on automatically. • To turn the device on manually, press the power button. • To turn the device off press and hold the power button for approx. 3 seconds. -
Página 13: Loop Recording
LOOP RECORDING Insert the microSD card into the memory card slot; the Loop Recording mode is set to 3 minutes as default. When the memory card storage is full, the device will automatically replace the oldest video file with the newest one; exception is the files protected from deletion. -
Página 14: Emergency Recording
EMERGENCY RECORDING Emergency recording is to protect the current video file from being overwritten and deleted. Emergency recording activated automatically when the G-sensor trig- gers (sudden acceleration /decelera- tion), or at point of collision. Emergen- cy recording is locked automatically to avoid erasing during loop recording. - Página 15 RECORDING PLAYBACK Playback (ensure dashcam recording has stopped). • In the standby mode, press and hold the MENU button to switch between Video & Photo. Video & Photo Mode. • Select the file to view using the Up / Down and Confirm buttons. •...
-
Página 16: Delete Files
DELETE FILES Press the Menu button to enter the submenu (ensure dashcam recording has stopped). Use the Up / Down buttons to select Delete and press the Rec button. Select the option to delete all files / one file, then confirm your choice by following the instructions on the display. -
Página 17: General Settings
GENERAL SETTINGS To access General Settings, press the Menu Button once from the Home screen. Video Resolution: Select required option (the highest option provides the optimum viewing performance). Loop Recording: 3 or 5 minutes G-Sensor: OFF / LOW / MEDIUM / HIGH Night Vision: OFF / ON / AUTO Recording Audio: OFF / ON Date Stamp: OFF / ON... -
Página 18: Advanced Settings
ADVANCED SETTINGS To access Advanced Settings, press the Menu Button twice from the Home screen. WiFi: OFF / ON Date / Time: Adjust for correct Date and Time. Language: Select the preferred menu lan- guage from the list. Plate Number: OFF / ON Screen Saver: OFF / ON Button Sound: OFF / ON Parking Monitor: OFF / ON... - Página 19 ADVANCED SETTINGS Version: Shows installed firmware version, and where to get updates. Default Settings: Reset the camera to its original configuration.
- Página 20 LICENSE PLATE When choosing ON, you will be prompted to enter in your license plate number. The license plate number will display on your recording.
- Página 21 FAQs MENU In the App: To access the FAQs Menu, press the dropdown menu and select FAQs. Swipe up or down to view all common frequently asked questions.
- Página 22 FAILURE TO PHOTOGRAPH / RECORD VIDEO Check if there is enough free space on the micro SD card. RECORDING HAS STOPPED Too many video files stored. Only use at least class 10 U1 high-speed micro SD cards by proven manufacturers. When you try to view a photo/play a video file, the “wrong file”...
- Página 23 HANG UP (NO IMAGE, NO BUTTON RESPONSE) Press the RESET button to reboot the device. MicroSD Card not recognized when used in dashcam ROADsight 30 please format card * ** Ensure MicroSD cards is inserted correctly into dashcam Press menu button twice to enter settings menu Using UP and DOWN buttons select the FORMAT option Select YES to FORMAT the MicroSD card * Format MicroSD card will delete all information and recordings from the MicroSD card...
-
Página 24: Updating Firmware
UPDATING FIRMWARE Download the firmware file at Dashcam Support | OSRAM Automotive and extract the file from the archive onto computer and Unzip. Ensure your MicroSD card has been formatted. Copy Firmware file (.bin) onto your MicroSD card. Insert the MicroSD card with the downloaded file into the dashcam memory card slot. - Página 25 FEATURES 1440p 140° ≤128 GB* ≤20HRS** Wi-Fi GPS ROADsight 1080p 130° ≤32 GB* ≤6HRS** Wi-Fi ROADsight 1080p 120° ≤32 GB* ≤3HRS** ROADsight * Full HD at 30 FPS. ** Max record time dependent on screen resolution, memory card size, and rear camera attachment.
-
Página 26: Power Requirements
POWER REQUIREMENTS ATTENTION! Once there is no external power input, the battery cannot support recording for a long time, please make sure power supply is connected when recording. Input voltage: 5V DC, 1.5A Charging input voltage: 12-24V DC Mini USB Connection for Power OPERATING TEMPERATURES (all models) Storage temperature: -20˚... - Página 27 PLEASE RECYCLE YOUR SPENT BATTERIES Batteries should not be disposed of in unsorted municipal waste, but separately collected to facilitate the correct treatment and recycling of the substances they contain. The recycling of batteries ensures the recovery of these valuable materials and prevents any potentially harmful effects upon both the environment and human health.
- Página 28 ROADsight Mobil verbundene Dashcam HD 1080p Deutsch...
- Página 29 WARNUNG Individuelle besondere Anforderungen und Rechtsvorschriften der Länder sind zu beachten, insbesondere hinsichtlich der Dauer der Aufzeichnungen/Verwendung und der Übermittlung von Daten. Bitte machen Sie sich mit den Datenschutzgesetzen Ihres Landes vertraut und stellen Sie sicher, dass Sie diese einhalten. Bitte machen Sie sich auch mit den einschlägigen Gesetzen und Vorschriften in Bezug auf die Verwendung und den Besitz von Dashcams in Ihrem Land vertraut.
-
Página 30: Vor Dem Start
VOR DEM START Wenn Sie die App noch nicht heruntergeladen haben, tun Sie dies jetzt, um Ihre Dashcamera optimal zu nutzen. Laden Sie die App herunter, indem Sie im App Store (iPhone) oder bei Google Play (Android) nach OSRAMconnect suchen. Öffnen Sie die App, folgen Sie dem angezeigten Setup-Vorgang und aktivieren Sie alle erforderlichen Einstellungen, wenn Sie dazu aufgefordert werden. -
Página 31: Lieferumfang
LIEFERUMFANG Dashcam Kurzanleitung Magnethalterung USB-Ladekabel Trimmentfernungswerkzeug Fensteraufkleber... - Página 32 ACHTUNG! Wählen Sie den Installationsort im Voraus, da das Klebeband auf der Halterung zum einmaligen Gebrauch bestimmt ist. Stellen Sie sicher, dass das Glas frei von Schmutz, Staub und Fett ist. Erwärmen Sie das Klebepadteil der Halterung in den Händen, um eine starke Haftung auf Glas zu gewährleisten.
- Página 33 Verwenden Sie zum Einschalten des Geräts und zum Laden des Akkus nur das mitgelieferte Netzteil. Schließen Sie das Netzkabel an die Halterung an und stecken Sie das USB- Ladegerät in die 12-V-Steckdose des Fahrzeugs. Wenn der Motor des Fahrzeugs startet, schaltet sich das Gerät automatisch ein.
- Página 34 EINSTELLEN DES BETRACHTUNGSWINKELS ACHTUNG! Die Einstellung des Betrachtungswinkels kann nur entlang der vertikalen Achse erfolgen. Achten Sie daher darauf, dass Sie das Gerät entlang der horizontalen Achse so nah wie möglich an der Mitte der Windschutzscheibe positionieren. Stellen Sie beim Ziehen oder Drücken des Geräts in der Halterung sicher, dass die Kamera das Bild in Proportionen von 30 % Himmel / 70 % Straße aufnimmt.
- Página 35 ANSCHLUSS AN MOBIL Halten Sie den Netzschalter an der Dashcamera gedrückt. Drücken Sie 3 Sekunden lang den Aufwärtspfeil, um den Wi- Fihotspot-Detailbildschirm zu öffnen. Öffnen Sie die Einstellungen Ihres Telefons. Tippen Sie aufWi-Fior- Verbindungen. Wählen Sie den Dashcamerahotspot aus und geben Sie das Kennwort ein, das auf der Dashcamera angezeigt wird.
-
Página 36: Konfiguration
KONFIGURATION Netzschalter: Drücken Sie diese Taste, um das Gerät einzuschalten. Halten Sie sie gedrückt, um das Gerät auszuschalten. Menütaste: Verwenden Sie diese Taste, um zwischen Video, Foto und Wiedergabe zu wechseln. Drücken Sie diese Taste während der Aufnahme, um ein Bild aufzunehmen. Aufwärts-Taste: Drücken Sie diese Taste, um das Menü... -
Página 37: Menüoptionen
FOTOMODUS Beenden Sie die Aufnahme und halten Sie die Menütaste 2 Sekunden lang gedrückt, um den Fotomodus aufzurufen. Drücken Sie Rec, um das Bild aufzunehmen. WIEDERGABEMODUS Halten Sie im Fotomodus die Menütaste 2 Sekunden lang gedrückt, um den Wiedergabemodus aufzurufen. Drücken Sie die Auf- und Ab-Taste, um die Videowiedergabe oder den Bildbetrachter auszuwählen. - Página 38 microSD-KARTE INSTALLIEREN Stellen Sie vor der Installation einer Speicherkarte sicher, dass das Gerät ausgeschaltet ist. Setzen Sie die Speicherkarte ein, bis sie einrastet. Entfernen einer Karte: Drücken Sie leicht auf die Karte und entfernen Sie sie dann aus dem Steckplatz. WARNUNG! Wenden Sie beim Einsetzen einer Speicherkarte keine übermäßige Kraft an, um Schäden am Gerät zu vermeiden.
- Página 39 EIN / AUS • Wenn die Fahrzeugzündung eingeschaltet ist, schaltet sich die Dashcam automatisch ein. • Um das Gerät manuell einzuschalten, drücken Sie den Netzschalter. • Um das Gerät auszuschalten, halten Sie den Netzschalter ca. 3 Sekunden.
- Página 40 DAUERAUFNAHME Setzen Sie die microSD-Karte in den Speicherkartensteckplatz ein. Der Daueraufnahmemodus ist standardmäßig auf 3 Minuten eingestellt. Wenn der Speicherkartenspeicher voll ist, ersetzt das Gerät automatisch die älteste Videodatei durch die neueste. Ausnahme sind die vor dem Löschen geschützten Dateien.
- Página 41 NOTFALLAUFNAHME Die Notfallaufnahme soll die aktuelle Videodatei vor dem Überschreiben und Löschen schützen. Die Notfallaufzeichnung wird automatisch aktiviert, wenn der G-Sensor auslöst (plötzliche Beschleunigung / Verzögerung) oder an einem Kollisionspunkt. Die Notfallaufzeichnung wird automatisch gesperrt, um ein Löschen während der Schleifenaufzeichnung zu vermeiden.
-
Página 42: Aufnahme Und Wiedergabe
AUFNAHME UND WIEDERGABE Wiedergabe (stellen Sie sicher, dass die Dashcam-Aufnahme gestoppt wurde). • Halten Sie im Standby-Modus die MENU-Taste gedrückt, um zwischen Video & Foto zu wechseln Video- und Fotomodus. • Wählen Sie die anzuzeigende Datei mit den Tasten Auf / Ab und Bestätigen aus. -
Página 43: Dateien Löschen
DATEIEN LÖSCHEN Drücken Sie die Menütaste, um das Untermenü aufzurufen (stellen sicher, dass die Dashcam-Aufzeichnung gestoppt wurde). Wählen Sie mit den Auf- / Ab-Tasten Löschen und drücken Sie die Aufnahmetaste. Wählen Sie die Option zum Löschen aller Dateien / einer Datei und bestätigen Sie Ihre Auswahl, indem Sie den Anweisungen auf dem Display folgen. -
Página 44: Allgemeine Einstellungen
ALLGEMEINE EINSTELLUNGEN Um auf die allgemeinen Einstellungen zuzugreifen, drücken Sie einmal die Menütaste auf dem Startbildschirm. Videoauflösung: Wählen Sie die gewünschte Option aus (die höchste Option bietet die optimale Anzeigeleistung). Loop-Aufnahme: 3 oder 5 Minuten G-Sensor: AUS / NIEDRIG / MITTEL / HOCH Nachtsicht: AUS / EIN / AUTO Audio aufnehmen: AUS / EIN Datumsstempel: AUS / EIN... -
Página 45: Erweiterte Einstellungen
ERWEITERTE EINSTELLUNGEN Um auf die erweiterten Einstellungen zuzugreifen, drücken Sie zweimal die Menütaste auf dem Startbildschirm. WiFi: AUS / EIN Datum / Uhrzeit: Stellen Sie das richtige Datum und die richtige Uhrzeit ein. Sprache: Wählen Sie die bevorzugte Sprache aus der Liste aus. Plattennummer: AUS / EIN Bildschirmschoner: AUS / EIN Tastenton: AUS / EIN... - Página 46 ERWEITERTE EINSTELLUNGEN Version: Zeigt die installierte Firmware- Version an und wo Updates erhältlich sind. Standardeinstellung: Setzen Sie die Kamera auf ihre ursprüngliche Konfiguration zurück.
- Página 47 KENNZEICHENSCHILD Bei Auswahl von EIN werden Sie aufgefordert, Ihr Kennzeichen einzugeben. Das Kennzeichen wird auf Ihrer Aufnahme angezeigt.
- Página 48 FAQs MENÜ In der APP: Um auf das FAQ-Menü zuzugreifen, drücken Sie auf das Dropdown-Menü und wählen Sie FAQs. Wischen Sie nach oben oder unten, um alle häufig gestellten Fragen anzuzeigen.
- Página 49 FEHLER BEI FOTOGRAFIE / VIDEOAUFNAHME Überprüfen Sie, ob auf der Micro-SD-Karte genügend freier Speicherplatz vorhanden ist. DIE AUFNAHME WURDE GESTOPPT Zu viele Videodateien gespeichert. Verwenden Sie mindestens U1-Hochgeschwindigkeits- Micro-SD-Karten der Klasse 10 von bewährten Herstellern. Wenn Sie versuchen, ein Foto anzuzeigen / eine Videodatei abzuspielen, wird die Meldung "Falsche Datei"...
- Página 50 AUFGEHÄNGT (KEIN BILD, KEINE TASTENANTWORT) Drücken Sie die RESET-Taste, um das Gerät neu zu starten. MicroSD-Karte wird bei Verwendung in der Dashcam ROADsight 20 nicht erkannt. Bitte formatieren Sie die Karte * ** Stellen Sie sicher, dass die MicroSD-Karten korrekt in die Dashcam eingesetzt sind Drücken Sie zweimal die Menütaste, um das Einstellungsmenü...
- Página 51 FIRMWARE WIRD AKTUALISIERT Laden Sie die Firmware-Datei unter Dashcam Support | herunter OSRAM Automotive extrahieren Sie die Datei aus dem Archiv auf den Computer und entpacken Sie sie. Stellen Sie sicher, dass Ihre MicroSD-Karte formatiert wurde. Kopieren Sie die Firmware-Datei (.bin) auf Ihre MicroSD-Karte.
- Página 52 FUNKTIONEN 1440p 140° ≤128 GB* ≤20HRS** Wi-Fi GPS ROADsight 1080p 130° ≤32 GB* ≤6HRS** Wi-Fi ROADsight 1080p 120° ≤32 GB* ≤3HRS** ROADsight * Full HD bei 30 FPS. ** Maximale Aufnahmezeit abhängig von Bildschirmauflösung, Speicherkartengröße und rückseitigem Kameraaufsatz.
- Página 53 ANFORDERUNGEN AN DAS STROMNETZ ACHTUNG! Wenn kein externer Stromeingang vorhanden ist, kann der Akku die Aufnahme für längere Zeit nicht unterstützen. Stellen Sie bitte sicher, dass die Stromversorgung bei der Aufnahme angeschlossen ist. Eingangsspannung: 5 V DC, 1,5 A. Ladeeingangsspannung: 12-24V DC Mini-USB-Anschluss für die Stromversorgung BETRIEBSTEMPERATUREN (alle Modelle)
- Página 54 BITTE RECYCELN SIE IHRE VERBRAUCHTEN BATTERIEN Batterien sollten nicht im unsortierten Siedlungsabfall entsorgt, sondern separat gesam- melt werden, um die korrekte Behandlung und das Recycling der enthaltenen Stoffe zu ermöglichen. Das Recycling von Batterien gewährleistet die Rückgewinnung dieser wert- vollen Materialien und verhindert potenziell schädliche Auswirkungen auf die Umwelt und die menschliche Gesundheit.
- Página 55 ROADsight Caméra de bord HD 1080p connectée au téléphone portable Français...
- Página 56 MISE EN GARDE Les exigences et la législation particulières individuelles des pays doivent être respectées, notamment en ce qui concerne la durée des enregistrements/l'utilisation et le transfert des données. Veuillez vous familiariser avec les lois sur la protection des données de votre pays et assurez-vous de les respecter. Veuillez également vous familiariser et vous conformer aux lois et réglementations en vigueur concernant l'utilisation et la proprié- té...
-
Página 57: Avant De Commencer
AVANT DE COMMENCER Si vous n'avez pas encore téléchargé l'application, faites- le maintenant pour tirer le meilleur parti de votre caméra de bord. Téléchargez l'application en recherchant OSRAMconnect dans l'App Store (iPhone) ou Google Play (Android). Ouvrez l'application, suivez le processus de configuration indiqué... -
Página 58: Contenu De L'EMballage
CONTENU DE L'EMBALLAGE Caméra de bord Guide de démarrage rapide Fixation magnétique Câble de chargement Outil de retrait de garniture Autocollant de fenêtre... - Página 59 ATTENTION ! Choisissez à l'avance l'emplacement d'installation, car le ruban adhésif sur la fixation est à usage unique. Assurez-vous que le verre est exempt de saleté, de poussière et de graisse. Chauffez la partie du tampon adhésif de la fixation dans les mains pour assurer une forte adhérence au verre.
- Página 60 Pour alimenter l'appareil et charger la batterie, utilisez uniquement l'adaptateur secteur inclus. Connectez le câble d'alimentation à la fixation, puis branchez le chargeur USB dans la prise d'alimentation 12 V du véhicule. Lorsque le moteur du véhicule démarre, l'appareil s'allume automatiquement.
- Página 61 RÉGLAGE DE L'ANGLE DE VUE ATTENTION ! Le réglage de l'angle de vue ne peut être effectué que le long de l'axe vertical, assurez-vous donc de positionner correctement l'appareil sur le pare- brise le long de l'axe horizontal aussi près que possible du centre du pare-brise. Tout en tirant ou en poussant l'appareil dans le support, assurez-vous que la caméra capture l'image dans des proportions de 30 % ciel / 70 % route.
- Página 62 CONNEXION AU TÉLÉPHONE PORTABLE Maintenez le bouton d'alimentation enfoncé sur l'interrupteur de la caméra de bord. Appuyez sur la flèche HAUT pendant 3 secondes pour ouvrir l' écran de détails Wi-Fi hotspot. Ouvrez les paramètres de votre téléphone. Appuyez sur Wi-Fi ou Connexions.
- Página 63 CONFIGURATION Bouton d'alimentation : appuyez pour allumer l'appareil. Maintenez cette touche enfoncée pour allumer ou éteindre l’appareil. Bouton Menu : utilisez ce bouton pour basculer entre la vidéo, la photo et la lecture. Appuyez sur ce bouton pendant l'enregistrement pour prendre une photo. Bouton Haut ...
-
Página 64: Mode Photo
MODE PHOTO Arrêtez l'enregistrement, puis appuyez sur le bouton Menu et maintenez-le enfoncé pendant 2 secondes pour accéder au mode photo. Appuyez sur Rec pour capturer l'image. MODE LECTURE En mode photo, appuyez sur le bouton Menu et maintenez-le enfoncé pendant 2 secondes pour accéder au mode Lecture. -
Página 65: Installation De La Carte Microsd
INSTALLATION DE LA CARTE microSD Avant d'installer une carte mémoire, assurez-vous que l'appareil est éteint. Insérez la carte mémoire jusqu'à ce qu'elle s'enclenche. Retrait d'une carte : appuyez légèrement sur la carte , puis retirez- la de son emplacement. AVERTISSEMENT ! N'appliquez pas de force excessive lors de l'insertion d'une carte mémoire pour éviter d'endommager l'appareil. - Página 66 ALLUMER / ÉTEINDRE • Lorsque le contact du véhicule est mis sur ON, la caméra de bord s’allume automatiquement. • Pour allumer l'appareil manuellement, appuyez sur le bouton d'alimentation. • Pour éteindre l'appareil, maintenez le bouton d'alimentation enfoncé pendant env. 3 secondes.
-
Página 67: Enregistrement En Boucle
ENREGISTREMENT EN BOUCLE Insérez la carte microSD dans la fente pour carte mémoire ; le mode d'enregistrement en boucle est réglé sur 3 minutes par défaut. Lorsque la mémoire de la carte mémoire est pleine, l'appareil remplace automatiquement le fichier vidéo le plus ancien par le plus récent ;... - Página 68 ENREGISTREMENT D'URGENCE L'enregistrement d'urgence sert à protéger le fichier vidéo actuel contre l'écrasement et la suppression. L'enregistrement d'urgence est activé automatiquement lorsque le capteur G se déclenche (accélération /décélération soudaine), ou à un point de collision. L'enregistrement d'urgence verrouillé automatiquement pour éviter l'effacement pendant l'enregistrement en boucle.
- Página 69 LECTURE D'ENREGISTREMENT Lecture (assurez-vous que l'enregistrement de la caméra de bord est arrêté). • En mode veille, maintenez le bouton MENU enfoncé pour basculer entre Vidéo et Photo. Mode vidéo et photo. • Sélectionnez le fichier à visualiser à l'aide des boutons Haut/Bas et Confirmer.
-
Página 70: Supprimer Des Fichiers
SUPPRIMER DES FICHIERS Appuyez sur le bouton Menu pour accéder au sous-menu (assurez-vous que l'enregistrement de la caméra de bord est arrêté). Utilisez les boutons Haut/Bas pour sélectionner Supprimer et appuyez sur le bouton Rec. Sélectionnez l'option permettant de supprimer tous les fi chiers / un fichier, puis confirmez votre choix en suivant les instructions à... -
Página 71: Paramètres Généraux
PARAMÈTRES GÉNÉRAUX Pour accéder aux paramètres généraux, appuyez une fois sur le bouton Menu depuis l'écran d'accueil. Résolution vidéo : sélectionnez l'option requise (l'option la plus élevée offre des performances de visualisation optimales). Enregistrement en boucle : 3 ou 5 minutes Capteur G : OFF / LOW / MEDIUM / HIGH Vision nocturne : OFF / ON / AUTO Enregistrement audio : OFF / ON... -
Página 72: Paramètres Avancés
PARAMÈTRES AVANCÉS Pour accéder aux paramètres avancés, appuyez deux fois sur le bouton Menu depuis l'écran d'accueil. WiFi : OFF / ON Date / Heure : réglez la date et l'heure correctes. Langue : sélectionnez la langue de menu préférée dans la liste. Numéro de plaque d'immatriculation : OFF / ON Économiseur d'écran : OFF / ON... - Página 73 PARAMÈTRES AVANCÉS Version : affiche la version du micrologiciel installé et où obtenir les mises à jour. Réglages par défaut : réinitialisez la caméra à sa configuration d'origine.
-
Página 74: Plaque D'IMmatriculation
PLAQUE D'IMMATRICULATION En sélectionnant ON, vous serez invité à entrer votre numéro de plaque d'immatriculation. Le numéro de plaque d'immatriculation s'affichera sur votre enregistrement. - Página 75 MENU FAQ Par le biais de l’application : Pour accéder au menu FAQ, appuyez sur le menu déroulant et sélectionnez FAQ. Faites glisser votre doigt vers le haut ou vers le bas pour afficher toutes les questions fréquemment posées.
-
Página 76: Échec De La Photographie / Enregistrement De La Vidéo
ÉCHEC DE LA PHOTOGRAPHIE / ENREGISTREMENT DE LA VIDÉO Vérifiez s'il y a suffisamment d'espace libre sur la carte micro SD. L'ENREGISTREMENT S'EST ARRÊTÉ Trop de fichiers vidéo stockés. N'utilisez qu'au moins des cartes micro SD haute vitesse de classe 10 U1 de fabricants reconnus. Lorsque vous essayez de visualiser une photo/lire un fichier vidéo, le message « Mauvais fichier »... - Página 77 SUSPENDRE (PAS D'IMAGE, PAS DE RÉPONSE DE BOUTON) Appuyez sur le bouton RESET pour redémarrer l'appareil. Carte MicroSD non reconnue lorsqu'elle est utilisée dans la caméra de bord ROADsight 30, veuillez formater la carte * ** Assurez-vous que les cartes MicroSD sont correctement insérées dans la caméra de bord Appuyez deux fois sur le bouton de menu pour accéder au menu des paramètres À...
-
Página 78: Mise À Jour Du Micrologiciel
MISE À JOUR DU MICROLOGICIEL Téléchargez le micrologiciel sur Dashcam Support | OSRAM Automotive et extrayez le fichier de l'archive sur l'ordinateur et décompressez. Assurez-vous que votre carte MicroSD a été formatée. Copiez le fichier du micrologiciel (.bin) sur votre carte MicroSD. - Página 79 CARACTÉRISTIQUES 1440p 140° ≤128 GB* ≤20HRS** Wi-Fi GPS ROADsight 1080p 130° ≤32 GB* ≤6HRS** Wi-Fi ROADsight 1080p 120° ≤32 GB* ≤3HRS** ROADsight * Full HD à 30 FPS. ** La durée d'enregistrement maximale dépend de la résolution de l'écran, de la taille de la carte mémoire et de la fixation de la caméra arrière.
-
Página 80: Exigences De Puissance
EXIGENCES DE PUISSANCE ATTENTION ! Une fois qu'il n'y a pas d'entrée d'alimentation externe, la batterie ne peut pas prendre en charge l'enregistrement pendant une longue période, veuillez vous assurer que l'alimentation est connectée lors de l'enregistrement. Tension d'entrée : 5 V CC, 1,5 A Tension d'entrée de charge : 12-24 V CC Connexion mini USB pour l'alimentation TEMPÉRATURES DE FONCTIONNEMENT... - Página 81 VEUILLEZ RECYCLER VOS BATTERIES USÉES Les batteries ne doivent pas être jetées dans les déchets municipaux non triés, mais collectées séparément pour faciliter le traitement et le recyclage corrects des substances qu'elles contiennent. Le recyclage des batteries assure la récupération de ces matériaux précieux et évite tout effet potentiellement nocif sur l'environnement et la santé...
- Página 82 ROADsight Dashcam HD 1080p con conexión móvil Español...
- Página 83 ATENCIÓN Deben respetarse los requisitos especiales y la ley de cada país, especialmente en lo relativo a la duración de los registros/uso y la transferencia de datos. Familiarícese con las leyes de protección de datos de su país y asegúrese de cumplirlas. Además, familiarícese y cumpla con las leyes y reglamentos correspondientes sobre el uso y la propiedad de las cámaras de salpicadero («dashcams») en su país.
-
Página 84: Antes De Comenzar
ANTES DE COMENZAR Si aún no ha descargado la aplicación, hágalo ahora para sacar el máximo partido a su cámara de salpicadero. Descargue la aplicación buscando OSRAMconnect en la App Store (iPhone) o en Google Play (Android). Abra la aplicación, siga el proceso de configuración mostrado y active todos los ajustes necesarios cuando se le solicite. -
Página 85: Contenido Del Paquete
CONTENIDO DEL PAQUETE Cámara de salpicadero Guía de inicio rápido Montaje magnético Cable de carga USB Herramienta para tapicería Etiqueta de la ventana... - Página 86 ¡ATENCIÓN! Elija el lugar de instalación con antelación, ya que la cinta adhesiva de la montura es de un solo uso. Asegúrese de que el cristal no tenga suciedad, polvo y grasa. Caliente la parte de la almohadilla adhesiva con las manos para asegurar una sólida adhesión al cristal.
- Página 87 Para alimentar el dispositivo y cargar la batería, utilice únicamente el adaptador de corriente incluido. Conecte el cable de alimentación al soporte y, a continuación, conecte el cargador USB a la toma de corriente de 12 V del vehículo. Cuando el motor del vehículo se pone en marcha, el dispositivo se enciende automáticamente.
-
Página 88: Ajuste Del Ángulo De Visión
AJUSTE DEL ÁNGULO DE VISIÓN ¡ATENCIÓN! El ajuste del ángulo de visión solo puede hacerse a lo largo del eje vertical, por lo que debe asegurarse de colocar el dispositivo correctamente en el parabrisas a lo largo del eje horizontal, lo más cerca posible del centro del parabrisas. -
Página 89: Conexión Con El Móvil
CONEXIÓN CON EL MÓVIL Mantenga pulsado el botón de encendido para encender la cámara de salpicadero. Pulse ARRIBA durante 3 segundos para abrir la pantalla de detalles del punto de acceso wifi. Abra los Ajustes del teléfono. Pulse Wifi o Conexiones. Seleccione el punto de acceso de la cámara e introduce la contraseña... - Página 90 AJUSTES Botón de encendido: púlselo para encender el dispositivo. Manténgalo pulsado para apagar el dispositivo. Botón de menú: use este botón para cambiar entre los modos vídeo, foto y reproducción. Presione este botón durante la grabación para hacer una foto. Botón Arriba: púlselo para desplazarse hacia arriba en el menú.
-
Página 91: Modo De Reproducción
MODO FOTO Detenga la grabación y mantenga pulsado el botón de Menú durante 2 segundos para entrar en el modo de fotografía. Presione Rec para capturar la imagen. MODO DE REPRODUCCIÓN En el Modo Foto, mantenga pulsado el botón de menú durante 2 segundos para acceder al Modo de Reproducción. -
Página 92: Instalación De La Tarjeta Microsd
INSTALACIÓN DE LA TARJETA microSD Antes de instalar una tarjeta de memoria, asegúrese de que el dispositivo está apagado. Inserte la tarjeta de memoria hasta que encaje en su sitio. Extracción de la tarjeta: presione ligeramente la tarjeta y luego retírela de la ranura. - Página 93 ENCENDIDO / APAGADO • Cuando el vehículo se pone en marcha, la cámara de salpicadero se enciende automáticamente. • Para encender el dispositivo manualmente, pulse el botón de encendido. • Para apagar el dispositivo, mantenga pulsado el botón de encendido durante unos 3 segundos.
-
Página 94: Grabación En Bucle
GRABACIÓN EN BUCLE Inserta la tarjeta microSD en la ranura para tarjetas de memoria; el modo de Grabación en bucle está ajustado a 3 minutos por defecto. Cuando el almacenamiento de la tarjeta de memoria esté lleno, el dispositivo sustituirá automáticamente el archivo de vídeo más antiguo por el más nuevo;... -
Página 95: Grabación De Emergencia
GRABACIÓN DE EMERGENCIA La grabación de emergencia tiene el propósito de evitar que el archivo de vídeo actual se sobrescriba y se borre. La grabación de emergencia se activa automáticamente cuando se dispara el sensor G (aceleración repentina / deceleración) o en el momento de colisión. -
Página 96: Reproducción De Grabación
REPRODUCCIÓN DE GRABACIÓN Reproducción (asegúrese de que la grabación de la cámara de salpicadero se haya detenido). • En el modo standby, mantenga pulsado el botón MENÚ para cambiar entre Vídeo y Foto. Modo Vídeo y Foto. • Seleccione el archivo que desea ver utilizando los botones Arriba / Abajo y Confirmar. -
Página 97: Eliminar Archivos
ELIMINAR ARCHIVOS Pulse el botón Menú para entrar en el submenú (asegúrese de que la grabación de la cámara de salpicadero se ha detenido). Utilice los botones Arriba/Abajo para seleccionar Borrar y pulse el botón Rec. Seleccione la opción de borrar todos los archivos / un solo archivo y, a continuación, confirme su elección siguiendo las instrucciones que aparecen en la pantalla. -
Página 98: Ajustes Generales
AJUSTES GENERALES Para acceder a los Ajustes Generales, pulse el botón Menú una vez desde la pantalla de Inicio. Resolución del vídeo: seleccione la opción deseada (la opción situada más arriba proporciona un rendimiento de visualización óptimo). Grabación en bucle: 3 o 5 minutos Sensor G: APAGADO / BAJO / MEDIO / ALTO Visión nocturna: APAGADO / ENCENDIDO / AUTO... -
Página 99: Ajustes Avanzados
AJUSTES AVANZADOS Para acceder a los Ajustes Avanzados, pulse dos veces el botón de Menú desde la pantalla de Inicio. Wifi: APAGADO / ENCENDIDO Fecha / Hora: ajuste la fecha y la hora correctas. Idioma: seleccione el idioma de menú preferido de la lista. - Página 100 AJUSTES AVANZADOS Versión: muestra la versión de firmware instalada y dónde obtener actualizaciones. Ajustes predeterminados: restablezca los ajustes originales de la cámara.
- Página 101 MATRÍCULA Al elegir ENCENDIDO, se le pedirá que introduzca su número de matrícula. El número de matrícula aparecerá en su grabación.
-
Página 102: Menú De Preguntas Frecuentes
MENÚ DE PREGUNTAS FRECUENTES En la aplicación: Para acceder al Menú de Preguntas frecuentes, pulse el menú desplegable y seleccione Preguntas frecuentes. Deslice el dedo hacia arriba o hacia abajo para ver todas las preguntas frecuentes. -
Página 103: Problemas Al Hacer Fotos / Grabar Vídeos
PROBLEMAS AL HACER FOTOS / GRABAR VÍDEOS Compruebe si hay suficiente espacio libre en la tarjeta micro SD. LA GRABACIÓN SE HA DETENIDO Demasiados archivos de vídeo almacenados. Utilice solo tarjetas micro SD de alta velocidad como mínimo de clase 10 U1 de fabricantes reconocidos. Cuando intenta ver una foto/reproducir un archivo de vídeo, aparece el mensaje «archivo incorrecto». - Página 104 SE CUELGA (NO HAY IMAGEN, LOS BOTONES NO RESPONDEN) Presione el botón RESET para reiniciar el dispositivo. El sistema no reconoce la tarjeta MicroSD cuando se utiliza en la cámara de salpicadero ROADsight 30: formatee la tarjeta * ** Asegúrese de que las tarjetas MicroSD se insertan correctamente en la cámara de salpicadero Pulse el botón de menú...
-
Página 105: Actualización De Firmware
ACTUALIZACIÓN DE FIRMWARE Descargue el archivo de firmware en Dashcam Support | OSRAM Automotive, extraiga el fichero del archivo en el ordenador y descomprímalo. Asegúrese de que su tarjeta MicroSD esté formateada. Copie el archivo de firmware (.bin) en su tarjeta MicroSD. -
Página 106: Características
CARACTERÍSTICAS 1440p 140° ≤128 GB* ≤20HRS** Wi-Fi GPS ROADsight 1080p 130° ≤32 GB* ≤6HRS** Wi-Fi ROADsight 1080p 120° ≤32 GB* ≤3HRS** ROADsight * Full HD a 30 FPS. ** El tiempo máximo de grabación depende de la resolución de la pantalla, el tamaño de la tarjeta de memoria y el montaje de la cámara trasera. -
Página 107: Requisitos De Energía
REQUISITOS DE ENERGÍA ¡ATENCIÓN! Cuando no hay entrada de energía externa, la batería no puede soportar la grabación durante mucho tiempo. Asegúrese de que la fuente de alimentación está conectada cuando grabe. Voltaje de entrada: 5 V CC, 1,5 A Voltaje de entrada de carga: 12-24 V CC Conexión mini USB para alimentación TEMPERATURAS DE FUNCIONAMIENTO... -
Página 108: Recicle Las Pilas Gastadas
RECICLE LAS PILAS GASTADAS Las pilas no deben depositarse en la basura municipal sin clasificar, sino que deben recogerse por separado para facilitar el correcto tratamiento y reciclaje de las sustancias que contienen. El reciclaje de las pilas garantiza la recuperación de estos valiosos materiales y evita cualquier efecto potencialmente perjudicial tanto para el medioambiente como para la salud humana. - Página 109 ROADsight Dashcam HD 1080p con connessione mobile Italiano...
- Página 110 AVVERTENZA Devono essere osservati i requisiti speciali individuali e la legislazione dei paesi, in particolare per quan- to riguarda la durata della registrazione/l'utilizzo e il trasferimento dei dati. Acquisire familiarità con le leggi sulla protezione dei dati del proprio paese e assicurarsi di rispettarle. Si prega inoltre di acquisire familiarità...
-
Página 111: Prima Di Iniziare
PRIMA DI INIZIARE Se non si è già scaricata l'app, farlo ora per ottenere il massimo dalla dashcam. Scaricare l'app cercando OSRAMconnect nell'App Store (iPhone) o in Google Play (Android). Aprire l'app, seguire la procedura di configurazione mostrata e abilitare tutte le impostazioni necessarie quando richiesto. -
Página 112: Contenuto Della Confezione
CONTENUTO DELLA CONFEZIONE Dashcam Guida rapida per iniziare Supporto magnetico Cavo di ricarica Strumento di rimozione del rivestimento Adesivo per finestrino... - Página 113 ATTENZIONE! Scegliere in anticipo la posizione di installazione, poiché il na- stro adesivo sul supporto è monouso. Assicurarsi che il vetro sia privo di sporco, polvere e grasso. Riscaldare con le mani la parte di adesivo del supporto per garantire una forte ade- sione al vetro.
- Página 114 Per alimentare il dispositivo e caricare la batteria, utilizzare solo l'adattatore di alimenta- zione incluso. Collegare il cavo di alimentazione al supporto, quindi collegare il caricatore USB alla presa di alimentazione a 12V del veicolo. Quando il motore del veicolo si avvia, il dispositivo si accende automaticamente.
- Página 115 REGOLAZIONE DELL'ANGOLO DI VISIONE ATTENZIONE! La regolazione dell'angolo di visione può essere eseguita solo lun- go l'asse verticale, quindi assicurarsi di posizionare correttamente il dispositivo sul parabrezza lungo l'asse orizzontale il più vicino possibile al centro del parabrezza. Mentre si tira o si spinge il dispositivo nel ritegno, assicurarsi che la fotocamera acquisisca l'immagine in proporzioni del 30% di cielo /70% di strada.
-
Página 116: Connessione Con Il Cellulare
CONNESSIONE CON IL CELLULARE Tenere premuto il pulsante di ali- mentazione per accendere la da- shcamera. Premere la freccia SU per 3 secondi per aprire la schermata dei dettagli dell'hotspot Wi-Fi. Aprire le Impostazioni del telefono. Toccare Wi-Fi o Connessioni. Selezionare l'hotspot della dashcam e immettere la password visualizzata sulla dashcam. - Página 117 CONFIGURAZIONE Pulsante di accensione: premere per accendere il dispositivo. Tenere premuto per spegnere il dispositivo. Pulsante Menu: utilizzare questo pulsante per alternare tra video, foto e riproduzio- ne. Premere questo pulsante durante la registrazione per scattare una foto. Pulsante su: premere per spostarsi in alto nel menu. In modalità VIDEO e FOTO, te- nere premuto per ingrandire;...
-
Página 118: Modalità Foto
MODALITÀ FOTO Interrompere la registrazione e quindi tenere premuto il pulsante Menu per 2 secondi per accedere alla modalità foto. Premere Rec per acquisire l'immagine. MODALITÀ DI RIPRODUZIONE In modalità foto, tenere premuto il pulsante Menu per 2 secondi per accedere alla modalità... -
Página 119: Installazione Della Scheda Microsd
INSTALLAZIONE DELLA SCHEDA microSD Prima di installare una scheda di me- moria, assicurarsi che il dispositivo sia spento. Inserire la scheda di memoria finché non scatta in posizione. Rimozione di una scheda: premere leg- germente la scheda e quindi rimuover- la dallo slot. - Página 120 ACCENSIONE / SPEGNIMENTO • Quando si porta su ON il blocchetto di accensione del veicolo, la dashcam si accende automaticamente. • Per accendere manualmente il disposi- tivo, premere il pulsante di accensione. • Per spegnere il dispositivo, tenere pre- muto il pulsante di accensione per ca. 3 secondi.
- Página 121 REGISTRAZIONE IN LOOP Inserire la scheda microSD nello slot del- la scheda di memoria; la modalità di registrazione in loop è impostata su 3 minuti come impostazione predefinita. Quando la memoria della scheda di memoria sarà piena, il dispositivo so- stituirà...
- Página 122 REGISTRAZIONE DI EMERGENZA La registrazione di emergenza serve a proteggere il file video corrente dalla sovrascrittura e dall'eliminazione. La registrazione di emergenza viene attivata automaticamente quando il sensore G si attiva (accelerazione /de- celerazione improvvisa) o al punto di collisione. La registrazione di emergen- za viene bloccata automaticamente per evitare la cancellazione durante la regi- strazione in loop.
- Página 123 RIPRODUZIONE DELLA REGISTRAZIONE Riproduzione (assicurarsi che la registra- zione della dash cam sia stata interrotta). • In modalità standby, tenere premuto il pulsante MENU per passare da vi- deo a foto e viceversa. Modalità video e foto. • Selezionare il file da visualizzare uti- lizzando i pulsanti Su /Giù...
- Página 124 ELIMINAZIONE DEI FILE Premere il pulsante Menu per accedere al sottomenu (assicurarsi che la registrazio- ne della dashcam sia stata interrotta). Utilizzare i pulsanti Su/Giù per selezionare Elimina e premere il pulsante Rec. Selezionare l'opzione per eliminare tutti i file / un file, quindi confermare la scelta seguendo le istruzioni sul display.
-
Página 125: Impostazioni Generali
IMPOSTAZIONI GENERALI Per accedere alle Impostazioni generali, premere una volta il pulsante Menu dalla schermata Home. Risoluzione video: selezionare l'opzione richiesta (l'opzione più alta offre prestazioni di visualizzazione ottimali). Registrazione in loop: 3 o 5 minuti Sensore G: OFF / BASSO / MEDIO / ALTO Visione notturna: OFF / ON / AUTO Registrazione audio: OFF / ON Timbro data: OFF / ON... -
Página 126: Impostazioni Avanzate
IMPOSTAZIONI AVANZATE Per accedere alle Impostazioni avanzate, premere due volte il pulsante Menu dalla schermata Home. WiFi: OFF / ON Data / Ora:regolare la data e l'ora corrette. Lingua: selezionare la lingua del menu prefe- rita dall'elenco. Numero di targa: OFF / ON Salvaschermo: OFF / ON Pulsante Suono: OFF / ON Monitor di parcheggio:OFF / ON... - Página 127 IMPOSTAZIONI AVANZATE Versione: mostra la versione del firmware installato e dove ottenere gli aggiornamenti. Impostazioni predefinite: ripristina la con- figurazione originale della fotocamera.
- Página 128 TARGA Se si sceglie ON, verrà chiesto di inserire il proprio numero di targa. Il numero di targa verrà visualizzato sulla registrazione.
- Página 129 MENU FAQ Nell'App: Per accedere al menu delle domande frequenti, premere il menu a discesa e selezionare FAQ. Scorrere verso l'alto o verso il basso per visualizzare tutte le domande fre- quenti più comuni.
- Página 130 MANCATA FOTOGRAFIA / REGISTRAZIONE VIDEO Controllare se c'è abbastanza spazio libero sulla scheda microSD. LA REGISTRAZIONE È STATA INTERROTTA Troppi file video memorizzati. Utilizzare solo schede microSD ad alta velocità che siano almeno di classe 10 U1 di produttori affermati. Quando si tenta di visualizzare una foto/riprodurre un file video, viene visualizzato il messaggio "file sbagliato".
- Página 131 CHIUDI CHIAMATA (NESSUNA IMMAGINE, NESSUNA RISPOSTA DEI PULSANTI) Premere il pulsante RESET per riavviare il dispositivo. Scheda MicroSD non riconosciuta se utilizzata nella dash cam ROADsight 30, formattare la scheda * ** Verificare che le schede MicroSD siano inserite correttamente nella dashcam Premere due volte il pulsante menu per accedere al menu delle impostazioni Utilizzando i pulsanti SU e GIÙ...
-
Página 132: Aggiornamento Del Firmware
AGGIORNAMENTO DEL FIRMWARE Scaricare il file del firmware da Dashcam Support | OSRAM Automotive, estrarre il file dall'archivio sul computer e decomprimerlo. Assicurarsi che la scheda MicroSD sia stata formattata. Copiare il file del firmware (.bin) sulla scheda MicroSD. Inserire la scheda MicroSD con il file scaricato nello slot della scheda di memoria della dashcam. -
Página 133: Caratteristiche
CARATTERISTICHE 1440p 140° ≤128 GB* ≤20HRS** Wi-Fi GPS ROADsight 1080p 130° ≤32 GB* ≤6HRS** Wi-Fi ROADsight 1080p 120° ≤32 GB* ≤3HRS** ROADsight * Full HD a 30 FPS. ** Il tempo di registrazione massimo dipende dalla risoluzione dello schermo, dalle dimen- sioni della scheda di memoria e dal collegamento della fotocamera posteriore. -
Página 134: Requisiti Di Alimentazione
REQUISITI DI ALIMENTAZIONE ATTENZIONE! Se non è presente un'alimentazione esterna, la batteria non può supportare la registrazione per un lungo periodo, assicurarsi che l'alimentazione sia collegata durante la registrazione. Tensione di ingresso: 5 V CC, 1,5 A. Tensione di ingresso di ricarica: 12-24 V CC Connessione mini USB per l'alimentazione TEMPERATURE DI FUNZIONAMENTO (tutti i modelli) - Página 135 RICICLARE LE BATTERIE USATE Le batterie non devono essere smaltite nei rifiuti urbani indifferenziati, ma raccolte separa- tamente per facilitare il corretto trattamento e riciclaggio delle sostanze in esse contenute. Il riciclaggio delle batterie garantisce il recupero di questi preziosi materiali e previene even- tuali effetti potenzialmente dannosi sia sull'ambiente che sulla salute umana.
- Página 136 ROADsight Mobiel verbonden Dashcam HD 1080p Dutch...
- Página 137 WAARSCHUWING Individuele speciale vereisten en wetgeving van de landen moeten in acht worden genomen, vooral met be- trekking tot de duur van de registratie/het gebruik en de overdracht van gegevens. Maak uzelf vertrouwd met de gegevensbeschermingswetten van uw land en zorg ervoor dat u deze naleeft. Maak uzelf ook vertrouwd met en houd u aan de relevante wet- en regelgeving met betrekking tot het gebruik en eigendom van dash- camera's in uw land.
-
Página 138: Voordat U Begint
VOORDAT U BEGINT Als u de app nog niet hebt gedownload, doe dit dan nu om het meeste uit uw dashcamera te halen. Download de app door te zoeken naar OSRAMconnect in de App Store (iPhone) of Google Play (Android). Open de app, volg het getoonde installatieproces en schakel alle benodigde instellingen in wanneer daarom wordt gevraagd. -
Página 139: Inhoud Van De Verpakking
INHOUD VAN DE VERPAKKING Dashcam Snelstartgids Magnetische houder USB-oplaadkabel Gereedschap voor het verwijderen van afwerkstukjes Raamsticker... - Página 140 LET OP! Kies van tevoren de montageplaats, want de plaktape op de houder is voor eenmalig gebruik. Zorg ervoor dat het glas vuil-, stof- en vetvrij is. Warm zelfklevend kussentje van de houder in de handen dient om een sterke hechting op glas te garanderen.
- Página 141 Gebruik alleen de meegeleverde voedingsadapter om het apparaat van stroom te voorzien en de batterij op te laden. Sluit de voedingskabel aan op de houder en sluit de USB- oplader aan op de 12V-aansluiting van de auto. Wanneer de motor van het voertuig start, wordt het apparaat automatisch ingeschakeld.
-
Página 142: De Kijkhoek Aanpassen
DE KIJKHOEK AANPASSEN LET OP! Het aanpassen van de kijkhoek is alleen mogelijk langs de verticale as, dus zorg ervoor dat u het apparaat correct op de voorruit plaatst langs de horizontale as, zo dicht mogelijk bij het midden van de voorruit. Terwijl u het apparaat in de houder trekt of duwt, moet u ervoor zorgen dat de camera het beeld vastlegt in een verhouding van 30% lucht / 70% weg. - Página 143 MET MOBIEL VERBINDEN Houd de aan / uit-knop ingedrukt om de dashboardcamera in te schakelen. Druk gedurende 3 seconden op de pijl OMHOOG om het Gegevenssscherm van de wifihotspot te openen. Open de Instellingen van uw telefoon. Tik op wifi of verbindingen. Selecteer de hotspot van de dashcamera en voer het wachtwoord in dat wordt weergegeven...
- Página 144 CONFIGURATIE Aan/uit-knop: Druk om het apparaat in te schakelen. Houd ingedrukt om het apparaat uit te schakelen. Menu-knop: Gebruik deze knop om te schakelen tussen video, foto en weergave. Druk tijdens het opnemen op deze knop om een foto te maken. Omhoog-knop: Druk om omhoog te gaan in het menu.
-
Página 145: Menu-Opties
FOTOMODUS Stop de opname en houd vervolgens de menuknop 2 seconden ingedrukt om de fotomodus te openen. Druk op Rec om een foto te maken. AFSPEELMODUS Houd in de fotomodus de menuknop 2 seconden ingedrukt om de afspeelmodus te openen. Druk op de knop Omhoog en Omlaag om videoweergave of afbeeldingsviewer te kiezen. -
Página 146: De Microsd-Kaart Installeren
DE microSD-KAART INSTALLEREN Zorg ervoor apparaat uitgeschakeld voordat geheugenkaart installeert. Plaats de geheugenkaart totdat deze op zijn plaats klikt. Verwijderen van een kaart: druk licht op de kaart en verwijder deze vervolgens uit de sleuf. WAARSCHUWING! Oefen geen overmatige kracht uit bij het plaatsen van een geheugenkaart om schade aan het apparaat te voorkomen. - Página 147 IN- / UITSCHAKELEN • Wanneer het contact van het voertuig wordt ingeschakeld, wordt de dashcam automatisch ingeschakeld. • Om het apparaat handmatig in te schakelen, drukt u op de aan/uit-knop. • Om het apparaat uit te schakelen, houdt u de aan/uit-knop ongeveer 2 seconden ingedrukt.
- Página 148 LUS-OPNAME Plaats de microSD-kaart in de geheugenkaartsleuf ; de Lus- opnamemodus is standaard ingesteld op 3 minuten. Als de geheugenkaart vol is, vervangt het apparaat automatisch het oudste videobestand door het nieuwste; uitzondering zijn de bestanden die tegen verwijdering zijn beschermd.
- Página 149 NOODOPNAME Noodopname is bedoeld om te voorkomen dat het huidige videobestand wordt overschreven en verwijderd. Noodopname wordt automatisch geactiveerd wanneer de G-sensor wordt geactiveerd (bij plotselinge versnelling /vertraging) of op het moment van een botsing. Noodopname wordt automatisch vergrendeld om het wissen tijdens lus-opname te voorkomen.
- Página 150 OPNAME AFSPELEN Afspelen (zorg ervoor dat de dashcam-opname is gestopt). • Houd in de stand-bymodus de MENU-knop ingedrukt om te schakelen tussen video en foto. Video- en fotomodus. • Selecteer het bestand dat u wilt bekijken met de knoppen Omhoog/Omlaag en Bevestigen. •...
-
Página 151: Bestanden Verwijderen
BESTANDEN VERWIJDEREN Druk op de Menu-knop om het submenu te openen (zorg ervoor dat de dashcam-opname is gestopt). Gebruik de Omhoog/Omlaag-knoppen om Verwijderen te selecteren en druk op de Rec-knop. Selecteer de optie om alle bestanden/ één bestand te verwijderen en bevestig uw keuze door de instructies op het display te volgen. -
Página 152: Algemene Instellingen
ALGEMENE INSTELLINGEN Om de algemene instellingen te openen, drukt u eenmaal op de menuknop vanuit het startscherm. Videoresolutie: selecteer de gewenste optie (de hoogste optie biedt optimale kijkprestaties). Lus-opname: 3 of 5 minuten G-sensor: UIT / LAAG / GEMIDDELD / HOOG Nachtzicht: UIT / AAN / AUTO Audio opnemen: UIT / AAN Datumstempel: UIT / AAN... -
Página 153: Geavanceerde Instellingen
GEAVANCEERDE INSTELLINGEN Om toegang te krijgen tot de geavanceerde instellingen, drukt u tweemaal op de menuknop vanuit het startscherm. WiFi: UIT / AAN Datum / tijd: aanpassen voor de juiste datum en tijd. Taal: selecteer de gewenste menutaal uit de lijst. Kentekenplaat: UIT / AAN Schermbeveiliging: UIT / AAN Knopgeluid: UIT / AAN... - Página 154 GEAVANCEERDE INSTELLINGEN Versie: toont de geïnstalleerde firmwareversie en waar u updates kunt krijgen. Standaardinstelling: reset de camera naar de oorspronkelijke configuratie.
- Página 155 KENTEKENPLAAT Als u AAN kiest, wordt u gevraagd uw kentekenplaatnummer in te voeren. Het nummer op uw kentekenplaat wordt op uw opname weergegeven.
- Página 156 MENU VEELGESTELDE VRAGEN In de app: Om het menu Veelgestelde vragen te openen, drukt u op het vervolgkeuzemenu en selecteert u Veelgestelde vragen. Veeg omhoog of omlaag om alle veelgestelde vragen te zien.
-
Página 157: De Opname Is Gestopt
FOTO / VIDEO OPNEMEN MISLUKT Controleer of er voldoende vrije ruimte is op de micro SD-kaart. DE OPNAME IS GESTOPT Er zijn te veel videobestanden opgeslagen. Gebruik minimaal klasse 10 U1 high-speed micro SD-kaarten van deugdelijk gebleken producenten. Wanneer u een foto probeert te bekijken/een videobestand probeert af te spelen, wordt het bericht "verkeerde bestand"... - Página 158 VASTLOPEN VAN APPARAAT (GEEN BEELD, GEEN KNOPRESPONS) Druk op de RESET-knop om het apparaat opnieuw op te starten. MicroSD-kaart niet herkend bij gebruik in dashcam ROADsight 20. Formatteer de kaart * ** Zorg ervoor dat de MicroSD-kaarten correct in de dashcam zijn geplaatst Druk tweemaal op de menuknop om het instellingenmenu te openen Gebruik de OMHOOG- en OMLAAG-knoppen om de optie FORMATTEREN te selecteren Selecteer JA om de MicroSD-kaart te FORMATTEREN...
-
Página 159: Firmware Bijwerken
FIRMWARE BIJWERKEN Download het firmwarebestand via Dashcam Support | OSRAM Automotive en pak het bestand uit het archief op de computer en unzip het. Zorg ervoor dat uw MicroSD-kaart is geformatteerd. Kopieer het firmwarebestand (.bin) naar uw MicroSD-kaart. Plaats de MicroSD-kaart met het gedownloade bestand in de geheugenkaartsleuf van de dashcam. - Página 160 KENMERKEN 1440p 140° ≤128 GB* ≤20HRS** Wi-Fi GPS ROADsight 1080p 130° ≤32 GB* ≤6HRS** Wi-Fi ROADsight 1080p 120° ≤32 GB* ≤3HRS** ROADsight * Full HD bij 30 FPS. ** De maximale opnametijd is afhankelijk van de schermresolutie, geheugenkaartgrootte en bevestiging van de camera aan de achterzijde.
- Página 161 STROOMVEREISTEN LET OP! Als er geen externe voedingsingang is, kan de batterij lange tijd geen opname ondersteunen. Zorg ervoor dat de voeding is aangesloten tijdens het opnemen. Ingangsspanning: 5V DC, 1.5A Laadingangsspanning: 12-24V DC Mini USB-aansluiting voor stroomvoorziening BEDRIJFSTEMPERATUREN (alle modellen) Opslagtemperatuur: -20 °...
- Página 162 RECYCLE UW GEBRUIKTE BATTERIJEN Batterijen mogen niet bij het ongesorteerde huisvuil worden weggegooid, maar moeten apart worden ingezameld om de juiste behandeling en recycling van de stoffen die ze bevatten, te vergemakkelijken. Het recyclen van batterijen zorgt voor het terugwinnen van deze waardevolle materialen en voorkomt mogelijke schadelijke effecten op zowel het milieu als de menselijke gezondheid.
- Página 163 ROADsight Kamera samochodowa HD 1080 p podłączona do telefonu komórkowego Polski...
- Página 164 OSTRZEŻENIE Należy bezwzględnie przestrzegać indywidualnych, specjalnych wymagań i przepisów obowiązujących w poszczególnych krajach, szczególnie odnośnie do czasu rejestracji/użytkowania i przesyłania danych. Zapoznaj się z przepisami dotyczącymi ochrony danych w Twoim kraju i upewnij się, że się do nich ściśle stosujesz. Ponadto, zapoznaj się i przestrzegaj odpowiednich przepisów dotyczących użytkowania kamer samochodowych w Twoim kraju i praw własności w kontekście aspektów prawnych.
-
Página 165: Przed Rozpoczęciem Użytkowania
PRZED ROZPOCZĘCIEM UŻYTKOWANIA Jeśli jeszcze nie pobrałeś aplikacji, zrób to teraz, aby móc w pełni wykorzystać swoją kamerę samochodową. Pobierz aplikację, wyszukując kamerę samochodową OSRAMconnect w App Store (iPhone) lub Google Play (Android). Otwórz aplikację, postępuj zgodnie z przedstawionym procesem konfiguracji i po wyświetleniu monitu uaktywnij wszystkie niezbędne ustawienia. -
Página 166: Zawartość Zestawu
ZAWARTOŚĆ ZESTAWU Kamera samochodowa Skrócona instrukcja obsługi Uchwyt magnetyczny Przewód USB do ładowania Narzędzie do usuwania zadziorów Naklejka na szybę... - Página 167 UWAGA! Wybierz wcześniej miejsce instalacji, ponieważ taśma klejąca na uchwycie jest przeznaczona tylko do jednorazowego użytku. Upewnij się, że szyba jest wolna od brudu, kurzu i tłuszczu. Ogrzej w dłoniach samoprzylepną część uchwytu, aby zapewnić jego mocne przyleganie do szkła. Po zamocowaniu uchwytu podłącz kamerę...
- Página 168 Do zasilania urządzenia i ładowania baterii używaj wyłącznie dołączonego do niego zasilacza. Podłącz przewód zasilający do uchwytu, a następnie podłącz ładowarkę USB do gniazda zapalniczki 12 V pojazdu. Urządzenie włącza się automatycznie w momencie uruchomienia silnika pojazdu.
- Página 169 REGULACJA KĄTA WIDZENIA UWAGA! Regulację kąta widzenia można przeprowadzić tylko wzdłuż osi pionowej, dlatego musisz prawidłowo ustawić urządzenie na przedniej szybie wzdłuż osi poziomej, jak najbliżej środka szyby. Pociągając lub popychając urządzenie w uchwycie upewnij się, że kamera rejestruje obraz w proporcji: 30% nieba / 70% drogi. Dobrze Źle...
- Página 170 ŁĄCZENIE Z TELEFONEM KOMÓRKOWYM Aby włączyć kamerę samochodową przytrzymaj przycisk zasilania. Przez 3 sekundy naciskaj strzałkę W GÓRĘ, aby otworzyć ekran szczegółów punktów aktywnych Wi-Fi. Otwórz ustawienia telefonu. Stuknij w Wi-Fi lub Połączenia. Wybierz hotspot i wprowadź hasło wyświetlane na kamerze samochodowej. Masz teraz połączenie ze swoim urządzeniem.
- Página 171 KONFIGURACJA Przycisk zasilania: naciśnij, aby włączyć urządzenie. Naciśnij i przytrzymaj, aby wyłączyć urządzenie. Przycisk menu: używaj tego przycisku do przełączania między trybami WIDEO, ZDJĘCIE i ODTWARZANIE. Aby zrobić zdjęcie, naciśnij ten przycisk podczas nagrywania. Przycisk W górę: naciśnij, aby przejść do górnej części menu. W trybach WIDEO i ZDJĘCIE naciśnij i przytrzymaj przycisk, aby powiększyć...
- Página 172 TRYB ZDJĘCIE Zatrzymaj nagrywanie, a następnie naciśnij i przytrzymaj przez 2 sekundy przycisk Menu, aby przejść do trybu ZDJĘCIE. Naciśnij przycisk Rec, aby zrobić zdjęcie. TRYB ODTWARZANIE W trybie ZDJĘCIE naciśnij i przytrzymaj przez 2 sekundy przycisk Menu, aby przejść do trybu ODTWARZANIE. Aby wybrać odtwarzanie wideo lub przeglądarkę...
- Página 173 INSTALACJA KARTY microSD Przed zainstalowaniem karty pamięci upewnij się, że urządzenie jest wyłączone. Wsuwaj kartę pamięci, aż do usłyszenia kliknięcia. Wyjmowanie karty: lekko naciśnij kartę , a następnie wyjmij ją z gniazda. OSTRZEŻENIE! Aby uniknąć uszkodzenia urządzenia, nie używaj nadmiernej siły podczas wkładania karty pamięci.
- Página 174 WŁĄCZANIE / WYŁĄCZANIE • włączeniu zapłonu pojazdu kamera samochodowa włącza się automatycznie. • Aby włączyć urządzenie ręcznie, naciśnij przycisk zasilania. • Aby wyłączyć urządzenie, naciśnij i przytrzymaj przez ok. 3 sekundy przycisk zasilania.
- Página 175 NAGRYWANIE W PĘTLI Włóż kartę microSD do gniazda karty pamięci; tryb nagrywania w pętli jest ustawiony domyślnie na 3 minuty. Po zapełnieniu karty pamięci urządzenie automatycznie zastąpi najstarszy plik wideo plikiem najnowszym. Wyjątkiem są pliki zabezpieczone przed usunięciem.
- Página 176 NAGRYWANIE AWARYJNE Nagrywanie awaryjne ma na celu zabezpieczenie bieżącego pliku wideo przed nadpisaniem i usunięciem. Nagrywanie awaryjne jest aktywowane automatycznie, gdy zostanie wyzwo- lony czujnik G (nagłe przyspieszenie / zwolnienie) lub w momencie kolizji. Na- grywanie awaryjne jest automatycznie blokowane w celu niedopuszczenia do skasowania podczas nagrywania w pętli.
- Página 177 NAGRYWANIE I ODTWARZANIE Odtwarzanie (upewnij się, że zostało zatrzymane nagrywanie z kamery samochodowej). • W trybie gotowości naciśnij i przytrzymaj przycisk MENU, aby przełączać się między trybami Wideo i Zdjęcia. Tryby Wideo i Zdjęcia. • Wybierz plik do wyświetlenia, używając przycisków W górę / W dół...
- Página 178 USUŃ PLIKI Naciśnij przycisk Menu, aby wejść do podmenu (upewnij się, że nagrywanie kamery samochodowej zostało zatrzymane). Za pomocą przycisków W górę/W dół wybierz opcję Usuń i naciśnij przycisk Rec. Wybierz opcję usunięcia wszystkich plików / jednego pliku, a następnie potwierdź swój wybór, postępując zgodnie z instrukcjami wyświetlanymi na ekranie.
-
Página 179: Ustawienia Podstawowe
USTAWIENIA PODSTAWOWE Aby uzyskać dostęp do ustawień ogólnych, naciśnij jeden raz przycisk Menu na ekranie głównym. Rozdzielczość Wideo: wybierz wymaganą opcję (najwyższa opcja zapewnia optymalną jakość oglądania). Nagrywanie w pętli: 3 lub 5 minut Czujnik G: WYŁĄCZONY / NISKI / ŚREDNI / WYSOKI Noktowizor: WYŁĄCZONY / WŁĄCZONY / AUTOMATYCZNY Nagrywanie dźwięku:... -
Página 180: Ustawienia Zaawansowane
USTAWIENIA ZAAWANSOWANE Aby uzyskać dostęp do Ustawień zaawansowanych, naciśnij dwukrotnie przycisk Menu na ekranie głównym. WiFi: WYŁ. / WŁ Data / Godzina: Ustaw prawidłową datę i godzinę. Język: wybierz z listy preferowany język menu. Numer tablicy rejestracyjnej: WYŁĄCZONY / WŁĄCZONY Wygaszacz ekranu: WYŁĄCZONY / WŁĄCZONY Dźwięk przycisku:... - Página 181 USTAWIENIA ZAAWANSOWANE Wersja: ukazuje zainstalowaną wersję oprogramowania firmowego i adres, pod którym można pobierać aktualizacje. Ustawienia domyślne: Zresetuj kamerę do oryginalnej konfiguracji.
- Página 182 TABLICA REJESTRACYJNA Po wybraniu opcji WŁĄCZONA, zostaniesz poproszony/-a o wprowadzenie numeru rejestracyjnego. Na Twoim nagraniu zostanie wyświetlony numer tablicy rejestracyjnej.
- Página 183 MENU CZĘSTO ZADAWANE PYTANIA W aplikacji: Aby uzyskać dostęp do menu CZĘSTO ZADAWANE PYTANIA, naciśnij menu rozwijane i wybierz opcję CZĘSTO ZADAWANE PYTANIA. Aby wyświetlić wszystkie często zadawane pytania, przesuń palcem w górę lub w dół.
- Página 184 ZROBIENIE ZDJĘCIA / NAGRANIE WIDEO NIE POWIODŁO SIĘ Sprawdź, czy na karcie microSD jest wystarczająco dużo wolnego miejsca. NAGRYWANIE ZOSTAŁO ZAKOŃCZONE Zapisano zbyt wiele plików wideo. Używaj wyłącznie szybkich kart micro SD klasy co najmniej 10 U1, pochodzących od sprawdzonych producentów. Podczas próby obejrzenia zdjęcia/odtworzenia pliku wideo pojawia się...
- Página 185 ZAWIESZENIE (BRAK OBRAZU, BRAK REAKCJI NA NACISKANIE PRZYCISKÓW) Aby ponownie uruchomić urządzenie, naciśnij przycisk RESET. Karta microSD nie została rozpoznana, gdy była używana w kamerze samochodowej ROADsight 30, sformatuj kartę*** Upewnij się, że karty microSD są prawidłowo włożone do kamery samochodowej Aby przejść...
-
Página 186: Aktualizacja Oprogramowania
AKTUALIZACJA OPROGRAMOWANIA Pobierz plik oprogramowania firmowego ze strony pomocy technicznej kamery samocho- dowej | OSRAM Automotive i wypakuj na komputer plik z archiwum, po czym go rozpakuj. Upewnij się, że została sformatowana karta microSD. Skopiuj plik oprogramowania firmowego (.bin) na kartę microSD. - Página 187 FUNKCJE 1440p 140° ≤128 GB* ≤20HRS** Wi-Fi GPS ROADsight 1080p 130° ≤32 GB* ≤6HRS** Wi-Fi ROADsight 1080p 120° ≤32 GB* ≤3HRS** ROADsight * Pełna rozdzielczość (HD) przy 30 klatkach/s. ** Maksymalny czas nagrywania zależy od rozdzielczości ekranu, rozmiaru karty pamięci i zamocowania kamery tylnej.
-
Página 188: Wymagania Dotyczące Zasilania
WYMAGANIA DOTYCZĄCE ZASILANIA UWAGA! W przypadku braku zewnętrznego źródła zasilania bateria nie może obsługiwać nagrywania przez długi czas. Upewnij się, że podczas nagrywania podłączone jest zasilanie. Napięcie wejściowe: 5 V DC, 1,5 A. Napięcie wejściowe ładowania: 12-24 V DC Złącze Mini USB do zasilania TEMPERATURY ROBOCZE (wszystkie modele) Temperatura przechowywania: od -20°C do 70°C... - Página 189 ODDAWAJ ZUŻYTE BATERIE DO RECYKLINGU Baterii nie należy wyrzucać wraz z niesortowanymi odpadami komunalnymi, lecz gromadzić je oddzielnie, aby ułatwić prawidłowe przetwarzanie i recykling zawartych w nich substancji. Recykling baterii zapewnia odzysk cennych materiałów i zapobiega potencjalnie szkodliwym skutkom zarówno dla środowiska, jak i dla zdrowia ludzi. G15094509...