Tabla de contenido

Resumen de contenidos para Ega Master 62981
- Página 1 MANUAL DE INSTRUCCIONES OPERATING INSTRUCTIONS ADAPTADOR ANGULAR ANGLE METER COD. 62981 ESPAÑOL ....... 2 ENGLISH ......14 GARANTIA / GUARANTEE ... 27...
-
Página 2: Características Principales
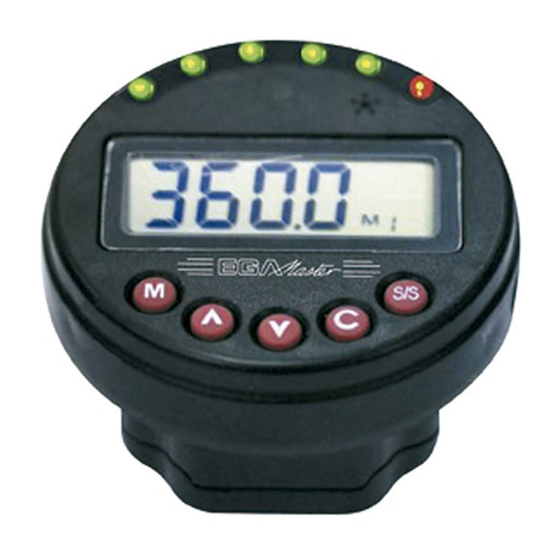
ESPAÑOL Estimado usuario, Gracias por haber adquirido este adaptador angular. Este manual le facilitará el uso de los diferentes elementos de su nuevo adaptador angular. Antes de manipular el adaptador, por favor lea completamente este manual y téngalo presente en futuras consultas. CARACTERÍSTICAS PRINCIPALES Lectura digital del valor angular +/- 2º... -
Página 3: Guía De Selección
GUÍA DE SELECCIÓN MODELO Nº: 62981 Communicación ESPECIFICACIONES para una rotación de 90º Precisión angular *1 a 30º/seg Rango de visualización 0~999.0° Resolución 0.1° Memoria deseada 9 disposiciones Rango deseado 1~360.0° (incremento1°) Capacidad de memoria de datos Conectividad con PC *2... -
Página 4: Antes De Usar El Adaptador
b. Frío c. Calor húmedo d. Cambios de temperatura e. Impacto f. Vibración g. Caída *6: Test de compatibilidad electromagnética: a. Inmunidad a descarga electromagnética (ESD) b. Sensibilidad a radiación c. Emisión de radiación ANTES DE USAR EL ADAPTADOR INSTALACIÓN DE LAS PILAS Afloje los tornillos de la tapa de las pilas. -
Página 5: Apagado Automático
Nota: Primero se mostrará la señal de dirección . Luego la pantalla LCD mostrará . Esto indicará que el adaptador está reiniciándose. Finalmente, cuando el reinicio se haya completado, se mostrará el ángulo objetivo. Por ejemplo se mostrará Precaución: Durante el proceso de reinicio, nunca se debe sacudir el adaptador. Déjelo tranquilo. APAGADO AUTOMÁTICO El adaptador se apagará... -
Página 6: Mensaje De Error
MENSAJE DE ERROR INDICADOR DE BATERÍA BAJA Si la carga de la pila es baja, el adaptador mostrará un símbolo de una batería y a continuación, se apagará. Por favor, reemplace las pilas. Indicador de batería baja Si el adaptador no se reinicia satisfactoriamente al cabo de un periodo de tiempo, se mostrará . -
Página 7: Paso 1: Ponga El Adaptador En La Llave
PASO 1: PONGA EL ADAPTADOR EN LA LLAVE PASO 2: ENCIENDA EL ADAPTADOR Y REINICIA - Para encender el adaptador pulse o reinícialo. - Finalmente el ángulo objetivo será mostrado. - Verifique la dirección. Si se quiere cambiar la dirección, por favor, vea el apartado “CAMBIO DE LA DIRECCIÓN DEL ÁNGULO”. Ángulo Sentido objetivo positivo actual (horario) Pulsar... -
Página 8: Paso 4: Pre-Tensar La Llave
PASO 4: PRE-TENSAR LA LLAVE - Sujete la llave para pre-tensar el tornillo (elimine el retroceso de la llave). Pre-tensar PASO 5: COMENZAR A MEDIR ÁNGULOS - Presione el botón para iniciar el medidor y a continuación accione la llave. Pulsar PASO 6: PARE Y ESPERE AL PARPADEO DEL LCD -Cuando el medidor de ángulos no registre variación durante unos segundos, la pantalla LCD... - Página 9 2. Existe también un sonido indicador de la proximidad del ángulo objetivo. El intervalo del sonido aumenta progresivamente desde el 80% hasta un modo continuo cuando se alcanza el 100% del ángulo objetivo. Por encima del 80% Por encima del -100% PASO 7: ELIMINAR EL VALOR DEL ÁNGULO, RECALCULAR EL ÁNGULO O GUARDAR LA MEDIDA DEL ÁNGULO - Pulsando...
-
Página 10: Introducción Al Menú De Ajustes
INTRODUCCIÓN AL MENÚ DE AJUSTES -Desde la pantalla de ángulo objetivo actual, realice una pulsación larga en el botón para acceder al menú de configuración. Pulsando continuamente se accede al menú de dirección, menú de registro, menú de borrado de datos y menú de comunicación. Finalmente pulse de nuevo para salir del menú... -
Página 11: Eliminar Un Único Registro
- Pulse repetidamente para salir del menú y volver a la pantalla de medición del ángulo objetivo. ELIMINAR UN ÚNICO REGISTRO -Acceda al menú de registro. - Pulse para seleccionar el Nº de registro que desee eliminar. - Pulse dos veces para eliminar el dato actual (se mostrará en la pantalla el mensaje Pulsar para seleccionar los datos Pulsar... -
Página 12: Comunicación
- Después de pulsar una vez se mostrará . Si desea cancelar la operación pulse para salir de este menú. - Pulsando repetidamente podrá salir del menú y volver a la pantalla de medición del ángu- lo objetivo. COMUNICACIÓN Precaución: 1. -
Página 13: Mantenimiento Y Almacenamiento
-Los datos cargados se muestran en la columna y se guardan como archivo *.cvs. Utilice Micro- soft Excel (o programa equivalente) para visualizar los archivos *.cvs. PRECAUCIÓN: Para más información diríjase al manual de usuario del programa de carga. MANTENIMIENTO Y ALMACENAMIENTO ATENCIÓN - Para mantener la precisión del aparato es necesaria una calibración periódica (anual). -
Página 14: Main Features
ENGLISH Dear User, Thank you for purchasing this digital angle meter. This manual will help you to use the many features of your new digital angle meter. Before operating the meter, please read this manual completely, and keep it nearby for future reference. MAIN FEATURES - Digital angle value readout - +/- 2°... - Página 15 SELECTION GUIDE MODEL Nº: 62981 Communication SPECIFICATIONS ±2° for 90° rotation Angle Accuracy *1 @ 30°/sec Display range 0~999.0° Resolution 0.1° Target memory 9 sets Target range 1~360.0° (increment 1°) Data memory size PC Connectivity *2 (1 Red + 5 Green)
-
Página 16: Battery Installation
b. Cold c. Damp heat d. Change of temperature e. Impact (shock) f. Vibration g. Drop *6: Electromagnetic compatibility test: a. Electrostatic discharge immunity (ESD) b. Radiation susceptibility c. Radiation emission BEFORE USING THE METER BATTERY INSTALLATION - Loosen the screw of the battery cap. - Insert two AAA batteries matching the -/+ polarities of the battery to the battery compartment. -
Página 17: Auto Power Off
Note:First the direction sign will show .Then the LCD shows . It indicates the meter is under resetting process. Finally if the reset process is completed, the target angle will be shown. For example is shown. Caution: During resetting process, never vibrate or shake the meter. Keep it rest. AUTO POWER OFF - The meter will auto power off after about 2 minutes idle for power saving. -
Página 18: Error Message
ERROR MESSAGE LOW VOLTAGE INDICATOR If the battery voltage is too low, the meter will display a battery symbol and then turn off. Replace batteries. If the meter does not reset successfully for a period of time , will be shown. Press do zero-reset again. - Página 19 Step 1:PUT THE METER ON THE WRENCH Step 2: POWER ON THE METER AND RESET - Press to power on the meter or reset it. - Finally the current target angle will be shown. - Make sure the direction. If you want to change to direction, please refer to “CHANGE ANGLE DIRECTION”...
- Página 20 Step 4: PRE-TIGHTEN WRENCH - Hold on your wrench to pre-tighten the screw. (eliminate the backlash of wrench) Step 5: START TO MEASURE ANGLE - Press to start the angle meter and immediately pull your wrench. Step 6: STOP AND WAIT FOR LCD FLASHING - As the angle meter does not move for a few second, the LCD screen will be flashing and the current angle is holding on screen. It also means the meter stop calculating angle. Note: 1.
- Página 21 2. There is also a buzzer to indicate the reaching level of target angle. Interval sound means it reaches over 80% and long sound means it reaches over 100% of target angle. Step 7: CLEAR ANGLE VALUE or CALCULATING ANGLE AGAIN or SAVE ANGLE RECORD - Pressing will clear the current angle - Pressing...
- Página 22 SETUP MENU INTRODUCTION - From the current target angle screen, long press to go into setup menu. Continuously press can visit the direction menu, record menu, record clear-all menu and communication menu. Finally press again to skip out the setup menu and go back to the current target angle screen. CHANGE ANGLE DIRECTION - Visit the direction menu, press to select the direction.
- Página 23 - If no record exists , will be shown. - Continuously pressing will skip out the setup menu and go back to the current target angle screen. CLEAR A SINGLE RECORD - Visit the record menu. - Press to select the data number you want to delete. - Press twice to delete the current data.
- Página 24 CLEAR ALL RECORDS - Visit the record clear-all menu - Press twice to delete the all record data. ( will be shown) - If press once, will be shown. If you want to abandon, just press to skip out this menu. - Continuously pressing will skip out the setup menu and go back to the current target angle screen.
-
Página 25: Maintenance And Storage
MAINTENANCE AND STORAGE ATTENTION: One-year periodic recalibration is necessary to maintain accuracy. Please contact your local dealer for calibrations. CAUTION: 1. Do not shake violently or drop meter. 2. Do not leave this meter in any place exposed to excessive heat, humidity, or direct sunlight. 3.