Publicidad
Enlaces rápidos
AIR LINK DW 20BR
(1)
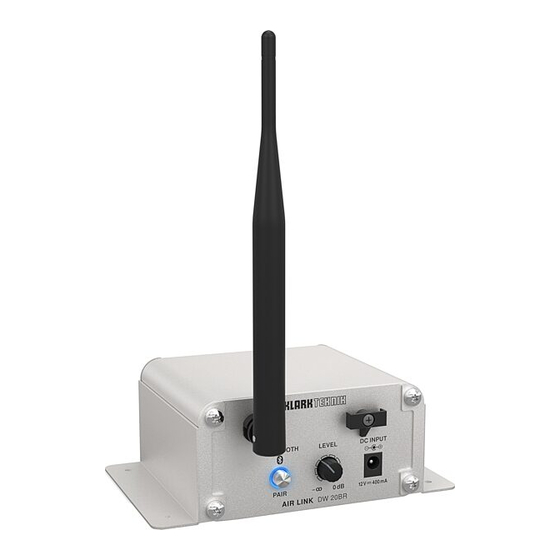
Controls
(EN) Step 1: Controls
(1) PAIR button – enables the unit to become available for pairing by pressing
and holding the button for 4 seconds. The LED ring will indicate the current
status. See the Getting Started section for details.
(2) LEVEL knob – adjusts the volume of the signal sent to the output jacks.
(3) DC INPUT – accepts the included power adapter.
(4) OUTPUTS – connect to an amp, powered speakers, or mixer via balanced
XLR or unbalanced ¼" TS cables.
(ES) Paso 1: Controles
(1) PAIR button – permite que la unidad esté disponible para emparejar
presionando y manteniendo presionado el botón durante 4 segundos. El
anillo LED indicará el estado actual. Consulte la sección Introducción para
obtener más detalles.
(2) LEVEL knob – ajusta el volumen de la señal enviada a las tomas de salida.
(3) DC INPUT – acepta el adaptador de corriente incluido.
(4) OUTPUTS – conéctelo a un amplificador, altavoces autoamplificados o
mezclador mediante cables XLR balanceados o TS de ¼ "no balanceados.
(FR) Etape 1: Réglages
(1) PAIR button - permet à l'appareil de devenir disponible pour l'appairage
en appuyant sur le bouton et en le maintenant enfoncé pendant 4
secondes. L'anneau LED indiquera l'état actuel. Consultez la section Mise
en route pour plus de détails.
(2) LEVEL knob - règle le volume du signal envoyé aux prises de sortie.
(3) DC INPUT - accepte l'adaptateur secteur inclus.
(4) OUTPUTS - se connecter à un ampli, des enceintes amplifiées ou une table
de mixage via des câbles XLR symétriques ou TS asymétriques ¼ ".
V 4.0
(2)
(3)
(DE) Schritt 1: Bedienelemente
(1) PAIR button - Ermöglicht die Kopplung des Geräts, indem die Taste 4
Sekunden lang gedrückt gehalten wird. Der LED-Ring zeigt den aktuellen
Status an. Weitere Informationen finden Sie im Abschnitt Erste Schritte.
(2) LEVEL knob - Stellt die Lautstärke des an die Ausgangsbuchsen
gesendeten Signals ein.
(3) DC INPUT - akzeptiert das mitgelieferte Netzteil.
(4) OUTPUTS - Über symmetrische XLR- oder unsymmetrische ¼ "TS-Kabel an
einen Verstärker, Aktivlautsprecher oder Mixer anschließen.
(PT) Passo 1: Controles
(1) PAIR button - permite que a unidade fique disponível para
emparelhamento pressionando e segurando o botão por 4 segundos. O
anel de LED indicará o status atual. Consulte a seção Introdução para obter
detalhes.
(2) LEVEL knob - ajusta o volume do sinal enviado para os conectores de saída.
(3) DC INPUT - aceita o adaptador de alimentação incluído.
(4) OUTPUTS - conecte a um amplificador, alto-falantes amplificados ou
mixer via cabos XLR balanceados ou TS não balanceados de ¼ ".
(IT) Passo 1: Controlli
(1) PAIR button - consente all'unità di rendersi disponibile per l'associazione
premendo e tenendo premuto il pulsante per 4 secondi. L'anello LED
indicherà lo stato corrente. Vedere la sezione Guida introduttiva
per i dettagli.
(2) LEVEL knob - regola il volume del segnale inviato ai jack di uscita.
(3) DC INPUT - accetta l'adattatore di alimentazione incluso.
(4) OUTPUTS - collegare a un amplificatore, altoparlanti amplificati o mixer
tramite cavi XLR bilanciati o cavi TS da ¼ "non bilanciati.
(4)
Publicidad

Resumen de contenidos para Klark Teknik AIR LINK DW 20BR
- Página 1 AIR LINK DW 20BR Controls (DE) Schritt 1: Bedienelemente (1) PAIR button - Ermöglicht die Kopplung des Geräts, indem die Taste 4 (EN) Step 1: Controls Sekunden lang gedrückt gehalten wird. Der LED-Ring zeigt den aktuellen Status an. Weitere Informationen finden Sie im Abschnitt Erste Schritte.
-
Página 2: Getting Started
2. En su teléfono inteligente o tableta, active Bluetooth y busque los dispositivos le haut-parleur ou la table de mixage reçoive un signal fort. empfangen soll. Beide Einheiten tragen den Namen „Klark Teknik DW 20BR“. disponibles. 7. Augmentez le volume de votre haut-parleur, mixeur, amplis, etc. jusqu'à ce (PL) Krok 1: Sterowanica 3. - Página 3 THD + N (distortion) 0.1% @ 1 kHz poziom odsłuchu. muziekapplicatie. Beide units krijgen de naam "Klark Teknik DW 20BR". 7. Alza il volume dell'altoparlante, del mixer, degli amplificatori, ecc. Fino a Signal-to-noise ratio >90 dB Uwagi dotyczące połączenia:...
- Página 4 All trademarks are the property of vorherige Ankündigung geändert werden. Alle Warenzeichen sind voorafgaande kennisgeving worden gewijzigd. Alle handelsmerken their respective owners. Midas, Klark Teknik, Lab Gruppen, Lake, Eigentum der jeweiligen Inhaber. Midas, Klark Teknik, Lab Gruppen, zijn eigendom van hun respectievelijke eigenaren. Midas, Klark...