Publicidad
Idiomas disponibles
Idiomas disponibles
Enlaces rápidos
ENGLISH
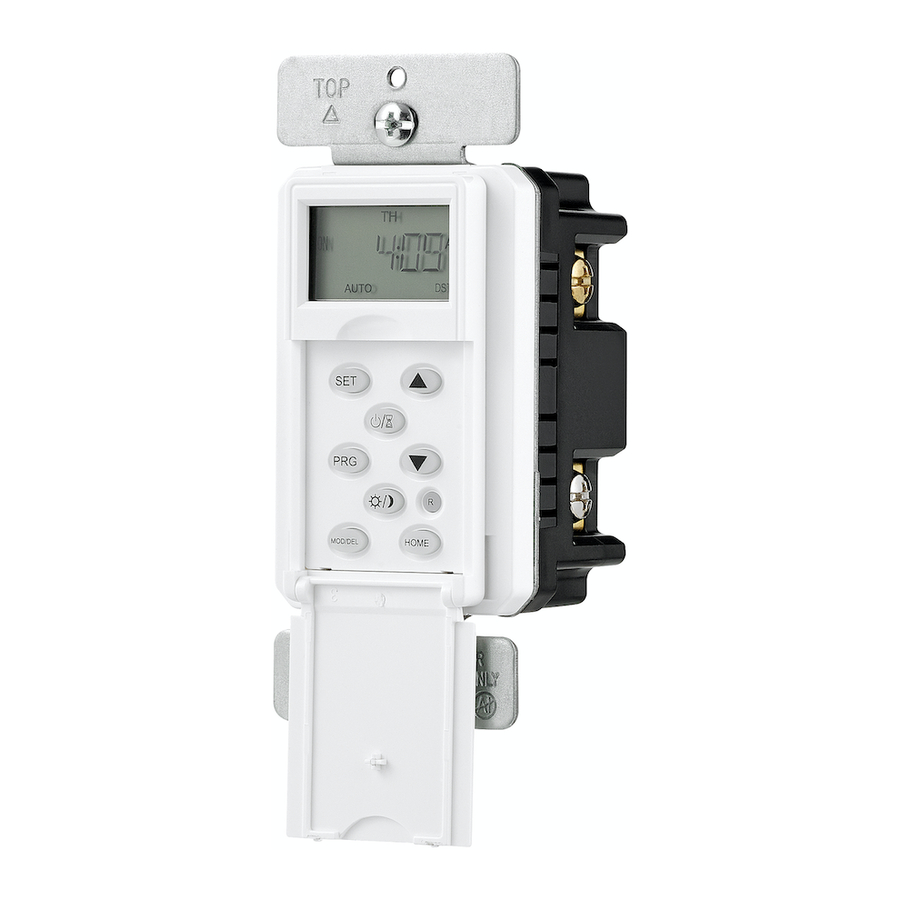
AT18HM - INSTALLATION INSTRUCTION FOR ASTRONOMIC PROGRAMMABLE TIMER
Model: AT18HM
Astronomic Programmable Timer
FEATURES:
• Astronomical feature: Automatically adjusts dusk
to dawn times
• Total of 7 on, 7 off programmable settings
• Single pole or three way installations
• Random ON/OFF operation for security
• Manual override
• Battery backup: Programs will be saved during
power outages
• Daylight Savings: Auto adjusts for daylight
Ground
Mise à la terre
savings time
Conexión a tierra
• Replaces standard wall switch
• Back-lit LCD screen
• Works with CFL, LED and incandescent bulbs
SPECIFICATIONS
Voltage..................................................................................................................120VAC, 60Hz
Resistive.........................................................................................................................15Amps
Tungsten...........................................................................................................................1200W
Standard Ballast............................................................................................................1200VA
Electronic Ballast/ LED............................................................................................5A (600W)
Motor..................................................................................................................................1/2HP
WARNING
Turn the power off at the circuit breaker before installing the
timer.
Read and understand these instructions before installing. This device is intended for
installation in accordance with the National Electrical Code as well as local regulations.
It is recommended that a qualified electrician performs this installation. Make sure to
turn off the circuit breaker or fuse(s) before wiring the device.
Use copper wire only.
Pre-Installation Requirements:
• This timer requires that your switch box have a neutral wire for proper installation
in order to operate correctly. If you open up your switch box and only see 2 wires,
this indicates that your switch box does not have a neutral wire and this timer will
not work.
• This timer will work in a single pole or 3-way installation. It will not work in a
4-way installation.
• This timer is rated for loads up to 15 amps.
Single-Pole Installation:
1. Take the existing wall switch out of the wall box, but do not remove the wires.
2. Identify and label all the wires, then remove existing switch
3. Connect the timer to the wires as shown. See Figure 1. Connect the HOT (Line)
to the HOT terminal of the timer. Connect the load wire to the LOAD terminal of
the timer. Connect the neutral wire to the NEUTRAL terminal of the timer. Connect
the ground wire to the GROUND terminal of the timer. Be sure that all the terminal
screws are tight.
4. Tuck the wires into the wall box and leave room for the timer.
5. Mount the timer to the wall box and install the wallplate.
6. Restore power at the circuit breaker.
Mise à la terre
Conexión a tierra
Neutral
Neutre
Neutro
Ground
Mise à la terre
Conexión a tierra
POWER
ALIMENTATION
ALIMENTACIÓN
FIGURE 1:
Single pole installation
Installation unipolaire
Instalación 1 polo
Neutral
Neutre
Neutro
POWER
ALIMENTATION
ALIMENTACIÓN
Traveler
Neutral
Neutre
Neutro
Ground
POWER
ALIMENTATION
ALIMENTACIÓN
Traveler
Ground / Mise à la terre /
Ground
Ground
Conexión a tierra
Mise à la terre
Conexión a tierra
POWER
ALIMENTATION
ALIMENTACIÓN
FIGURE 2
3-way installation
Installation à 3 voies
Instalación de tres vías
Timer at load side
Minuterie du côté charge
Temporizador en el lado de carga
Load / Charge / Carga
Traveler
Neutral
Hot
Neutre
Chaude
Neutro
Línea
FIGURE 3:
3-way installation
Installation à 3 voies
Instalación de tres vías
Timer at load side
Minuterie du côté charge
Temporizador en el lado de carga
Mise à la terre
Conexión a tierra
Buttons Description
Part
Load / Charge / Carga
DISPLAY: easy-to-read digital
1
Traveler
display
Neutral
Hot
Neutre
Chaude
SET: press to set the calendar, clock,
Neutro
Línea
2
region and daylight saving setting
Ground / Mise à la terre /
Conexión a tierra
PROG: press to set daily on/off
3
times
DAWN/DUSK: press to change the
4
default dawn/dusk times
MODE/DELETE: press to choose
from auto, manual or random modes,
5
when the timer is in program mode,
this button deletes program settings
ON/OFF AND TIMER OVERRIDE:
6
press to turn load on/off and hold to
start the countdown function
UP/DOWN BUTTON: press to
7
change selected value
RESET: press to reset the timer to
8
return to default settings.
HOME: press to return to Home
9
screen
Ground
Ground
Mise à la terre
Conexión a tierra
POWER
ALIMENTATION
ALIMENTACIÓN
SETTING TIME AND REGION:
Load / Charge / Carga
1. Open the faceplate. Gently press RESET to clear all programs and set timer to
Traveler
Neutral
Hot
default settings. Press the SET button to begin setting the timer and calendar.
Neutre
Chaude
Traveler
Neutro
Línea
Load
The time "12:00 am" will be flashing. See Figure 6.
Ground
Charge
Mise à la terre
Carga
Conexión a tierra
Ground
Ground
POWER
ALIMENTATION
ALIMENTACIÓN
1. DISPLAY
Description
ÉCRAN
PANTALLA
2. SET
RÉGLAGE
CONFIGURAR
3. PROG
PROG
PROGRAMACIÓN
4. DAWN/DUSK
LEVER ET COUCHER
DU SOLEIL
AMANECER/
ATARDECER
5. MODEL/DELETE
MODÈLE/SUPPRIMER
MODELO/ELIMINAR
Traveler
Load
Charge
Carga
FIGURE 5
Traveler
AT18HM
Load
Ground
Charge
Mise à la terre
Carga
Conexión a tierra
FIGURE 4
6. ON/OFF AND TIMER
OVERRIDE
MARCHE/ARRÊT ET
CONTOURNEMENT
DE LA MINUTERIE
ENCENDIDO/APAGADO
Y ANULACIÓN DEL
TEMPORIZADOR
7. UP/DOWN BUTTON
BOUTON HAUT/BAS
BOTÓN ARRIBA/
ABAJO
8. RESET
RÉINITIALISER
RESTABLECER
9. HOME
ACCUEIL
INICIO
Ground
Mise à la terre
Conexión a tierra
www.eaton.com
www.eaton.com/wiringdevices
EIS-0269-EFS (REV. A)
MO TU WE
ON
Publicidad

Manuales relacionados para Eaton AT18HM

Resumen de contenidos para Eaton AT18HM
- Página 1 ENGLISH AT18HM - INSTALLATION INSTRUCTION FOR ASTRONOMIC PROGRAMMABLE TIMER Model: AT18HM FIGURE 3: 3-way installation Astronomic Programmable Timer Installation à 3 voies Instalación de tres vías Timer at load side FEATURES: Minuterie du côté charge Temporizador en el lado de carga •...
-
Página 2: Troubleshooting Tips
1. Press the PROGRAM button to set the program times. The display will show “ON avings unit, at its option. Eaton will not be responsible under this warranty if examination shows that the defective condition of the unit was PG. 1”... - Página 3 6. Utiliser les boutons HAUT/BAS pour régler la région, puis appuyer sur le bouton SET. Les options sont NOR sa discrétion. Eaton ne pourra être tenu responsable en vertu de la présente garantie si l’examen prouve que le problème a été...
-
Página 4: Especificaciones
5. Utilice los botones ARRIBA/ABAJO para desplazarse por los días de la semana y elija una de las siguien- Si tiene alguna pregunta sobre el uso o el cuidado de este producto, escriba a la División de Servicio al Cliente, Eaton Wiring tes opciones: Devices, 203 Cooper Circle, Peachtree City, GA 30269. - Página 5 Folding and Printing Instructions- Document Dimensions: 8.5” W x 11” H 2-sided printing, Accordian fold in fourths logo at top, fold in fourths again. Final Size: 2.25” W x 2.75” H...