Tabla de contenido
Publicidad
Idiomas disponibles
Idiomas disponibles
Enlaces rápidos
USE AND CARE GUIDE
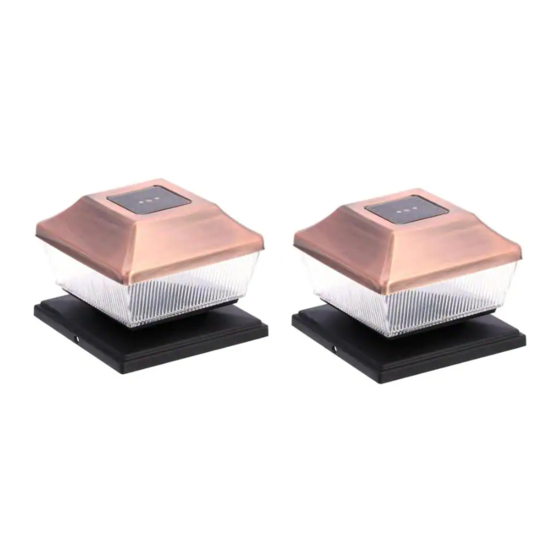
SOLAR LED POST CAP LIGHT 2PK
Questions, problems, missing parts? Before returning to the store,
We appreciate the trust and confidence you have placed in Hampton Bay through the purchase of this lighting
system. We strive to continually create quality products designed to enhance your home. Visit us online to see our
full line of products available for your home improvement needs. Thank you for choosing Hampton Bay!
call Hampton Bay Customer Service
8 a.m. - 6 p.m., EST, Monday - Friday
1-855-HD-HAMPTON
1-8
55-HD-HAMPTON
1-8
1-8
55-HD-HAMPTON
55-HD-HAMPTON
HAMPTONBAY.COM
HAMPTONBAY.COM
HAMPTONBAY.COM
HAMPTONBAY.COM
THANK YOU
THANK
YOU
THANK
THANK
YOU
YOU
Item # 1000020910
Model # QTP22a-R4-AC-2
®
Publicidad
Capítulos
Tabla de contenido
Solución de problemas

Resumen de contenidos para HAMPTON BAY QTP22a-R4-AC-2
- Página 1 THANK THANK We appreciate the trust and confidence you have placed in Hampton Bay through the purchase of this lighting system. We strive to continually create quality products designed to enhance your home. Visit us online to see our full line of products available for your home improvement needs. Thank you for choosing Hampton Bay!
-
Página 2: Tabla De Contenido
Table of Contents Assembly ............ 4 Table of Contents ........2 Maintenance ..........5 Safety Information ........2 Care and Cleaning ........6 Warranty ............ 2 Troubleshooting ........6 Pre-Assembly ..........3 Planning Installation ......... 3 3 3 3 Service Parts ..........7 Package Contents ........ -
Página 3: Pre-Assembly
Pre-Assembly PLANNING INSTALLATION PLANNING INSTALLATION PLANNING PLANNING INSTALLATION INSTALLATION For optimum performance, it is best to install the solar lights in full sunlight and allow their batteries to charge for □ 10-12 hours. It will take 8-12 entire charging and discharging cycles to reach the batteries' maximum capacity. PACKAGE CONTENTS PACKAGE CONTENTS... -
Página 4: Assembly
Assembly Removing Removing Removing Removing the the isolation isolation isolation strip isolation strip strip strip Assembling Assembling the Assembling Assembling the lantern lantern lantern lantern Locate two locking tabs on the top housing (A). On Use the screws (E) to secure the base (C) or □... -
Página 5: Maintenance
Maintenance Replacing Replacing the Replacing Replacing the battery battery battery battery Replacing Replacing the the battery battery Replacing Replacing battery battery (continued) (continued) (continued) (continued) Twist the lens (B) clockwise and remove it from the Remove the battery compartment cover. □... -
Página 6: Care And Cleaning
Care and Cleaning Winter tips Keep debris and snow off the solar panel (A) to allow the batteries to recharge. If the lights have been covered by □ snow for a long time, allow the batteries to recharge in full, direct sunlight for 10-12 hours, so they can maintain maximum capacity. -
Página 7: Service Parts
Service Parts QTP22a-R4-AC-2 Part Part Description Description Quantity Quantity Part Part Description Description Quantity Quantity Top Housing Lens Small Mounting Base (4 in. x 4 in.) Large Mounting Base (6 in. x 6 in.) Screw Rechargeable battery HAMPTONBAY.COM Please contact 1-855-HD-HAMPTON for further assistance. - Página 8 ® Questions, problems, missing parts? Before returning to the store, call Hampton Bay Customer Service 8 a.m.- 6 p.m., EST, Monday-Friday 1-855 55 55 55- - - - HD HD- - - - HAMPTON HAMPTON HAMPTON HAMPTON HAMPTONBAY.COM HAMPTONBAY.COM HAMPTONBAY.COM HAMPTONBAY.COM...
-
Página 9: Uso Mantenimiento
HAMPTONBAY.COM GRACIAS Apreciamos la confianza que has depositado en Hampton Bay al comprar este sistema de iluminación. Nos esforzamos para continuamente crear productos de calidad diseñados para mejorar tu hogar. Visítanos por Internet para ver nuestra línea completa de productos disponibles para las necesidades de mejoras de tu hogar. - Página 10 Tabla de contenido Tabla de de de de contenido Tabla contenido....................2 2 2 2 Tabla Tabla contenido contenido .................... Ensamblaje..........Ensamblaje ..........4 4 4 4 Ensamblaje Ensamblaje ....................Mantenimiento......... Mantenimiento ......... 5 5 5 5 Mantenimiento Mantenimiento .........
-
Página 11: Preensamblaje
Preensamblaje Planificar la instalación Para un funcionamiento óptimo, es mejor instalar las lámparas solares con luz solar total y dejar que las □ baterías carguen durante 10 a 12 horas. Tomará de 8 a 12 ciclos completos de carga y descarga para alcanzar el máximo de capacidad de la batería. -
Página 12: Ensamblaje
Ensamblaje Cómo quitar la cinta de Cómo ensamblar el farol aislamiento Localiza las dos lengüetas de cierre de la carcasa Usa los tornillos (E) para asegurar la base □ □ superior (A). De cualquier lado, empuja la pared de (C) o (D) sobre un poste de madera de plástico con la fuerza adecuada para liberar el 15.2 cm x 15.2 cm o 10.2 cm x 10.2 cm. -
Página 13: Mantenimiento
Mantenimiento Cómo reemplazar la batería Cómo reemplazar la batería (continuación) Gira el lente (B) en el sentido de las manecillas Retira la cubierta del compartimento de la □ □ del reloj y quítalo de la base (C) o (D). batería. Reemplaza la batería vieja por una nueva □... -
Página 14: Mantenimiento Limpieza
Mantenimiento y limpieza Consejos para el invierno Limpia los desechos y la nieve del panel solar (A) para permitir la recarga de las baterías. Si la nieve ha cubierto □ las lámparas por largo tiempo, deja que las baterías se recarguen con luz solar directa y total por 10 a 12 horas para que puedan funcionar al máximo de su capacidad. -
Página 15: Repuesto
Piezas de repuesto QTP22a-R4-AC-2 P P P P i i i i e e e e z z z z a a a a D D D D e e e e scr scri i i i p p p p c c c c i i i i ó ó ó ó n n n n... - Página 16 ® ¿Preguntas, problemas o piezas faltantes? Antes de regresar a la tienda, llama al Servicio al cliente de Hampton Bay de lunes a viernes entre 8 a.m. y 6 p.m. (hora estándar del Este) 1-855 55 55 55- - - - HD...