
Manuales relacionados para Uniteck UNIFIX 1C


Resumen de contenidos para Uniteck UNIFIX 1C
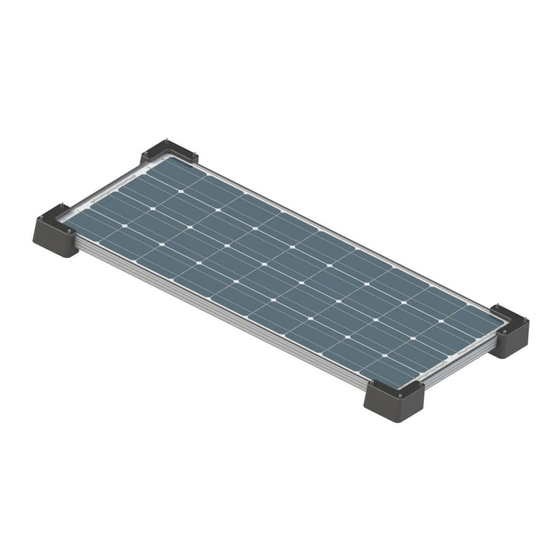
- Página 1 Unisolar 20.24 W UNIFIX 1C Le support de fixation campingcar The mounting bracket for Campervans El soporte de fijación especial campervan 28/03/2013 www.uniteck.fr CO00056...
-
Página 2: Consignes De Sécurité
Cher client, nous vous remercions pour votre achat de l'un de nos produits Uniteck. Veuillez lire avec attention toutes les instructions avant d'utiliser le produit. Le support Unifx 1C est destiné exclusivement à la fixation de vos panneaux Unisun. Il a été conçu pour être utilisé... - Página 3 (non fourni), puis laissez sécher quelques minutes. (ne pas utiliser d'alcool/ de white spirit) Fixez les 4 supports Unifix sur votre panneau. Nettoyez la zone de pose de vos supports avec le dégraissant fourni. (Ne pas utiliser d'alcool/de white spirit...). www.uniteck.fr 3/22...
- Página 4 Repositionnez les supports sur les marquages préalablement réalisés. Réalisez une pression brève de haut en bas. Respectez 4 heures de temps de sèchage. Ne pas bouger ou manipuler pendant cette période. Pendant ce temps d'attente, vous pouvez réaliser la pose du passe toit. (produit non inclus, cf partie passe-toit) www.uniteck.fr 4/22...
- Página 5 UNIFIX - FIXATION PANNEAU (SUITE) Positionnez le panneau sur les angles de fixation. Fixez les 4 dessus d'angle sur les supports grâce aux rondelles plates, rondelles grower er écrous borgnes. www.uniteck.fr 5/22...
- Página 6 Appliquez la colle fournie sur la zone indiquée en blanc sur l’image ci-dessous, puis positionnez- le à l’endroit du perçage. Passez les câbles. Gardez une longueur suffisante pour votre câblage. Serrez les écrous du presse- étoupe pour assurer une étanchéité. www.uniteck.fr 6/22...
- Página 7 COLLAGE DU PASSE-TOIT (PRODUIT NON INCLUS) Fermez le capot grâce aux 2 vis plastiques. Raccordez les connecteurs entre eux. (Pas de risque d’erreur, les connecteurs sont polarisés). www.uniteck.fr 7/22...
-
Página 8: Spécifications Techniques
Attention : notre SAV n’accepte pas les retours en port dû. Après la garantie, notre SAV assure les réparations après acceptation d’un devis. Contact SAV : Uniteck- 1 Avenue de Rome Zae Via Europa - bâtiment Cassis 34350 Vendres -France France mail: sav@uniteck.fr... -
Página 9: Safety Instructions
Dear customer, thank you for purchasing one of our Uniteck products. Please read all the instructions carefully and thoroughly before using the product. The Unifx 1C mounting bracket is designed to fix your Unisun panels only. It has been designed to be used on a flat surface (ex.: campervan roof, houseboat). - Página 10 (not provided), then let it dry for a few minutes (do not use alcohol/white spirit). Fix the 4 brackets on your panel Clean the bottom of the brackets (area that will get glued) with the degreaser provided (do not use alcohol/white spirit...). www.uniteck.fr 10/22...
- Página 11 P l a c e the brackets on the previously marked surfaces. Press briefly down on the brackets. Respect 4 hours of drying time. Do not move or manipulate during this period. During this waiting time, you can fix the roof pass (cf roof pass part). www.uniteck.fr 11/22...
- Página 12 UNIFIX – PANEL FIXING Put the panel on the fixing angles. Fix the 4 upper parts of the angles on the brackets using the flat washers, the lock washers and the cap nuts www.uniteck.fr 12/22...
- Página 13 Put the provided glue on the area indicated in white on the picture below, then put it over the drilling hole. Pass the cables as seen on the picture below. Keep a sufficient length for the connection. Tighten the nuts of the cable gland to ensure waterproofness www.uniteck.fr 13/22...
- Página 14 ROOF PASS FIXING (PRODUCT NOT INCLUDED) Close the cover with the 2 plastic screws Connect the connectors between them. (No risk of error, connectors are polarized). www.uniteck.fr 14/22...
-
Página 15: Technical Specifications
Caution: Our after-sales service does not accept carriage forward/ collected returns. After the warranty, our after-sales service ensures repairs after acceptance of a quotation. After-sales service contact : Uniteck- 1 Avenue de Rome Zae Via Europa - bâtiment Cassis 34350 Vendres -France E-mail : sav@uniteck.fr... -
Página 16: Consignas De Seguridad
Estimado cliente, gracias por comprar nuestro producto Uniteck. Por favor lea con cuidado todas las instrucciones antes de usar el producto. El soporte Unifx 1C está concebido únicamente a la fijación de sus paneles Unisun. Está previsto para estar usado sobre una superficie plana (ej: tejado de autocaravana, casa móvil, barcaza...). -
Página 17: Unifix - Fijación Del Panel
(no provisto), y después deje secas algunos minutos (no use alcohol o aguarrás). Fije los 4 soportes Unifix sobre su panel. Limpie la zona de colocación de sus soportes con el desengrasente provisto (no use alcohol, aguarrás….). www.uniteck.fr 17/22... - Página 18 Respete 4 horas de tiempo de secado. No mueva o manipule los elementos durante este periodo. Durante este tiempo de espera, realiza la colocación del pasatecho. (producto no incluido, cf parte paso del tejado) www.uniteck.fr 18/22...
- Página 19 UNIFIX – FIJACIÓN DEL PANEL Posicione el panel sobre los angulos de fijación. Fije las 4 parte superiores de los angulos sobre los soportes gracias a las 4 arandelas platas, rondelas grower y tuercas de sombrerete. www.uniteck.fr 19/22...
-
Página 20: Instalación Del Paso Del Tejado (Producto No Incluido)
Aplique el pegamento provisto sobre la zona indicada en blanco en la imagen más abajo, y después colóquelo en el lugar de la perforación. Pase los cables. Conserve una longitud suficiente para su cableado. Apriete las tuercas del prensaestopas para asegurar la impermeabilidad. www.uniteck.fr 20/22... - Página 21 INSTALACIÓN DEL PASO DEL TEJADO (PRODUCTO NO INCLUIDO) Cierre la tapa con 2 tornillos plásticos. Conecte los conectores entre ellos (no riesgo de error, los conectores son polarizados). www.uniteck.fr 21/22...
-
Página 22: Especificaciones Técnicas
Cuidado : nuestro Servicio Postventa no acepta devoluciones a portes debidos. Después la garantía, nuestro Servicio Postventa asegura las reparaciones después aceptación de un presupuesto. Contacto SAV : Uniteck- 1 Avenue de Rome Zae Via Europa - bâtiment Cassis 34350 Vendres -France France mail: sav@uniteck.fr...