Tabla de contenido
Publicidad
Idiomas disponibles
Idiomas disponibles
Enlaces rápidos
Publicidad
Capítulos
Tabla de contenido
Solución de problemas

Manuales relacionados para auna Starmaker Plus


Resumen de contenidos para auna Starmaker Plus
-
Página 3: Tabla De Contenido
Sehr geehrter Kunde, wir gratulieren Ihnen zum Erwerb Ihres Gerätes. Lesen Sie die folgenden Hinweise sorgfältig durch und befolgen Sie diese, um möglichen Schäden vorzubeugen. Für Schäden, die durch Missachtung der Hinweise und unsachgemäßen Gebrauch entstehen, übernehmen wir keine Haftung. Scannen Sie den folgenden QR-Code, um Zugriff auf die aktuellste Bedienungsanleitung und weitere Informationen rund um das Produkt zu erhalten:... -
Página 4: Sicherheitshinweise
SICHERHEITSHINWEISE Allgemeine Hinweise • Blitzschlag - Wenn Sie das Gerät länger nicht benutzen oder es gewittert, ziehen Sie den Stecker aus der Steckdose oder trennen Sie das Gerät vom Antennenanschluss. Dadurch werden Schäden am Produkt durch Blitzschlag und Überspannung vermieden. •... -
Página 5: Lieferumfang
LIEFERUMFANG • Karaokeanlage (1x) • Netzteiladapter (1x) • RCA-Kabel (1x) • Mikrofon mit Kabel (1x) • Bedienungsanleitung (1x) -
Página 6: Geräteübersicht
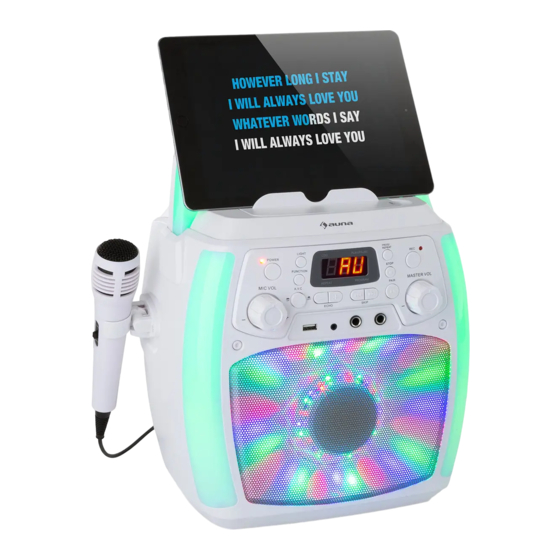
GERÄTEÜBERSICHT Vorderseite Griff REC-Anzeige (Aufnahme) SKIP -/+ Taste (Zurück/Vor) CD-Fach REC-Taste (Aufnahme) USB-Anschluss LED-Bildschirm STOP-Taste AUX-IN-Anschluss LIGHT MODE-Taste MIC VOL-Regler 20 MIC 1-Eingang (Lichtmodus) (Mikrofonlautstärke) (Mikrofon) Betriebsleuchte A.V.C (Ein/Aus)-Taste MIC 2-Eingang (Autom. Sprachsteuerung) (Mikrofon) EIN/AUS-Taste ECHO -/+ Taste LED-Dekolicht FUNCTION-Taste MASTER VOL-Regler Metallgitter (Funktionen) - Página 7 Rückseite VIDEO-Ausgang AUDIO Ausgang (L) Mikrofon-Halterung AUDIO-Ausgang (R) DC Netzteil-Anschluss Batteriefach...
-
Página 8: Anschlüsse
Display-Anzeigen CDG-Anzeige PlAY/PAUSE-Anzeige (Wiedergabe/Pause) LED-Anzeige PROGRAM-Anzeige (Speicher) REPEAT-Anzeige (Wiederholen) ANSCHLÜSSE Mikrofon anschließen Sie können das Mikrofon sowohl mit dem Anschluss MIC 1 (20) als auch mit dem Anschluss MIC 2 (21) verbinden. Hinweis: Lassen Sie das Mikrofon nicht herunterfallen, da dies zu Schäden am Mikrofon oder am Lautsprecher führen kann. - Página 9 HINWEISE: • Dieses Gerät kann sowohl mit als auch ohne Fernseher verwendet werden. Es wird jedoch empfohlen, dass Gerät in Verbindung mit einem Fernseher zu verwenden, damit alle Funktionen genutzt werden können. • Lesen Sie sich in Bezug auf die Verwendung des Fernsehers dessen Bedienungsanleitung durch.
-
Página 10: Bedienung
BEDIENUNG AUX-IN-Anschluss Drücken Sie die EIN/AUS-Taste (6), um das Gerät einzuschalten. 2. Stecken Sie den Anschluss des 3,5-mm-Audiokabels (nicht im Lieferumfang enthalten) in den AUX-IN-Anschluss (19) des Geräts. 3. Drücken Sie die FUNCTION-Taste (7) auf der Vorderseite des Geräts, um in den AUX-IN-Modus zu wechseln. - Página 11 3. Drücken Sie mehrmals die FUNCTION-Taste (7), um den CDG/CD- Modus auszuwählen. Auf dem Bildschirm wird dann „Cd“ angezeigt. Während des Einlesens blinkt „---” auf dem Bildschirm auf. Sobald die CD gelesen wurde, wird die Gesamtzahl der auf der CD befindlichen Titel auf dem Bildschirm angezeigt.
- Página 12 3. Drücken Sie mehrmals die FUNCTION-Taste (7) um den USB-Modus aufzurufen. Auf dem Bildschirm wird „USB“ angezeigt. Solange der USB- Stick eingelesen wird, blinkt auf dem Bildschirm „---” auf. Anschließend wird auf dem Bildschirm die Gesamtanzahl der auf dem USB-Stick befindlichen Titel angezeigt.
- Página 13 Geräte getrennt, so dass ein neues Gerät gekoppelt werden kann. 3. Aktivieren Sie die BT-Funktion Ihres externen Geräts. Öffnen Sie die Geräteliste und wählen Sie „Starmaker Plus“ aus. HINWEIS: Weitere Hinweise zur Verwendung der BT-Funktion des externen Geräts befinden sich in dessen Bedienungsanleitung.
- Página 14 5. Starten Sie die Wiedergabe auf dem BT-Gerät. Drücken Sie während der Wiedergabe die PLAY/PAUSE-Taste (16), um die Wiedergabe zu pausieren. 6. Drücken Sie zur Auswahl des nächsten oder vorherigen Titels die Tasten SKIP -/+ (17). Aufnahme-Funktion Drücken Sie zum Aufnehmen Ihres Gesangs sowie der Musik die REC- Taste (10).
-
Página 15: Reinigung Und Pflege
REINIGUNG UND PFLEGE • Schalten Sie das Gerät vor der Reinigung aus und ziehen Sie den Netzstecker aus der Steckdose. • Wenn das Gerät staubig ist, wischen Sie es mit einem weichen und trockenen Staubtuch ab. • Reinigen Sie das Gerät mit einem weichen Tuch. •... - Página 16 Problem Mögliche Ursache Lösungsmöglichkeit Kein Ton, wenn Der Ton am Fernseher ist Stellen Sie die Lautstärke an Fernseher stummgeschaltet oder zu am Fernseher ein. angeschlossen. leise eingestellt. Es wurde nicht die richtige Wählen Sie die Quelle am Fernseher richtige Quelle aus (für ausgewählt.
- Página 17 Problem Mögliche Ursache Lösungsmöglichkeit USB-Dateien Die USB-Dateien sind Ersetzen Sie die Dateien. werden nicht beschädigt. wiedergegeben. Das Dateiformat Nutzen Sie Dateien eines kann nicht vom Gerät kompatiblen Formats. wiedergegeben werden. Der USB-Stick wird nicht Nutzen Sie einen anderen vom Gerät unterstützt. USB-Stick.
-
Página 18: Hinweise Zur Entsorgung
HINWEISE ZUR ENTSORGUNG Befi ndet sich die linke Abbildung (durchgestrichene Mülltonne auf Rädern) auf dem Produkt, gilt die Europäische Richtlinie 2012/19/EU. Diese Produkte dürfen nicht mit dem normalen Hausmüll entsorgt werden. Informieren Sie sich über die örtlichen Regelungen zur getrennten Sammlung elektrischer und elektronischer Gerätschaften. -
Página 19: Technical Data
Dear Customer, Congratulations on purchasing this device. Please read the following instructions carefully and follow them to prevent possible damages. We assume no liability for damage caused by disregard of the instructions and improper use. Scan the QR code to get access to the latest user manual and more product information. -
Página 20: Safety Instructions
SAFETY INSTRUCTIONS General information • This product is not intended for commercial use. Household use only. • Lightning - If you are not going to use the device for a long time or if there is a storm, disconnect the plug from the electrical outlet and disconnect the device from the antenna connector. -
Página 21: Scope Of Delivery
SCOPE OF DELIVERY • Karaoke system (1x) • AC adapter (1x) • RCA cable (1x) • Wired microphone (1x) • Instruction manual (1x) -
Página 22: Device Overview
DEVICE OVERVIEW Front Handle REC Indicator SKIP-/+ Button CD Compartment REC Button USB Jack LED Display STOP Button AUX IN Jack LIGHT MODE Button MIC VOL Knob 20 MIC 1 Jack Power Indicator A.V.C on/off Button MIC 2 Jack POWER on/off Button ECHO -/+ Button LED Decoration Light FUNCTION Button... - Página 23 Back VIDEO Out Jack AUDIO OUT (L) Jack Microphone Holder AUDIO OUT (R) Jack DC IN Jack Battery Compartment...
-
Página 24: Connections
Display CDG Indicator PLAY/PAUSE Indicator LED Display PROGRAM Indicator REPEAT Indicator CONNECTIONS Connecting the Microphone Connect the microphone into MIC 1 jack (20) as well as MIC 2 jack (21) when desired. Notes: Do not drop or tap the microphone as damage to the microphone or speaker may occur. - Página 25 NOTES: • This unit can be used with or without a TV, but it is highly recommended to use a TV in order to utilize all the features. • Also please refer to the TV’s User Guide. • To see the lyrics on the screen, you must use a CD+G disc or MP3+G files.
-
Página 26: Operation
OPERATION Connecting to AUX IN Jack Press the POWER button (6) to turn the unit on. 2. Insert the 3.5 mm audio cable (not included) into the AUX IN jack (19) of the unit. 3. Press the FUNCTION button (7) on the front panel to switch to AUX IN mode. - Página 27 4. Press the PLAY/PAUSE button (16) to start playback. If listening to a CD+G file, the image and lyrics will appear on the TV screen (if connected). When a CDG disc is inserted, the CDG indicator will light. • If connected to a TV you will see the selected song and folders on the TV screen.
- Página 28 NOTES: • If connected to a TV you will see the selected song and folders on the TV screen. • Press the SKIP-/+ buttons (17) to choose the song that you want to play. 5. Adjust the volume to a comfortable level using the MASTER VOL knob (15).
- Página 29 3. Turn on your device’s BT option in settings to search for a discoverable device with a BT signal. Select “Starmaker Plus“ from the device results on the BT menu. NOTE: Also refer to the user manual of your BT device for detailed instructions.
-
Página 30: Cleaning And Care
Using Programming Function While in the STOP mode, press the REPEAT/PROG button (8). The PROGRAM indicator (5) will blink and ”P01” will appear on the display indicating the fi rst program is ready to program. 2. Select the fi rst track by using the SKIP -/+ buttons (17). 3. -
Página 31: Troubleshooting
TROUBLESHOOTING Before contacting costumer service, check the troubleshooting information listed in the table. Problem Possible Cause Possible Solution No Power. The unit is turned off. Press the POWER button to turn on the unit. The power cord is not Make sure that the connected correctly. - Página 32 Problem Possible Cause Possible Solution No sound from The microphone is not Make sure that the the microphone. properly connected to microphone is correctly one of the microphone connected to the MIC 1 or jacks. MIC 2 jack. The microphone is turned Slide the microphone off.
-
Página 33: Hints On Disposal
HINTS ON DISPOSAL According to the European waste regulation 2012/19/ EU this symbol on the product or on its packaging indicates that this product may not be treated as household waste. Instead it should be taken to the appropriate collection point for the recycling of electrical and electronic equipment. -
Página 35: Fiche Technique
Chère cliente, cher client, Toutes nos félicitations pour l’acquisition de ce nouvel appareil. Veuillez lire attentivement et respecter les instructions de ce mode d’emploi afin d’éviter d’éventuels dommages. Le fabricant ne saurait être tenu pour responsable des dommages dus au non-respect des consignes de sécurité... -
Página 36: Consignes De Sécurité
CONSIGNES DE SÉCURITÉ Consignes générales • Foudre - Si vous n‘utilisez pas l‘appareil pendant une longue période ou s‘il y a de l‘orage, débranchez la fiche de la prise et débranchez l‘antenne de l‘appareil. Cela évite d‘endommager le produit à cause de la foudre et des surtensions. -
Página 37: Contenu De L'eMballage
CONTENU DE L‘EMBALLAGE • Chaîne karaoké (1x) • Adaptateur secteur (1x) • Câble RCA (1x) • Micro filaire (1x) • Mode d‘emploi (1x) -
Página 38: Aperçu De L'aPpareil
APERÇU DE L‘APPAREIL Face avant Poignée Témoin REC SKIP -/+ (retour / avance) Lecteur CD (enregistrement) REC Port USB Ecran LED STOP Prise AUX-IN Touche LIGHT MODE MIC VOL (réglage du volume 20 Entrée MIC 1 (micro) (mode lumière) du micro) Voyants de A.V.C (activé... - Página 39 Dos de l‘appareil Sortie VIDEO Sortie AUDIO (L) Support de micro Sortie AUDIO (R) Adaptateur secteur DC Compartiment des piles...
-
Página 40: Connexions
Voyants de l‘écran Voyant CDG Voyant PLAY/PAUSE (lecture/Pause) Voyant LED Voyant PROGRAMME (mémoire) Voyant REPEAT (répétition) CONNEXIONS Branchement du micro Vous pouvez connecter le micro à la prise MIC 1 (20) et à la prise MIC 2 (21). Remarque : Ne faites pas tomber le micro car cela pourrait endommager celui-ci ou l‘enceinte. - Página 41 REMARQUES: • Cet appareil peut être utilisé avec ou sans téléviseur. Cependant, il est recommandé que l‘appareil soit utilisé avec un téléviseur afin que toutes les fonctions puissent être utilisées. • Pour plus d‘informations sur l‘utilisation du téléviseur, lisez son mode d‘emploi.
-
Página 42: Utilisation
UTILISATION Branchement sur AUX-IN Appuyez sur le bouton ON / OFF (6) pour allumer l‘appareil. 2. Branchez la fiche du câble audio 3,5 mm (non fourni) dans la prise AUX- IN (19) de l‘appareil. 3. Appuyez sur FUNCTION (7) à l‘avant de l‘appareil pour passer en mode AUX-IN. - Página 43 3. Appuyez plusieurs fois sur FUNCTION (7) pour sélectionner le mode CDG / CD. Cd apparaît alors sur l‘écran. „---“ clignote sur l‘écran pendant le processus de lecture. Une fois le CD lu, le nombre total de pistes sur le CD s‘affiche à l‘écran. 4.
- Página 44 4. Appuyez plusieurs fois sur la touche FUNCTION (7) pour appeler le mode USB. „USB“ apparaît sur l‘écran. Tant que la clé USB est en cours de lecture, „---“ clignote à l‘écran. Le nombre total de pistes de la clé USB s‘affiche alors à...
- Página 45 être appairé. 3. Activez la fonction BT de votre appareil externe. Ouvrez la liste des appareils et sélectionnez „Starmaker Plus“. REMARQUE : Vous trouverez de plus amples informations sur l‘utilisation de la fonction BT de l‘appareil externe dans son mode d‘emploi.
- Página 46 5. Démarrez la lecture sur l‘appareil BT. Pendant la lecture, appuyez sur PLAY / PAUSE (16) pour interrompre la lecture. 6. Pour sélectionner la piste suivante ou précédente, appuyez sur les touches SKIP - / + (17). Fonction enregistrement Appuyez sur REC (10) pour enregistrer votre chant et votre musique. L‘enregistrement démarre et le témoin REC (9) s‘allume en continu.
-
Página 47: Nettoyage Et Entretien
NETTOYAGE ET ENTRETIEN • Avant de nettoyer l‘appareil, éteignez-le et débranchez la fi che de la prise. • Si l‘appareil est poussiéreux, essuyez-le avec un chiff on doux et sec. • Nettoyez l‘appareil avec un chiff on doux. • N‘utilisez pas de cire, de sprays de polissage ou de produits de nettoyage agressifs pour le nettoyage. - Página 48 Problème Cause possible Possibilité de solution Pas de son Le son du téléviseur est Réglez le volume sur le lorsque coupé ou réglé trop bas. téléviseur. l'appareil est La source correcte n'a pas Sélectionnez la bonne branché au été sélectionnée sur le source (généralement téléviseur.
- Página 49 Problème Cause possible Possibilité de solution Impossible La fonction BT de votre Activez la fonction BT de d'appairer appareil externe est votre appareil externe un appareil désactivée. (voir son mode d'emploi). externe. L'appareil n'est pas en Appuyez sur le bouton mode de couplage.
-
Página 50: Informations Sur Le Recyclage
INFORMATIONS SUR LE RECYCLAGE Vous trouverez sur le produit l’image ci-contre (une poubelle sur roues, barrée d‘une croix), ce qui indique que le produit se trouve soumis à la directive européenne 2012/19/UE. Renseignez-vous sur les dispositions en vigueur dans votre région concernant la collecte séparée des appareils électriques et électroniques. -
Página 51: Datos Técnicos
Estimado cliente: Le felicitamos por la adquisición de este producto. atentamente siguiente manual siga cuidadosamente las instrucciones de uso con el fin de evitar posibles daños. La empresa no se responsabiliza de los daños ocasionados por un uso indebido del producto o por haber desatendido las indicaciones de seguridad. -
Página 52: Indicaciones De Seguridad
INDICACIONES DE SEGURIDAD Indicaciones generales • Relámpago - Si no va a utilizar el aparato durante un periodo largo de tiempo o si hay una tormenta eléctrica, desenchufe el aparato de la toma de corriente y desconecte el conector de antena. De este modo, protegerá... -
Página 53: Contenido Del Envío
CONTENIDO DEL ENVÍO • Equipo de karaoke (1x) • Adaptador de alimentación (1x) • Cable RCA (1x) • Micrófono con cable (1x) • Manual de instrucciones (1x) -
Página 54: Descripción Del Aparato
DESCRIPCIÓN DEL APARATO Parte delantera Indicador REC (grabación) Botón SKIP -/+ (atrás/adelante) Compartimento del CD Tecla REC (grabación) Conexión USB Pantalla LED Tecla STOP Conector AUX IN Botón de MODO DE LUZ Control MIC VOL (Volumen del 20 Entrada MIC 1 micrófono) (micrófono) Luz de funcionamiento... - Página 55 Parte trasera Salida de VÍDEO Salida de AUDIO (L) Soporte de micrófono Salida de AUDIO (R) Conector de alimentación Compartimento de la de CC batería...
-
Página 56: Conexiones
Señales de la pantalla Pantalla CDG Indicador PlAY/PAUSE (Reproducir/Pausar) Pantallas LED Pantalla de PROGRAMA (memoria) Pantalla de REPETIR (repetir) CONEXIONES Conectando el micrófono Puede conectar el micrófono a los conectores MIC 1 (20) y MIC 2 (21). Nota: No deje caer el micrófono ya que esto puede dañar el micrófono o el altavoz. - Página 57 NOTAS: • Este dispositivo puede ser usado con o sin un televisor. Sin embargo, se recomienda que el dispositivo se utilice junto con una TV para que todas las funciones puedan ser utilizadas. • Con respecto al uso de la televisión, lea las instrucciones de funcionamiento.
-
Página 58: Funcionamiento
FUNCIONAMIENTO Conector AUX-IN Presione el botón ON/OFF (6) para encender la unidad. 2. Enchufe el conector del cable de audio de 3,5 mm (no incluido) en el conector AUX-IN (19) de la unidad. 3. Presione el botón FUNCTION (7) en el frente de la unidad para cambiar al modo AUX-IN. - Página 59 3. Presione el botón FUNCTION (7) varias veces para seleccionar el modo CDG/CD La pantalla mostrará „Cd“. Durante la lectura „---“ parpadea en la pantalla. Una vez que se ha leído el CD, el número total de pistas del CD se muestra en la pantalla. 4.
- Página 60 4. Presione el botón PLAY/PAUSE (16) para iniciar la reproducción. Cuando se reproduce un archivo MP3+G, la imagen y la letra se muestran en la pantalla del televisor (si está conectado al televisor). NOTA: • Si ha conectado la unidad a un televisor, su pantalla muestra las pistas y carpetas seleccionadas.
- Página 61 3. Active la función BT de su dispositivo externo. Abra la lista de dispositivos y seleccione „Starmaker Plus”. NOTA: Para más instrucciones sobre cómo utilizar la función BT del dispositivo externo, consulte su manual de usuario.
- Página 62 NOTAS : • Si está usando la conexión BT y le solicitan contraseña, introduzca lo siguiente para establecer una conexión“0000“. • Con algunos dispositivos BT, después de un emparejamiento exitoso se requiere aceptar su „uso como dispositivo de audio“ o similar. •...
-
Página 63: Limpieza Y Cuidado
3. Presione el botón REPEAT/PROG (8) de nuevo para confi rmar 4. Los pasos anteriores pueden repetirse hasta en 20 pistas. Presione el botón PLAY/PAUSE (16) para iniciar la reproducción. NOTAS : • Para detener y borrar la lista de la memoria, pulse el botón Botón STOP (11) 2 veces. - Página 64 Problema Posible causa Posible solución No hay sonido El control de volumen Ajuste el volumen con el está en el ajuste mínimo. control MASTER VOL-. Se selecciona la función Presione el botón incorrecta. FUNCTION para seleccionar la función correcta. Se está utilizando un Aumente el volumen del dispositivo externo.
- Página 65 Problema Posible causa Posible solución El micrófono no El micrófono no está Asegúrese de que suena conectado correctamente el micrófono esté al conector. correctamente conectado al conector MIC 1 o MIC 2. El micrófono está Deslice el interruptor de apagado. encendido y apagado del micrófono a la posición "ON".
-
Página 66: Retirada Del Aparato
RETIRADA DEL APARATO Según el Reglamento europeo de residuos 2012/19/ UE, este símbolo en el producto o en su embalaje indica que este producto no puede tratarse como basura doméstica. En su lugar, debe ser llevado al punto de recogida adecuado para el reciclaje de aparatos eléctricos y electrónicos. -
Página 67: Dati Tecnici
Gentile Cliente, La ringraziamo per aver acquistato il dispositivo. La preghiamo di leggere attentamente le seguenti istruzioni per l’uso e di seguirle per evitare possibili danni tecnici. Non ci assumiamo alcuna responsabilità per danni scaturiti da una mancata osservazione delle avvertenze di sicurezza e da un uso improprio del dispositivo. -
Página 68: Avvertenze Di Sicurezza
AVVERTENZE DI SICUREZZA Avvertenze generali • Colpo di fulmine – Se il dispositivo non viene utilizzato o c’è un temporale, staccare la spina dalla presa di corrente e scollegare il dispositivo dalla connessione dell’antenna. In questo modo si evitano danni al dispositivo dovuti a colpi di fulmine o sovratensione. •... -
Página 69: Volume Di Consegna
VOLUME DI CONSEGNA • Impianto di karaoke (1x) • Adattatore di rete (1x) • Cavo RCA (1x) • Microfono con cavo (1x) • Manuale di istruzioni (1x) -
Página 70: Descrizione Del Dispositivo
DESCRIZIONE DEL DISPOSITIVO Lato anteriore Impugnatura Indicazione REC (registrare) Tasto SKIP +/- Vano CD Tasto REC (registrare) Connessione USB Schermo LED Tasto STOP Connessione AUX-IN Tasto LIGHT MODE Regolazione MIC VOL (volume 20 Ingresso MIC1 (modalità luminosa) microfono) (microfono) Spie di funzionamento Tasto A.V.C. - Página 71 Lato posteriore Uscita VIDEO Uscita AUDIO (L) Supporto per microfono Uscita AUDIO (R) Connessione DC Vano delle batterie alimentatore...
-
Página 72: Connessioni
Indicazioni sul display PLAY/PAUSE (riproduzione/pausa) PROGRAM (memoria) REPEAT (ripetere) CONNESSIONI Collegare il microfono Il microfono può essere collegato con MIC1 (20) e MIC2 (21). Nota: non far cadere il microfono, altrimenti possono risultare danni a microfono o altoparlante. Non avvolgere o piegare il cavo del microfono, altrimenti potrebbe danneggiarsi. - Página 73 NOTE: • Questo dispositivo può essere utilizzato con o senza televisore. Tuttavia, si consiglia di utilizzare il dispositivo con un televisore, in modo da poter sfruttare tutte le funzioni. • Per l’utilizzo con un televisore, consultare il manuale d’uso del televisore in questione.
-
Página 74: Utilizzo
UTILIZZO Connessione AUX-IN Premere ON/OFF (6) per accendere il dispositivo. 2. Inserire il cavo audio da 3,5 mm (non incluso in consegna) nella connessione AUX-IN (19) del dispositivo. 3. Premere FUNCTION (7) sul lato anteriore per passare in modalità AUX- 4. - Página 75 3. Premere più volte FUNCTION (7) per selezionare la modalità CDG/CD. Sullo schermo compare “CD”. Durante la lettura lampeggia “---” sullo schermo. Non appena il CD viene letto, compare il numero totale di titoli sul CD. 4. Premere PLAY/PAUSE (16) per avviare la riproduzione. Se è stato inserito un CD+G, sullo schermo del televisore compaiono immagini e testi (se è...
- Página 76 è stato collegato un televisore). NOTE: • Se il dispositivo è stato collegato a un televisore, titoli e cartelle selezionati vengono mostrati sullo schermo del televisore. • Premere SKIP +/- (17) per selezionare il titolo da riprodurre. 5. Regolare il volume con MASTER VOL (15). NOTA: Se il dispositivo è...
- Página 77 NOTA: se si preme PAIR (16) a lungo, tutti i dispositivi accoppiati vengono scollegati, in modo da poterne accoppiare uno nuovo. 3. Attivare la funzione BT del dispositivo esterno. Aprire l’elenco dei dispositivi e selezionare “Starmaker Plus”. NOTA: ulteriori indicazioni sull’uso della funzione BT dei dispositivi esterni sono disponibili nei rispettivi manuali.
-
Página 78: Pulizia E Manutenzione
4. Selezionare la modalità USB con FUNCTION (7) per ascoltare i fi le registrati. Selezionare i fi le registrati da ascoltare con SKIP +/- (17). 5. Premere PLAY/PAUSA (16) per riprodurre il fi le selezionato. NOTA: la funzione di registrazione è disponibile nelle seguenti modalità: BT, AUX e CD. -
Página 79: Ricerca E Correzione Degli Errori
RICERCA E CORREZIONE DEGLI ERRORI Prima di rivolgersi al servizio di assistenza ai clienti, controllare le indicazioni relative alla risoluzione di eventuali problemi presentate nella seguente tabella. Problema Possibile causa Soluzioni Il dispositivo è Il dispositivo è spento. Accendere il dispositivo spento. - Página 80 Problema Possibile causa Soluzioni Il testo dei Il connettore video non è Collegare correttamente brani non viene collegato correttamente. il connettore video. mostrato sul Non è stata selezionata Selezionare la fonte televisore. la fonte corretta dal corretta (normalmente televisore. AV). I file/titoli riprodotti non Solo per file che contengono i testi.
- Página 81 Problema Possibile causa Soluzioni Impossibile La funzione BT del Attivare la funzione BT del accoppiare un dispositivo esterno è dispositivo in questione dispositivo BT spenta. (v. il manuale d’uso del esterno. dispositivo). Il dispositivo non si Premere PAIR per rendere trova in modalità...
-
Página 82: Avviso Di Smaltimento
AVVISO DI SMALTIMENTO Se sul prodotto è presente la fi gura a sinistra (il bidone dei rifi uti con le ruote), si applica la direttiva europea 2012/19/UE. Questi prodotti non possono essere smaltiti con i rifi uti normali. Informarsi sulle disposizioni vigenti per la raccolta di dispositivi elettrici ed elettronici.