Tabla de contenido
Publicidad
Idiomas disponibles
Idiomas disponibles
Enlaces rápidos
Publicidad
Capítulos
Tabla de contenido

Manuales relacionados para Steren HER-257


Resumen de contenidos para Steren HER-257
-
Página 3: Detector De Voltaje, Metal Y Densidad
Detector de voltaje, metal y densidad HER-257 Gracias por la compra de este producto Steren. Este manual contiene todas las funciones de operación y solución de problemas necesarias para instalar y operar su nuevo Detector de voltaje, metal y densidad Steren. -
Página 5: Tabla De Contenido
CONTENIDO Características Controles Preparación para su uso Operación Detección de cambios en la densidad de una superficie Especificaciones Precisión máxima... -
Página 6: Importante
IMPORTANTE -No intente abrir el equipo, puede ocasionar mal funcionamiento y anulación de la garantía. -No use ni almacene este equipo en lugares donde existan goteras o salpicaduras de agua. -No exponga el equipo a frío extremo. -Siempre utilice un paño suave, limpio y seco para limpiar el equipo. -
Página 7: Características
Características El detector 3 en 1 le ayuda a encontrar metales, voltaje y cambios en la densidad de una superficie de una forma rápida, precisa y fácil. Incluye señalización visual y acústica, puede detectar voltaje, metales, tornillos, clavos, conducciones metálicas, tuberías de agua, gas, cables o conducciones de baja tensión, postes, juntas, etc. -
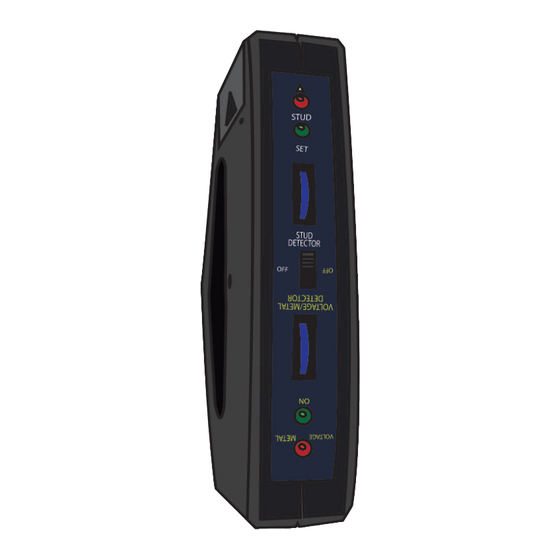
Página 8: Controles
Controles LED ROJO LED VERDE PERILLA DE SENSIBILIDAD (DETECTOR DE CAMBIOS EN DENSIDAD ) INTERRUPTOR PERILLA DE SENSIBILIDAD (DETECTOR DE METAL/VOLTAJE) LED VERDE “ON” LED ROJO... - Página 9 CARA DE DETECTOR METAL/VOLTAJE TIMBRE battery COMPARTIMIENTO DE BATERÍAS CARA DE DETECTOR DE DENSIDAD...
-
Página 10: Preparación Para Su Uso
Preparación para su uso Retire la tapa del compartimiento de baterías ubicado en la parte trasera del detector. Conecte una batería de 9V nueva. Coloque y asegure la tapa en el compartimiento. Ahora el detector esta listo para su uso. Operación DETECCIÓN DE VOLTAJE/METAL Sujete la unidad como se muestra en figura y gire la perilla azul... - Página 11 2.- Mueva el interruptor a la posición VOLTAGE/METAL DETECTOR (Detector de voltaje/metal), el LED verde de ON se encenderá. Asegúrese de que la unidad está lejos de cualquier metal o conductor portador de corriente. 3.- Gire la perilla azul hacia arriba hasta que los LEDs se enciendan (El LED rojo se encenderá...
- Página 12 5.- Si los indicadores (LEDs y alama) no se activan o desactivan después de encender el detector, éste necesita ser ajustado.
-
Página 13: Seguridad
SEGURIDAD Cuando el detector da una lectura de “NO VOLTAJE” (si el LED rojo no parpadea y la alarma sonora no suena cuando toca un conductor) compruebe previamente, en otra fuente de voltaje segura, la existencia de corriente eléctrica. Una vez que verifique realice las detecciones deseadas. PRECAUCIÓN No se detectan conductores dentro de mangueras o cubiertas. -
Página 14: Detección De Cambios En La Densidad De Una Superficie
Detección de cambios en la densidad de una superficie Siga estos pasos para la localización de vigas o columnas de pared. 1.- Sujete el detector verticalmente como se muestra en la figura y gire la perilla azul totalmente hacia abajo. 2.-Mueva interruptor posición STUD DETECTOR (Detector... - Página 15 6.- Si el detector no brinda lecturas correctas, necesitará ser ajustado. 7.- Sujete el detector como se muestra en figura y mueva horizontalmente en el muro. 8.- Cuando un borde de la viga o columna de pared esta debajo de la unidad, el LED rojo se activará...
- Página 16 NOTAS 1.- La detección de una columna puede llevarse en paredes normales o tapizadas. Sin embargo, no puede funcionar en algunos tipos de papeles o telas metalizadas. 2.- Si por casualidad se coloca la unidad sobre la columna de pared o poste para proceso de calibración.
-
Página 17: Especificaciones
Precisión máxima La sensibilidad del detector puede ser incrementada en un lugar exacto de cables, vigas o columnas. Para hacer esto, traslade el detector de un lado a otro en el área deseada, con la luz y la alarma activándose. Después de cada movimiento, gradualmente ajuste la perilla azul, hasta que la luz y la alarma se activen prolongadamente. - Página 18 1.- Para hacer efectiva la garantía, presente ésta póliza y el producto, en donde fue adquirido o en Electrónica Steren S.A. de C.V. 2.- Electrónica Steren S.A de C.V. se compromete a reparar el producto en caso de estar defectuoso sin ningún cargo al consumidor. Los gastos de transportación serán cubiertos por el proveedor.
- Página 22 Thank You on purchasing your new Steren product. This manual includes all the feature operations and troubleshooting necessary to install and operate your new Steren Voltage, metal and density detector. Please review this manual thoroughly to ensure proper installation and operation of this product. For...
- Página 24 CONTENT Highlights Controls Preparation for use Operation Density detection procedure Maximizing accurancy Specifications...
-
Página 25: Important
IMPORTANT - Warranty is void if you open the case. -Do not use nor store the equipment near wet places. May cause malfunction or shock hazard. - Avoid exposure to extreme cold. - Clean only with a soft, dry cloth. -
Página 26: Highlights
Highlights The 3-in-1 detector allows you to detect metal, voltage and changes in surface density, quickly, accurate and easy. It has visual and audible warnings when you search for voltage, metals, screws, nails, metallic conductors, water pipes, gas pipes, cables, low tension conductors, poles, among others. -
Página 27: Controls
Controls RED LED INDICATOR GREEN LED INDICATOR SENSITIVITY KNOB (DENSITY SELECTOR) SELECTOR SWITCH SENSITIVITY KNOB (VOLTAGE/METAL DETECTOR) GREEN “ON” LED RED LED INDICATOR... - Página 28 VOLTAGE / METAL DETECTION FACE BUZZER battery BATTERY COMPARTMENT COVER DENSITY DETECTOR FACE...
-
Página 29: Preparation For Use
Preparation for use Slide battery compartment cover, on the back of the unit. Connect a fresh 9V battery. Replace cover and securely snap in place. Now the unit is ready for use. Operation METAL/ VOLTAGE DETECTION PROCEDURE: 1.- Hold the unit as shown in illustration, and turn the blue knob fully downwards. - Página 30 Move selector switch VOLTAGE/METAL DETECTOR position, the green “ON” LED will come on immediately. Make sure that unit is well away from any metal or current-carrying conductor. 3.- Turn the blue knob upwards until the indicators turns on (RED LED lights and BUZZER sounds).
- Página 31 5.- If the indicators do not go on, or won’t go out, after the set has been switched on, the unit needs to be adjusted.
- Página 32 SAFETY When the unit gives a “NO VOLTAGE” reading (no blinking motion of RED LED and beeping sound BUZZER when touching the conductor), check the unit on a known voltage source BEFORE touching any conductor. CAUTION The unit will not detected shielded conductors, as those in metal conduit, it will only detect metal presence.
-
Página 33: Density Detection Procedure
Density detection procedure To locate battens or wall studs, refer to the following procedures: 1.- Hold the unit vertically as shown in illustration and turn the blue knob fully downwards. 2.- Move the selector Switch to STUD DETECTOR position. 3.-Place the detector over the desired surface. - Página 34 7.- Move the unit horizontally across the wall, make sure that the detection face marked with “STUD” is a placed against wall. Otherwise, GREEN LED will go out and calibration procedures need to carry from the beginning. 8.-When a edge of batten or wall stud is under the groove if the unit, the RED LED will come on and BUZZER sound will change to higher pitch.
- Página 35 NOTES 1.- The stud detection can be carried normally on wall-papered walls. However, it may not function on some types of foil backed or metallic fabric surfaces. 2.-If by chance the unit is placed over the wall batten or stud to process calibration.
-
Página 36: Maximizing Accurancy
Maximizing accurancy The sensitivity of the unit can be pin-pointed at the exact place of popes and cables or battens and studs. To do this, sweep unit across the area in question, with light and buzzer sounding. After each sweep, gradually adjust blue knob, unit light and buzzer are longer activated. - Página 37 Part number: HER-257 Brand: Steren WARRANTY This Steren product is warranted under normal usage against defects in workmanship and materials to the original purchaser for one year from the date of purchase. CONDITIONS 1.- This warranty card with all the required information, invoice, product box or package, and product, must be presented when warranty service is required.
- Página 39 Este instructivo puede mejorar con tu ayuda, llámanos a: Help us to improve this instruction manual, call us to: 01800 500 9000 Centro de Servicio a Clientes Customer Service Center...