Tabla de contenido

Resumen de contenidos para Stanley POWERMAX RT901
- Página 1 POWERMAX REMOTE ™ Customer Service / Servicio al Cliente / Service à la Clientèle 1-800-730-3707 • 10AM - 6PM, EST Monday to Friday / Lunes a Viernes / Lundi au Vendredi Model/Modelo/Modele# RT901/TX218...
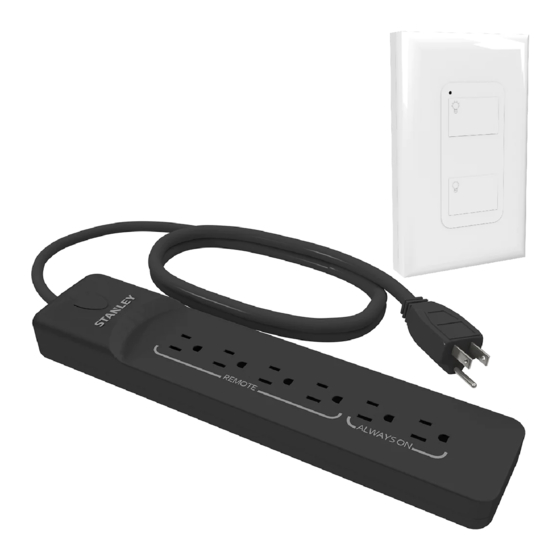
- Página 2 INSTRUCTIONS 1. Connect the power strip to a 120V grounded outlet. 2. Plug your electrical devices into one of the power strip’s outlets. a) Plug devices that need to b) Plug devices that you wish to be always powered into operate by remote control into the ALWAYS ON outlets.
-
Página 3: Resetting The Unit
REMOTE PAIRING 1. Locate the power button on the power strip. 2. Press and hold the power button for 3 seconds. The LED power indicator beneath the button will begin to flash slowly. 3. On the remote control (LED indicator still flashing) press the top of the switch (on), wait 2 seconds, and then press the bottom of the switch (off). - Página 4 REMOTE DISASSEMBLY FIGURE A FIGURE B FIGURE C FIGURE D FIGURE E (FRONT) FIGURE F FIGURE G FIGURE H (BACK) WALL INSTALLATION METHODS FIGURE 1 Apply double-sided tape to the back of the wall mount (Figure F). Then place on desired location.
- Página 5 FIGURE 2 To apply the wall mountable remote to the wall, using screws. Disassemble wall mount until it maches “Figure E”. Use a screwdriver to fasten screws in the indicated areas (Figure 2). Reassemble until it resembles “Figure A”. FIGURE 3 To apply to the wall mountable remote to an electrical box, disassemble wall mount until it matches “Figure H”.
- Página 6 CAUTION: WARNING DO NOT SPLICE, REPAIR, OR MODIFY. CHANGES OR MODIFICATIONS TO THIS UNIT UNPLUG WHEN NOT IN USE. FULLY INSERT NOT EXPRESSLY APPROVED BY THE PARTY PLUG. DO NOT USE DAMAGED REMOTE RESPONSIBLE FOR COMPLIANCE COULD SETS. INSPECT PERIODICALLY. USE WITHIN VOID THE USER AUTHORITY TO OPERATE THE ELECTRICAL RATING MARKED ON THE THE EQUIPMENT.
-
Página 7: Instrucciones
INSTRUCCIONES 1. Conecte la regleta a un enchufe de tierra de 120 V. 2. Conecte los aparatos eléctricos a una de los enchufes de la regleta. b) Conecte los dispositivos que a) Conecte los dispositivos que necesiten estar desee operar por control remoto siempre encendidos en en los enchufes REMOTE. -
Página 8: Conexión Del Control Remoto
CONEXIÓN DEL CONTROL REMOTO 1. Localice el botón de encendido en la regleta. 2. Mantenga pulsado el botón de encendido durante 3 segundos. El indicador de alimentación LED debajo del botón empezará a parpadear lentamente. 3. En el control remoto (mientras el indicador LED parpadea) presione la parte superior del interruptor (on), espere 2 segundos y, luego, pulse la parte inferior del interruptor (off). -
Página 9: Métodos De Instalación De La Pared
DESMONTAJE REMOTO FIGURA A FIGURA B FIGURA C FIGURA D FIGURA E (FRONT) FIGURA F FIGURA G FIGURA H (BACK) MÉTODOS DE INSTALACIÓN DE LA PARED FIGURA 1 Aplique cinta de doble cara a la parte trasera del soporte de pared (Figura F). Luego colóquelo en el lugar deseado. - Página 10 FIGURA 2 Para colocar el control remoto con soporte en la pared, usando tornillos. Desarme el soporte hasta que se asemeje a la “Figura E”. Use un destornillador para apretar los tornillos de las áreas indicadas (Figura 2). Vuelva a armar hasta que se asemeje a la “Figura A”. FIGURA 3 Para conectar el control remoto para montar en pared a un tomacorriente, desarme el soporte hasta que se asemeje a la “Figura H”.
- Página 11 ADVERTENCIA PRECAUCIÓN LOS CAMBIOS O MODIFICACIONES A ESTA NO EMPALME, REPARAR O MODIFICAR. UNIDAD NO APROBADOS EXPRESAMENTE DESENCHUFE CUANDO NO ESTÉ EN USO. POR LA PARTE RESPONSABLE DEL INSERTE COMPLETAMENTE EL ENCHUFE. CUMPLIMIENTO PODRÍAN ANULAR LA NO USE SISTEMAS REMOTOS DAÑADOS. AUTORIDAD DEL USUARIO PARA OPERAR INSPECCIONE PERIÓDICAMENTE.
- Página 12 INSTRUCTIONS 1. Connectez la bande d’alimentation à une prise de 120V à la terre. 2. Branchez vos appareils électriques dans l’un des prises de la bande de puissance. a) Dispositifs enfichables b) Branchez les périphériques que qui doivent toujours être vous souhaitez utiliser avec la alimentés dans ALWAYS télécommande dans les prises...
-
Página 13: Branchement De Commande A Distance
BRANCHEMENT DE COMMANDE A DISTANCE 1. Localisez le bouton d’alimentation sur le bande. 2. Appuyez sur et maintenez le bouton d’alimentation pendant 3 secondes. L’indicateur de puissance de LED sous le bouton se met à clignoter lentement. 3. Sur la télécommande (pendant que le voyant clignote), appuyez sur le haut de l’interrupteur (on), attendez deux secondes, puis appuyez sur le bas de l’interrupteur (off). - Página 14 DÉMONSE À DISTANCE FIGURE A FIGURE B FIGURE C FIGURE D FIGURE E (FRONT) FIGURE F FIGURE G FIGURE H (BACK) MÉTHODES D’INSTALLATION MURALES FIGURE 1 Appliquez du ruban double-face au dos du support mural (Figure F). Puis placez à l’endroit désiré.
- Página 15 FIGURE 2 Pour appliquer la télécommande à montage mural en utilisant des vis. Démontez le support mural jusqu’à ce qu’il corresponde à la « Figure E ». Utilisez un tournevis pour visser les vis dans les endroits indiqués (Figure 2). Rassemblez jusqu’à...
- Página 16 AVERTISSEMENT ATTENTION LES CHANGEMENTS OU MODIFICATIONS NE PAS ÉPISSER, RÉPARER, OU MODIFIER. À CET APPAREIL QUI NE SONT PAS DÉBRANCHER SI NON UTILISÉ. BIEN EXPRESSÉMENT APPROUVÉS PAR LES INSÉRER LA FICHE. NE PAS EMPLOYER GENS RESPONSABLES DE LA CONFORMITÉ UN APPAREIL ENDOMMAGÉ. VÉRIFIER-LE PEUVENT ANNULER L’AUTORISATION À...
- Página 17 STANLEY® and the STANLEY® logo are registered trademarks of Stanley Black & Decker, Inc., or one of its affiliates, and are used under license. STANLEY® y el STANLEY® logo son marcas registradas de Stanley Black & Decker, Inc., o uno de sus afiliados, y se usan con licencia.