Publicidad
Enlaces rápidos
LED Floodlight with PIR
Projecteur LED + capteur IRP
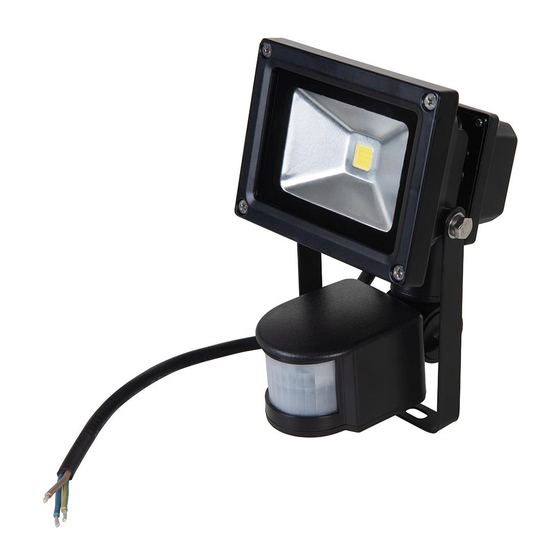
Product Familiarisation
1. LED Unit
4. Connection Wire
2. Front Lens
5. PIR Sensor
3. Mounting Bracket
Specification
Input voltage: 230V~ 50Hz
Power: 10W
Lamp type: LED
Energy efficiency: efficiency class A rating
Protection class:
Ingress protection: IP65
Dimensions (LxWxH): 112 x 155 x 140mm
Weight: 0.57kg
Detection beam angle: 120°
Max detection distance: 10m
Working temperature range: -10 - 40°C
Working humidity: <93%RH
Switching time delay: min 5sec., max 6min
Ambient light: approx. <3 - 2000Lux
Installation height: approx. 2 - 4.5m
Se familiariser avec le produit
1. Unité LED
4. Câble de connexion
2. Lentille avant
5. Capteur IRP
3. Support de montage
Caractéristique techniques
Tension d'entrée : 230 V~ 50 Hz
Puissance : 10 W
Type de lampe : LED
Efficacité énergétique : Classe A d'efficacité
Classe de protection :
Indice de protection : IP65
Dimensions (L x l x H): 112 x 155 x 140 mm
Poids : 0,57 kg
Angle de rayon de détection : 120°
Distance max de détection : 10 m
Plage de température de fonctionnement : -10 - 40 °C
Humidité de fonctionnement : <93% HR
Temporisation à la commutation: min 5 sec., max 6 min
Lumière ambiante : environ <3 - 2000Lux
Hauteur d'installation : environ 2 – 4,5 m
LED-Strahler mit Bewegungsmelder
Foco proyector LED con sensor PIR
Faro a LED con PIR
LED overstroming licht met PIR-sensor
Intended Use
• Weatherproof, wall-mounted LED floodlight for domestic use in outside locations
around the home, workshop, garage and garden.
Before Use
Installation
WARNING: This device must be installed by a qualified fitter. Electrical connections
must be undertaken by a qualified electrician.
• Fit the floodlight in a suitable location to a wall, using the holes in the Mounting
Bracket (3), suitable screws and wall plugs (not included)
• Avoid areas with limited ventilation, direct sunlight or high ambient temperatures
• To keep the ingress protection rating of IP65, the LED light must be connected
to a junction box, equipped with a cable gland, both of which are required to be
rated IP65
Adjusting the angle
• Loosen both screws located at the side of the Mounting Bracket (3) using a
suitable spanner, and adjust into the desired position. Tighten the screws firmly
to lock the light into position
Adjusting the PIR sensor
• After installation, BEFORE switching on the power, turn the 'TIME' dial on the
underneath of the PIR sensor anticlockwise to its minimum setting, and the
'DAYLIGHT' dial clockwise to its maximum setting
• Switch on the power. The floodlight should switch on after approximately
30 seconds
Usage conforme
• Projecteur LED à l'épreuve des intempéries pour installation murale. Pour usage
domestique extérieur à la maison, en atelier, dans le garage et dans le jardin.
Avant utilisation
Installation
ATTENTION : Cet appareil doit être installé par un installeur qualifié. Les connexions
électriques doivent être effectuées par un électricien qualifié.
• Montez le projecteur dans un endroit approprié sur un mur, en vous servant des
trous dans le support de montage (3), de vis adaptées et de chevilles murales
(non fournies).
• Evitez les endroits dont la ventilation est limitée, la lumière directe du soleil et les
températures ambiantes élevées.
• Afin de conserver l'indice de protection IP65, une boite de raccordement et un
presse-étoupe du même indice doivent être utilisés.
Réglage de l'inclinaison
• Desserrez les deux vis sur le côté du support de montage (3) en vous servant
d'une clé adéquate, et réglez pour obtenir la position requise. Serrez les vis
solidement pour verrouiller le projecteur en place.
Réglage du capteur IRP
• Après installation, et AVANT de brancher l'alimentation électrique, tournez le
cadran « TIME » sur le dessous du capteur IRP dans le sens inverse des aiguilles
d'une montre jusqu'à sa valeur minimale, et le cadran « DAYLIGHT » dans le sens
des aiguilles d'une montre jusqu'à sa valeur maximale.
1 0 W
• Adjust the 'TIME' and 'LIGHT' dials to suit your needs, adjusting the switch-on
Maintenance
• This LED floodlight is maintenance free. There is no need to open the housing.
• If the Front Lens (2) or the PIR Sensor (5) is dirty, carefully wipe with a soft damp
Disposal
Always adhere to national regulations when disposing of electrical devices that are
no longer functional and are not viable for repair.
• Do not dispose of power tools, or other waste electrical and electronic equipment
• Contact your local waste disposal authority for information on the correct way to
• Mettez sous tension. Le projecteur devrait s'allumer après environ 30 secondes.
• Réglez les cadrans « TIME » et « LIGHT » en fonction de vos besoins, pour régler
Entretien
• Ce projecteur LED ne nécessite aucun entretien. Il n'y a aucun besoin d'ouvrir le
• Si la lentille avant (2) ou le capteur IRP (5) sont sales, essuyez-les avec un
Recyclage
Lorsque l'appareil électrique n'est plus en état de fonctionner et qu'il n'est pas
réparable, recyclez l'appareil électrique conformément aux régulations nationales.
• Ne jetez pas les outils électriques et autres équipements électriques ou
• Contactez les autorités locales compétentes en matière de gestion des déchets
1
N (Blue)
L (Brown)
G (green/yellow)
duration and the light levels at which the floodlight starts to operate
The LED module is not exchangeable
cloth and a mild detergent, if necessary. Never use caustic agents or other
aggressive cleaners
(WEEE), with household waste
dispose of power tools
la durée d'allumage et les niveaux lumineux auxquels le projecteur commence
à fonctionner.
boitier. Le module LED n'est pas échangeable.
chiffon doux humide et un détergent doux, si nécessaire. N'utilisez jamais
d'agents caustiques ou d'autres produits de nettoyage agressifs.
électroniques (DEEE) avec les ordures ménagères.
pour vous informer de la procédure à suivre pour recycler les outils électriques.
www.silverlinetools.com
259800
2
3
4
5
Publicidad

Resumen de contenidos para Silverline 359800
- Página 1 259800 1 0 W N (Blue) L (Brown) G (green/yellow) LED-Strahler mit Bewegungsmelder Foco proyector LED con sensor PIR Faro a LED con PIR LED Floodlight with PIR LED overstroming licht met PIR-sensor Projecteur LED + capteur IRP Product Familiarisation Intended Use •...
- Página 2 Produktübersicht Bestimmungsgemäße Verwendung Uhrzeigersinn auf die niedrigste Einstellung und das „DAYLIGHT“-Rädchen („Tageslicht“) im Uhrzeigersinn auf die höchste Einstellung. 4. Anschlusskabel 1. LED Witterungsbeständiger LED-Strahler zur Wandmontage im Außenbereich an Haus, • Bei Anschluss an die Stromversorgung sollte sich der Strahler innerhalb von etwa Werkstatt, Garage und im Garten (nicht für gewerbliche Nutzung).