
Resumen de contenidos para Starlyf SEW WHIZ
- Página 1 Starlyf® Sew Whiz is a registered EU/CTM trade mark. International patents pending. All imitations will be prosecuted.
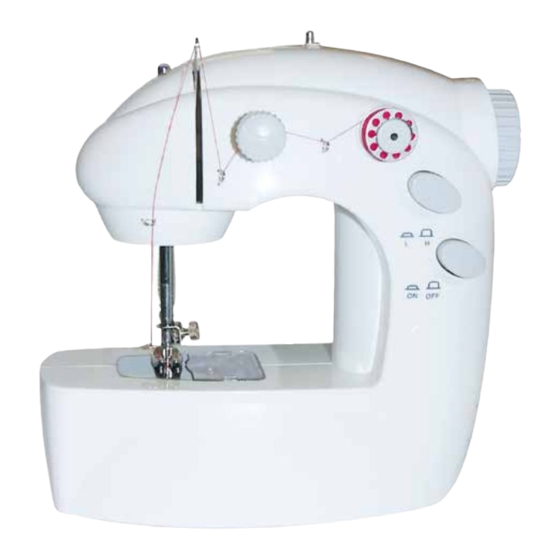
- Página 4 ENGLISH 9- Thread tension unit 10- Thread-guide disks MINI TWO-THREAD ELECTRIC SEWING MACHINE 11- Thread guide MANUAL OPTION 12- Thread take-up lever 13- Needle bar - Easy-to-insert bobbins and easy threading 14- Presser-foot lever - Two speeds (high and low) suitable for different sewing needs 15- Presser-foot support 16- Presser-foot pivot IMPORTANT NOTE:...
-
Página 5: Troubleshooting Guide
thread the needle. outwards, leaving a small amount of thread projecting from the hole so that it 2- Lower bobbin (E) can be easily held. Press the button to open the lid (25) at the back of the sewing machine. (If 5- Turn the machine ON and start filling the bobbin while holding the thread as shown in the photo. - Página 6 The machine does not Threading Rethread the upper and sew when turned ON correctly done lower threads The needle has not Push the needle up as been inserted enough far as it will go and secure The machine stops The fabric is too thick Choose a thinner fabric suddenly when working The upper and lower...
-
Página 7: Mini Maquina De Coser Electrica Con Doble Hilo Opcion Manual
ESPAÑOL 9- Tensor de hilo 10- Discos sujeta hilos MINI MAQUINA DE COSER ELECTRICA CON DOBLE HILO 11- Sujeta hilos OPCION MANUAL 12- Elevador 13- Soporte de la aguja - Fácil colocación de las canillas y fácil enhebrado 14- Elevador del sujeta telas 15- Soporte del sujeta telas - Dos velocidades (alta y baja) adecuadas para los distintos trabajos de costura... - Página 8 del elevador (12). Siga el enhebrado pasando el hilo por el siguiente orificio de superior en línea recta) (G) alambre y finalmente páselo por el agujero para el hilo (17) y el ojo de la aguja (Nota: Durante estos ajustes, compruebe que el hilo superior no se haya (enhebrado) pasar por la aguja desde fuera hacia dentro.
-
Página 9: Tabla De Problemas Y Soluciones
posición OFF) tienen efectos nefastos sobre el medioambiente o la salud humana y deben ser reciclados adecuadamente. TABLA DE PROBLEMAS Y SOLUCIONES PROBLEMA POSIBLE CAUSA SOLUCIÓN máquina Pilas mal colocadas Coloque pilas funciona al colocar el correctamente botón de conexión en Pilas agotadas posición ON Cambie las pilas... -
Página 10: Mini-Machine À Coudre Électrique À Double Fil Avec Option De Fonctionnement Manuel
FRANÇAIS 9- Régulateur de tension 10- Support de tension du dévidoir MINI-MACHINE À COUDRE ÉLECTRIQUE À DOUBLE FIL 11- Guide-fil AVEC OPTION DE FONCTIONNEMENT MANUEL 12- Releveur de fil 13- Barre du pied-de-biche - Mise en place facile des canettes et système d’enfilage simplifié 14- Levier de la barre du pied-de-biche - Deux vitesses (rapide et lente) adaptées aux différents travaux de couture 15- Support du pied-de-biche... - Página 11 Pour enfiler plus facilement le fil, il est recommandé d’utiliser l’enfile-aiguille 6- REMPLISSAGE DE LA CANETTE (H) fourni dans la pochette d’accessoires. La broche de bobinage (3), dissimulée par le volant (4), sert à soutenir la canette vide autour de laquelle le fil doit être embobiné de la façon suivante : 2- Canette inférieure (E) 1- Appuyez sur la broche de bobinage et faites-la tourner dans le sens indiqué...
-
Página 12: Problèmes Et Solutions
PROBLÈMES ET SOLUTIONS PROBLÈME CAUSE PROBABLE SOLUTION Après avoir placé le Piles mal placées Placez correctement bouton de marche/arrêt les piles en position ON, la machine ne fonctionne Piles usées Remplacez les piles pas. Mélange piles Utilisez piles neuves et de piles neuves usagées machine... -
Página 13: Sicherheitshinweise
DEUTSCH 5- Halterung für kurze Spulen 6- Obere Spule ELEKTRISCHE MININÄHMASCHINE MIT DOPPELTEM FADEN 7- Obere Garnspule zum Aufspulen von kurzen Spulen OPTION HANDBEDIENUNG 8- Garnrollenstift zum Spulen 9- Spannungsregler des Oberfadens - Einfaches Einlegen der Spulen, einfaches Einfädeln 10- Scheiben der Oberfadenspannung - Zwei Geschwindigkeiten (schnell und langsam) für die verschiedenen 11- Oberfadenspannung Näharbeiten... -
Página 14: Einstellen Der Fadenspannung
des Fadens im Uhrzeigersinn dreht. Führen Sie den Faden durch die Wenn die Naht auf der Oberseite des Stoffes als durchgehende Linie Metallöse neben der Spulenhalterung, danach durch die Scheiben der erscheint, ist der Oberfaden zu stark gespannt. Um die Spannung zu verringern, drehen Sie den Knopf der Oberfadenspannung leicht gegen den Oberfadenspannung (10) und durch die nächste Metallöse. - Página 15 Spannung muss der jeweiligen Wechselstromspannung entsprechen. Elektrische und elektronische Geräte enthalten gefährliche Stoffe, welche Stecken Sie den Adapter-Stecker in den Adapter-Anschluss des Geräts. die Umwelt oder die menschliche Gesundheit belasten können und angemessen recycelt werden müssen. (Wichtig: Bevor Sie den Adapter anschließen, vergewissern Sie sich, dass der Ein-/Ausschaltknopf auf OFF steht.) TABELLE MÖGLICHER PROBLEME UND DEREN LÖSUNG PROBLEM...
- Página 16 ITALIANO 11- Reggifilo 12- Sollevatore MINI MACCHINA DA CUCIRE ELETTRICA CON DOPPIO FILO 13- Supporto dell’ago OPZIONE MANUALE 14- Sollevatore del piedino 15- Supporto del piedino - Facile collocazione dei rocchetti e facile infilatura. 16- Perno di fissaggio - Due velocità (alta e bassa), adeguate per i diversi lavori di cucito. 17- Foro per il filo 18- Piedino NOTA IMPORTANTE:...
- Página 17 Per facilitare l’infilatura dell’ago, consigliamo di utilizzare l’infilatore contenuto 1- Premere il supporto ribobinatore e ruotarlo nel senso indicato dalla freccia. Il nella bustina degli accessori. supporto uscirà automaticamente. 2- Collocare il rocchetto vuoto nel supporto ribobinatore e farlo girare 4 o 5 volte in senso orario.
- Página 18 TAVOLA DI PROBLEMI E SOLUZIONI PROBLEMA POSSIBILE CAUSA SOLUZIONE macchina Pile mal collocate Collocare bene le pile funziona al collocare il tasto di accensione in Pile esaurite Sostituire le pile posizione ON Utilizzare pile nuove Pile nuove mischiate con pile vecchie La macchina non cuce L’infilatura è...
-
Página 19: Acessórios (B)
PORTUGUÊS 10 – Discos de guia da linha 11 – Guia da linha MINI MÁQUINA DE COSTURA ELÉCTRICA COM DUAS LINHAS 12 – Elevador OPÇÃO MANUAL 13 – Suporte da agulha 14 – Elevador do segurador do tecido - Fácil colocação das bobines e fácil de enfiar 15 –... - Página 20 enfiamento da agulha, recomendamos utilizar o enfiador fornecido no saco do a sustentar a bobine vazia, a qual deve ser enchida de acordo com os de acessórios. seguintes passos: 1 – Prima o suporte rebobinador e rode-o tal como indica a seta; a seguir, o 2 –...
- Página 21 TABELA DE PROBLEMAS E SOLUÇÕES PROBLEMA POSSÍVEL CAUSA SOLUÇÃO máquina não Pilhas mal instaladas Instale pilhas funciona ao regular o correctamente botão de ligação para a posição ON Pilhas esgotadas Substitua as pilhas Pilhas novas mistura- Utilize apenas pilhas das com pilhas velhas novas A máquina não costura O enfiamento não é...
- Página 22 NEDERLANDS 11- Draadhouder 12- Hevel ELEKTRISCHE DUBBELDRADIGE MINI-NAAIMACHINE 13- Naaldsteun OPTIONELE HANDBEDIENING 14- Hevel van de stofhouder 15- Steun van de stofhouder • Eenvoudig plaatsen van spoelen en garen 16- Steunas • Twee snelheden (hoog en laag), geschikt voor verschillend naaiwerk 17- Opening voor het garen 18- Stofhouder BELANGRIJK:...
- Página 23 gebruiken die in het zakje met accessoires wordt meegeleverd. 6- VULLEN VAN DE SPOEL (H) De steun van de terugspoeler (3) die in het handwiel (4) is verborgen, is 2-Onderspoel (E) bedoeld als ondersteuning van de lege spoel die als volgt dient te worden Druk op de knop voor de opening van de afdekking (25) die zich op de gevuld: 1-Druk op de steun van de terugspoeler en draai deze in de richting van de...
- Página 24 OVERZICHT VAN PROBLEMEN EN OPLOSSINGEN dienen op een passende wijze gerecycleerd te worden. PROBLEEM MOGELIJKE OORZAAK OPLOSSING machine Batterijen niet goed Plaats de batterijen op functioneert niet met de geplaatst correcte wijze schakelaar in de stand Batterijen zijn leeg Vervang de batterijen Nieuwe batterijen zijn Gebruik nieuwe...