
Manuales relacionados para Artillery Genius

Resumen de contenidos para Artillery Genius
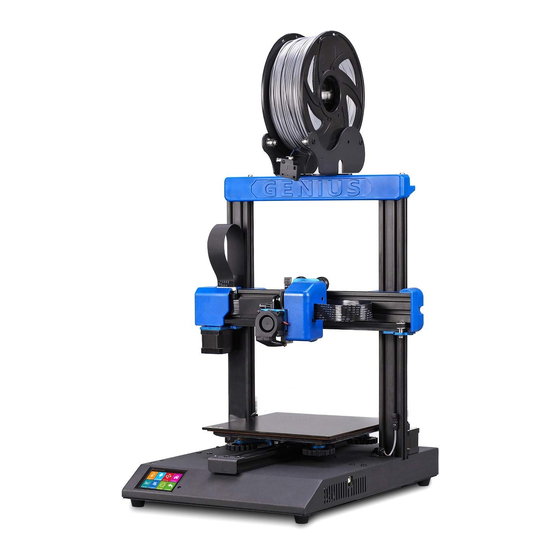
- Página 1 GENIUS Installation Manual ARTILLERY 3D PRINTER Email: ytcz@artillery3d.com Website: www.artillery3d.com...
-
Página 2: Read Me First
READ THIS MANUAL COMPLETELY BEFORE ASSEMBLING AND POWERING UP YOUR PRINTER! Hazards and Warnings The Artillery GENIUS 3D printer has motorized and heated parts. When the printer is in operation, always be aware of possible hazards. Electric Shock Hazard Never open the electronics bay of the printer while the printer is powered on. -
Página 3: Tabla De Contenido
Table of Contents Read me first Table of Contents Letter from Artillery Contents of packaging Assembly Adjustment Tips Slicer Preparation... -
Página 4: Letter From Artillery
Letter from Artillery Dear Customer, Thank you for choosing Artillery GENIUS 3D printer. This guide will step you through the assembly and the first run of the printer. If you have any problems during assembly, please contact our customer service or visit our official Facebook group at: https://www.facebook.com/groups/artillerygenius/... -
Página 5: Contents Of Packaging
List 1 - Main Modules List 2 – Tools & Spares 24pin (1pc) M4x45 (5pcs) -
Página 6: Assembly
Step 1 Align the XZ gantry to the base, make sure the cable connector also slides into the female connector on the base. Then fix the gantry with 4 pcs of M5x40 screws as shown in the picture. M5x40 (4pcs) Step 2 Insert the spool holder into the slot on the back of the top beam, then install the M3x4 screw on to the left side of the holder. -
Página 7: Adjustment
Step 3 Connect Z Endstop connector and both Z-axis stepper motors, then plug in the connectors on both ends of filament runout sensor. Step 4 Adjust the eccentric nuts with the spanner supplied if the wheels on X and Y carriage were loose. - Página 8 Step 5 Now you can connect your power and turn on the machine. On the touch screen, go to Tools -> Heat to pre-heat the nozzle and bed. Wait till both heated up to target temperature and wait for 1 minute to allow all components to equalize in temperature, then go to Tools ->...
-
Página 9: Reset Button
Reset Button With this reset button, it will reset the machine and CANNOT resume printing afterward, so be careful not to press it accidentally. Tips During printing, the LED near the nozzle shows the current printing status: - gradually change from blue to violet as the heated bed gets to target temperature. -
Página 10: Slicer Preparation
Slicer Preparation - Step 1 This printer works with most slicing / printing software like Repetier- Host, Cura, Simplify3D etc. But we will go in details for Repetier-Host and tell you how to set it up so that you can make your first print. First, install the Repetier-Host software comes on the USB stick or you can download a copy from http://www.repetier.com. - Página 11 Slicer Preparation - Step 2 Click on Printer Settings button on the top right corner to set up your printer first. In Printer Settings windows, go to Printer tab, and configure the printer as shown in below:...
- Página 12 Slicer Preparation - Step 3 Go to Printer Shape tab, configure with the following parameters: X Max: 230; Y Max: 230; Print Area Wdith/Depth: 220; Print Area Height: 250...
- Página 13 Slicer Preparation - Step 4 Click on OK to close the Printer Settings window, then go to Slicer tab on the right, choose Slic3r as Slicer and click on Configuration button.
- Página 14 Slicer Preparation - Step 5 If it’s your first time installing Repetier-Host, you may see the “Welcome to the Slic3r Configuration Wizard” window, please follow the steps below to set it up. Firmware Type - RepRap (Marlin/Sprinter) Bed Size - Shape: Rectangular; x: 220; y: 220 Nozzle diameter - 0.4 Filament Diameter - 1.75 Temperature - according to your filament, usually 220 for PLA is fine...
- Página 15 Slicer Preparation - Step 6 In Slic3r window, go to File -> Load Config Bundle... and load the config file supplied on the USB stick comes with the machine.
- Página 16 Slicer Preparation - Step 7 When load finished, you will see the screen below, you can now close this window.
- Página 17 Slicer Preparation - Step 8 Choose the desired settings when slicing. You may need to tweak the settings according to the filaments of your choice.
- Página 18 请先 读我 安装及使用本机前,请先详阅本手册 危险和警告 此 Artrillery 小天才 3D 打印机电动及加热部件。打印机运行时,请始终 注意可能存在的危险。 触电危险 打印机电源打开时,切勿打开打印机的机箱。在打开机箱检修前,请务 必关闭打印机电源并拔下电源线。 灼伤危险 在喷嘴、加热块、热床还没完全冷却前,千万不要直接触摸。此些部件 可能需要20分钟以上才能完全冷却。同时,不要触摸刚挤出的耗材,未 冷却的塑料有可能粘住皮肤导致灼伤。 失火危险 在开启或运行时,切勿在打印机上或附近放置易燃材料或液体。液体丙 酮及挥发气体极易燃烧。 夹伤危险 打印机运行时,请小心不要将手指放在活动部件上,包括皮带,皮带 轮,齿轮,滚轮或螺杆。 静电 在接触打印机之前,请务必将自己接地,尤其是电子设备。静电可能会 损坏电子元件。要自己接地,请触摸接地源。 年龄警告 对于18岁以下的用户,建议成人进行监督。小心小零件对儿童有窒息危 险。...
- Página 19 目录 请先读我 目录 Artillery的信 包装内容 组装 调整 提示 切片软件准备...
- Página 20 Ar ti l l er y的信 亲爱的顾客, 感谢您选择 Artillery 小天才 3D 打印机。 本手册将一步一步带领您从组装到第一次使用此打印机进行打印。如果 您在组装的时候遇到了什么问题,请跟我们的售后团队联系,请电邮至 support@artillery3d.com 或到我们的官方 Facebook 专页 https://www.facebook.com/groups/artillerygenius/ 详细的保修政策,请参阅 https://desk.zoho.com/portal/evnovo/kb/articles/evnovo-limited- warranty (英文) 同时,您亦可到我们的售后系统提交售后要求 https://desk.zoho.com/portal/evnovo/newticket 我司 Facebook 专页 https://www.facebook.com/artillery3d 深圳市云图创智科技有限公司 最后更新日期:2019年09月26日 本手册内容更新截止至印刷当日, 如有更新改动,请参考最新的电子版本。...
- Página 21 清 单 1 – 主 要部 件 清 单2 – 工 具 与 备 用 件 24pin (1pc) M4x45 (5pcs)
- Página 22 第一 步 龙门架与底架连接;先把龙门架顺着槽配合进去,同时把金手指排线也 同时配合插进去,最后用M5x40螺栓锁紧。 M5x40 (4pcs) 第二 步 先把料架放进横梁的槽中,左侧料架底部带上M3X4螺栓,放各种耗材移 动的时,不容易脱落。...
- Página 23 第 三 步 先插上限位开关的连接公母插端子,再插上两个Z轴电机的连接线,最后 插上断料检测开关的上下的端子。 第 四 步 如有发现X轴或者Y轴滑轮有松动的情况,可以用配送的开口扳手调节偏 心轮,达到滑顺的状态。...
- Página 24 第 五 步 现在您可以链接并打开电源,启动机器。在触屏上,转到 TOOLS -> HEAT 以预加热喷嘴和热床。当喷嘴和热床达到目标温度时,请等候 1 分 钟以使所有组件温度均衡,然后转到 TOOLS -> LEVEL。 从触屏上把喷嘴移动到四个角落,通过转动热床底下的旋钮调节高度。 在喷嘴和热床之间放置一张 A4 纸,然后一边调整高度同时滑动纸张,调 整高度,直至纸张能在之间滑动,并同时感觉到轻微的压力。 由于调整一个角落的时候会同时影响其余的角落,所以您可能需要重复 多次执行相同的过程以达致最佳效果。...
- Página 25 重 启 键 此重启键会同时重启主板及 TFT 触屏主板,重启后将不能续打,请小心 使用。 提 示 在打印的过程中,喷嘴附近的 LED 灯会显示当前的打印状态: - 随着热床加热达到目标温度,逐渐从蓝色变为紫色 - 随着喷嘴温度达到目标温度,逐渐从紫色变为红色 - 变为白色以照亮工作面 - 打印完毕后变为绿色 此外,您可以通过 TFT 触摸屏更改 LED 颜色或将其关闭。...
- Página 26 切 片 软件准 备 - 第 一步 此打印机能配合大多数切片/打印软件使用,如 Repetier-Host, Cura, Simplify3D 等。本手册将教导您怎么配置 Repetier-Host 以便进行首次打 印。 首先,安装在 U 盘上的 Repetier-Host 软件,同时您亦可到其官网下载: http://www.repetier.com 在安装过程中,在选择组件步骤中取消选中 Repetier-Server,除非您清 楚知道这是什么功能并确定需要使用)。 安装完成后并首次启动软件,您应该看到以下窗口:...
- Página 27 切片 软 件准 备 - 第 二 步 单击右上角的 打印机设置 按钮,并设置打印机参数。 在打印机设置窗口中,转到打印机选项卡,然后如下图所示配置打印机:...
- Página 28 切片 软件准备 - 第 三 步 转到 打印机形状 选项卡,使用以下参数进行配置: X 最大 : 230; Y 最大 : 230; 打印区域宽度 / 长度 : 220; 打印区域高度 : 250...
- Página 29 切片 软件 准 备 - 第四 步 单击 确定 按钮关闭打印机设置窗口, 然后转到右侧的 切片软件 选项卡, 选择 Slic3r 作为切片软件,并点击配置。...
- Página 30 切 片 软件准 备 - 第 五步 如果这是您第一次安装 Repetier-Host 软件,您可能会看到 Welcome to the Slic3r Configuration Wizard 窗口,请按照以下参数配置: Firmware Type - RepRap (Marlin/Sprinter) Bed Size - Shape: Rectangular; x: 220; y: 220 Nozzle diameter - 0.4 Filament Diameter - 1.75 Temperature - 根据您准备使用的打印耗材设置,PLA 一般设置为 220 Bed Temperature - PLA 设置为...
- Página 31 切片 软 件准 备 - 第 六 步 在 Slic3r 窗口中,转到 File -> Load Config Bundle... 并加载随机 U 盘上 的配置文件。...
- Página 32 切 片 软件准 备 - 第 七步 加载完成后,您将看到下面的画面,您现在可以关闭此窗口。...
- Página 33 切片 软 件准 备 - 第 八 步 切片时,选择所需的设置。您可能需要根据实际情况对配置进行微调。...
-
Página 34: Lese Mich Zuerst
Lese mich zuerst LESEN SIE DIESE ANLEITUNG VOLLSTÄNDIG, BEVOR SIE DEN DRUCKER ZUSAMMENBAUEN UND EINSCHALTEN! Gefahren und Warnungen Der Artillery-GENIUS-3D-Drucker verfügt über motorisierte und beheizte Teile. Achten Sie beim Betrieb des Druckers immer auf mögliche Gefahren. Stromschlaggefahr Öffnen Sie niemals den Elektronikschacht des Druckers, während der Drucker eingeschaltet ist. -
Página 35: Inhaltsverzeichnis
Inhaltsverzeichnis Lese mich zuerst Inhaltsverzeichnis Brief der Artillery Verpackungsinhalt Versammlung Einstellung Tipps Slicer Vorbereitung... -
Página 36: Brief Der Artillery
Brief der Artillery Sehr geehrter Kunde, Vielen Dank, dass Sie sich für den Artillery GENIUS 3D-Drucker entschieden haben. Diese Anleitung führt Sie durch die Montage und den ersten Durchlauf des Druckers. Wenn Sie Probleme bei der Montage haben, wenden Sie... -
Página 37: Verpackungsinhalt
Liste 1 – Hauptmodule Liste 2 - Werkzeuge und Ersatzteile 24pin (1pc) M4x45 (5pcs) -
Página 38: Versammlung
Schritt 1 Richten Sie das XZ-Portal an der Basis aus und stellen Sie sicher, dass der Kabelstecker auch in die Buchse an der Basis passt. Befestigen Sie dann das Portal mit 4 Stück M5x40-Schrauben, wie in der Abbildung gezeigt. M5x40 (4pcs) Schritt 2 Setzen Sie den Spulenhalter in den Schlitz auf der Rückseite des oberen Trägers ein und bringen Sie dann die M3x4-Schraube an der... -
Página 39: Einstellung
Schritt 3 Schließen Sie den Z-Endanschlag-Stecker und beide Z-Achsen- Schrittmotoren an und stecken Sie dann die Stecker an beiden Enden des Glühfadensensors ein. Schritt 4 Stellen Sie die Exzentermuttern mit dem mitgelieferten Schraubenschlüssel ein, wenn die Räder am X- und Y-Schlitten lose waren. - Página 40 Schritt 5 Jetzt können Sie die Stromversorgung herstellen und die Maschine einschalten. Gehen Sie auf dem Touchscreen zu Tools -> Heat, um die Düse und das Bett vorzuwärmen. Warten Sie, bis beide auf die Zieltemperatur aufgeheizt sind, und warten Sie 1 Minute, bis sich die Temperatur aller Komponenten angeglichen hat.
-
Página 41: Tipps
Reset-Knopf Mit dieser Reset-Taste wird das Gerät zurückgesetzt und der Druckvorgang KANN NICHT fortgesetzt werden. Achten Sie daher darauf, dass Sie nicht versehentlich darauf drücken. Tipps Während des Druckvorgangs zeigt die LED neben der Düse den aktuellen Druckstatus an: - allmählich von blau nach violett wechseln, wenn das erwärmte Bett die Zieltemperatur erreicht. -
Página 42: Slicer Vorbereitung
Slicer Vorbereitung - Schritt 1 Dieser Drucker funktioniert mit den meisten Slicing / Printing- Programmen wie Repetier-Host, Cura, Simplify3D usw. Wir gehen jedoch auf Repetier-Host ein und erklären Ihnen, wie Sie ihn einrichten müssen, damit Sie Ihren ersten Druck durchführen können. Deaktivieren Sie während des Installationsvorgangs Repetier-Server im Schritt Komponenten auswählen (sofern Sie nicht wissen, was es ist und was es benötigt). - Página 43 Slicer Vorbereitung - Schritt 2 Klicken Sie oben rechts auf die Schaltfläche Druckereinstellungen, um zuerst Ihren Drucker einzurichten. Wechseln Sie im Fenster "Druckereinstellungen" zur Registerkarte "Drucker" und konfigurieren Sie den Drucker wie folgt:...
- Página 44 Slicer Vorbereitung - Schritt 3 Gehen Sie zur Registerkarte Druckerform und konfigurieren Sie mit den folgenden Parametern: X Max: 230; Y Max: 230; Breite/Tiefe Druckbereich: 220; Höhe Druckbereich: 250...
- Página 45 Slicer Vorbereitung - Schritt 4 Klicken Sie auf OK, um das Fenster Druckereinstellungen zu schließen. Gehen Sie dann zur Registerkarte Slicer auf der rechten Seite, wählen Sie Slic3r als Slicer und klicken Sie auf die Schaltfläche Konfiguration.
- Página 46 Slicer Vorbereitung - Schritt 5 Wenn Sie Repetier-Host zum ersten Mal installieren, wird möglicherweise das Fenster “Welcome to the Slic3r Configuration Wizard” angezeigt. Befolgen Sie zum Einrichten die nachstehenden Schritte. Firmware Type - RepRap (Marlin/Sprinter) Bed Size - Shape: Rectangular; x: 220; y: 220 Nozzle diameter - 0.4 Filament Diameter - 1.75 Temperature - Je nach Filament sind normalerweise 220 für PLA...
- Página 47 Slicer Vorbereitung - Schritt 6 Gehen Sie im Slic3r-Fenster zu File -> Load Config Bundle... und laden Sie die Konfigurationsdatei, die auf dem mit dem Computer gelieferten USB-Stick enthalten ist.
- Página 48 Slicer Vorbereitung - Schritt 7 Wenn der Ladevorgang abgeschlossen ist, wird der folgende Bildschirm angezeigt. Sie können dieses Fenster jetzt schließen.
- Página 49 Slicer Vorbereitung - Schritt 8 Wählen Sie beim Schneiden die gewünschten Einstellungen. Möglicherweise müssen Sie die Einstellungen an die Filamente Ihrer Wahl anpassen.
-
Página 50: Advertencia De Edad
¡LEA ESTE MANUAL COMPLETAMENTE ANTES DE MONTAR Y ENCENDER SU IMPRESORA! Peligros y advertencias La impresora 3D Artillery GENIUS tiene piezas motorizadas y calentadas. Cuando la impresora está en funcionamiento, tenga siempre en cuenta los posibles peligros. Peligro de descarga eléctrica Nunca abra el compartimento electrónico de la impresora mientras la... -
Página 51: Tabla De Contenido
Tabla de contenido Léeme primero Tabla de contenido Carta de Artillery Contenido del embalaje Asamblea Ajustamiento Consejos Preparación de Slicer... -
Página 52: Carta De Artillery
Carta de Artillery Estimado cliente, Gracias por elegir la impresora 3D Artillery GENIUS. Esta guía lo guiará a través del ensamblaje y la primera ejecución de la impresora. Si tiene algún problema durante el montaje, comuníquese con nuestro servicio al cliente o visite nuestro grupo oficial de Facebook en: https://www.facebook.com/groups/artillerygenius/... -
Página 53: Contenido Del Embalaje
Lista 1 - Módulos principals Lista 2 - Herramientas y repuestos 24pin (1pc) M4x45 (5pcs) -
Página 54: Asamblea
Paso 1 alinee el pórtico XZ con la base, asegúrese de que el conector del cable también se deslice en el conector hembra de la base. Luego fije el pórtico con 4 piezas de tornillos M5x40 como se muestra en la imagen. M5x40 (4pcs) Paso 2 inserte el soporte del carrete en la ranura en la parte posterior de la viga... -
Página 55: Ajustamiento
Paso 3 conecte el conector Z Endstop y ambos motores paso a paso del eje Z, luego conecte los conectores en ambos extremos del sensor de salida de filamento. Paso 4 ajuste las tuercas excéntricas con la llave suministrada si las ruedas del carro X e Y estaban flojas. - Página 56 Paso 5 Ahora puede conectar su alimentación y encender la máquina. En la pantalla táctil, vaya a Tools -> Heat para precalentar la boquilla y la cama. Espere hasta que ambos se hayan calentado a la temperatura deseada y espere 1 minuto para permitir que todos los componentes se igualen en temperatura, luego vaya a Tools ->...
-
Página 57: Botón De Reinicio
Botón de reinicio Con este botón de reinicio, reiniciará la máquina y NO PUEDE reanudar la impresión después, así que tenga cuidado de no presionarlo accidentalmente. Consejos Durante la impresión, el LED cerca de la boquilla muestra el estado actual de impresión: - cambie gradualmente de azul a violeta a medida que el lecho calentado alcance la temperatura deseada. -
Página 58: Preparación De Slicer
Preparación de Slicer - Paso 1 Esta impresora funciona con la mayoría de los programas de corte / impresión como Repetier-Host, Cura, Simplify3D, etc. Pero detallaremos Repetier-Host y le diremos cómo configurarlo para que pueda hacer su primera impresión. Primero, instale el software Repetier-Host que viene en la memoria USB o puede descargar una copia desde http://www. - Página 59 Preparación de Slicer - Paso 2 Haga clic en el botón Configurar Impresora en la esquina superior derecha para configurar su impresora primero. En las ventanas de Impresora Ajustes, v:...
- Página 60 Preparación de Slicer - Paso 3 Vaya a la pestaña "Dimensiones Impres" , configure con los siguientes parámetros: X Max: 230; Y Max: 230; Anchura/Profundidad area de impresión: 220; Altura area de impresión: 250...
- Página 61 Preparación de Slicer - Paso 4 Haga clic en Aceptar para cerrar la ventana "Impresora Ajustes" , luego vaya a la pestaña "Slicer" a la derecha, elija "Slic3r" como "Slicer" y haga clic en el botón "Configuration" .
- Página 62 Preparación de Slicer - Paso 5 Si es la primera vez que instala Repetier-Host, puede ver la ventana “Welcome to the Slic3r Configuration Wizard”, siga los pasos a continuación para configurarlo. Firmware Type - RepRap (Marlin/Sprinter) Bed Size - Shape: Rectangular; x: 220; y: 220 Nozzle diameter - 0.4 Filament Diameter - 1.75 Temperature - según su filamento, generalmente 220 para PLA está...
- Página 63 Preparación de Slicer - Paso 6 En la ventana Slic3r, vaya a "File" -> "Load Config Bundle..." y cargue el archivo de configuración suministrado en la memoria USB que viene con la máquina.
- Página 64 Preparación de Slicer - Paso 7 Cuando finalice la carga, verá la pantalla a continuación, ahora puede cerrar esta ventana.
- Página 65 Preparación de Slicer - Paso 8 Elija la configuración deseada al cortar. Es posible que deba ajustar la configuración de acuerdo con los filamentos de su elección.
-
Página 66: Lisez-Moi D'aBord
Lisez-moi d'abord LISEZ CE MANUEL COMPLÈTEMENT AVANT D'ASSEMBLER ET D'ALIMENTER VOTRE IMPRIMANTE! Dangers et avertissements L’imprimante 3D Artillery GENIUS comprend des pièces motorisées et chauffées. Lorsque l’imprimante est en marche, soyez toujours conscient des dangers possibles. Risque de choc électrique N'ouvrez jamais la baie électronique de l'imprimante tant qu'elle est... -
Página 67: Table Des Matières
Table des matières Lisez-moi d’abord Table des matières Lettre de Artillery Contenu de l’emballage Assemblée Adjustement Conseils Préparation de la trancheur... -
Página 68: Lettre De Artillery
Letter from Artillery Cher client, Merci d’avoir choisi l’imprimante 3D Artillery GENIUS. Ce guide vous guidera à travers l’assemblage et la première utilisation de l’imprimante. Si vous rencontrez des problèmes lors de l’assemblage, veuillez contacter notre service clientèle ou visiter notre groupe Facebook officiel à... -
Página 69: Contenu De L'eMballage
Liste 1 – Modules principaux Liste 2 - Outils et pièces de rechange 24pin (1pc) M4x45 (5pcs) -
Página 70: Assemblée
Étape 1 Alignez le portique XZ sur la base, assurez-vous que le connecteur de câble coulisse également dans le connecteur femelle de la base. Fixez ensuite le portique à l’aide de 4 vis M5x40, comme indiqué sur la photo. M5x40 (4pcs) Étape 2 Insérez le porte-bobine dans la fente à... -
Página 71: Adjustement
Étape 3 Branchez le connecteur Z-Endstop et les deux moteurs pas à pas d'axe Z, puis branchez les connecteurs aux deux extrémités du capteur de fin de filament. Étape 4 Ajustez les écrous excentriques à l'aide de la clé fournie si les roues du chariot X et Y étaient desserrées. - Página 72 Étape 5 Maintenant, vous pouvez connecter votre pouvoir et allumer la machine. Sur l'écran tactile, sélectionnez Outils -> Chaleur pour préchauffer la buse et le lit. Attendez que les deux chauffent à la température cible et attendez 1 minute pour permettre à tous les composants d’équilibrer la température, puis allez à...
-
Página 73: Bouton De Réinitialisation
Bouton de réinitialisation Avec ce bouton de réinitialisation, la machine sera réinitialisée et NE PEUT PAS reprendre l’impression par la suite. Veillez donc à ne pas appuyer accidentellement dessus. Conseils Pendant l’impression, le voyant situé près de la buse indique l’état actuel de l’impression: - change progressivement du bleu au violet au fur et à... -
Página 74: Préparation De La Trancheur
Préparation de la Trancheur - Étape 1 Cette imprimante fonctionne avec la plupart des logiciels de découpage / impression tels que Repetier-Host, Cura, Simplify3D, etc. Mais nous détaillerons cette option et vous expliquerons comment la configurer pour que vous puissiez effectuer votre première impression. Tout d’abord, installez le logiciel Repetier-Host fourni sur la clé... - Página 75 Préparation de la Trancheur - Étape 2 Cliquez sur le bouton "Réglages imprimante" dans le coin supérieur droit pour configurer votre imprimante. Dans les fenêtres "Paramètres imprimante", accédez à l'onglet "Imprimante" et configurez l'imprimante comme indiqué ci-dessous:...
- Página 76 Préparation de la Trancheur - Étape 3 Allez dans l’onglet “Format imprimante”, configurez-le avec les paramètres suivants: X Max: 230; Y Max: 230; Larg./Prof. zone d'impression: 220; Haut zone d'impression: 250...
- Página 77 Préparation de la Trancheur - Étape 4 Cliquez sur OK pour fermer la fenêtre "Réglages imprimante“, puis allez à l'onglet "Trancheur" sur la droite, choisissez "Slic3r" en tant que "Trancheur" et cliquez sur le bouton Configuration.
- Página 78 Préparation de la Trancheur - Étape 5 Si vous installez Repetier-Host pour la première fois, la fenêtre “Welcome to the Slic3r Configuration Wizard” peut s’afficher. Veuillez suivre les étapes ci-dessous pour le configurer. Firmware Type - RepRap (Marlin/Sprinter) Bed Size - Shape: Rectangular; x: 220; y: 220 Nozzle diameter - 0.4 Filament Diameter - 1.75 Temperature - selon votre filament, généralement 220 pour le PLA, c'est...
- Página 79 Préparation de la Trancheur - Étape 6 Dans la fenêtre Slic3r, allez dans "File" -> "Load Config Bundle..." et chargez le fichier de configuration fourni sur la clé USB fournie avec la machine.
- Página 80 Préparation de la Trancheur - Étape 7 Lorsque le chargement est terminé, vous verrez l'écran ci-dessous, vous pouvez maintenant fermer cette fenêtre.
- Página 81 Préparation de la Trancheur - Étape 8 Choisissez les paramètres souhaités lors de la découpe. Vous devrez peut-être modifier les paramètres en fonction des filaments de votre choix.
-
Página 82: Leggimi Prima
LEGGERE COMPLETAMENTE QUESTO MANUALE PRIMA DI ASSEMBLARE E ACCENDERE LA STAMPANTE! Pericoli e avvertenze La stampante 3D GENIUS di Artillery ha parti motorizzate e riscaldate. Quando la stampante è in funzione, prestare sempre attenzione ai possibili pericoli. Rischio di scosse elettriche Non aprire mai l'alloggiamento dell'elettronica della stampante mentre la stampante è... -
Página 83: Sommario
Sommario Leggimi prima Sommario Lettera di Artillery Contenuto della confezione Montaggio Registrazione Suggerimenti Slicer Preparazion... -
Página 84: Lettera Di Artillery
Lettera di Artillery Caro cliente, Grazie per aver scelto la stampante 3D GENIUS di artiglieria. Questa guida ti guiderà attraverso l’assemblaggio e la prima esecuzione della stampante. In caso di problemi durante il montaggio, si prega di contattare il nostro servizio clienti o visitare il nostro gruppo Facebook ufficiale all’indirizzo:... -
Página 85: Contenuto Della Confezione
Elenco 1 - Moduli principali Elenco 2 - Strumenti e ricambi 24pin (1pc) M4x45 (5pcs) -
Página 86: Montaggio
Passaggio 1 allineare il portale XZ alla base, assicurarsi che anche il connettore del cavo scorra nel connettore femmina sulla base. Quindi fissare il cavalletto con 4 pezzi di viti M5x40 come mostrato in figura. M5x40 (4pcs) Passaggio 2 inserire il portarocchetto nella fessura sul retro della trave superiore, quindi installare la vite M3x4 sul lato sinistro del supporto. -
Página 87: Registrazione
Passaggio 3 collegare il connettore Z Endstop e entrambi i motori passo-passo dell'asse Z, quindi collegare i connettori su entrambe le estremità del sensore di esaurimento del filamento. Passaggio 4 regolare i dadi eccentrici con la chiave in dotazione se le ruote sul carrello X e Y erano allentate. - Página 88 Passaggio 5 Ora puoi collegare la tua alimentazione e accendere la macchina. Sul touchscreen, vai su “Tools” -> “Heat” per preriscaldare l’ugello e il letto. Attendere che entrambi si riscaldino fino alla temperatura target e attendere 1 minuto per consentire a tutti i componenti di uniformarsi in temperatura, quindi andare su “Tools”...
-
Página 89: Tasto Reset
Tasto reset Con questo pulsante di ripristino, ripristinerà la macchina e NON PUO 'riprendere a stampare successivamente, quindi fai attenzione a non premerlo accidentalmente. Suggerimenti Durante la stampa, il LED vicino all'ugello mostra lo stato di stampa corrente: - passare gradualmente dal blu al viola man mano che il letto riscaldato raggiunge la temperatura target. -
Página 90: Slicer Preparazion
Slicer Preparazione - Passaggio 1 Questa stampante funziona con la maggior parte dei software di slicing / stampa come Repetier-Host, Cura, Simplify3D, ecc. Ma andremo nei dettagli per Repetier-Host e ti diremo come configurarlo in modo da poter effettuare la tua prima stampa. Innanzitutto, installare il software Repetier-Host sulla chiavetta USB oppure è... - Página 91 Slicer Preparazione - Passaggio 2 Fare clic sul pulsante "Impostazioni stampante" nell'angolo in alto a destra per configurare prima la stampante. Nelle finestre "Impostazioni stampante" , vai alla scheda "Stampante" e configura la stampante come mostrato di seguito:...
- Página 92 Slicer Preparazione - Passaggio 3 Vai alla scheda "Opzioni piano di stampa", configura con i seguenti parametri: X Max: 230; Y Max: 230; Larghezza/Profondita area di stampa: 220; Altezza area di stampa: 250...
- Página 93 Slicer Preparazione - Passaggio 4 Fare clic su OK per chiudere la finestra "Impostazioni stampante", quindi andare alla scheda Affettatrice a destra, selezionare Slic3r come Affettatrice e fare clic sul pulsante "Configurazione" .
- Página 94 Slicer Preparazione - Passaggio 5 Se è la prima volta che installi Repetier-Host, potresti visualizzare la finestra "Welcome to the Slic3r Configuration Wizard" , segui i passaggi seguenti per configurarlo. Firmware Type - RepRap (Marlin/Sprinter) Bed Size - Shape: Rectangular; x: 220; y: 220 Nozzle diameter - 0.4 Filament Diameter - 1.75 Temperature - secondo il tuo filamento, di solito 220 per PLA vanno...
- Página 95 Slicer Preparazione - Passaggio 6 Nella finestra di Slic3r, vai su File -> Load Config Bundle... e carica il file di configurazione fornito sulla chiavetta USB fornito con la macchina.
- Página 96 Slicer Preparazione - Passaggio 7 Al termine del caricamento, verrà visualizzata la schermata seguente, ora è possibile chiudere questa finestra.
- Página 97 Slicer Preparazione - Passaggio 8 Scegli le impostazioni desiderate durante il taglio. Potrebbe essere necessario modificare le impostazioni in base ai filamenti di propria scelta.
- Página 98 Сначала прочитайте меня ПРОЧИТАЙТЕ НАСТОЯЩЕЕ РУКОВОДСТВО ПЕРЕД СБОРКОЙ И ПИТАНИЕМ ПРИНТЕРА! Опасности и предупреждения Принтер Artillery GENIUS 3D имеет моторизованные и нагреваемые детали. Когда принтер работает, всегда помните о возможных опасностях. Опасность поражения электрическим током Никогда не открывайте отсек электроники принтера, когда принтер...
- Página 99 Содержание Сначала прочитайте меня Содержание Письмо из Artillery Содержимое упаковки сборочный регулировка подсказки Подготовка слайсера...
- Página 100 Письмо из артиллерии Artillery Уважаемый клиент, Благодарим Вас за выбор 3D-принтера Artillery GENIUS. Это руководство проведет вас через сборку и первый запуск принтера. Если у вас возникли проблемы во время сборки, пожалуйста, свяжитесь с нашей службой поддержки или посетите нашу официальную группу в Facebook по адресу: https://www.facebook.com/groups/artillerygenius/...
- Página 101 Список 1 - Основные модули Список 2 - Инструменты и запасные части 24pin (1pc) M4x45 (5pcs)
- Página 102 Шаг 1 Совместите гентри XZ с основанием, убедитесь, что разъем кабеля также вставляется в гнездовой разъем на основании. Затем закрепите портал с помощью 4 винтов M5x40, как показано на рисунке. M5x40 (4pcs) Шаг 2 Вставьте держатель катушки в паз на задней части верхней балки, затем...
- Página 103 Шаг 3 Подключите разъем Z Endstop и оба шаговых двигателя оси Z, затем подключите разъемы на обоих концах датчика биения нити накала. Шаг 4 Отрегулируйте эксцентриковые гайки с помощью прилагаемого гаечного ключа, если колеса на каретке X и Y были ослаблены.
- Página 104 Шаг 5 Теперь вы можете подключить питание и включить машину. На сенсорном экране перейдите в Tools -> Heat, чтобы предварительно нагреть насадку и кровать. Дождитесь, пока оба нагреются до заданной температуры, и подождите 1 минуту, чтобы все компоненты выровнялись по температуре, затем перейдите к Tools ->...
- Página 105 Кнопка сброса Эта кнопка сброса сбрасывает аппарат и НЕ МОЖЕТ возобновить печать после этого, поэтому будьте осторожны, чтобы случайно не нажать на нее. подсказки Во время печати светодиод возле сопла показывает текущее состояние печати: - постепенно переходить от синего к фиолетовому, когда нагретая кровать...
- Página 106 Подготовка слайсера - Шаг 1 Этот принтер работает с большинством программ для нарезки / печати, таких как Repetier-Host, Cura, Simplify3D и т. Д. Но мы подробно расскажем о Repetier-Host и расскажем, как его настроить, чтобы вы могли сделать свою первую печать. Во- первых, установка...
- Página 107 Подготовка слайсера - Шаг 2 Нажмите кнопку «Настройки принтера» в правом верхнем углу, чтобы сначала настроить принтер. В окнах «Настройки принтера» перейдите на вкладку «Принтер» и настройте принтер, как показано ниже:...
- Página 108 Подготовка слайсера - Шаг 3 Перейдите на вкладку «Размеры», настройте следующие параметры: Макс X: 230; Макс Y: 230; Ширина/Глубина области печати: 220; Высота области печати: 250...
- Página 109 Подготовка слайсера - Шаг 4 Нажмите OK, чтобы закрыть окно «Настройки принтера», затем перейдите на вкладку Slicer справа, выберите Slic3r в качестве Slicer и нажмите кнопку Конфигурация.
- Página 110 Подготовка слайсера - Шаг 5 Если вы впервые устанавливаете Repetier-Host, вы можете увидеть окно «Welcome to the Slic3r Configuration Wizard», выполните следующие действия, чтобы настроить его. Firmware Type - RepRap (Marlin/Sprinter) Bed Size - Shape: Rectangular; x: 220; y: 220 Nozzle diameter - 0.4 Filament Diameter - 1.75 Temperature - согласно...
- Página 111 Подготовка слайсера - Шаг 6 В окне Slic3r перейдите в File -> Load Config Bundle ... и загрузите файл конфигурации, поставляемый с USB-накопителя, который входит в комплект поставки устройства.
- Página 112 Подготовка слайсера - Шаг 7 Когда загрузка закончится, вы увидите экран ниже, теперь вы можете закрыть это окно.
- Página 113 Подготовка слайсера - Шаг 8 Выберите нужные настройки при нарезке. Возможно, вам придется настроить параметры в соответствии с выбранными вами нитями.
- Página 114 Shenzhen Yuntu Chuangzhi Technology Co., Ltd. Address: 3/F, Bldg C, Hepinggang Hi-Tech Industrial Park, No. 48, Fengmen Road, Gangtou Community, Longtian District, Shenzhen, China Email: ytcz@artillery3d.com Website:www.artillery3d.com...