Palazzetti EASYTOUCH Uso Y Funciones
Ocultar thumbs
Ver también para EASYTOUCH:
- Uso y funciones (67 páginas) ,
- Traducción de las instrucciones originales (60 páginas) ,
- Uso y funciones (64 páginas)
Tabla de contenido
Publicidad
Idiomas disponibles
Idiomas disponibles
Enlaces rápidos
IT
UTILIZZO E FUNZIONALITÀ
EN
USE AND FUNCTION
DE
VERWENDUNG UND BETRIEB
FR
UTILISATION ET FONCTIONNEMENT
ES
USO Y FUNCIONES
Il presente manuale è parte integrante del prodotto.
Si raccomanda di leggere attentamente le istruzioni prima
dell'installazione, manutenzione o utilizzo del prodotto.
This manual is an integral part of the product.
Read the instructions carefully before installing, servicing
or operating the product.
Die vorliegende Anleitung ist fester Bestandteil des
Produkts.
Vor der Installation, Wartung und Verwendung die
EASY
TOUCH
Anleitungen stets aufmerksam durchlesen.
Le présent manuel fait partie intégrante du produit.
Il est conseillé de lire attentivement les consignes avant
l'installation, l'entretien ou l'utilisation du produit.
Este manual es parte integrante del producto.
Se recomienda leer detenidamente las instrucciones
antes de la instalación, el mantenimiento y el uso del
producto.
Publicidad
Capítulos
Tabla de contenido

Manuales relacionados para Palazzetti EASYTOUCH


Resumen de contenidos para Palazzetti EASYTOUCH
- Página 1 UTILIZZO E FUNZIONALITÀ USE AND FUNCTION VERWENDUNG UND BETRIEB UTILISATION ET FONCTIONNEMENT USO Y FUNCIONES EASY TOUCH Il presente manuale è parte integrante del prodotto. Anleitungen stets aufmerksam durchlesen. Si raccomanda di leggere attentamente le istruzioni prima dell’installazione, manutenzione o utilizzo del prodotto. Le présent manuel fait partie intégrante du produit.
- Página 2 Gentile cliente, desideriamo innanzitutto ringraziarLa per la preferenza che ha voluto accordarci acquistando il nostro prodotto e ci congratuliamo con Lei per la scelta. Per consentirLe di utilizzare al meglio la Sua nuova stufa, la invitiamo a seguire attentamente quanto descritto nel presente manuale. Dear Customer, We’d like to thank you for having purchased one of our products and congratulate you on your choice.
-
Página 3: Tabla De Contenido
INDICE Pannello comandi Descrizione Uso del pannello comandi Parametri di funzionamento Operazioni preliminari Caricamento pellet Alimentazione elettrica Impostazioni iniziali Utilizzo della stufa Accensione Modifica dei parametri Spegnimento Funzionamento con termostato ambiente Funzionamento con sonda ambiente a bordo stufa Funzionamento in abbinamento con un accumulo Funzioni disponibili Funzione ”Timer”... -
Página 4: Pannello Comandi
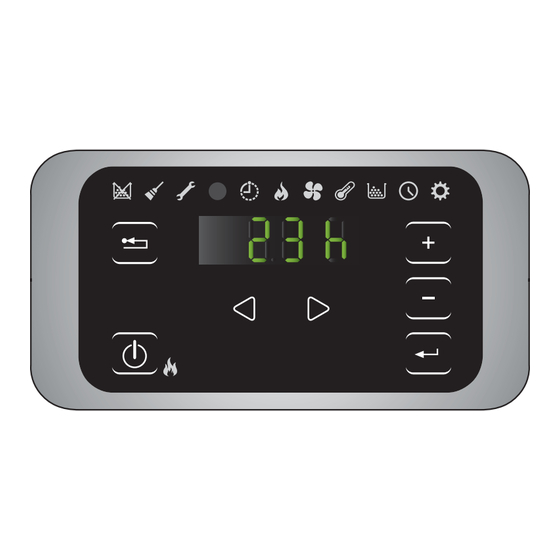
Pannello comandi Descrizione Il pannello comandi è composto da: A) una parte superiore con i led di stato e le icone retroilluminate che identificano ciascuna funzione; B) display a led; C) tasto di accensione; D) tasto “Annulla” e visualizzazione “errore”; E) due tasti freccia per spostarsi tra le varie funzioni;... - Página 5 config.1: 65..80 °C Visualizza la temperatura letta dalla sonda* e permette di impostare la temperatura desiderata. Temperatura config.2-5: 10.. 48 °C *config.1: sonda di mandata; config.2: sonda ambiente; config. 3-4: sonda esterna/accumulo; config.3-4: 45..75 °C Combustibile Funzione non utilizzata config.1: OFF; 1,..5 Ventilazione Impostazione della velocità...
-
Página 6: Uso Del Pannello Comandi
1.2 Uso del pannello comandi • Agendo sui tasti freccia ci si sposta tra i diversi menu che si illuminano di volta in volta. • Soffermandosi su una determinata funzione si possono scorrere gli eventuali sottomenu con i tasti ; per modificare un parametro basta agire sul tasto e modificarne i valori, sempre con i tasti . - Página 7 1.3.3 Modifica della ventilazione (ove previsto) Per modificare il valore della ventilazione: a) Portarsi con i tasti sul menu ventilazione e premere il tasto b) Lampeggerà il valore di ventilazione; modificarne il valore con i tasti • “1” minimo,...,”5” massimo; •...
-
Página 8: Operazioni Preliminari
Operazioni preliminari 2.1 Caricamento pellet La prima operazione da eseguire prima di accendere il prodotto è quella di riempire il serbatoio di combustibile (pellet). Il pellet deve essere versato nel serbatoio con una paletta. Non svuotare il sacco direttamente nel serbatoio per evitare di caricare della segatura o altri elementi estranei che potrebbero... -
Página 9: Impostazioni Iniziali
2.3 Impostazioni iniziali Prima di utilizzare la stufa è necessario impostare la data e l’ora corrente. 2.3.1 Impostazione orario e data Per modificare la data: a) Portarsi con i tasti sul menu setup e premere il tasto b) selezionare la password “7” con il tasto e confermare con il tasto c) scorrere con il tasto , selezionare il sottomenu [3] e confermare con il tasto... -
Página 10: Impostazione Volume
2.3.4 Impostazione volume È possibile impostare il livello di volume del cicalino, in base alle proprie necessità: a) Agendo sui tasti freccia portarsi sul menu setup e premere il tasto b) selezionare la password “7” con il tasto e confermare con il tasto c) scorrere con il tasto e selezionare il sottomenu [13] e confermare con il tasto d) impostare con i tasti... -
Página 11: Utilizzo Della Stufa
Utilizzo della stufa 3.1 Accensione Prima di ogni accensione, accertarsi che il braciere sia completamente vuoto e correttamente posizionato nella sua sede. Per accendere la stufa tenere premuto il tasto per qualche secondo. L’icona a forma di fiamma inizierà a lampeggiare, durante la fase di accensione fino a restare fissa a stufa accesa. -
Página 12: Funzionamento Con Termostato Ambiente
3.4 Funzionamento con termostato ambiente Quando la stufa viene comandata da un termostato (o cronotermostato) esterno, l’installatore deve avere impostato la configurazione 1. In questa configurazione la stufa si spegne quando il termostato esterno è soddisfatto (circuito aperto) oppure modula il proprio funzionamento (cioè la stufa tenta di mantenere la temperatura desiderata consumando il meno possibile) al raggiungimento della temperatura dell’acqua impostata. -
Página 13: Funzioni Disponibili
Funzioni disponibili 4.1 Funzione “Timer” È possibile impostare, abilitare ed assegnare ai vari giorni della settimana, i programmi personalizzati per l’accensione e/o lo spegnimento automatico della stufa. È possibile configurare fino a sei programmi personalizzati. Per ciascun programma si può impostare: ora di accensione, ora di spegnimento e temperatura desiderata. -
Página 14: Funzione Risparmio "Eco Mode
4.1.2 Assegnare programmi ai giorni Con questa funzione è possibile assegnare fino a tre programmi diversi ad un determinato giorno. a) Agendo sui tasti freccia portarsi sul menu setup e premere il tasto b) selezionare la password “7” con il tasto e confermare con il tasto c) selezionare il sottomenu [1] e confermare con il tasto d) scegliere con i tasti... -
Página 15: Funzione "Blocco Tastiera
4.4 Funzione “Blocco tastiera” Con questa funzione è possibile bloccare l’utilizzo del pannello comandi per evitare modifiche accidentali. Per abilitare/disabilitare tale funzione: a) Agendo sui tasti freccia portarsi sul menu setup e premere il tasto b) selezionare la password “7” con il tasto e confermare con il tasto c) selezionare il sottomenu [10] e confermare con il tasto d) impostare con i tasti... -
Página 16: Funzione "Delta Di Riaccensione
4.6 Funzione “Delta di riaccensione” Delta di riaccensione: (nelle configurazioni installative 2, 3 e 4) è il numero di gradi, al di sotto della temperatura di spegnimento, oltre il quale la stufa si riaccende automaticamente. Ad esempio se la stufa è impostata per spegnersi a 20°C (Eco Mode attivo) e impostiamo un “Delta di riaccensione”... -
Página 17: Gestione Degli Allarmi
Gestione degli allarmi Nel caso si verifichi un’anomalia nel funzionamento, viene attivata la seguente procedura: 1. allarme acustico (beep); 2. si illumina uno dei seguenti led di sistema: 3. se l’anomalia riguarda un errore, la stufa si spegnerà. La pressione prolungata del tasto “annulla” consente la visualizzazione sul display del codice di errore: CODICE... - Página 18 Camera di combustione, braciere o sistema di evacuazione dei fumi sporchi ---- Pulizia stufa Tubi rilevamento pressione staccati o ostruiti Ingresso dell’aria comburente ostruito Pellet esaurito; Resistenza di accensione ---- Errore di mancata accensione guasta; Guarnizioni consumate; Posizione del braciere non corretta Dopo aver verificato il tipo messaggio è...
- Página 19 CONTENTS Control panel Description Use of the control panel Operating parameters Preliminary operations Pellet loading Electrical power supply Initial settings Using the stove Power on Modifying the parameters Power off Operation with room thermostat Operation with room probe on the boiler Operation in combination with a storage tank Available functions...
-
Página 20: Control Panel
Control panel 1.1 Description The control panel consists of: A) an upper part with status LEDs and backlit icons that identify each function; B) LED display; C) power on key; D) “Cancel” button and “error” display; E) two arrow keys to move between the various functions;... - Página 21 config.1: 65..80 °C It displays the temperature read by the probe* and allows the desired temperature to be set. Temperature config.2-5: 10.. 48 °C *config.1: delivery probe; config.2: room probe; config. 3-4: external probe/storage tank; config.3-4: 45..75 °C Fuel Function not used config.1: OFF;...
-
Página 22: Use Of The Control Panel
1.2 Use of the control panel • Use the arrow keys to move between the different menus that light up from time to time. • Focusing on a specific function, it is possible to scroll through any sub-menus with the keys ;... - Página 23 1.3.3 Changing the ventilation (where featured) To change the value of the ventilation: a) Use the keys on the ventilation menu and press the key b) The ventilation value will flash; change the value with the keys • "1" minimum,...,”5” maximum; •...
-
Página 24: Preliminary Operations
Preliminary operations 2.1 Pellet loading The first operation to be performed before switching on the product is to fill the fuel tank (pellets). The pellet must be poured into the tank with a scoop. Do not empty the bag directly into the tank to avoid loading sawdust or other foreign elements that could compromise correct functioning of the stove and to... -
Página 25: Initial Settings
2.3 Initial settings Before using the stove it is necessary to set the current date and time. 2.3.1 Setting time and date To change the date: a) Use the keys on the set-up menu and press the key b) select the password "7" with the key and confirm with the key c) scroll with the key , select the submenu [3] and confirm with the key... -
Página 26: Volume Setting
2.3.4 Volume setting Set the volume level of the buzzer, according to your requirements: a) Use the arrow keys to go to the set-up menu and press the key b) select the password "7" with the key and confirm with the key c) scroll with the key and select the submenu [13] and confirm with the key d) use the... -
Página 27: Using The Stove
Using the stove 3.1 Power on Before each ignition, make sure that the burn pot is completely empty and correctly positioned in its seat. To turn on the stove keep the key pressed for a few seconds. The flame icon will start to flash, during the ignition phase until it remains fixed when the stove is on. -
Página 28: Operation With Room Thermostat
3.4 Operation with room thermostat When the stove is controlled by an external thermostat (or chronothermostat), the installer must have set the configuration 1. In this configuration the stove switches off when the external thermostat is satisfied (open circuit) or modulates its operation (i.e. the stove tries to maintain the desired temperature while consuming as little as possible) when the set water temperature is reached. -
Página 29: Available Functions
Available functions 4.1 “Timer” function It is possible to set, enable and assign to the various days of the week the customised programs for the automatic switching on and/or off of the stove. Up to six customised programs can be configured. For each program it is possible to set: start time, switch off time and desired temperature. -
Página 30: Eco Mode" Saving Function
4.1.3 Timer enabling / disabling a) Use the arrow keys to go to the Timer menu b) confirm with the key c) scroll with the keys and select: “ON” to enable the timer or “OFF” to disable it. d) press the key to confirm the selection When the timer is enabled, the fixed icon will appear to indicate that the timer is active. -
Página 31: Antifreeze" Function
4.5 “Antifreeze” function In the installation configurations 2, 3 and 4 it is possible to set a minimum temperature below which the stove switches on (outside the set time bands). Configuration 2: To modify the ”antifreeze” temperature value: a) Use the arrow keys to go to the set-up menu and press the key b) select the password "7"... -
Página 32: Alarm Management
Alarm management If an anomaly occurs in the operation, the following procedure is activated: 1. acoustic alarm (beep); 2. one of the following system LEDs lights up: 3. if the anomaly concerns an error, the stove will switch off. Prolonged pressing of the ”cancel” key allows the display of the error code: CODE DESCRIPTION... - Página 33 Combustion chamber, burn pot or dirty fume evacuation ---- Stove cleaning Detached or blocked pressure sensing tubes Blocked combustion air intake Low level of pellets; ignition resistance faulty; ---- Ignition failure error worn seals; Incorrect burn pot position After checking the message type, it is possible to reset the alarm by pressing the on/off key for a few seconds.
- Página 34 INHALTSVERZEICHNIS Bedientafel Beschreibung Bedienung der Bedientafel Betriebsparameter Vorbereitende Maßnahmen Einfüllen der Pellets Stromversorgung Anfängliche Einstellungen Verwendung des Heizofens Anfeuern Änderung der Parameter Ausschalten Betrieb mit Raumthermostat Betrieb mit Raumfühler am Kessel Betrieb in Verbindung mit einem Speicher Verfügbare Funktionen Funktion „Zeitschaltuhr“ Sparfunktion „Öko-Modus“...
-
Página 35: Bedientafel
Bedientafel 1.1 Beschreibung Die Bedientafel besteht aus: A) einen oberen Teil mit Status-LEDs und beleuchteten Symbolen, die jede Funktion identifizieren; B) LED-Display; C) Zündtaste; D) Taste „Abbrechen“ und Anzeige von „Fehlern“; E) Zwei Pfeiltasten, um sich zwischen den verschiedenen Funktionen zu bewegen; F) Zwei Tasten um auf die Untermenüs zuzugreifen und die... - Página 36 Zeigt die von der Sonde* gelesene Temperatur an und KonAbb.1: 65-80°C ermöglicht die Einstellung der gewünschten Temperatur. Temperatur KonAbb. 2-5: 10-48°C *KonAbb.1: Sonde am Zulauf; KonAbb.2: Raumsonde; KonAbb. 3-4: externe Sonde/Speichersonde; KonAbb. 3-4: 45-75°C Brennstoff Funktion nicht verwendet KonAbb.1: OFF; 1,..5 Belüftung Einstellung der Geschwindigkeit des Ventilators KonAbb.
-
Página 37: Bedienung Der Bedientafel
1.2 Bedienung der Bedientafel • Mithilfe der Pfeiltasten kann man zwischen den verschienden Menüs wechseln, die von Zeit zu Zeit aufleuchten. • Innerhalb einer bestimmten Funktion kann man die eventuell vorhandenen Untermenüs mit den Tasten durchblättern. Um einen Parameter zu ändern, die Taste drücken und die Werte mit den Tasten ändern. - Página 38 1.3.3 Änderung der Belüftung (sofern vergesehen) Um den Belüftungswert zu ändern: a) Mithilfe der Tasten auf das Menü der Belüftung zugreifen und die Taste drücken; b) Der Belüftungswert blinkt; den Wert mit den Tasten ändern: • „1“ kleine Stufe,..., „5“ Höchststufe; •...
-
Página 39: Vorbereitende Maßnahmen
Vorbereitende Maßnahmen 2.1 Einfüllen der Pellets Die erste Maßnahme zur Inbetriebnahme desHeizofens Anfüllen Brennstoffbehälters (Pellets). Die Pellets mit einer Schaufel einfüllen. Den Beutel nicht direkt in den Tank leeren, um zu vermeiden, dass Sägemehl oder andere Fremdkörper in den Tank gelangen, die die ordnungsgemäße Funktion des Ofens beeinträchtigen könnten, und dass die Pellets außerhalb des Tanks verteilt... -
Página 40: Anfängliche Einstellungen
2.3 Anfängliche Einstellungen Bevor der Ofen benutzt wird, müssen das aktuelle Datum und die Uhrzeit eingestellt werden. 2.3.1 Uhrzeit- und Datumeinstellung Um das Datum zu ändern: a) Mithilfe der Tasten auf das Menü der Einstellung zugreifen und die Taste drücken; b) Das Passwort “7”... -
Página 41: Einstellung Der Lautstärke
2.3.4 Einstellung der Lautstärke Es kann die Lautstärke des Summes gemäß den jeweiligen Bedürfnissen eingestellt werden: a) Mithilfe der Pfeiltasten zum Einstellungsmenü gehen und die Taste drücken; b) Das Passwort „7” mit der Taste wählen und mit der Taste bestätigen; c) Mithilfe der Taste scrollen und das Untermenü... -
Página 42: Verwendung Des Heizofens
Verwendung des Heizofens 3.1 Anfeuern Vor jeder Zündung sicherstellen, dass das Kohlebecken vollständig entleert und richtig in seinem Sitz positioniert ist. Zum Einschalten des Ofens die Taste einige Sekunden gedrückt halten. Das Flammensymbol beginnt während der Zündphase zu blinken, bis es bei eingeschaltetem Ofen dauerhaft leuchtet. -
Página 43: Betrieb Mit Raumthermostat
3.4 Betrieb mit Raumthermostat Wenn der Heizofen von einem externen Thermostat (oder einem Zeitthermostat) gesteuert wird, muss der Installateur die Konfiguration 1 eingestellt haben. In dieser Konfiguration schaltet der Ofen ab, wenn der externe Thermostat das OK hierzu gibt (offener Stromkreis) oder moduliert seinen Betrieb (d.h. der Ofen versucht, die gewünschte Temperatur zu halten, während er so wenig wie möglich verbraucht), wenn die eingestellte Wassertemperatur erreicht ist. -
Página 44: Verfügbare Funktionen
Verfügbare Funktionen 4.1 Funktion „Zeitschaltuhr“ Es ist möglich, die benutzerdefinierten Programme für das automatische Ein- und / oder Ausschalten des Ofens einzustellen, zu aktivieren und den verschiedenen Wochentagen zuzuweisen. Es können bis zu sechs benutzerdefinierte Programme konfiguriert werden. Für jedes Programm können eingestellt werden: Zündzeitpunkt, Ausschaltzeitpunkt und gewünschte Temperatur. -
Página 45: Sparfunktion „Öko-Modus
4.1.2 Zuweisung der Programme auf die Tage Mit dieser Funktion ist es möglich, einem bestimmten Tag bis zu drei verschiedene Programme zuzuweisen. a) Mithilfe der Pfeiltasten zum Einstellungsmenü gehen und die Taste drücken; b) Das Passwort „7” mit der Taste wählen und mit der Taste bestätigen;... -
Página 46: Neuzündung Nach Einem Stromausfall
4.3 Neuzündung nach einem Stromausfall Bei einem Stromausfall schaltet sich der Heizofen automatisch wieder ein und überprüft die Sicherheitsbedingungen, wenn die Stromversorgung wiederhergestellt wird. 4.4 Funktion „Tastensperre“ Mit dieser Funktion ist es möglich, die Verwendung des Bedienfelds zu sperren, um versehentliche Änderungen zu vermeiden. -
Página 47: Funktion „Neuzündungsdelta
4.6 Funktion „Neuzündungsdelta“ Neuzündungsdelta: (in den Installationskonfigurationen 2, 3 und 4) ist es die Gradzahl unterhalb der Ausschalttemperatur, ab der sich der Ofen automatisch wieder einschaltet. Wenn der Ofen beispielsweise so eingestellt ist, dass er sich bei 20 °C ausschaltet (Öko- Modus aktiv) und wir ein „Neuzündungsdelta“... -
Página 48: Alarmverwaltung
Alarmverwaltung Sollte es zu einer Betriebsstörung kommen, wird folgende Prozedur aktiviert: 1. Akustischer Alarm (Beep); 2. Es schaltet sich eine der folgenden System-LEDs ein: 3. Betrifft die Störung einen Fehler, schaltet sich der Heizofen ab. Durch längeres Drücken der Taste „Abbrechen“ kann der Fehlercode am Display angezeigt werden: CODE... - Página 49 Brennkammer, Kohlenbecken oder Rauchabzug ---- Reinigung des Heizofens Druckerfassungsrohre getrennt oder verstopft Zufuhr der Verbrennungsluft verstopft Keine Pellets; Zündwiderstand defekt; Dichtungen ---- Fehlzündung abgenutzt; Position des Kohlebeckens nicht korrekt Nach Überprüfung des Meldungstyps kann der Alarm zurückgesetzt werden, indem die Ein / Aus-Taste einige Sekunden lang gedrückt wird.
- Página 50 INDEX Panneau de commande Description Utilisation du panneau de commande Paramètres de fonctionnement Opérations préalables Chargement des granulés de bois Alimentation électrique Programmations initiales Utilisation du poêle Allumage Modification des paramètres Arrêt Fonctionnement avec thermostat ambiant Fonctionnement avec sonde ambiante dans la chaudière Fonctionnement associé...
-
Página 51: Panneau De Commande
Panneau de commande 1.1 Description Le panneau de commande est composé de : A) une partie supérieure avec les LED d’état et les icônes rétroéclairées qui identifient chaque fonction ; B) affichage à LED ; C) touche d’allumage ; D) touche « Annuler » et affichage « erreur »; E) deux touches fléchées pour se déplacer parmi les différentes fonctions ;... - Página 52 config.1 : 65..80 °C Affiche la température lue par la sonde* et permet de programmer la température désirée. Température config.2-5 : 10.. 48 °C *config.1 : sonde de refoulement ; config.2 : sonde ambiante ; config. 3-4 : sonde externe/accumulation ; config.3-4 : 45..75 °C Combustible Fonction non utilisée...
-
Página 53: Utilisation Du Panneau De Commande
1.2 Utilisation du panneau de commande • En agissant sur les touches fléchées on se déplace parmi les différents menus qui s’allument à chaque passage. • En s’arrêtant sur une fonction, il est possible de faire défiler les éventuels sous- menus avec les touches ;... -
Página 54: Modification De La Ventilation (Si Prèvue)
1.3.3 Modification de la ventilation (si prèvue) Pour modifier la valeur de la ventilation : a) A l'aide des touches , se positionner sur le menu ventilation et appuyer sur la touche b) La valeur de ventilation se met à clignoter ; modifier la valeur avec les touches •... -
Página 55: Opérations Préalables
Opérations préalables 2.1 Chargement des granulés de bois Avant d’allumer le produit, remplir le réservoir de combustible (granulés de bois). Les granulés de bois doivent être versés dans le réservoir avec une palette. Ne videz pas le sac directement dans le réservoir pour éviter de charger de la sciure de bois ou d’autres éléments IS IS... -
Página 56: Programmations Initiales
2.3 Programmations initiales Avant d’utiliser le poêle, il est nécessaire de programmer la date et l’heure courant. 2.3.1 Programmation heure et date Pour modifier la date : a) Se déplacer avec les touches sur le menu setup et frapper la touche b) sélectionner le mot de passe «... -
Página 57: Réglage Du Volume
2.3.3 Programmation luminosité affichage Il est possible de programmer le degré d’atténuation de la luminosité de l’affichage lorsqu’il est en mode veille : a) En agissant sur les touches fléchées se positionner sur le menu setup puis frapper la touche b) sélectionner le mot de passe «... -
Página 58: Utilisation Du Poêle
Utilisation du poêle 3.1 Allumage Avant chaque allumage, vérifier que le brasier est complètement vide et correctement positionné à sa place. Pour allumer le poêle, maintenir la touche appuyée pendant quelques secondes. L’icône en forme de flamme se met à clignoter, pendant la phase d’allumage et devient fixe quand le poêle est allumé. -
Página 59: Fonctionnement Avec Thermostat Ambiant
3.4 Fonctionnement avec thermostat ambiant Lorsque le poêle est commandé par un thermostat (ou un chronothermostat) externe, l’installateur doit avoir programmé la configuration 1. Dans cette configuration, le poêle s’éteint lorsque le thermostat externe est satisfait (circuit ouvert) ou module son propre fonctionnement (c’est-à-dire que le poêle essaie de maintenir la température ambiante désirée en consommant le moins possible) lorsque la température de l’eau programmée a été... -
Página 60: Fonctions Disponibles
Fonctions disponibles 4.1 Fonction « Timer » (minuterie) Il est possible de programmer, de valider et d’attribuer aux différents jours de la semaine les programmes personnalisés pour l’allumage et/ou l’arrêt automatique du poêle. Il est possible de configurer jusqu’à 6 programmes personnalisés. Pour chaque programme, on peut programmer l’heure d’allumage, l’heure d’arrêt et la température désirée. -
Página 61: Fonction Économie « Eco Mode
4.1.2 Attribuer des programmes aux jours de la semaine Cette fonction permet d’attribuer jusqu’à 3 programmes différents à un jour de la semaine. a) En agissant sur les touches fléchées se positionner sur le menu setup et frapper la touche b) sélectionner le mot de passe «... -
Página 62: Rallumage Après Une Coupure De Courant
4.3 Rallumage après une coupure de courant En cas d’interruption du courant électrique, le poêle se rallume automatiquement, en vérifiant les conditions de sécurité, au moment du rétablissement du courant. 4.4 Fonction « Blocage clavier » Cette fonction permet de bloquer l’utilisation du panneau de commande pour éviter des modifications accidentelles. -
Página 63: Fonction « Delta De Rallumage
4.6 Fonction « Delta de rallumage » Delta de rallumage : (Dans les configurations d’installation 2, 3 et 4), c’est le numéro de degrés, en dessous de la température d’arrêt, au-delà duquel le poêle se rallume automatiquement. Par exemple, si le poêle est programmé pour s’éteindre à 20°C (Eco Mode actif) et que l’on programme un «... -
Página 64: Gestion Des Alarmes
Gestion des alarmes Si une anomalie se vérifie dans le fonctionnement, la procédure suivante est activée : 1. alarme sonore (bip) ; 2. l’une des LED suivantes s’allume : 3. si l’anomalie concerne une erreur, le poêle s’éteint. En appuyant de façon prolongée sur la touche « annuler » on permet l’affichage du code d’erreur : CODE... - Página 65 Chambre de combustion, brasier ou système d’évacuation des fumées sales ---- Nettoyage poêle Tubes pour mesure de la pression détachés ou obstrués Arrivée de l’air de combustion obstruée Granulés épuisés ; résistance d’allumage ---- Erreur pour allumage échoué défectueuse : joints usés ; position du brasier erronée Après avoir vérifié...
- Página 66 ÍNDICE Panel de mandos Descripción Uso del panel de mandos Parámetros de funcionamiento Operaciones preliminares Carga de pellet Alimentación eléctrica Configuraciones iniciales Uso de la estufa Encendido Modificación de los parámetros Apagado Funcionamiento con termostato ambiente Funcionamiento con sonda ambiente a bordo de la caldera Funcionamiento en combinación con un acumulador...
-
Página 67: Panel De Mandos
Panel de mandos 1.1 Descripción El panel de mandos está compuesto por: A) una parte superior con los ledes de estado y los iconos retroiluminados que identifican cada función; B) display de led; C) tecla de encendido; D) tecla “Anular” y visualización “error”; E) dos teclas de flecha para desplazarse entre las diferentes funciones;... - Página 68 config.1 : 65..80 °C Muestra la temperatura leída por la sonda* y permite configurar la temperatura deseada. Temperatura config.2-5 : 10.. 48 °C *config.1: sonda de envío; config.2: sonda ambiente; config. 3-4: sonda externa/acumulador; config.3-4 : 45..75 °C Combustible Función no utilizada config.1: OFF;...
-
Página 69: Uso Del Panel De Mandos
1.2 Uso del panel de mandos • Utilizando las tecla de flecha se mueve entre los diferentes menús que se iluminan en cada caso. • Centrándose en una determinada función se pueden desplazar los eventuales submenús con las teclas ; para modificar un parámetro basta con utilizar la tecla y modificar los valores, siempre con las teclas . -
Página 70: Modificación De La Ventilación
(donde estè previsto) 1.3.3 Modificación de la ventilación Para modificar el valor de la ventilación: a) Ir con las teclas al menú de ventilación y presionar la tecla b) Parpadeará el valor de ventilación; modificar el valor con las teclas •... -
Página 71: Operaciones Preliminares
Operaciones preliminares 2.1 Carga de pellet La primera operación para realizar antes de encender el producto es la de llenar el depósito de combustible (pellet). El pellet debe ser colocado en el depósito con una pala. No vaciar la bolsa directamente en el depósito para evitar cargar aserrín u otros elementos extraños que podrían IS IS... -
Página 72: Configuraciones Iniciales
2.3 Configuraciones iniciales Antes de utilizar la estufa es necesario configurar la fecha y la hora actual. 2.3.1 Configuración horario y fecha Para modificar la fecha: a) Ir con las teclas al menú setup y presionar la tecla b) seleccionar la contraseña “7” con la tecla y confirmar con la tecla;... -
Página 73: Configuración Del Volumen
2.3.4 Configuración del volumen Es posible configurar el nivel de volumen del timbre, en base a las propias necesidades: a) Actuando en las teclas de flecha ir al menú setup y presionar la tecla b) Seleccionar la contraseña “7” con la tecla y confirmar con la tecla;... -
Página 74: Uso De La Estufa
Uso de la estufa 3.1 Encendido Antes de cada encendido, asegurarse que el brasero esté completamente vacío y correctamente posicionado en su sede. Para encender la estufa mantener presionada la tecla par algunos segundos. El icono con forma de llama comenzará a parpadear, durante la fase de encendido hasta permanecer fijo con la estufa encendida. -
Página 75: Funcionamiento Con Termostato Ambiente
3.4 Funcionamiento con termostato ambiente Cuando la estufa es controlada por un termostato (o cronotermostato) externo, el instalador debe haber establecido la configuración 1. En esta configuración la estufa se apaga cuando el termostato externo está satisfecho (circuito abierto) o modula el propio funcionamiento (es decir, la estufa intenta mantener la temperatura deseada consumiendo lo menos posible) cuando alcanza la temperatura del agua configurada. -
Página 76: Funciones Disponibles
Funciones disponibles 4.1 Función “Timer” Es posible configurar, habilitar y asignar los distintos días de la semana, los programas personalizados para el encendido y/o el apagado automático de la estufa. Es posible configurar hasta seis programas personalizados. Para cada programa se puede configurar: hora de encendido, hora de apagado y temperatura deseada. -
Página 77: Asignar Programas A Los Días
4.1.2 Asignar programas a los días Con esta función es posible asignar hasta tres programas diferentes a un determinado día. a) Actuando en las teclas de flecha ir al menú setup y presionar la tecla b) Seleccionar la contraseña “7” con la tecla y confirmar con la tecla;... -
Página 78: Función "Bloqueo Teclado
4.4 Función “Bloqueo teclado” Con esta función es posible bloquear el uso del panel de mandos para evitar modificaciones accidentales. Para habilitar/deshabilitar esta función: a) Actuando en las teclas de flecha ir al menú setup y presionar la tecla b) Seleccionar la contraseña “7” con la tecla y confirmar con la tecla;... -
Página 79: Función "Delta De Reencendido
4.6 Función “Delta de reencendido” Delta de reencendido: (en las configuraciones de instalación 2, 3 y 4) es el número de grados, por debajo de la temperatura de apagado, por encima del cual la estufa se enciende de nuevo automáticamente. Por ejemplo, si la estufa está configurada para apagarse a 20°C (Eco Mode activo) y se configura un ”Delta de reencendido”... -
Página 80: Gestión De Las Alarmas
Gestión de las alarmas En el caso en que se compruebe una anomalía en el funcionamiento, se activa el siguiente procedimiento: 1. alarma acústica (bip); 2. se ilumina uno de los siguientes ledes de sistema: 3. si la anomalía está relacionada a un error, la estufa se apagará. La presión prolongada de la tecla ”anular”... - Página 81 Cámara de combustión, brasero o sistema de evacuación de los humos sucios ---- Limpieza de la estufa Tubos de detección de la presión desconectados u obstruidos Entrada de aire comburente obstruido Pellet agotado; Resistencia de encendido dañada; ---- Error de falta de encendido Guarniciones desgastadas;...
- Página 84 Produkte jederzeit und ohne vorherige Ankündigung zu ändern, um sie zu verbessern, ohne ihre grundlegenden Eigenschaften beeinträchtigen. Palazzetti se réserve le droit de modifier ses produits à tout moment et sans préavis afin de les améliorer sans en compromettre caractéristiques essentielles.