Publicidad
Idiomas disponibles
Idiomas disponibles
Enlaces rápidos
Publicidad

Manuales relacionados para Tristar KA-5110


Resumen de contenidos para Tristar KA-5110
- Página 1 KA-5110...
- Página 2 Algemene Veiligheidsaanwijzingen. Controleer of de spanning van uw stroomnetwerk overeenkomt met de spanning aangegeven op het label van uw apparaat. • Voordat u dit apparaat in gebruik gaat nemen, lees a.u.b. eerst de gebruiksaanwijzing grondig door en bewaar het zodat u het later weer kunt nalezen. •...
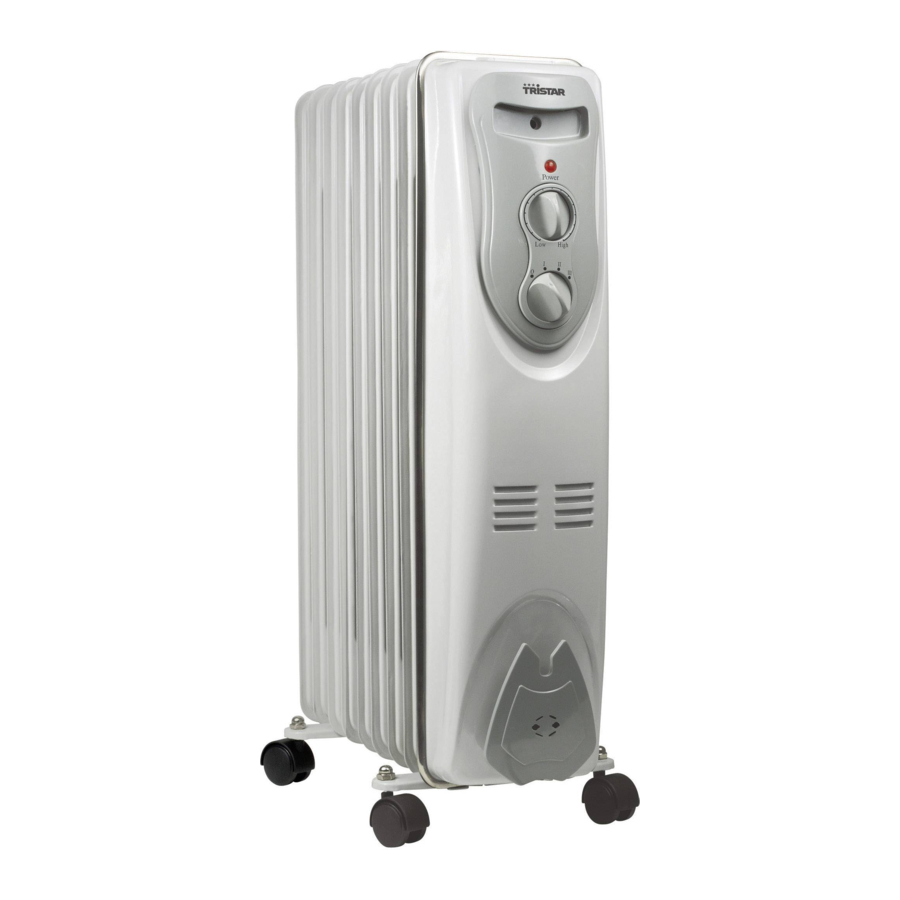
- Página 3 Onderdelenlijst A. Plastic handvat B. Thermostaat C. Stroomknop D. Ribs Draad opslag Zwenkwieltjes Diagram I Diagram II Belangrijke punten voordat u de met olie gevulde verwarming gebruikt. • Sommige geuren en dampen kunnen voorkomen bij het eerste gebruik van uw verwarming. •...
- Página 4 Reiniging Voordat u uw verwarming reinigt, haal de stekker uit het stopcontact. Laat het apparaat nu enkele minuten afkoelen. • Reinig uw verwarming met een zachte, vochtige doek. • Gebruik geen chemische reinigingsmiddelen. • Gebruik geen droge en poederreinigers/oplossingen. • Maak uw verwarming nooit schoon door er water op te gieten, zorg ervoor dat de verwarming droog is voordat u het gebruikt.
- Página 5 Allgemeine Sicherheitshinweise Überprüfen Sie, ob Ihre Haushaltsspannung mit der Spannung auf dem Typenschild Ihres Geräts übereinstimmt. • Lesen Sie diese Bedienungsanleitung vor der Inbetriebnahme bitte sorgfältig durch und bewahren Sie diese für die Zukunft gut auf. • Bewahren Sie bitte diese Bedienungsanleitung, den Garantieschein, die Kaufquittung, und wenn möglich, den Karton mit der inneren Verpackung auf! •...
- Página 6 Teileliste G. Plastic handle A. Plastikgriff H. Thermostat B. Thermostat Power switch C. Stromschalter D. Lamellen Fins E. Kabelaufwickelung K. Cord storage F. Stützräder L. Castor wheels Diagram I Diagram II Abbildung I Abbildung II Wichtige Hinweise vor der Verwendung des mit Öl befüllten Heizkörpers. •...
- Página 7 Betrieb • Schalten Sie den Stromschalter (C) ein. I: 800W, II: 1200W und III ist 2000W, stellen Sie den Thermostat (B) auf die höchste Einstellung ein. Wenn die gewünschte Temperatur erreicht ist, drehen Sie den Thermostat zurück, bis die Anzeigeleuchte erlischt. Im Außenbereich können Sie nur Stufe I verwenden.
- Página 8 Instructions générales de sécurité Vérifiez si la tension de votre alimentation correspond au voltage indiqué sur le label de votre appareil. • Avant de mettre cet appareil en service, veuillez lire le manuel d’instructions attentivement et conservez-le afin de pouvoir vous y référer dans le futur. •...
- Página 9 Liste des pièces Poignée en plastique B. Thermostat C. Interrupteur d'alimentation D. Ailettes Stockage du cordon Roulettes pivotante Schéma I Schéma II Points importants avant d'utiliser le radiateur à bain d'huile. • Des odeurs et des vapeurs peuvent apparaître lors de la première utilisation de votre radiateur. •...
- Página 10 Fonctionnement • Activez l'interrupteur d'alimentation (C). I : 800 W, II : 1 200 W et III : 2 000 W et tournez le thermostat (B) sur la valeur la plus élevée. Lorsque la température voulue a été atteinte, remettez le thermostat à...
- Página 11 General safety instructions Check if the tension of your supply corresponds with the voltage indicated on the rating plate of your appliance. • Before commissioning this device please read the instruction manual carefully and keep this sothat you can check them later . •...
- Página 12 Parts list A. Plastic handle B. Thermostat C. Power switch D. Fins E. Cord storage F. Castor wheels Diagram I Diagram II Important points before using the oil filled heater. • Some odour and fumes could occur resulting from the first use of your heater. •...
- Página 13 Cleaning Before cleaning your heater, cut the connection between the plug and socket so it can cool off for a couple of minutes. • Make sure that the heater is cold before • Clean your heater with a soft damp cloth. •...
- Página 14 Istruzioni di sicurezza generale Controllare che la tensione dell’alimentazione corrisponda con quella indicate nella targhetta di classificazione dell’apparecchio. • Prima di far usare a qualcuno questo dispositivo si prega di leggere attentamente il manuale d’istruzioni e tenerlo in modo da poterlo controllare in futuro. •...
- Página 15 Lista delle parti G. Impugnatura in plastica H. Termostato Interruttore di corrente J. Alette K. Vano avvolgicavo L. Ruote direzionabili Figura I Figura II Informazioni importanti da sapere prima di utilizzare il radiatore elettrico ad olio. • Al primo utilizzo del vostro termosifone si possono verificare delle fuoriuscite di odori e fumi. •...
- Página 16 Funzionamento • Accendere l’interruttore di corrente (C). I: 800 W, II: 1200 W e III: 2000 W e girare il termostato (B) po sizionandolo all’impostazione più elevata. Al raggiungimento della temperatura desiderata, girare nuovamente il termostato fino a quando la spia luminosa non si spegne. Nel caso si volesse utilizzare il radiatore all’esterno, usare solamente il livello I.
- Página 17 Instrucciones generales de seguridad Asegúrese de que el voltaje de la toma de corriente se corresponde con el voltaje indicado en la placa de especificaciones del aparato. • Antes de utilizar el aparato, lea el manual de instrucciones atentamente y consérvelo para futuras consultas.
- Página 18 Lista de piezas A. Asa de plástico B. Termostato C. Interruptor de encendido D. Aletas E. Almacenamiento de cable F. Ruedas Diagrama I Diagrama II Aspectos importantes antes de usar la estufa de aceite. • Pueden producirse olores y humos cuando use la estufa por primera vez. •...
- Página 19 Funcionamiento • Encienda el interruptor de encendido (C). I: 800W, II: 1200W y III es 2000W, y ponga el termostato (B) a la posición más alta. Cuando llegue a la temperatura deseada, baje el termostato hasta que la luz indicadora se apague. Si quiere usarlo en exterior, sólo puede usar el nivel I. •...
- Página 20 Instruções gerais de segurança Verifique se a sua tensão de alimentação corresponde à tensão indicada na placa de identificação do seu aparelho. • Antes de ligar este aparelho, leia o manual de instruções, e guarde-o para consulta futura. • Guarde estas instruções, o certificado de garantia, o recibo de compra e, se possível, a caixa com os respectivos materiais de acondicionamento! •...
- Página 21 Lista de Peças A. Pega de plástico B. Termóstato C. Interruptor D. Protecções E. Armazenamento do cabo F. Rodízios Diagrama II Diagrama I Pontos importantes antes de utilizar o aquecedor a óleo • Podem surgir alguns odores e fumos resultantes da primeira utilização do seu aquecedor. •...
- Página 22 Funcionamento • Ligue o interruptor (C). I: 800W, II: 1200W e III é 2000W e coloque o termóstato (B) na posição mais alta. Quando alcançar a temperatura pretendida, rode o termóstato até a luz indicadora se desligar. Se quiser utilizar no exterior, só deve utilizar o nível I. •...
- Página 23 Opće sigurnosne upute Provjerite da li napon vaše mreže odgovara naponu navedenom na nazivnoj pločici aparata. • Prije puštanja u rad ovog uređaja, molimo pažljivo pročitajte priručnik s uputama i čuvajte ga na mjestu gdje ga možete lako i kasnije koristiti. •...
- Página 24 Popis dijelova A. Plastična drška B. Termostat C. Sklopka za uključivanje D. Rebra E. Spremnik za kabel F. Okretljivi kotačići Slika I Slika II Važne napomene prije korištenja ovoga uljnog radijatora. • Prilikom prvog korištenja može se pojaviti neugodni miris i dim. •...
- Página 25 Čišćenje Prije čišćenja vašeg grijača, isključite ga iz utičnice par minuta prije tako da se može ohladiti. • Provjerite da li je grijač hladan prije • Čistite grijač samo mekom i vlažnom krpom. • Nemojte koristiti kemijske materijale za čišćenje svog grijača. •...