Tabla de contenido
Publicidad
Idiomas disponibles
Idiomas disponibles
Enlaces rápidos
Système de localisation : Canicom GPS
Location system : Canicom GPS
Sistema de localización : Canicom GPS
Verfolgungssystem : Canicom GPS
Sistema per tracciamento : Canicom GPS
Guide d'utilisation p.2/User's guide p.18/Guía de uso p.34/
Benutzeranleitung p.51/Guida per l'uso p.68
1/84
Guide Canicom GPS – Indice B
Publicidad
Capítulos
Tabla de contenido

Manuales relacionados para Num'axes Canicom GPS

Resumen de contenidos para Num'axes Canicom GPS
- Página 1 Système de localisation : Canicom GPS Location system : Canicom GPS Sistema de localización : Canicom GPS Verfolgungssystem : Canicom GPS Sistema per tracciamento : Canicom GPS Guide d’utilisation p.2/User’s guide p.18/Guía de uso p.34/ Benutzeranleitung p.51/Guida per l’uso p.68 1/84 Guide Canicom GPS –...
-
Página 2: Système De Localisation : Canicom Gps
La présente déclaration de conformité est établie sous la seule responsabilité du fabricant. This declaration of conformity is issued under the sole responsibility of the manufacturer. Objet de la déclaration : l’équipement radioélectrique Canicom GPS composé : • du collier Canicom GPS (CAGC7EXXXXXX) •... - Página 3 La conformité du collier Canicom GPS est déclarée par rapport aux normes harmonisées suivantes : /The conformity of Canicom GPS collar is declared in relation to the following harmonised standards: Section Normes appliquées/Applied standards ETSI EN 301 489-1 V2.2.3 (2019-11) ETSI EN 301 489-3 V2.1.1 (2019-03)
-
Página 4: Tabla De Contenido
N’hésitez pas à faire appel aux conseils d’un dresseur professionnel pour une éducation adaptée à votre chien. Composition du produit − 1 collier Canicom GPS − 1 télécommande Canicom GPS − 2 chargeurs aimantés − 1 dragonne Guide Canicom GPS – Indice B 4/84... -
Página 5: Présentation Du Produit
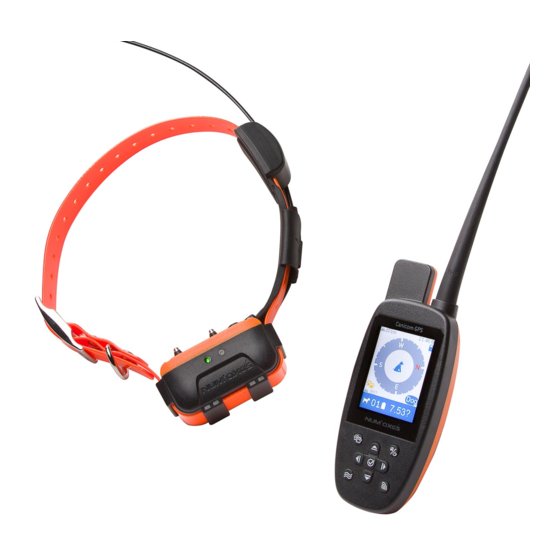
GPS haute sensibilité sensibilité Présentation du collier ❶ ❺ ❻ ❹ ❷ ❸ ❼ ❽ ❶ Antenne radio ❷ Antenne GPS ❸ Collier ❹ Sangle du collier ❺ Bouton Marche/Arrêt et Codage du collier/télécommande Guide Canicom GPS – Indice B 5/84... -
Página 6: Présentation De La Télécommande
Touche pour voir les différents groupes de chiens (dans le menu suivi) ou pour valider votre choix (OK) dans d’autres écrans ❸ Touche vibration ❹ Touche stimulation ❺ Flèches pour se déplacer dans les menus ❻ Touche centrale du pad pour valider Guide Canicom GPS – Indice B 6/84... -
Página 7: Charge De L'eNsemble De Géolocalisation
Pour arrêter votre collier, appuyez à nouveau assez longuement sur le bouton marche/arrêt : le collier vibre une fois (assez longuement) et les deux leds en face avant s’allument en même temps, puis s’éteignent. Votre collier est éteint. Guide Canicom GPS – Indice B 7/84... -
Página 8: Démarrage De L'eNsemble De Géolocalisation
✓ Etape N°1 : Calibrez la boussole électronique (si votre télécommande vous le demande) Allumez votre télécommande : un message peut apparaître : la boussole doit être calibrée. Appuyez sur la touche « calibrer » Guide Canicom GPS – Indice B 8/84... - Página 9 Positionnez votre télécommande à l’horizontale comme indiqué sur le schéma. Appuyez sur la touche correspondant à début et maintenez-la en position pendant 3 secondes. La télécommande vibre pour vous indiquer que l’étape 1 est validée. Appuyez sur la touche correspondant à début Guide Canicom GPS – Indice B 9/84...
- Página 10 Appuyez sur choisir : une animation vous indique comment procéder pour ajouter un collier. Allumez votre collier et appuyez 2 fois très rapidement sur le bouton marche/arrêt du collier (double-clic) : les leds se mettent à clignoter alternativement (1 fois vert/1 fois rouge). Guide Canicom GPS – Indice B 10/84...
- Página 11 Votre collier est alors couplé avec votre télécommande. Il clignotera en rouge tant qu’il cherchera à accrocher le GPS. Une fois le GPS accroché, il clignotera 2 fois en vert et 2 fois en rouge. Il fonctionne normalement, vous pouvez alors suivre votre chien. Guide Canicom GPS – Indice B 11/84...
-
Página 12: Correspondances Menus De L'aCcueil De La Télécommande/Fonctions
Informations : dans ce menu vous trouverez des infos sur votre produit (N° de série et version de Informations soft), les coordonnées de notre société, un QR code qui vous renvoie vers le guide d’utilisation de votre Canicom GPS. Guide Canicom GPS – Indice B 12/84... -
Página 13: Utilisation De L'aPplication Pour Afficher Le Chien Sur Un Fond Cartographique
également sur votre télécommande dans Bluetooth/QR code appli Android et iOS. Vous serez automatiquement redirigé vers notre application Canicom GPS. Installez-la sur votre smartphone. Notre application est compatible à partir de la version 8 sur iOS et la version 6 sur Android. - Página 14 Sinon, activez-le en sélectionnant choisir activer Pour visualiser votre position et celle du chien sur un fond cartographique appuyez sur Carte (menu en bas de l’écran). Guide Canicom GPS – Indice B 14/84...
-
Página 15: Réglementation Concernant L'uTilisation Des Fréquences
Les canaux français (F1 et F2) sont strictement réservés aux utilisateurs français sur le territoire français. Dans ce cas, l’utilisateur de l’appareil doit obligatoirement prendre une licence auprès de l’ACUFA (5 € TTC/an en 2021). Guide Canicom GPS – Indice B 15/84... -
Página 16: Caractéristiques Techniques
De 20 à 50 cm Écran Grand écran incassable : 3.33 x 4.44’’ ; résolution : 240 x 320 px Accessoires Chargeur aimanté fourni, Chargeur aimanté fourni, 2 dragonne paires d’électrodes (longues et courtes) fournies Guide Canicom GPS – Indice B 16/84... -
Página 17: Garantie
à la protection de la santé humaine. Pour plus d’informations sur les lieux de collecte des équipements usagés, vous pouvez contacter votre mairie, le service de traitement des déchets ménagers ou nous retourner le produit. Guide Canicom GPS – Indice B 17/84... - Página 18 La présente déclaration de conformité est établie sous la seule responsabilité du fabricant. This declaration of conformity is issued under the sole responsibility of the manufacturer. Objet de la déclaration : l’équipement radioélectrique Canicom GPS composé : • du collier Canicom GPS (CAGC7EXXXXXX) •...
- Página 19 La conformité du collier Canicom GPS est déclarée par rapport aux normes harmonisées suivantes : /The conformity of the Canicom GPS collar is declared in relation to the following harmonised standards: Section Normes appliquées/Applied standards ETSI EN 301 489-1 V2.2.3 (2019-11) ETSI EN 301 489-3 V2.1.1 (2019-03)
-
Página 20: Warnings
Do not hesitate to use the services of a professional to train your dog in an appropriate way. Composition of the product − 1 Canicom GPS collar − 1 Canicom GPS handheld − 2 magnetic chargers − 1 wrist strap − 2 sets of electrodes (short and long) Guide Canicom GPS – Indice B 20/84... -
Página 21: Presentation Of The Product
Canicom GPS geolocation handheld Canicom GPS geolocation collar equipped with a high sensitivity GPS equipped with a high sensitivity GPS module module Presentation of the collar ❶ ❺ ❻ ❹ ❷ ❸ ❼ ❽ Guide Canicom GPS – Indice B 21/84... -
Página 22: Presentation Of The Handheld
LED)/GPS search if it flashes rapidly/the collar charge status Presentation of the handheld ❶ ❷ ❸ ❹ ❶ Radio antenna ❷ GPS antenna ❸ Screen ❹ Keypad Handheld key functions ❶ ❷ ❺ ❻ ❸ ❹ Guide Canicom GPS – Indice B 22/84... -
Página 23: Charging The Geolocation System
The red LED then starts to flash, indicating that the collar is looking for the GPS. As soon as it captures the GPS signal, the LEDs (green and red) flash more slowly and alternately. Your collar is ready to be paired with the handheld. Guide Canicom GPS – Indice B 23/84... -
Página 24: Starting The Geolocation System
Turn your handheld on: a message is displayed: the compass has to be calibrated. Press the “ calibrate” Press the key (in the top left) to calibrate your handheld. Follow the instructions displayed on the screen: Guide Canicom GPS – Indice B 24/84... - Página 25 Then move on to step 2: press ‘start’ and move the handheld in figure 8 motions by returning it halfway through as shown in the animation. The handheld vibrates to tell you that step 2 is validated. Guide Canicom GPS – Indice B 25/84...
- Página 26 Press “select”: an animation shows you how to add a collar. Turn your collar on and press the on/off button on the collar twice in very rapid succession: the LEDs start flashing alternately (green once/red once). Guide Canicom GPS – Indice B 26/84...
- Página 27 You collar is now paired with your handheld. It will flash red as long as it tries to hook up the GPS. Once the GPS is hooked, it will flash green twice and red twice. It is working normally; you can now track your dog. Guide Canicom GPS – Indice B 27/84...
-
Página 28: Matching Handheld Home/Function Menus
Bluetooth: you can activate or deactivate Bluetooth or rename it. From this menu you can menu also find the QR code that will allow you to download the Canicom GPS app (if you want to have the location on a basemap). -
Página 29: Using The Application To Display The Dog On A Basemap
By default, the application opens with the map. At the bottom of the screen, you will find the application's various menus: Map, Compass, Training, Bluetooth. Tap the Bluetooth menu at the bottom of the screen and select your remote: Canicom GPS. Your Canicom GPS should then appear as ‘connected’. - Página 30 If not, activate it by choosing Select Activate To view your position and that of your dog on a basemap tap on Map (menu at the bottom of the screen). Guide Canicom GPS – Indice B 30/84...
-
Página 31: Regulations Regarding The Use Of Frequencies
The French channels (F1 and F2) are strictly reserved for French users within the French territory. In this case, the user of the device must obtain a licence from the ACUFA (5€ per year incl. taxes in 2021). Guide Canicom GPS – Indice B 31/84... -
Página 32: Technical Information
From 20 to 50 cm Screen Large shatter-proof screen: 3.33 x 4.44’’; resolution: 240 x 320 px Accessories Magnetic charger supplied, Magnetic charger supplied, 2 wrist strap pairs of electrodes (long and short) supplied Guide Canicom GPS – Indice B 32/84... -
Página 33: Guarantee
For further information on collection points for used equipment, you can contact your local council, the household waste processing service or you can return the product to us. Guide Canicom GPS – Indice B 33/84... -
Página 34: Sistema De Localización: Canicom Gps
Esta declaración de conformidad ha sido elaborada bajo la responsabilidad exclusiva del fabricante. This declaration of conformity is issued under the sole responsibility of the manufacturer. Objeto de la declaración: el dispositivo radioeléctrico Canicom GPS, compuesto por: • el collar Canicom GPS (CAGC7EXXXXXX) •... - Página 35 La conformidad del collar Canicom GPS está declarada respecto a las siguientes normas armonizadas: /The conformity of Canicom GPS collar is declared in relation to the following harmonised standards: Sección Normas aplicadas/Applied standards ETSI EN 301 489-1 V2.2.3 (2019-11) ETSI EN 301 489-3 V2.1.1 (2019-03) ETSI EN 301 489-5 V2.2.1 (2019-04)
-
Página 36: Advertencias
No dude en pedir consejo a un adiestrador profesional para un adiestramiento adaptado a su perro. Composición del producto − 1 collar Canicom GPS − 1 mando a distancia Canicom GPS − 2 cargadores magnéticos − 1 correa de seguridad −... -
Página 37: Presentación Del Producto
Presentación del collar ❶ ❺ ❹ ❻ ❷ ❼ ❽ ❸ ❶ Antena de radio ❷ Antena GPS ❸ Collar ❹ Correa del collar ❺ Botón de encendido/apagado y sincronización del collar/mando a distancia Guide Canicom GPS – Indice B 37/84... -
Página 38: Presentación Del Mando A Distancia
Botón para visualizar los distintos grupos de perros (en el menú siguiente) o para confirmar su selección en las demás pantallas ❸ Botón de vibración ❹ Botón de estímulo ❺ Flechas de desplazamiento por los menús ❻ Botón central del teclado para confirmar Guide Canicom GPS – Indice B 38/84... -
Página 39: Carga Del Conjunto De Geolocalización
Para apagar su collar, pulse y mantenga de nuevo el botón de encendido/apagado : el collar vibra ❺ una vez (vibración larga), los dos LED delanteros se iluminan al mismo tiempo y después se apagan. Su collar está apagado. Guide Canicom GPS – Indice B 39/84... -
Página 40: Puesta En Marcha Del Conjunto De Geolocalización
✓ Paso Nº 1: Calibre la brújula electrónica (Si el mando te lo pide) Encienda su mando a distancia: aparece un mensaje: la brújula debe ser calibrada. Pulse el botón correspondiente a « Calibrar » Guide Canicom GPS – Indice B 40/84... - Página 41 Pulse el botón correspondiente a iniciar y manténgalo en esa posición durante 3 segundos. El mando vibra para indicar que el paso 1 está validado. Pulse el botón correspondiente a « Iniciar » Guide Canicom GPS – Indice B 41/84...
- Página 42 Pulse seleccionar: una animación le indica cómo proceder para añadir un collar. Encienda su collar y pulse 2 veces muy rápidamente el botón de encendido/apagado del collar (doble clic): los LED comienzan a parpadear de forma alternativa (1 veces verde/1 veces rojo). Guide Canicom GPS – Indice B 42/84...
- Página 43 Una vez seleccionado el nombre, confírmelo con el botón Aceptar. Su collar ya está vinculado con su mando a distancia. Parpadeará 2 veces en verde y 2 veces en rojo. Funciona correctamente, ya puede realizar el seguimiento de su perro. Guide Canicom GPS – Indice B 43/84...
-
Página 44: Correspondencia De Los Menús De Inicio Del Mando A Distancia/Funciones
Información: en este menú puede encontrar la información acerca de su producto (nº de Información serie y versión del software), los datos de contacto de nuestra compañía y un código QR que le redirige a la guía de uso de su Canicom GPS. Guide Canicom GPS – Indice B 44/84... -
Página 45: Uso De La Aplicación Para Mostrar El Perro Sobre Un Fondo Cartográfico
Bluetooth/código QR aplicación Android y iOS. Se le dirigirá automáticamente a nuestra aplicación Canicom GPS. Instale la aplicación en su smartphone. Nuestra aplicación es compatible a partir de la versión 8 de iOS y la versión 6 de Android. - Página 46 OK y podrá ver si está activado correctamente. Si no es así, actívelo seleccionando seleccionar activar Para visualizar su posición y la del perro sobre un fondo cartográfico, pulse en Mapa (menú de la parte inferior de la pantalla). Guide Canicom GPS – Indice B 46/84...
- Página 47 Su posición aparecerá en forma de un punto azul. La posición del perro aparecerá en forma de un perro de color si su collar está encendido, o en forma de un perro gris si está apagado. Collares apagados Collares encendidos Guide Canicom GPS – Indice B 47/84...
-
Página 48: Reglamentación Sobre El Uso De Frecuencias
86 mm x 45 mm x 45 mm 148 mm x 58,6 mm x 39,5 mm Peso (con las baterías) 250 g 280 g Correa ajustable al cuello De 20 a 50 cm Guide Canicom GPS – Indice B 48/84... -
Página 49: Garantía
Registro de su producto Puede registrar su producto en nuestro sitio web www.numaxes.com. Accesorios Puede adquirir los accesorios (pilas, correa, tornillos, etc.) en cualquier momento en NUM’AXES (www.numaxes.com) o pidiéndoselos a su distribuidor. Guide Canicom GPS – Indice B 49/84... -
Página 50: Recogida Y Reciclaje De Su Aparato Al Final De Su Vida Útil
Para más información acerca de los lugares de recogida de equipos usados, puede ponerse en contacto con su ayuntamiento, el servicio de tratamiento de residuos domésticos o devolvernos el producto. Guide Canicom GPS – Indice B 50/84... - Página 51 Gegenstand der Erklärung: das Canicom GPS-Funksystem bestehend aus: • dem Canicom GPS-Halsband (CAGC7EXXXXXXXX) • der Canicom GPS-Fernbedienung (CAGH7EXXXXXXXX) Object of the declaration: the Canicom GPS radio equipment which comprises: • the Canicom GPS collar (CAGC7EXXXXXX) • the Canicom GPS handheld (CAGH7EXXXXXX) Der Gegenstand dieser Erklärung steht im Einklang mit den geltenden Harmonisierungsvorschriften...
- Página 52 Die Konformität des Canicom GPS-Halsbandes wird in Bezug auf die folgenden harmonisierten Normen erklärt: /The conformity of Canicom GPS collar is declared in relation to the following harmonised standards: Abschnitt Angewandte Normen/Applied standards ETSI EN 301 489-1 V2.2.3 (2019-11) ETSI EN 301 489-3 V2.1.1 (2019-03) ETSI EN 301 489-5 V2.2.1 (2019-04)
-
Página 53: Warnungen
Sammlung und Recycling Ihres Gerätes am Ende der Lebensdauer ............67 Vielen Dank, dass Sie sich für ein Produkt aus der Reihe NUM'AXES entschieden haben. Lesen Sie vor der Verwendung Ihres Produkts die Erklärungen in dieser Anleitung bitte sorgfältig durch und bewahren Sie sie zum späteren Nachschlagen auf. -
Página 54: Produktpräsentation
Hundes auf einer Karte Canicom GPS-Geolokalisierungs- Canicom GPS- Fernbedienung mit Geolokalisierungshalsband mit hochempfindlichem GPS-Modul hochempfindlichem GPS-Modul Präsentation des Halsbands ❶ ❺ ❻ ❹ ❷ ❸ ❼ ❽ ❶ Funkantenne ❷ GPS-Antenne ❸ Halsband Guide Canicom GPS – Indice B 54/84... -
Página 55: Präsentation Der Fernbedienung
Taste zur Anzeige der verschiedenen Hundegruppen (im Menü Verfolgung) oder zur Bestätigung Ihrer Wahl auf anderen Bildschirmen ❸ Taste Vibration ❹ Taste Stimulation ❺ Pfeile zum Bewegen durch die Menüs ❻ Zentrale Taste des Pads zum Bestätigen Guide Canicom GPS – Indice B 55/84... -
Página 56: Laden Des Geolokalisierungssets
Um Ihr Halsband auszuschalten, halten Sie die Ein-/Ausschalttaste erneut lange gedrückt : Das ❺ Halsband vibriert einmal (relativ lang) und die beiden Leuchtdioden an der Vorderseite leuchten gleichzeitig auf und schalten sich dann aus. Ihr Halsband ist ausgeschaltet. Guide Canicom GPS – Indice B 56/84... -
Página 57: Start Des Geolokalisierungssets
Um Ihre Fernbedienung einzuschalten, drücken Sie einfach die Ein-/Aus-Taste auf der Fernbedienung und halten Sie sie gedrückt, bis der Bildschirm aufleuchtet und das NUM'AXES-Logo zu sehen ist. Die Fernbedienung vibriert 3 Mal schnell: Sie ist eingeschaltet. Um Ihre Fernbedienung auszuschalten, gehen Sie auf dieselbe Weise vor und halten Sie die Ein- /Ausschalttaste gedrückt, bis sich der Fernbedienungsbildschirm ausschaltet. - Página 58 Gehen Sie dann zu Schritt 2: Drücken Sie Start und beschreiben Sie mit der Fernbedienung eine 8, wie in der Animation gezeigt. Drücken Sie Fertig. Die Fernbedienung vibriert, um Sie darüber zu informieren, dass Schritt 2 abgeschlossen wurde. Ihre Fernbedienung ist jetzt kalibriert. Guide Canicom GPS – Indice B 58/84...
- Página 59 Drücken Sie auf Wählen: eine Animation zeigt Ihnen, wie Sie eine Halskette hinzufügen können. Schalten Sie Ihr Halsband ein und drücken Sie sehr schnell zweimal auf den Ein-/Aus-Knopf des Halsbandes: die Leds beginnen abwechselnd zu blinken (1 Mal grün/1 Mal rot). Guide Canicom GPS – Indice B 59/84...
- Página 60 Ihr Halsband ist jetzt mit Ihrer Fernbedienung gekoppelt. Es blinkt rot, solange versucht wird, das GPS anzuschließen. Es wird zweimal grün und zweimal rot blinken. Seine Funktion ist jetzt normal und Sie können Ihren Hund nun verfolgen. Guide Canicom GPS – Indice B 60/84...
-
Página 61: Entsprechungen Startseitenmenü Der Fernbedienung/Funktionen
Bildschirms anpassen (die Helligkeit und eine Verringerung der Intensität programmieren). Menü Über: In diesem Menü finden Sie Informationen über Ihr Produkt (Seriennummer und Software-Version), die Über Adresse unseres Unternehmens, einen QR-Code, der Sie auf die Bedienungsanleitung Ihres Canicom GPS verweist. Guide Canicom GPS – Indice B 61/84... -
Página 62: Verwendung Der App, Um Ihren Hund Auf Einem Kartenhintergrund Anzuzeigen
Rücken Ihres Handkoffers befindet bzw. ebenfalls in Ihrer Fernbedienung unter Bluetooth/QR-Code App Android und iOS. Sie werden automatisch zu unser App Canicom GPS umgeleitet. Installieren Sie diese auf Ihrem Smartphone. Unsere App ist kompatibel ab Version 8 unter iOS und Version 6 unter Android. - Página 63 Öffnen Sie das Bluetooth-Menü unten auf dem Bildschirm und wählen Sie Ihre Fernbedienung: Canicom GPS. Ihr Canicom GPS muss nun „online“ angezeigt werden. Wählen Sie das Bluetooth-Menü Fernbedienung online NB: Bluetooth ist in Ihrer Fernbedienung standardmäßig aktiviert, aber Sie können diese Aktivierung überprüfen, wenn Ihre Fernbedienung nicht in der App angezeigt wird.
- Página 64 Ihr Standort erscheint als blauer Punkt. Der Standort des Hundes erscheint als farbiges Hund-Symbol, wenn das Halsband in Betrieb ist oder als graues Hund-Symbol, wenn es außer Betrieb ist. Halsbänder außer Betrieb Halsbänder in Betrieb Guide Canicom GPS – Indice B 64/84...
-
Página 65: Verordnung Über Die Nutzung Von Frequenzen
Zwischen -10°C und +40°C Zwischen -10°C und +40°C Abmessungen (ohne Antenne) 86 mm x 45 mm x 45 mm 148 mm x 58,6 mm x 39,5 mm Gewicht (mit Batterien) 250 g 280 g Guide Canicom GPS – Indice B 65/84... -
Página 66: Garantie
8 - Fotos und Zeichnungen sind unverbindlich. Registrierung Ihres Geräts Sie können Ihr Gerät auf unserer Website www.numaxes.com registrieren. Zubehör Zubehör (Batterien, Gurt, Schrauben…) erhalten Sie jederzeit bei NUM’AXES (www.numaxes.com) oder Ihrem Vertragshändler. Guide Canicom GPS – Indice B 66/84... -
Página 67: Sammlung Und Recycling Ihres Gerätes Am Ende Der Lebensdauer
Ressourcen und zum Schutz der menschlichen Gesundheit bei. Für weitere Informationen über Sammelstellen für gebrauchte Geräte kontaktieren Sie Ihre örtliche Kommunalverwaltung, Abteilung für die Verwertung von Haushaltsabfällen, oder Sie senden das Produkt an uns zurück. Guide Canicom GPS – Indice B 67/84... - Página 68 Oggetto della dichiarazione: apparecchiatura di radiolocalizzazione Canicom GPS composta: • dal collare Canicom GPS (CAGC7EXXXXXX) • dal telecomando Canicom GPS (CAGH7EXXXXXX) Object of the declaration: the Canicom GPS radio equipment which comprises: • the Canicom GPS collar (CAGC7EXXXXXX) • the Canicom GPS handheld (CAGH7EXXXXXX) L'oggetto della presente dichiarazione è...
- Página 69 Si dichiara che il collare Canicom GPS è conforme alle seguenti norme armonizzate: /The conformity of Canicom GPS collar is declared in relation to the following harmonised standards: Sezione Norme applicate/Applied standards ETSI EN 301 489-1 V2.2.3 (2019-11) ETSI EN 301 489-3 V2.1.1 (2019-03) ETSI EN 301 489-5 V2.2.1 (2019-04)
-
Página 70: Avvertenze
− Rivolgersi a un addestratore professionista per un addestramento adatto al proprio cane Composizione del prodotto − 1 collare Canicom GPS − 1 telecomando Canicom GPS − 2 caricabatterie magnetici − 1 cinturino Guide Canicom GPS – Indice B 70/84... -
Página 71: Presentazione Del Prodotto
Applicazione gratuita IOS e Android per localizzare il cane su una mappa Telecomando di geolocalizzazione Collare di geolocalizzazione Canicom Canicom GPS dotato di un modulo GPS dotato di un modulo GPS ad alta GPS ad alta sensibilità sensibilità Presentazione del collare ❶... -
Página 72: Presentazione Del Telecomando
Presentazione del telecomando ❶ ❷ ❸ ❹ ❶ Antenna radio ❷ Antenna GPS ❸ Schermo ❹ Tastiera Funzioni dei tasti del telecomando ❶ ❷ ❺ ❻ ❸ ❹ Guide Canicom GPS – Indice B 72/84... -
Página 73: Caricamento Del Sistema Di Geolocalizzazione
3 volte abbastanza rapidamente e i due led sulla parte anteriore si accendono, poi il led verde lampeggia varie volte velocemente. Il collare è acceso. Guide Canicom GPS – Indice B 73/84... -
Página 74: Avviamento Del Sistema Di Geolocalizzazione
Avviamento del sistema di geolocalizzazione ✓ Fase n° 1: Calibrazione della bussola elettronica (Se il tuo telecomando te lo chiede) Accendere il telecomando: appare un messaggio: la bussola deve essere calibrata. Premere il tasto “Calibrare” Guide Canicom GPS – Indice B 74/84... - Página 75 Passare quindi alla fase 2: premere su Inizio e disegnare un 8 tenendo il telecomando capovolgendolo a metà percorso come mostrato nell’animazione. Il telecomando vibrerà per farti sapere che la fase 2 è stato completata. Viene fuori il messaggio "Alta precisione ". Premere su Fatto per confermare. Guide Canicom GPS – Indice B 75/84...
-
Página 76: Fase N° 2: Accoppiamento Del Collare Con Il Telecomando
(1 volte verde/1 volte rosso). Non appena il collare comunica con il telecomando, appare un testo sul telecomando: premere il tasto “accoppiare” del telecomando per aggiungere il nuovo collare rilevato. Guide Canicom GPS – Indice B 76/84... - Página 77 A questo punto il collare è accoppiato con il telecomando. Lampeggerà in rosso fintanto che tenta di collegare il GPS. Una volta agganciato il GPS, lampeggerà 2 volte verde e 2 volte rosso. Funziona normalmente, è possibile iniziare a monitorare il cane. Guide Canicom GPS – Indice B 77/84...
-
Página 78: Corrispondenze Menu Iniziali Del Telecomando/Funzioni
Informazioni: in questo menu si possono trovare informazioni sul prodotto (n° di serie e Informazioni versione del software), i recapiti della nostra società, un codice QR che permette di accedere alla guida per l’uso del Canicom GPS. Guide Canicom GPS – Indice B 78/84... -
Página 79: Utilizzo Dell'aPplicazione Per Visualizzare Il Cane Su Una Mappa
Bluetooth/Codice QR app Android e iOS. Si sarà automaticamente reindirizzati all’applicazione Canicom GPS. Installarla sul proprio smartphone. L’applicazione è compatibile a partire dalla versione 8 con IOS e dalla versione 6 con Android. - Página 80 A questo punto Canicom GPS deve apparire come “connesso”. Scegliere il menu Bluetooth Telecomando connesso NB: il Bluetooth è attivato di default sul telecomando, ma è possibile verificarlo se non si vede apparire il telecomando nell’applicazione. Sul telecomando accedere al menu Bluetooth...
- Página 81 La posizione dell’utente è indicata da un punto blu. La posizione del cane è indicata da un cane colorato se il collare è acceso e da un cane grigio se il collare è spento. Collari Collari spenti accesi Guide Canicom GPS – Indice B 81/84...
-
Página 82: Normativa Relativa All'uTilizzo Delle Frequenze
86 mm x 45 mm x 45 mm 148 mm x 58,6 mm x 39,5 mm Peso (con le batterie) 250 g 280 g Cinghia regolabile al collo Da 20 a 50 cm Guide Canicom GPS – Indice B 82/84... -
Página 83: Garanzia
Registrazione del prodotto Il prodotto può essere registrato sul nostro sito web www.numaxes.com. Accessori È possibile trovare gli accessori (pile, cinghia, viti, ecc.) in qualsiasi momento presso NUM’AXES (www.numaxes.com) o presso il proprio distributore. Guide Canicom GPS – Indice B 83/84... -
Página 84: Raccolta E Riciclaggio Del Dispositivo A Fine Vita
Z.A.C. des Aulnaies 745 rue de la Bergeresse 45161 OLIVET CEDEX FRANCE numaxes.com France: info@numaxes.com +33 (0)2 38 63 64 40 Autres pays: export@numaxes.com +33 (0)2 38 69 96 27 Guide Canicom GPS – Indice B 84/84...