Tabla de contenido
Publicidad
Idiomas disponibles
Idiomas disponibles
Enlaces rápidos
Inhaltsverzeichnis
Verwendung .......................................................................................................... 2
Produktteile ........................................................................................................... 4
Gebrauchsanleitung lesen und aufbewahren......................................................... 6
..................................................................................... 7
Lenkstange montieren .........................................................................................10
Sitz montieren ......................................................................................................10
mini micro 3in1 deluxe ......................................................................................... 11
Verschleiss ............................................................................................................12
remsen wechseln ............................................................................................... 12
Steuerfeder wechseln ...........................................................................................12
Wartung ................................................................................................................12
Garantiebestimmungen ........................................................................................13
Entsorgung ............................................................................................................14
Verpackung entsorgen .......................................................................................... 14
Mini micro deluxe Pass .........................................................................................15
InhaltsverzeIchnIs
DE
5
Publicidad
Capítulos
Tabla de contenido

Manuales relacionados para Micro Mini 3in1 Deluxe Plus

Resumen de contenidos para Micro Mini 3in1 Deluxe Plus
-
Página 1: Tabla De Contenido
Verwendung ......................2 Produktteile ......................4 Gebrauchsanleitung lesen und aufbewahren............6 ..................7 Sicherheitshinweise Lenkstange montieren ..................10 Sitz montieren ......................10 mini micro 3in1 deluxe ..................11 Verschleiss ......................12 remsen wechseln ....................12 Steuerfeder wechseln ...................12 Wartung ........................12 Garantiebestimmungen ..................13 Entsorgung ......................14 Verpackung entsorgen .................. -
Página 2: Gebrauchsanleitung Lesen Und Aufbewahren
Gebrauchsanleitung lesen und aufbewahren Liebe Kundin, lieber Kunde, schön, dass Sie sich für Micro (das Original) entschieden haben – Sie können sicher sein, dass Sie ein hochwertiges Produkt erworben haben. Wir bieten Ihnen darüber hinaus einen guten After-Sales-Service an. Wir sind stolz darauf, als der führende Scooter und Kickboard® Produzent weltweit bekannt zu sein. -
Página 3: Sicherheitshinweise
Unfällen und Verletzungen führen. Beachten Sie die folgenden Hinweise um Verletzun- gen und Unfälle zu vermeiden. • Kontrollieren Sie den mini micro deluxe vor jeder Fahrt und vergewissern Sie sich, dass alle Ver- riegler, Hebel, Muttern und Schrau ben fest angezogen sind. Achten Sie auch darauf, dass die Rä- der richtig befestigt sind und keine Verschleisszeichen aufweisen und stellen Sie sicher, dass das Lenkrohr in der gewünschten Höhe sicher hält. - Página 4 • Achten Sie darauf, dass Ihr Kind stets auf Wegen fährt, die nicht für motorisierte Fahrzeuge zulässig sind. Am besten sind hierzu Fussgänger- oder Fahrradwege geeignet. • Beachten Sie stets die Verkehrsregeln und -vorschriften. Das mini micro deluxe darf nicht auf öffentlichen Strassen benutzt werden.
- Página 5 WARNUNG! Erstickungsgefahr! Der mini micro deluxe enthält verschluckbare Kleinteile. Lassen Sie Kinder nicht mit der Verpackung und den Kleinteilen spielen. Kinder können sich beim Spielen darin verfan- gen und ersticken oder die Kleinteile verschlucken und daran ersticken. • Der mini micro deluxe muss von einem Erwachsenen zusammengebaut werden.
-
Página 6: Lenkstange Montieren
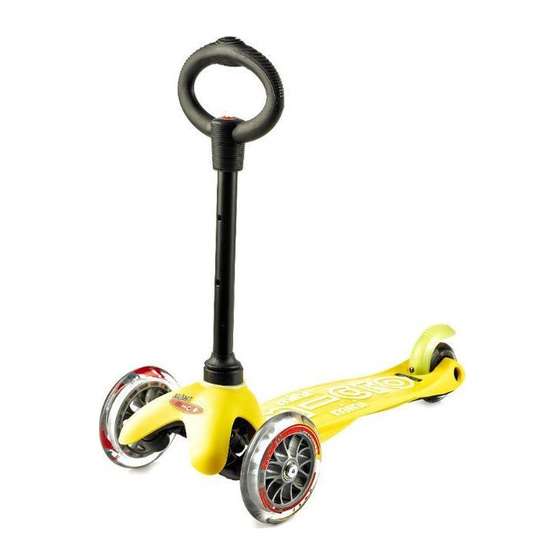
Sitz montieren Für die Jüngsten empfehlen wir, den Sitz am mini micro 3in1 deluxe zu befestigen (siehe Abb. I). Der Sitz sollte auf der richtigen Höhe fixiert werden. Dem Kind sollte es möglich sein, den Boden mit beiden Fusssohlen vollständig zu berühren. Anderenfalls könnte das Bremsen gefährlich wer-... -
Página 7: Mini Micro 3In1 Deluxe
Mini Micro 3in1 Deluxe Hinweis: Die Mini Micro 3in1 Deluxe Plus Modelle haben keinen O-Lenker mehr. Der Sitz kann di- rekt auf den T-Lenker montiert werden (separates Instruktionsblatt). Version mit Sitz Version mit O-Lenker Version mit T-Lenker für Kinder ab 1 Jahr. -
Página 8: Verschleiss
Prüfen Sie regelmässig den festen Sitz aller Schrauben und den Zustand der Räder und wechseln Sie diese bei Bedarf aus. Reinigen Sie das mini micro deluxe nach jedem Gebrauch mit einem feuchten, weichen Tuch und prüfen Sie es regelmässig auf optische Schäden oder Veränderungen. -
Página 9: Garantiebestimmungen
Kosten: Kostenfreie Reparatur bzw. Austausch oder Geldrückgabe. Um die Garantie in Anspruch zu nehmen, wenden Sie sich an unser Händlernetz oder unseren Kundendienst unter Tel. +41 (0) 44 910 11 22 oder Email: info@micro.ms Die Garantie gilt nicht bei Schäden durch: •... -
Página 10: Entsorgung
entsorGunG Entsorgung Entsorgen Sie den Scooter entsprechend den in Ihrem Land gültigen Gesetzen und Bestimmungen. Verpackung entsorgen Entsorgen Sie die Verpackung sortenrein. Geben Sie Pappe und Karton zum Altpapier, Folien in die Wertstoffsammlung. -
Página 11: Mini Micro Deluxe Pass
DeLuxe Pass Mini micro deluxe Pass Füllen Sie den SCOOTER-Pass aus. Lesen Sie die Seriennummer Ihres Scooter: vorne unterhalb des Scooter. Bewahren Sie den mini micro deluxe Pass an einem sicheren Ort auf. Eigentümer Vor- und Nachname: ................... - Página 13 Reading and storing the user manual ..............19 Safety information ....................20 Assembling the handlebar ..................22 Assembling the seat ....................23 Mini Micro 3in1 Deluxe ..................23 Wear and tear .......................24 Changing the brakes ....................24 Changing the wheel spring ..................24 Maintenance ......................25 Conditions of warranty ..................25...
-
Página 14: Product Parts
ProduCt Parts Product parts Push button Handlebar Hole Locking mechanism Screw (for changing the brakes), 8× Deck Screw (for changing the wheel spring) Wheel spring Seat O-handlebar Plastic covering Hexagonal bolt... -
Página 15: Reading And Storing The User Manual
Reading and storing the user manual Dear customer, Thank you for choosing Micro (the original) – you can rest assured that you have acquired a high-quality product. We also offer you excellent after-sales services. We are proud to be known as the leading scooter and Kickboard®... -
Página 16: Safety Information
Note the following information to avoid accidents and injuries. • Always check the Mini Micro Deluxe prior to riding and make sure that all locks, clamps, nuts and screws are tightened properly. Also check the wheels for wear and proper mounting and make sure that the steering column is securely held in the proper position. - Página 17 • Ensure that your child always rides on paths on which motorised vehicles are not permitted. Pavements or cycle paths are best suited for this. • Always follow the traffic rules and guidelines in your area. The Mini Micro Deluxe must not be used on public roads.
-
Página 18: Assembling The Handlebar
Incorrect assembly of the Mini Micro Deluxe and improper handling can result in damage to the Mini Micro Deluxe. • No alterations should be made to the Mini Micro Deluxe apart from those in line with this user manual. • The Mini Micro Deluxe must only be repaired by an authorised specialist service centre. Only original spare parts may be used. -
Página 19: Assembling The Seat
Assembling the seat For younger children, we recommend attaching the seat to the Mini Micro 3in1 Deluxe (see Fig. I). The seat should be fixed at the right height. It should be possible for the child to fully touch the floor with both soles of the feet. -
Página 20: Wear And Tear
Wear and tear 1. Put the seat pin into the corresponding hole in the O-handlebar depending on the desired height (see Fig. J). 2. Secure the plastic covering with the hexagonal bolt This approach is the same for both positions (high and low). If you would like to remove the seat, follow these steps in the reverse order. -
Página 21: Maintenance
Maintenance Regularly check that all screws are tight, check the condition of the wheels, and replace if neces- sary. Clean the Mini Micro Deluxe with a soft, moist cloth after each use, and regularly check for visible damage or changes. -
Página 22: Disposal
disPosal The manufacturer’s legal warranty requirement is not limited by this warranty. The duration of the warranty can only be extended if there is a legal rule that governs this. In countries where (man- datory) warranties and/or spare-part storage and/or damage-compensation regulations are legally prescribed, the minimum legally prescribed conditions apply. -
Página 23: Mini Micro Deluxe Passport
Mini Micro Deluxe passport Fill in the SCOOTER passport. Read your scooter’s serial number: in front underneath the scooter. Keep the mini micro deluxe passport in a safe place. Owner Name and surname: ................... Street/number:................... SCOOTER Serial number:.................... - Página 25 Partes del producto ...............30 Lea y almacene el manual ..............31 Aviso de seguridad ................32 Montaje del manillar ..............35 Montar el sillín ................35 mini micro 3in1 deluxe ..............36 Desgaste ..................37 Cambiar los frenos ...............37 Cambiar el resorte ................37 Mantenimiento ................37 Disposiciones de garantía ..............38 Eliminación ..................39...
-
Página 26: Partes Del Producto
ParteS del Producto Partes del producto Botón de presión Manillar Orificio Enclavamiento Tornillo (cambio de frenos), 8× Cubierta Tornillo (cambio del resorte) Resorte Sillín Manillar en O Recubrimiento de plástico Tornillo hexagonal... -
Página 27: Lea Y Almacene El Manual
Lea y almacene el manual Estimado cliente: Nos alegra que haya optado por Micro (el original). Puede estar seguro/a de que ha adquirido un producto de gran calidad. Además, le ofrecemos un buen servicio posventa. Nos enorgullece ser el productor líder de Scooter y Kickboard® más conocido a nivel mundial. Nuestros productos se ven- den en más de 10 000 tiendas especializadas por todo el mundo. -
Página 28: Aviso De Seguridad
Tenga en cuenta los siguientes avisos para prevenir lesiones y accidentes. • Verifique el mini micro deluxe antes de cada uso y asegúrese de que los mecanismos de suje- ción, palancas, tuercas y tornillos estén bien fijados. Cerciórese igualmente de que las ruedas estén bien sujetas y de que no presenten signos de desgaste. - Página 29 • Asegúrese de que su hijo conduzca siempre por caminos en los que no puedan circular vehícu- los a motor. Lo mejor es que circule por caminos para bicicletas o peatones. • Respete siempre las normas de tráfico y las normativas. El mini micro deluxe no se puede utilizar en vías públicas.
- Página 30 Un montaje deficiente del mini micro deluxe y su uso inadecuado pueden provocar deterioros en el mini micro deluxe. • En el mini micro deluxe no se deben realizar modificaciones que no se mencionen en este manual. • El mini micro deluxe debe repararse exclusivamente en un taller especializado autorizado.
-
Página 31: Montaje Del Manillar
Montar el sillín Para los más pequeños, recomendamos asegurar el sillín en el mini micro 3in1 deluxe (véase la fig. I). El sillín debería estar ajustado a la altura correcta. El niño debe ser capaz de tocar el suelo con ambas plantas de los pies por completo. -
Página 32: Mini Micro 3In1 Deluxe
Sillín Mini Micro 3in1 Deluxe Nota: Los modelos Mini Micro 3in1 Deluxe Plus no incluyen el manillar en O. El asiento se puede montar directamente en el manillar en T (hoja de instrucciones por separado). Versión con sillín para ni- Versión con manillar en O... -
Página 33: Desgaste
Compruebe con regularidad que todos los tornillos estén bien ajustados y el estado de las ruedas y cámbielas en caso necesario. Después de cada uso, limpie el mini micro deluxe con un paño suave húmedo y compruebe periódicamente si presenta daños o modificaciones. -
Página 34: Disposiciones De Garantía
Para beneficiarse de la garantía, diríjase a nuestra red de comerciales o a nuestro servicio de aten- ción al cliente en el tel. +41 (0) 44 910 11 22 o por correo electrónico a: info@micro.ms La garantía no incluye daños por: •... -
Página 35: Eliminación
eliminación Eliminación Elimine el Scooter siguiendo las leyes y disposiciones vigentes en su país. Eliminación del embalaje Elimine el embalaje según los materiales. Tire la cartulina y el cartón al contene- dor del papel; el plástico, al contenedor de reciclaje. -
Página 36: Pasaporte Mini Micro Deluxe
PasaPorte Mini Micro deluxe Pasaporte mini micro deluxe Rellene el pasaporte del MICRO SCOOTER. Vea el número de serie de su Scooter: en la parte delan- tera debajo del Scooter. Guarde el pasaporte de su mini micro deluxe en un lugar seguro. - Página 37 Monter le siège ....................47 mini micro 3in1 deluxe ..................47 Usure ........................49 Remplacer le frein ....................49 Remplacer le ressort de commande ..............49 Entretien ......................50 Conditions de garantie ..................50 Élimination ......................51 Éliminer l’emballage ....................51 Passeport mini micro deluxe ................. 52...
-
Página 38: Pièces Du Produit
pièces du pRoduit Pièces du produit Bouton-pression Tige du guidon Trou Mécanisme de blocage Vis (remplacement du frein), 8× Repose-pied Vis (remplacement du ressort de commande) Ressort de commande Siège Barre du guidon en O Capot en plastique Vis à tête hexagonale... -
Página 39: Lire Le Manuel D'uTilisation Et Le Conserver
Lire le manuel d’utilisation et le conserver Chère cliente, cher client, Nous nous réjouissons que vous ayez choisi Micro (l’original). Vous pouvez être certain d’avoir acquis un produit de qualité supérieure. De plus, nous vous proposons un service après-vente unique. Nous sommes fiers de notre réputation internationale de fabricant leader de Scooter et de Kickboard®. -
Página 40: Règles De Sécurité
Veuillez observer les consignes suivantes pour prévenir les blessures et les accidents. • Contrôlez toujours votre mini micro deluxe avant de l’utiliser et assurez-vous que tous les verrouillages, leviers, écrous et vis sont correctement serrés. Assurez-vous également que les roues sont correctement fixées, qu’elles ne présentent aucune trace d’usure et que la tige du... - Página 41 • Veillez à ce que votre enfant roule toujours sur des chemins interdits aux véhicules motorisés. Les trottoirs et les pistes cyclables conviennent le mieux à cela. • Respectez toujours les règles du code de la route. N’utilisez jamais la mini micro deluxe sur la voie publique.
-
Página 42: Monter La Tige Du Guidon
Monter la tige du guidon (Mini Micro deluxe/-3in1) AVERTISSEMENT ! Risque de suffocation ! La mini micro deluxe contient des petites pièces que votre enfant pourrait avaler. Ne laissez pas les enfants jouer avec l’emballage et les petites pièces. Les enfants peuvent s’y emmêler et s’étouffer en jouant avec ou avaler les petites pièces et s’étouffer avec. -
Página 43: Monter Le Siège
«clic», qui signifie que le guidon est correctement verrouillé. Monter le siège Pour les plus petits, nous recommandons de fixer le siège à la mini micro 3in1 deluxe (voir fig. I). Il faut immobiliser le siège à la hauteur appropriée. L’enfant doit pouvoir poser les deux pieds com- plètement à... - Página 44 Mini Micro 3in1 deluxe Version avec siège pour Version avec guidon en O Version avec guidon en T pour enfants à partir d’un an. pour enfants à partir de enfants de 2 à 5 ans. 20 kg max. 2 ans.
-
Página 45: Usure
usuRe Usure Remplacer le frein 1. Desserrez les huit vis (voir fig. E). (voir fig. F) et dévissez les vis du frein avec un tournevis. 2. Retirez le repose-pied 3. Remplacez le frein et revissez le repose-pied. Remplacer le ressort de commande 1. -
Página 46: Entretien
Conditions de garantie La garantie MICRO SCOOTER vous offre les avantages suivants par rapport à la garantie légale : Durée de garantie : 30 mois en ce qui concerne la résistance à la rupture de la tige du guidon et du repose-pied. -
Página 47: Élimination
éLimination Cette garantie ne limite aucunement l’obligation légale de garantie du fabricant/revendeur. La du- rée de garantie peut être prolongée uniquement si une disposition légale le prévoit. Les conditions minimums légales s’appliquent dans les pays où une garantie (obligatoire) et/ou un stockage de pièces de rechange et/ou un régime en matière d’indemnisation sont légalement prescrits. -
Página 48: Passeport Mini Micro Deluxe
PassePort Mini Micro deluxe Passeport mini micro deluxe Remplissez le passeport SCOOTER. Lisez le numéro de série de votre Scooter: à l’avant, sous le Scooter. Conservez le passeport mini micro deluxe en lieu sûr. Propriétaire Prénom et nom : ......................... - Página 49 3in1 deluxe ..................59 Usura ........................61 Sostituzione dei freni ....................61 Sostituzione della molla di comando ..............61 Manutenzione ...................... 61 Condizioni di garanzia ................... 62 Smaltimento ......................63 Smaltimento dell’imballaggio ................63 Passaporto del monopattino mini micro deluxe ............ 64...
-
Página 50: Componenti Del Prodotto
Componenti del prodotto Componenti del prodotto Pulsante a pressione Manubrio Foro Dispositivo di arresto Vite (sostituzione del freno), 8× Pedana Vite (sostituzione molla di comando) Molla di comando Sedile Manubrio a O Copertura di plastica Vite a testa esagonale... -
Página 51: Leggere E Conservare Le Istruzioni Per L'uSo
Leggere e conservare le istruzioni per l’uso Gentili Clienti, grazie per aver scelto (l’originale) Micro! Potete essere certi di aver acquistato un prodotto di alta qualità. Vi offriamo inoltre un ottimo servizio post-vendita. Siamo orgogliosi di essere conosciuti a livello mondiale come produttori di scooter e Kickboard® e che i nostri prodotti siano venduti in tutto il mondo in più... -
Página 52: Avvertenze Di Sicurezza
• Prima di ogni uso ispezionare il mini micro deluxe per assicurarsi che tutti gli elementi di bloc- caggio, le leve, i dadi e i bulloni siano serrati saldamente. Accertarsi inoltre che le ruote siano correttamente fissate e non presentino segni di usura;... - Página 53 • Non apportare alcuna modifica al mini micro deluxe poiché ciò potrebbe pregiudicare la sicurezza. • Il mini micro deluxe è adatto a bambini fino a una statura di circa 120 cm. • Oltre agli indumenti protettivi, far indossare indumenti ben visibili e riflettenti.
-
Página 54: Montaggio Del Manubrio
• Non è consentito apportare nessuna modifica al mini micro deluxe ad eccezione di quanto previsto in queste istruzioni per l’uso. • Il mini micro deluxe può essere riparato solo da un centro di assistenza tecnica autorizzato. Si devono utilizzare esclusivamente pezzi di ricambio originali. -
Página 55: Montaggio Del Sedile
Sedile Montaggio del sedile Per i più piccoli consigliamo di montare il sedile sul mini micro 3in1 deluxe (vedi Fig. I). Il sedile deve essere fissato all’altezza corretta. Il bambino deve essere in grado di toccare completamente il pavimento con entrambe le piante dei piedi. - Página 56 montaggio del Sedile Versione con sedile per Versione con sedile per bam- Versione con manubrio a T per bambini a partire da 1 bini a partire da 2 anni d’età. bambini dai 2 ai 5 anni d’età. anno d’età. Max. 20 kg Max.
-
Página 57: Usura
Controllare regolarmente la tenuta di tutte le viti e le condizioni delle ruote e sostituirle se necessa- rio. Pulire il mini micro deluxe dopo ogni utilizzo con un panno umido e morbido ed eseguire rego- larmente un controllo visivo per rilevare eventuali danni o modifiche. -
Página 58: Condizioni Di Garanzia
Per far valere il proprio diritto alla garanzia, rivolgersi alla nostra rete di rivenditori o al nostro Servi- zio clienti al numero telefonico +41 (0) 44 910 11 22 oppure per e-mail: info@micro.ms La garanzia non si applica ai danni causati da: •... -
Página 59: Smaltimento
Smaltimento Smaltimento Smaltire lo scooter secondo le leggi e le normative vigenti nel proprio Paese. Smaltimento dell’imballaggio Smaltire l’imballaggio differenziandolo. Gettare carta e cartone nella raccolta di carta straccia, la pellicola nella raccolta dei materiali riciclabili. -
Página 60: Passaporto Del Monopattino Mini Micro Deluxe
Passaporto del monopattino mini micro deluxe Compilare il passaporto SCOOTER. Leggere il numero di serie dello scooter : nella parte anteriore sotto lo scooter. Conservare il passaporto del mini micro deluxe in un luogo sicuro. Proprietario Nome e cognome: .................... - Página 61 閱讀和保存用戶手冊 ................. 67 安全須知 ..................... 68 組裝手柄 ..................... 70 組裝車座 ....................71 Mini Micro 3in1 Deluxe ................71 磨損 ......................72 更換刹車系統 ....................72 更換車輪彈簧 ....................72 保養 ......................73 保養條件 ..................... 73 處置 ......................74 處置包裝 ......................74 Mini Micro Deluxe 護照 ................. 75...
-
Página 62: 產品零件
產品零件 產品零件 按鈕 手柄 孔 鎖定系統 螺絲(用於更換刹車系統),共8顆 車板 螺絲(用於更換車輪彈簧) 車輪彈簧 車座 O形手柄 塑膠外罩 六角螺栓... -
Página 63: 閱讀和保存用戶手冊
閱讀和保存用戶手冊 閱讀和保存用戶手冊 中文 親愛的顧客: 感謝您購買Micro(原廠)產品 — 您可以放心,因爲您得到的產品絕對優質。我們還會向 您提供出色的售後服務。我們是領先全球的滑板車和Kickboard 產品製造商,對此,我們 ® 非常自豪。我們的產品在全球10,000多家專賣店有售。 本手冊包含安全、性能和保養方面的重要資訊。第一次使用Mini Micro Deluxe 前,請仔細閱讀以下指南,加以指導孩子,並將手冊妥善保存,以便日後參考。 祝您使用Micro產品時玩個痛快! 您的Micro團隊 www.micro-mobility.com... -
Página 64: 安全須知
安全須知 安全須知 警告!意外和受傷風險! 疏忽或不當使用本產品,均可能引致嚴重,甚至致命的意外,並傷害到身體。請 注意以下資訊以避免意外發生,造成傷害。 • 使用前必須檢查Mini Micro Deluxe滑板車,確保所有鎖件、夾鎖、螺絲母和螺絲妥善 擰緊。必須檢查車輪有沒有磨損和是否已適當安裝,確保轉向柱已緊緊固定在適當的位 置。使用前,必須確保轉向系統已作調整適當。請定期將產品送到專賣店進行保養。 • 確保孩子使用Mini Micro Deluxe時,必須戴上合規格的頭盔,並扣穩帽 帶。確保孩子使用Mini Micro Deluxe時,必須穿上護腕、護肘、護膝和 膠底鞋。 • 避免孩子使用滑板車在陡坡向下衝,在這種情況下,綜合刹車系統將無法提供可靠的保 障。綜合刹車系統不能用於急衝下坡! • 刹車附件在使用時溫度會上升。因此,確保孩子避免經常使用刹車系統,這點非常重 要。請向孩子說明,直接接觸刹車系統,可能會灼傷皮膚。 • 請勿讓孩子以超過5公里/小時的速度踏滑板車。... - Página 65 • Mini Micro Deluxe每次只能承載一名兒童! • 切勿在黃昏或夜間踏滑板車。 • 請勿在濕潤、油滑、多砂、骯髒、結冰、積雪覆蓋、粗糙或凹凸不平的路面使用Mini Micro Deluxe滑板車。 • 必須教導孩子學懂如何控制滑板車。確保孩子不會使用本產品作試驗或嘗試任何危險的 動作。請視乎個人能力決定使用方式! • 請勿對Mini Micro Deluxe滑板車進行改裝,這可能會危及使用兒童的安全。 • Mini Micro Deluxe適合身高約120厘米的兒童。 • 除防護裝外,還應穿上反光服飾。 • 警告。必須佩帶防護設備。請勿在車流間踏滑板車。Mini Micro 3in1 Deluxe的最大承 受重量為20公斤。Mini Micro Deluxe的最大承受重量為50公斤。 警告!窒息風險! Mini Micro Deluxe滑板車包括或會被人吞下的細小零件。切勿讓兒童玩弄包裝和 細小零件。兒童玩耍時,可能會因為被包裝包裹或吞下細小零件而窒息。 • Mini Micro Deluxe必須由成人組裝。...
-
Página 66: 組裝手柄
組裝手柄 (Mini MicrO Deluxe/-3in1) 注意!損壞風險! 若組裝不當或操作不當,可能會損壞Mini Micro Deluxe滑板車。 • 除本用戶手冊允許外, 不可對Mini Micro Deluxe進行改裝。 • 必須由授權專門客戶服務中心修理Mini Micro Deluxe滑板車。必須使用原廠配件。 • 載重不能超過50公斤。 組裝手柄 (Mini Micro Deluxe/-3in1) 1. 按下按鈕 ,將手柄 放入孔 中,平坦的一面朝向後輪(參見圖A和圖B)。 您或可以:將桿固定在適當的位置,並向上將手柄插入孔中(見圖D)。 2. 確保按鈕鎖定在鎖定系統 中(見圖C)。 Mini Micro Deluxe Foldable 折疊/打開滑板車時,請按住車把下端左側的按鈕,同時另一隻手按下/提起車把,直至聽見“喀 噠”聲,這意味著車把已正確鎖定... -
Página 67: 組裝車座
組裝車座 組裝車座 中文 對於年幼的兒童,我們建議將車座安裝在 Mini Micro 3in1 Deluxe上(參見圖I)。兒童的雙 腳應可同時完全接觸地面。否則,剎停滑板車可能會很危險,而且無法保證能妥善控制 Mini Micro 3in1 Deluxe 滑板車。 Mini Micro 3in1 Deluxe 注意:Mini Micro 3in1 Deluxe Plus不再配備O型手柄,座椅可以直接安裝在T型車把上(配 獨立說明書) 配上車座,適合1歲或以 配上O形手柄,適合2歲或 配上T形手柄,適合2至5歲 上的兒童使用。 以上的兒童使用。 的兒童使用。 最大承受重量為20公斤。 最大承受重量為20公斤。 最大承受重量為50公斤。... -
Página 68: 更換刹車系統
組裝車座 1. 視乎所需高度,把車座梢 插入O形手柄 上的孔內(參見圖 J)。 2. 使用六角螺栓 將塑膠外罩 固定。 此方法適用於兩個不同高度(高和低)。 若要卸下車座,請以相反的次序完成步驟。 O形手柄的組裝方法和T形手柄相同(參見「組裝手柄」一節)。 現在,使用新滑板車玩個 痛快吧! 磨損 更換刹車系統 1. 除下8顆螺絲 (見圖E)。 2. 拆下車板 (見圖F),並用螺絲刀除下刹車系統的螺絲。 3. 更換刹車系統並再次擰上車板的螺絲。 更換車輪彈簧 1. 用螺絲刀除下螺絲 (見圖G)。 2. 向上推動車輪彈簧 ,並替換上一個新彈簧(見圖H)。 3. 安上螺絲並擰緊。... -
Página 69: 保養條件
保養 保養 中文 定期檢查所有螺絲是否牢固,並檢查車輪的狀況,必要時請更換部件。每次使用後,請用 柔軟濕潤的布料擦拭 Mini Micro Deluxe ,並定期檢查是否有明顯的損壞或變化。 保養條件 除了法定保養要求外,MicrO滑板車還提供如下保養: 保養期: 手柄和車板在30個月內可抗斷裂。 費用: 免費維修、更換或退款。 如需提出保養索償,請聯繫我們的經銷網絡或客戶服務中心,電話: +41 (0) 44 910 11 22 或電郵:info@micro.ms 保養不包括以下原因所造成的損壞: • 意外或不可預見的事件(如閃電、水災、火災等) • 使用或運輸不當 • 未有遵守安全和保養規則 • 不良操作或不當改裝 • 正常磨損... -
Página 70: 處置包裝
處置 製造商的法定保養要求並不只限於本保養書。若有法例規管延長保養期限的事宜,方可延長 保養期限。在擁有(強制)保養和/或備件儲存和/或損害賠償法例的國家,需應用最低法定 條件。 處置 應根據您所在國家的現行法律和條例處置滑板車。 處置包裝 正確回收包裝紙。紙板應與其他紙質商品一同回收;塑膠膜應與其他可回收 物品一同回收。... -
Página 71: Mini Micro Deluxe 護照
Mini MicrO Deluxe 護照 Mini Micro Deluxe 護照 中文 填寫滑板車「護照」。请检查滑板車正面下方印刷的序號,並妥善保管滑板車「護照」。 持有人 姓名: ......................街道/號碼:....................滑板車 序號:......................型號:......................顏色:......................車輪尺寸:....................特性:......................購買日期:....................經銷商姓名:....................經銷商地址:....................購買價格:....................