Tabla de contenido
Publicidad
Idiomas disponibles
Idiomas disponibles
Enlaces rápidos
Publicidad
Capítulos
Tabla de contenido

Resumen de contenidos para Targa GW 84 B1
- Página 3 Español ....................2 Italiano ....................16 Português ....................30 English ....................44 Deutsch ....................58 V 3.5...
-
Página 4: Tabla De Contenido
GW 84 B1 Índice 1. Uso previsto ....................3 2. Derechos de propiedad intelectual ..............3 3. Material incluido .................... 4 4. Material de montaje ..................4 5. Datos técnicos ....................5 6. Indicaciones de seguridad ................5 ... -
Página 5: Uso Previsto
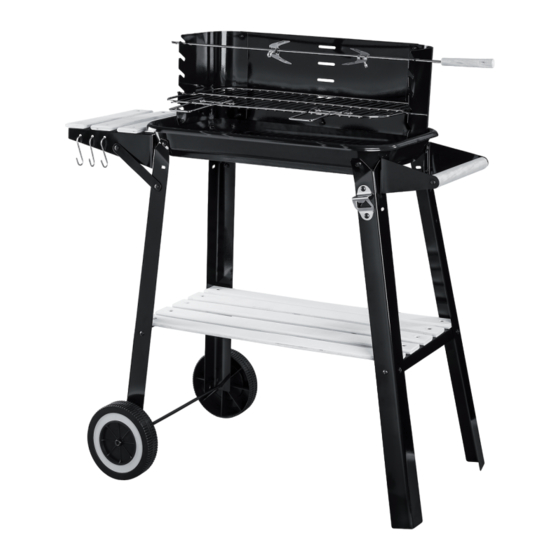
GW 84 B1 ¡Enhorabuena! Al comprar el carro barbacoa GW 84 B1 (en adelante, denominado barbacoa) ha elegido un producto de primera calidad. Antes del montaje de la barbacoa, le recomendamos que se familiarice con el producto y con las piezas suministradas y que lea atentamente las presentes instrucciones de uso. -
Página 6: Material Incluido
GW 84 B1 3. Material incluido Saque la barbacoa y todos sus accesorios del embalaje. Retire todos los materiales de embalaje y compruebe que todos los componentes estén íntegros y no presenten daños. Si su material presenta daños o no está completo, póngase en contacto con el fabricante. -
Página 7: Datos Técnicos
GW 84 B1 5. Datos técnicos Modelo GW 84 B1 Medidas tras montaje (long. x alt. x anch.) aprox. 84 x 86 x 45 mm Medidas de la parrilla (anch. x prof.) aprox. 48 x 27 cm Combustible Carbón (no usar briquetas de carbón) Capacidad del depósito de carbón... -
Página 8: Montaje
GW 84 B1 ¡PELIGRO! Utilice siempre la barbacoa en el exterior. Dejar que el carbón se consuma o se vaya apagando poco a poco al aire libre, nunca en espacios cerrados!De lo contrario, existe peligro de sufrir una intoxicación por monóxido de carbono que podría producir la muerte en muy poco tiempo. - Página 9 GW 84 B1 Reserve el tiempo suficiente para ello. Procure disponer de una superficie de trabajo de tamaño adecuado. Extraiga todas las piezas del embalaje y dispóngalas a su alcance. Extraiga el material de montaje del embalaje y dispóngalo a su alcance.
- Página 10 GW 84 B1 Paso 2 Atornille a mano los dos soportes del asa (8) a los pies de apoyo (10). Utilice para ello el orificio inferior del soporte del asa (8). Necesita un tornillo (21), una arandela (25) y una tuerca (23) para cada uno.
- Página 11 GW 84 B1 Paso 4 Pase el eje (14) por los orificios más inferiores de los pies de apoyo para ruedas (15). Coloque ahora las ruedas (13) en los extremos del eje (14). Enrosque a mano las tuercas de sombrerete (24) en los extremos del eje (14).
- Página 12 GW 84 B1 Paso 6 Fije a mano las 3 tablas del estante (19) sobre los soportes del estante (18). Necesita 6 tornillos (21), 6 arandelas (25) y 6 tuercas (23). Apriete ahora todos los tornillos. Introduzca los 3 ganchos (16) en los orificios del soporte del estante delantero (18).
- Página 13 GW 84 B1 Paso 8 Compruebe todas las uniones roscadas y apriételas de nuevo si es necesario. Coloque ahora la parrilla (5) y el pincho de la barbacoa (1) en las ranuras del cortavientos (2, 3, 4). Atornille el abrebotellas (9) incluido en el pie de soporte delantero derecho (10, flechas).
-
Página 14: Puesta En Funcionamiento
GW 84 B1 8. Puesta en funcionamiento Caliente la barbacoa antes de la primera puesta en marcha durante al menos 30 minutos para quemar cualquier posible residuo de fabricación. Durante este tiempo se pueden producir algunos ruidos, aunque esto es completamente normal. -
Página 15: Mantenimiento Y Limpieza
GW 84 B1 9. Mantenimiento y limpieza Para proceder con la limpieza, espere hasta que la barbacoa se haya enfriado por completo. De lo contrario, existe riesgo de quemaduras. La barbacoa no contiene piezas que exijan un mantenimiento regular. Para la limpieza normal, utilice un paño y agua mezclada con un detergente doméstico. -
Página 16: Información Sobre La Garantía Y El Servicio Postventa
GW 84 B1 12. Información sobre la garantía y el servicio postventa Garantía de TARGA GmbH Muy estimado cliente, muy estimada cliente: Este aparato tiene 3 años de garantía a partir de la fecha de compra. Recuerde que, si detecta desperfectos en este aparato, usted tiene derechos legales respecto al vendedor del producto. -
Página 17: Fabricante
GW 84 B1 Antes de poner en marcha el producto, lea detenidamente la documentación adjunta. Si experimenta algún problema y no puede solucionarlo con ayuda de esas instrucciones, llame a nuestro servicio de atención al cliente. Siempre que vaya a realizar una consulta, tenga preparado el comprobante de caja y la referencia o el número de serie del aparato para poder acreditar la compra. - Página 18 GW 84 B1 Sommario 1. Destinazione d’uso ..................17 2. Copyright ..................... 17 3. Contenuto della confezione ................18 4. Materiale per il montaggio ................18 5. Specifiche tecniche ..................19 6. Avvertenze di sicurezza ................19 ...
-
Página 19: Destinazione D'uSo
GW 84 B1 Congratulazioni! Congratulazioni per l’acquisto del barbecue con carrello GW 84 B1 (di seguito definito “barbecue”) e per la scelta di un prodotto di alta gamma. Prima del montaggio del barbecue, è necessario leggere attentamente le istruzioni per l’uso, in modo da acquisire dimestichezza con il prodotto e le parti in dotazione. -
Página 20: Contenuto Della Confezione
GW 84 B1 3. Contenuto della confezione Estrarre dalla confezione il barbecue e tutti i rispettivi accessori. Rimuovere completamente i materiali di imballaggio, verificando la completezza e l’integrità di tutti i componenti. Nel caso in cui la consegna risulti incompleta o danneggiata, contattare il produttore. -
Página 21: Specifiche Tecniche
GW 84 B1 5. Specifiche tecniche Modello GW 84 B1 Dimensioni da montato (L x A x P) ca. 84 x 86 x 45 mm Dimensioni griglia (L x P) ca. 48 x 27 mm Combustibile Carbonella (non bricchetti di carbonella) Capacità... -
Página 22: Montaggio
GW 84 B1 PERICOLO! Non utilizzare in alcun caso il barbecue all’interno di ambienti chiusi. Non accendere o far bruciare la carbonella in ambienti chiusi, bensì esclusivamente all'aperto!In questo caso sussiste il pericolo di avvelenamento da monossido di carbonio, che può causare la morte in breve tempo. -
Página 23: Prima Del Montaggio
GW 84 B1 7.2. Prima del montaggio Procedere con attenzione al montaggio del barbecue. Preventivare un lasso di tempo sufficiente alle operazioni. Utilizzare una superficie di lavoro con dimensioni idonee. Estrarre tutti i pezzi dall’imballaggio e disporli a portata di mano. - Página 24 GW 84 B1 Fase 2 Avvitare a mano i supporti impugnatura (8) ai piedistalli (10). A tale scopo utilizzare il foro inferiore del supporto impugnatura (8). Sono necessarie una vite (21), una rosetta (25) e un dado (23). Fissare i piedistalli (10) incl. i supporti impugnatura (8) montati al lato destro del recipiente per la carbonella (6).
- Página 25 GW 84 B1 Fase 4 Infilare l’asse (14) attraverso i fori inferiori dei piedistalli ruota (15). Posizionare quindi le ruote (13) alle estremità dell’asse (14). Avvitare i dadi ciechi (24) alle estremità dell’asse (14). In seguito, con l’ausilio di due chiavi fisse a larghezza 13, serrare contemporaneamente entrambi i dadi ciechi (24).
- Página 26 GW 84 B1 Fase 6 Fissare a mano le 3 tavole di appoggio (19) ai supporti ripiano (18). Sono necessarie 6 viti (21), 6 rosette (25) e 6 dadi (23). Serrare quindi tutte le viti. Infilare i 3 ganci (16) nei fori del supporto ripiano anteriore (18).
- Página 27 GW 84 B1 Fase 8 Verificare la tenuta di tutte le viti e all’occorrenza provvedere al serraggio. Posizionare quindi la griglia (5) e lo spiedo (1) negli inserti del paravento (2, 3, 4). Avvitare il cavatappi fornito (9) sul piedistallo destro anteriore (10, vedere le frecce). Sono necessarie 2 viti (21), 2 rosette (25) e 2 dadi (23).
-
Página 28: Messa In Esercizio
GW 84 B1 8. Messa in esercizio Prima di accendere il barbecue per la prima volta, è opportuno riscaldarlo per almeno 30 minuti, così da bruciare possibili residui dei materiali di produzione. Durante questo lasso di tempo, è possibile che all’interno del barbecue si sviluppino degli odori, in modo del tutto normale. -
Página 29: Manutenzione / Pulizia
GW 84 B1 9. Manutenzione / pulizia Prima di procedere alla pulizia, attendere che il barbecue si sia completamente raffreddato. Altrimenti sussiste il pericolo di ustione! Il barbecue non contiene alcun pezzo da sottoporre a manutenzione regolare. Per la normale pulizia utilizzare un panno con acqua e un comune detersivo. -
Página 30: Indicazioni Sulla Garanzia E Assistenza
GW 84 B1 12. Indicazioni sulla garanzia e assistenza Garanzia di TARGA GmbH Gentile cliente, con questo apparecchio riceve 3 anni di garanzia a partire dalla data di acquisto. Nel caso in cui dovesse riscontrare difetti del presente prodotto, Lei gode di diritti legali nei confronti del venditore del prodotto. - Página 31 GW 84 B1 Prima della messa in funzione del prodotto, leggere attentamente la documentazione allegata. Se dovesse presentarsi un problema che non si riesce a risolvere con i mezzi indicati, contattare la nostra assistenza clienti. Per ogni richiesta, si prega di custodire come prova d'acquisto lo scontrino fiscale e il codice articolo oppure il numero di serie, se esistente.
- Página 32 GW 84 B1 Índice 1. Utilização adequada ..................31 2. Direitos de autor ..................31 3. Material fornecido ..................32 4. Material de montagem ................. 32 5. Dados técnicos ....................33 6. Indicações de segurança ................33 ...
-
Página 33: Utilização Adequada
GW 84 B1 Muitos parabéns! Com a compra do grelhador com rodas GW 84 B1, seguidamente designado como grelhador, escolheu um produto de alta qualidade. Familiarize-se com o produto e as peças fornecidas em conjunto antes da montagem do grelhador e leia atentamente este manual de instruções. -
Página 34: Material Fornecido
GW 84 B1 3. Material fornecido Retire o grelhador e todos os acessórios da embalagem. Remova todos os materiais que fazem parte da embalagem e verifique se todos os componentes estão intactos e não apresentam danos. Se o material fornecido não estiver intacto ou apresentar eventuais danos, entre em contacto com o fabricante. -
Página 35: Dados Técnicos
GW 84 B1 5. Dados técnicos Modelo GW 84 B1 Dimensões montado (L x A x P) aprox. 84 x 86 x 45 cm Dimensões da grelha (L x P) aprox. 48 x 27 cm Carvão vegetal (não usar briquetes de carvão Combustível... -
Página 36: Montagem
GW 84 B1 PERIGO! Utilize o grelhador apenas fora de espaços fechados. Não queime nem deixe arder carvão para churrasco em espaços fechados, mas apenas ao ar livre! Caso contrário, existe perigo de envenenamento por monóxido de carbono, que pode causar a morte num curto espaço de tempo. - Página 37 GW 84 B1 Providencie uma área de trabalho de dimensão suficiente. Retire todas as peças individuais da embalagem e coloque-as à mão. Retire o material de montagem da embalagem e coloque as peças à mão. Coloque as ferramentas necessárias à mão.
- Página 38 GW 84 B1 Passo 2 Aparafuse manualmente os suportes da pega (8) nos pés (10). Para tal, utilize o furo inferior do suporte da pega (8). Precisa de um parafuso (21), uma arruela (25) e uma porca (23) para cada um.
- Página 39 GW 84 B1 Passo 4 Insira o eixo (14) nos furos inferiores dos pés de roda (15). Então, coloque as rodas (13) nas extremidades do eixo (14). Nas extremidades do eixo (14), aperte manualmente as porcas de capa (24). De seguida, com a ajuda de duas chaves de bocas de 13 mm, apertar simultaneamente ambas as porcas de capa (24), muito firmemente.
- Página 40 GW 84 B1 Passo 6 Fixe manualmente as 3 prateleiras (19) nos suportes de prateleira (18). Precisa de 6 parafusos (21), 6 arruelas (25) e 6 porcas (23). Agora, aperte bem todos os parafusos. Coloque os 3 ganchos (16) nos furos do suporte de prateleira (18) dianteiro.
- Página 41 GW 84 B1 Passo 8 Verifique todas as uniões roscadas e aperte-as novamente, se necessário! Então, coloque a grelha (5) e o espeto de grelhar (1) nas reentrâncias da proteção contra vento (2, 3, 4). Aparafuse o abre-garrafas (9) fornecido no pé dianteiro direito (10, setas). Precisa de 2 parafusos (21), 2 arruelas (25) e 2 porcas (23).
-
Página 42: Colocação Em Funcionamento
GW 84 B1 8. Colocação em funcionamento Antes da primeira colocação em funcionamento, aqueça o grelhador por, pelo menos, 30 minutos, para queimar possíveis resíduos de fabrico. Durante este período, pode ocorrer formação de odor; contudo, isto é totalmente normal. -
Página 43: Manutenção/Limpeza
GW 84 B1 9. Manutenção/limpeza Para a limpeza, aguarde até o grelhador estar totalmente arrefecido. Caso contrário, existe perigo de queimaduras! O grelhador não inclui peças que requeiram manutenção regular. Para a limpeza normal, utilize um pano e água com detergente comum. Não utilize produtos de limpeza agressivos ou abrasivos, a fim de evitar danos. -
Página 44: Informações Sobre A Garantia E Os Serviços
GW 84 B1 12. Informações sobre a garantia e os serviços Garantia da TARGA GmbH Estimado(a) cliente, Com este aparelho, usufrui de 3 anos de garantia a partir da data de compra. Em caso de defeitos neste produto, estão-lhe garantidos os direitos legais do consumidor. Estes direitos legais não são limitados pela garantia de seguida apresentada. - Página 45 GW 84 B1 Para qualquer pedido, tenha a postos o recibo e o número de referência ou, se disponível, o número de série, como comprovativo de compra. Caso não seja possível conseguir uma solução por via telefónica, a nossa linha de apoio ao cliente fará...
- Página 46 GW 84 B1 Contents 1. Intended use ....................45 2. Copyright ..................... 45 3. Package contents ..................46 4. Assembly material..................46 5. Technical data ....................47 6. Safety instructions ..................47 7. Assembly ...................... 48 ...
-
Página 47: Intended Use
GW 84 B1 Congratulations! By purchasing the trolley barbecue GW 84 B1, hereinafter referred to as barbecue, you have opted for a high-quality product. Familiarise yourself with the product and the components supplied before assembling the barbecue and read these operating instructions carefully. Observe the safety instructions and only use the barbecue in the manner described in these operating instructions and for the indicated fields of application. -
Página 48: Package Contents
GW 84 B1 3. Package contents Unpack the barbecue and all of the accessories. Remove all packaging materials and check all of the components for completeness and signs of damage. If any parts are missing or damaged, please contact the manufacturer. -
Página 49: Technical Data
GW 84 B1 5. Technical data Model GW 84 B1 Dimensions when assembled (W x H x D) Approx. 84 x 86 x 45 cm Dimensions of cooking grate (W x D) Approx. 48 x 27 cm Fuel Charcoal (not charcoal briquettes) Charcoal basket capacity max. -
Página 50: Assembly
GW 84 B1 DANGER! Always place the barbecue on an even, heat-resistant, solid surface and not in the vicinity of flammable materials, liquids or gases. Ensure a sufficient distance from walls and other objects and never leave the barbecue unattended when in use and after use for as long as it is still warm. - Página 51 GW 84 B1 WARNING! When assembling the barbecue, make sure that the heads of the screws always point outwards. This allows you to prevent injuries caused by protruding screws. Below are instructions on how to assemble the barbecue in eight steps, including diagrams. Set aside the required individual components and assembly materials.
- Página 52 GW 84 B1 Step 2 Hand-screw the handle bracket (8) to the legs (10). Use the bottom hole of the handle bracket (8) for this. You will need a screw (21), a washer (25) and a nut (23) in each case.
- Página 53 GW 84 B1 Step 4 Place the axle (14) through the bottom hole of the wheel leg (15). Now place the wheels (13) onto the ends of the axle (14). Hand-screw the cap nuts (24) onto the ends of the axle (14).
- Página 54 GW 84 B1 Step 6 Hand-screw the three shelf slats (19) to the slat holders (18). You will need six screws (21), six washers (25) and six nuts (23). Now tighten all the screws. Insert the three hooks (16) into the holes on the front slat holder (18).
- Página 55 GW 84 B1 Step 8 Check all screw connections and retighten as necessary! Now insert the cooking grate (1) and barbecue rotisserie (5) into the recesses on the wind guard (2, 3, 4). Screw the bottle opener (9) provided to the front, right leg (10, arrows). You will need two screws (21), two washers (25) and two nuts (23).
-
Página 56: Initial Use
GW 84 B1 8. Initial use Before using the barbecue for the first time, heat it for at least 30 minutes in order to burn any possible production residues. Odours may develop during this time, but this is completely normal. -
Página 57: Cleaning/Care
GW 84 B1 9. Cleaning/care Wait until the barbecue has cooled down completely before cleaning. Otherwise, there is a risk of burn injuries. The barbecue does not contain any components that require regular maintenance. Use a dishcloth, water and any commercially available washing up-liquid for routine cleaning. Do not use any aggressive or scouring cleaning agents in order to prevent damage. -
Página 58: Notes On Guarantee And Service
GW 84 B1 12. Notes on guarantee and service Warranty of TARGA GmbH Dear Customer, This device is sold with three years warranty from the date of purchase. In the event of product defects, you have legal rights towards the seller. These statutory rights are not restricted by our warranty as described below. - Página 59 GW 84 B1 Before using your product for the first time, please read the enclosed documentation carefully. Should any problems arise which cannot be solved in this way, please call our hotline. Always have your receipt, the product article number as well as the serial number (if available) to hand as proof of purchase.
- Página 60 GW 84 B1 Inhaltsverzeichnis 1. Bestimmungsgemäße Verwendung .............. 59 2. Urheberrecht ....................59 3. Lieferumfang ....................60 4. Montagematerial ..................60 5. Technische Daten ..................61 6. Sicherheitshinweise ..................61 7. Montage ....................... 62 ...
-
Página 61: Bestimmungsgemäße Verwendung
GW 84 B1 Herzlichen Glückwunsch! Mit dem Kauf des Grillwagens GW 84 B1, im Folgenden als Grill bezeichnet, haben Sie sich für ein hochwertiges Produkt entschieden. Machen Sie sich vor der Montage des Grills mit dem Produkt und den mitgelieferten Teilen vertraut und lesen Sie diese Bedienungsanleitung aufmerksam durch. -
Página 62: Lieferumfang
GW 84 B1 3. Lieferumfang Nehmen Sie den Grill und alle Zubehörteile aus der Verpackung. Entfernen Sie alle Verpackungsmaterialien und überprüfen Sie, ob alle Komponenten vollständig und unbeschädigt sind. Im Falle einer unvollständigen oder beschädigten Lieferung wenden Sie sich bitte an den Hersteller. -
Página 63: Technische Daten
GW 84 B1 5. Technische Daten Modell GW 84 B1 Abmessungen montiert (B x H x T) ca. 84 x 86 x 45 cm Abmessungen Grillrost (B x T) ca. 48 x 27 cm Brennstoff Holzkohle (keine Holzkohlebriketts) Fassungsvermögen Kohlebehälter max. -
Página 64: Montage
GW 84 B1 GEFAHR! Betreiben Sie den Grill nur außerhalb von geschlossenen Räumen. Grillkohlen nicht in geschlossenen Räumen, sondern nur im Freien abbrennen oder ausglühen lassen! Ansonsten besteht die Gefahr einer Kohlenmonoxidvergiftung, die in kürzester Zeit zum Tod führen kann. - Página 65 GW 84 B1 Schaffen Sie sich eine ausreichend große Arbeitsfläche. Entnehmen Sie alle Einzelteile aus der Verpackung und legen Sie die Teile griffbereit. Entnehmen Sie das Montagematerial aus der Verpackung und legen Sie die Teile griffbereit. ...
- Página 66 GW 84 B1 Schritt 2 Schrauben Sie die Griffhalter (8) handfest an die Standfüße (10). Verwenden Sie hierzu das untere Loch des Griffhalters (8). Sie benötigen jeweils eine Schraube (21), eine Unterlegscheibe (25) und eine Mutter (23). Befestigen Sie die Standfüße (10) inkl. der montierten Griffhalter (8) an der rechten Seite des Kohlebehälters (6).
- Página 67 GW 84 B1 Schritt 4 Stecken Sie die Achse (14) durch die untersten Löcher der Rad-Standfüße (15). Setzen Sie nun die Räder (13) auf die Enden der Achse (14). Schrauben Sie auf die Enden der Achse (14) die Hutmuttern (24) handfest auf. Ziehen Sie anschließend unter Zuhilfenahme zweier Maulschlüssel SW13 beide Hutmuttern (24) gleichzeitig fest an.
- Página 68 GW 84 B1 Schritt 6 Befestigen Sie die 3 Ablagebretter (19) handfest auf den Ablagehaltern (18). Sie benötigen 6 Schrauben (21), 6 Unterlegscheiben (25) und 6 Muttern (23). Ziehen Sie nun alle Schrauben fest an. Setzen Sie die 3 Haken (16) in die Bohrungen des vorderen Ablagehalters (18).
- Página 69 GW 84 B1 Schritt 8 Überprüfen Sie alle Schraubverbindungen und ziehen Sie diese ggf. nach! Setzen Sie nun den Grillrost (5) und den Grillspieß (1) in die Aussparungen des Windschutzes (2, 3, 4) ein. Schrauben Sie den mitgelieferten Flaschenöffner (9) am vorderen rechten Standfuß (10, Pfeile) fest.
-
Página 70: Inbetriebnahme
GW 84 B1 8. Inbetriebnahme Heizen Sie den Grill vor der ersten Inbetriebnahme für mindesten 30 Minuten auf, um mögliche Fertigungsrückstände zu verbrennen. Während dieser Zeit kann es zu Geruchsentwicklung kommen, diese ist aber völlig normal. GEFAHR! Verwenden Sie zum Anzünden oder Wiederanzünden ausschließlich Anzündhilfen, die der europäischen Norm EN 1860-3 entsprechen. -
Página 71: Wartung / Reinigung
GW 84 B1 9. Wartung / Reinigung Warten Sie mit der Reinigung bis der Grill vollständig abgekühlt ist. Andernfalls besteht Gefahr durch Verbrennungen! Der Grill beinhaltet keine regelmäßig zu wartenden Teile. Für die normale Reinigung verwenden Sie ein Spültuch und Wasser mit einem handelsüblichen Spülmittel. Verwenden Sie keine aggressiven oder scheuernden Reinigungsmittel, um Beschädigungen zu vermeiden. -
Página 72: Hinweise Zu Garantie Und Serviceabwicklung
GW 84 B1 12. Hinweise zu Garantie und Serviceabwicklung Garantie der TARGA GmbH Sehr geehrte Kundin, sehr geehrter Kunde, Sie erhalten auf dieses Gerät 3 Jahre Garantie ab Kaufdatum. Im Falle von Mängeln dieses Produkts stehen Ihnen gegen den Verkäufer des Produkts gesetzliche Rechte zu. Diese gesetzlichen Rechte werden durch unsere im Folgenden dargestellte Garantie nicht eingeschränkt. - Página 73 GW 84 B1 Bitte lesen Sie vor Inbetriebnahme Ihres Produktes sorgfältig die beigefügte Dokumentation. Sollte es mal zu einem Problem kommen, welches auf diese Weise nicht gelöst werden kann, wenden Sie sich bitte an unsere Hotline. Bitte halten Sie für alle Anfragen den Kassenbon und die Artikelnummer bzw. wenn vorhanden die Seriennummer als Nachweis für den Kauf bereit.