Tabla de contenido
Publicidad
Enlaces rápidos
Publicidad
Tabla de contenido

Manuales relacionados para K'Nex SIMPLE MACHINES DELUXE


Resumen de contenidos para K'Nex SIMPLE MACHINES DELUXE
-
Página 2: Tabla De Contenido
CONTENTS WARNING: Each K’NEX piece has its own color and shape; You can slide these special connectors CHOKING HAZARD - Small parts. match it to pieces in the picture instructions. together. Push tightly until you hear a “click”. Not for children under 3 years. Pulley Stand . -
Página 3: Poleas Soporte
Pulley Stand Poleas Soporte Poulies Stand Front View Back View Vista Frontal Vista Posterior L’image avant L’image arrière ™ START Tie cord here COMENZAR Ate el cable aqui COMMENCER Attacher la corde ici ™... -
Página 4: Pulley Stand
Note: Use the back view of the Pulley Stand Fixed Pulley to work with the Fixed Pulley. Nota: Use la vista posterior del soporte de Polea Fija la polea para trabajar con la polea fija. Note : Utiliser l’image arrière de la longueur de poulie pour travailler avec une poulie fixe. -
Página 5: Movable Pulley
FINISH Note: Use the front view of the Pulley Movable Pulley Tie cord here Stand to work with the Movable Pulley. TERMINAR Nota: Use la vista frontal del soporte de Polea móvil la polea para trabajar con la polea móvil. Ate el cable aquí... -
Página 6: Combination Pulley
Note: Use the front view of the Pulley Combination Pulley Stand to work with the Combination Pulley. Nota: Use la vista frontal del soporte de la polea para trabajar con la polea de Polea de Combinación Combinación. Note : Utiliser l’image avant de la longueur de poulie pour travailler avec une Poulie combinée combinaison de poulie. -
Página 7: Flagpole
Flagpole Varilla Mât de drapeau ™ ™... -
Página 8: Sailboat
Sailboat Velero Bateau à voile ™ ™... -
Página 9: Clothlesline
Clothesline Tendedero Corde à linge ™ ™... -
Página 10: Elevator
Elevator Ascenseur Ascensor ™ ™... - Página 11 ™...
- Página 12 FINISH Tie cord around a white Connector as shown. TERMINAR Ate el cable alrededor del FINISH Tie cord around a white conector blanco como se Connector as shown. muestra. TERMINAR Ate el cable alrededor del TERMINER Attacher la corde autour conector blanco como se du connecteur blanc muestra.
-
Página 13: Block & Tackle
Block & Bloc et Tackle palan Aparejo de poleas ™ ™... - Página 14 Pulley A Polea A Pulley A Poulie A Polea A Poulie A Pulley B Polea B Poulie B • Attach Pulley A to frame • Adjunte la Polea A la • Attacher la poulie A au (step #5). estructura (paso #5). cadre (étape #5).
- Página 15 How to String Try these other Pulley Configurations Cómo atar Pruebe estas otras configuraciones de la polea Pulley A Comment corder Essayer ces autres configurations de poulies Polea A Poulie A FINISH CORD START CORD TERMINAR CABLE COMENZAR CABLE TERMINER LA CORDE COMMENCER LA CORDE Tie this end of Pulley A...
- Página 16 Add frame front Añada la parte delantera del marco Ajouter le cadre avant Place a cup of pennies in bucket for weight. Coloque una taza de monedas de un centavo en el cubo para pesar. Placer quelques sous dans le bac pour vérifier le poids.
-
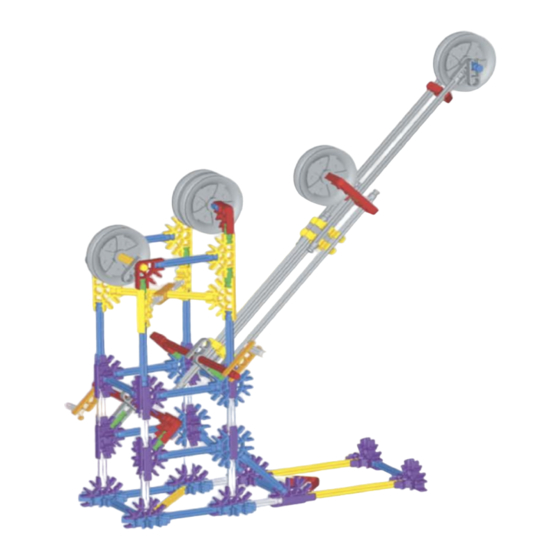
Página 17: Crane
Crane Grúa ™ Grue ™... - Página 18 ™...
- Página 19 How to String 1 st Cord Color Key Cómo atar el 1 er cable Clave de colores Comment corder la première corde Couleur de la clé Cord Cord Cable Cable Corde Corde Tie the other end of the cord here. Ate el otro extremo How to String 2 nd Cord del cable de aquí.
- Página 20 PULLEYS – Parts List POLEAS – Lista de Partes POULIES – Liste de Pièces...