Tabla de contenido
Publicidad
Idiomas disponibles
Idiomas disponibles
Enlaces rápidos
Publicidad
Tabla de contenido
Solución de problemas

Manuales relacionados para Kicker KMC3


Resumen de contenidos para Kicker KMC3
- Página 1 KMC3 Multi-Media Receiver KMC3 Owner’s Manual | English Manual del Propietario | Español KMC3 Receptor Multi-Media Benutzerhandbuch | Deutsch KMC3 Multi-Media-Receiver Manuel d’utilisation | Française KMC3 Multi-Media Receiver...
- Página 2 Le dispositif rencontre l’exemption des limites courantes d’évaluation dans la section 2.5 de RSS 102 et la conformité à l’exposition de RSS-102 rf, utilisateurs peut obtenir l’information canadienne sur l’exposition et la conformité de rf. FCC ID: RGR-KMC3 IC ID: 11078A-KMC3...
- Página 3 print mounting hole cutout template at 8.5”x11” in “Portrait” and “Actual Size” It is recommended you mark the screw holes for Surface Mounting after making the mounting hole. Imprima la plantilla de recorte del orificio de montaje en tamaño 8.5 x 11 pulgadas, con las opciones de con- figuración “Vertical”...
- Página 4 print mounting hole cutout template at 8.5”x11” in “Portrait” and “Actual Size” It is recommended you mark the screw holes for Surface Mounting after making the mounting hole. Imprima la plantilla de recorte del orificio de montaje en tamaño 8.5 x 11 pulgadas, con las opciones de con- figuración “Vertical”...
-
Página 5: Tabla De Contenido
KMC3 OWNER’S MANUAL Contents Contenido Specs Especificaciones Overview Descripción general Installation Instalación Operation Funcionamiento Troubleshooting Resolución de problemas Warranty Garantía Contenu Inhalt Caractéristiques Spezifikationen Présentation Übersicht Installation Installation Utilisation Betrieb Dépannage Fehlerbehebung Garantie Garantie... -
Página 6: Specs
Input Sensitivity 500mV Bluetooth Range [ft] With a KICKER KXM amplifier, a pair of KICKER USB Playback MP3, WMA, FLAC, WAV KM speakers, and a few KICKER cables, you’re looking at a full system upgrade that will... -
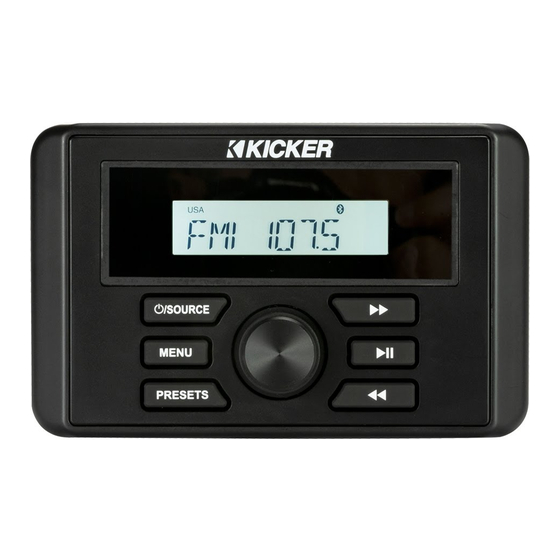
Página 7: Overview
OVERVIEW NOTE: Use short and long presses to operate. Some input sources do not support all functions. •change volume/value (scroll) •next/previous (scroll) •select (press) •enter audio settings menu (press & hold) •digital display •power on/off (press & hold) •change source (press) •seek up (press) •next track (press) •fast forward/manual tuning (press &... -
Página 8: Installation
INSTALLATION LINE OUT wired remote (sold separately) AUX IN fuse 15A ATM USB input USB charging radio antenna positive +12V (switched) negative ground remote auto-turn on output (to amplifiers) battery illumination/dimmer rear rear front front ground (day/night mode when right left right left... -
Página 9: Surface Mounting
Surface Mounting Secure the KMC3 to the surface on which you’re mounting using the supplied screws. Push the faceplate onto the KMC3 until it locks into place. - Página 10 Bracket Mounting Attach threaded bolts to the back of the KMC3 Position the mounting bracket over the bolts. Place washers over bolts and securely attach nuts. Depending on the size of your mounting baffle, you may need to snap off one or more of the metal tabs from the mounting bracket to...
-
Página 11: Operation
While in pairing mode, the Bluetooth icon will flash. When successfully paired, the Bluetooth icon will become solid. The USB input source is only available when there is a USB device connected. The KMC3 will automatically switch to USB input when a USB device is connected and detected, with a USB icon. -
Página 12: Audio Settings
Audio Settings Press and hold the VOLUME KNOB to enter the Audio Settings menu. The available audio settings are: Bass, Treble, Balance, Fader, and EQ. Use the VOLUME KNOB to change the available values for each setting, then press it to confirm the settings. Changes to the Bass, Treble, and EQ settings are applied to the RCA outputs. -
Página 13: Troubleshooting
TROUBLESHOOTING If your KMC3 does not appear to be working, check the obvious things first such as blown fuses, poor or incorrect wiring connections etc. If you’re using an amplifier, check for incorrect setting of crossover switches and gain controls etc. -
Página 14: Especificaciones
ESPECIFICACIONES Asegúrese de no perforar el cableado ni los mecanismos del vehículo. Usted es el único responsable de instalar el centro multimedia KMC3 de manera segura. Consulte la plantilla de Modelo KMC3 corte de orificios de montaje de las páginas 2 y 3. -
Página 15: Descripción General
DESCRIPCIÓN GENERAL NOTA: Para operar, presione durante tiempos cortos y prolongados. Algunas fuentes de entrada no admiten todas las funciones. •cambiar volumen/valor (desplazar) •siguiente/anterior (desplazar) •seleccionar (presionar) • ingresar al menú de configuraciones de audio (presionar y sostener) •pantalla digital •... -
Página 16: Instalación
INSTALACIÓN LÍNEA DE SALIDA remoto alámbrico (se vende por separado) ENTRADA AUXILIAR fusible 15 A ATM Entrada USB Carga USB antena de radio positivo +12 V (encendido) negativo conexión a tierra encendido automático remoto en la salida (para amplificadores) batería iluminación/atenuador posterior posterior... -
Página 17: Montaje En Superficie
Montaje en superficie Fije el KMC3 a la superficie en la que desea montarlo usando los tornillos suministrados. Presione la placa frontal sobre el KMC3 hasta que quede fijada en su lugar. - Página 18 Soporte de montaje Coloque los tornillos roscados en la parte posterior del KMC3 Posicione el soporte de montaje sobre los tornillos. Coloque las arandelas sobre los tornillos y ajuste las tuercas con firmeza. Según el tamaño del deflector de montaje, es posible que necesite quitar uno o más de los tabuladores metálicos del soporte de montaje para adaptar...
-
Página 19: Funcionamiento
USB, y mostrará un ícono USB. Para obtener el mejor rendimiento, KICKER recomienda las unidades SANDISK. En pruebas, se demostró que el KMC3 funciona con algunos discos duros; no obstante, ¡esta función no está respaldada por KICKER! Las unidades se deben formatear en sistemas de archivos FAT16 o FAT32. -
Página 20: Configuraciones De Audio
Configuraciones de audio Mantenga presionada la perilla VOLUME (Volumen) para ingresar al menú de configuraciones del dispositivo. Las opciones disponibles son: Bass (Graves), Treble (Agudos), Balance (Balance), Fader (Atenuador) y EQ (Ecualizador). Use la perilla VOLUME (Volumen) para cambiar los valores disponibles para cada ajuste y luego presiónela para confirmar. -
Página 21: Resolución De Problemas
+12 V, el cable a tierra y los fusibles reciban energía y estén correctamente conectados. ¿Hay baja o ninguna salida? Œ Compruebe el control de balance en el KMC3. Verifique las conexiones de salida del altavoz. Ž Apague y vuelva a encender el KMC3. -
Página 22: Caractéristiques
Lecture par liaison USB MP3, WMA, FLAC, WAV Un amplificateur KICKER KXM, une paire de haut-parleurs KICKER KM et quelques câbles KICKER, et vous disposez Recharge par liaison USB CC 5 V, 1 A d'une mise à niveau complète du système qui va dominer ! Système de fichiers compatible USB... -
Página 23: Présentation
PRÉSENTATION REMARQUE : appuyer de façon rapide ou prolongée pour utiliser. Certaines sources d'entrée ne prennent pas en charge toutes les fonctions. •modifier le volume/la valeur (faire défiler) •précédent/suivant (faire défiler) •sélectionner (appuyer) • accéder au menu des paramètres audio (appuyer longuement) •affichage numérique •marche/arrêt (appuyer longuement) •changer de source (appuyer) -
Página 24: Sortie De Ligne
INSTALLATION SORTIE DE LIGNE commande à distance câblée (vendue séparément) entrée AUX fusible 15 A ATM entrée USB chargement USB antenne radio positif +12 V (commuté) négatif masse sortie mise en marche à distance (vers les amplificateurs) batterie illumination/variateur (mode jour/ arrière arrière avant avant... - Página 25 Montage en surface Fixez le KMC3 à la surface sur laquelle vous effectuez le montage à l'aide des vis fournies. Poussez la plaque frontale dans le KMC3 jusqu'à ce qu'elle se verrouille en place.
- Página 26 Support de fixation Fixez les boulons filetés à l'arrière du KMC3 Placez le support de fixation sur les boulons. Placez les rondelles sur les boulons, puis vissez fermement les écrous. Selon la taille de votre montage de baffle, il est possible que vous deviez casser une ou plusieurs des languettes en métal du support de montage pour...
-
Página 27: Utilisation
USB est connecté et détecté avec une icône USB. KICKER recommande les disques SANDISK pour obtenir une performance optimale. Dans des essais, KMC3 a montré qu'il fonctionnait avec certains disques durs, toutefois, cela n'est pas pris en charge par KICKER ! Les disques doivent être formatés au système de fichiers FAT16 ou FAT32. -
Página 28: Réglages Audio
Réglages audio Appuyez longuement sur la MOLETTE VOLUME pour accéder au menu des paramètres audio. Les paramètres audio disponibles sont : Bass, Treble, Balance, Fader et EQ. Utilisez la MOLETTE VOLUME pour modifier chaque paramètre parmi les valeurs possibles, puis appuyez dessus pour confirmer les paramètres. Les changements apportés aux paramètres Bass, Treble et EQ sont appliqués aux sorties RCA. -
Página 29: Dépannage
à la terre et le(s) fusible(s) pour contrôler l'alimentation et la connexion. Pas de sortie ou sortie faible ? Œ Vérifiez la commande de balance sur le KMC3. Vérifiez les connexions de sortie des enceintes. Ž Mettez le KMC3 sous tension. -
Página 30: Spezifikationen
SPEZIFIKATIONEN Achten Sie darauf, nicht in die Verkabelung oder den Mechanismus des Fahrzeugs zu bohren. Der Einbau des KMC3 Media Center unterliegt allein Ihrer Verantwortung. Auf Modell KMC3 S. 2 - 3 finden Sie eine Schablone für die Einbauöffnung. Ausgangsleistung bei 14,4 V, 4 Ω Stereo, <10 % THD+N 25 W x 4... -
Página 31: Übersicht
ÜBERSICHT HINWEIS: Betrieb mit kurzem und längerem Tastendruck. Bestimmte Eingangsquellen unterstützen nicht alle Funktionen. • Lautstärke/Wert ändern (scrollen) • nächster/vorheriger (scrollen) • auswählen (drücken) • Menü Audioeinstellungen eingeben (drücken und halten) • Digitales Display • ein-/ausschalten (drücken und halten) • Eingangsquelle ändern (drücken) •... -
Página 32: Installation
INSTALLATION AUSGANG Kabelfernbedienung (separat erhältlich) AUX-EINGANG Sicherung 15 A ATM USB-Eingang USB-Ladekabel Radioantenne plus +12 V (geschaltet) minus Erdung Ausgang für ferngesteuerte automatische Inbetriebnahme Batterie (zum Verstärker) Beleuchtung/Dimmer hinten hinten vorne vorne Erdung (Tag/Nacht-Modus bei Anschluss rechts links rechts links an die Fahrzeugbeleuchtung) - Página 33 Nichtbündiger Einbau Befestigen Sie den KMC3 mit den mitgelieferten Schrauben an der Montageoberfläche. Schieben Sie die Abdeckung auf den KMC3, bis sie einrastet.
- Página 34 Montagehalterung Befestigen Sie die Gewindebolzen an der Rückseite des KMC3. Bringen Sie die Halterung über den Bolzen in Position. Bringen Sie die Unterlegscheiben über den Bolzen an und verschrauben Sie sie fest. Je nach Größe Ihrer Montagefläche müssen Sie unter Umständen eines oder mehrere der Metallelemente der Halterung abbrechen, damit diese richtig passt.
-
Página 35: Betrieb
Wenn Bluetooth als Eingangsquelle ausgewählt wurde, wechselt der KMC3 automatisch in den Bluetooth-Kopplungsmodus, sofern es keine bereits bestehende Bluetooth-Verbindung gibt, und wird auf Ihrem Audiogerät als „KMC KICKER“ angezeigt. Bei Auswahl von „BT PAIR“ im Menü wechselt das Gerät ebenfalls in den Kopplungsmodus. - Página 36 Audioeinstellungen Drücken und halten Sie den LAUTSTÄRKEREGLER, um das Menü der Audioeinstellungen zu öffnen. Die verfügbaren Audioeinstellungen sind: Bass, Höhen, Balance, Fader und EQ. Verwenden Sie den LAUTSTÄRKEREGLER, um die Werte der jeweiligen Einstellung zu ändern, und drücken Sie ihn dann, um die Einstellung zu bestätigen.
-
Página 37: Fehlerbehebung
Niedrige Spannung: Der KMC3 überwacht die Spannungsstärke. Bei einem Spannungsabfall wird das Batteriesymbol angezeigt und das Zeichen „LOW BAT“ blinkt. Die Funktionen bleiben erhalten, bis die Spannung unter +10 V fällt, dann schaltet sich der KMC3 ab. Sorgen Sie für eine angemessene Batterielaufzeit, da der KMC3 mit der Zeit Strom verbraucht. -
Página 38: What Is Not Covered
KICKER strives to maintain a goal of one week turnaround for all electronics (amplifiers, crossovers, equalizers, etc.) returns. Delays may be incurred if lack of replacement inventory or parts is encountered. Failure to follow these steps may void your warranty. Any questions can be directed to the KICKER Customer Service Department at (405) 624-8510. -
Página 39: International Warranty
Sea precavido cuando controle el volumen. La frase “combustible para vivir la vida Livin’ Loud™ a todo volumen” se refiere al entusiasmo por la vida que la marca Kicker de estéreos de automóvil representa y a la recomendación a nuestros clientes de que vivan lo mejor posible (“a todo volumen”) en todo sentido. - Página 40 ©2020 Stillwater Designs...