Tabla de contenido
Publicidad
Idiomas disponibles
Idiomas disponibles
Enlaces rápidos
BEDIENUNGSANLEITUNG
USER MANUAL
MODE D'EMPLOI
MANUAL DEL USUARIO
EVO-10
Lighting effect
©
Für weiteren Gebrauch aufbewahren!
Copyright
Keep this manual for future needs!
Nachdruck verboten!
Gardez ce mode d'emploi pour des
Reproduction prohibited!
utilisations ultérieures!
Réproduction interdit!
Guarde este manual para posteriores usos.
Prohibida toda reproducción.
Publicidad
Tabla de contenido

Manuales relacionados para Futurelight EVO-10


Resumen de contenidos para Futurelight EVO-10
- Página 1 BEDIENUNGSANLEITUNG USER MANUAL MODE D'EMPLOI MANUAL DEL USUARIO EVO-10 Lighting effect © Für weiteren Gebrauch aufbewahren! Copyright Keep this manual for future needs! Nachdruck verboten! Gardez ce mode d’emploi pour des Reproduction prohibited! utilisations ultérieures! Réproduction interdit! Guarde este manual para posteriores usos.
-
Página 2: Tabla De Contenido
MULTI-LANGUAGE-INSTRUCTIONS Inhaltsverzeichnis Table of contents Sommaire/Contenido EINFÜHRUNG..............................4 Lieferumfang ..............................4 SICHERHEITSHINWEISE..........................4 BESTIMMUNGSGEMÄßE VERWENDUNG..................... 6 GERÄTEBESCHREIBUNG ..........................7 Features ................................. 7 Geräteübersicht.............................. 8 INSTALLATION .............................. 10 Lampeninstallation/Lampenwechsel ......................10 Lampenjustierung............................11 Einsetzen/Austauschen von Gobos ......................11 Überkopfmontage............................12 Anschluss ans Netz............................13 Anschluss an den DMX-512 Controller / Verbindung Projektor - Projektor .......... - Página 3 You can find the latest update of this user manual in the Internet under: Vous pouvez trouvez la dernière version de ce mode d'emploi dans l'Internet sous: Vd. puede encontrar la versión más reciente de este manual en el Internet bajo: www.futurelight.com 3/104 51837570_V_1_0.DOC...
-
Página 4: Einführung
- sich die letzte Version der Anleitung im Internet herunter laden EINFÜHRUNG Wir freuen uns, dass Sie sich für einen FUTURELIGHT EVO-10 entschieden haben. Sie haben hiermit ein leistungsstarkes und vielseitiges Gerät erworben. Nehmen Sie den EVO-10 aus der Verpackung. - Página 5 Unbedingt lesen: Bei Schäden, die durch Nichtbeachtung der Anleitung verursacht werden, erlischt der Garantiean- spruch. Für daraus resultierende Folgeschäden übernimmt der Hersteller keine Haftung. Das Gerät darf nicht in Betrieb genommen werden, nachdem es von einem kalten in einen warmen Raum gebracht wurde.
-
Página 6: Bestimmungsgemäße Verwendung
Bei der ersten Inbetriebnahme kann es zu Rauch- und Geruchserzeugung kommen. Hierbei handelt es sich nicht um eine Störung des Gerätes. Achtung: Gerät niemals während des Betriebes berühren. Gehäuse erhitzt sich! Vermeiden Sie es, das Gerät in kurzen Intervallen an- und auszuschalten (z. B. Sekundentakt), da anson- sten die Lebensdauer der Lampe erheblich reduziert werden würde. -
Página 7: Gerätebeschreibung
Achten Sie bei der Montage, beim Abbau und bei der Durchführung von Servicearbeiten darauf, dass der Bereich unterhalb des Montageortes abgesperrt ist. Der Projektor ist immer mit einem geeigneten Sicherheitsfangseil zu sichern. Die maximale Umgebungstemperatur t = 45° C darf niemals überschritten werden. Nehmen Sie das Gerät erst in Betrieb, nachdem Sie sich mit seinen Funktionen vertraut gemacht haben. -
Página 8: Geräteübersicht
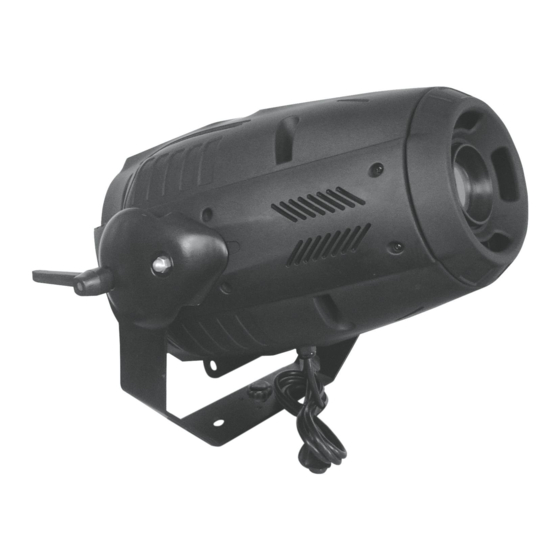
Geräteübersicht (1) Feststellschraube (2) Gehäuseschrauben (3) Gehäuse (4) Hängebügel (5) Lüftungsschlitz (6) Fresnell-Linse (7) Netzleitung (8) DMX-Ausgangsbuchse (9) DMX-Eingangsbuchse (10) Sicherungshalter (11) Lüfter 8/104 51837570_V_1_0.DOC... - Página 9 (12) Mode/Enter-Taste (13) Down-Taste (14) Up-Taste (15) Exit-Taste (16) Display (17) Lampensystem 9/104 51837570_V_1_0.DOC...
-
Página 10: Installation
INSTALLATION Lampeninstallation/Lampenwechsel LEBENSGEFAHR! Lampe nur bei ausgeschaltetem Gerät einsetzen! Netzstecker ziehen! Zur Installation benötigen Sie eine MSR 575/2 GX-9,5 Lampe. Die Lampe darf nur nach Anlegen geeigneter Schutzkleidung (Schutzbrille, Schutzhandschuhe, Schutzhelm mit Visier, Lederschurz) gewechselt werden. ACHTUNG! Die Lampe muss gewechselt werden, wenn diese beschädigt ist oder sich durch Wärme verformt hat! Die vom Hersteller angegebene Lebensdauer der Lampe darf niemals überschritten werden. -
Página 11: Lampenjustierung
Lampenjustierung Der Lampenhalter des Gerätes wird ab Werk justiert. Da sich die zu verwendenden Lampen von Hersteller zu Hersteller unterscheiden, kann es u. U. notwendig sein, die Position des Lampenhalters nachzujustieren. Zünden Sie die Lampe, öffnen Sie den Shutter, stellen Sie die Dimmerintensität auf 100 % und Sie den Lichtstrahl eine... -
Página 12: Überkopfmontage
Hinweis! Slot In Gobo-System für Gobowechsel ohne Werkzeug! Einsetzen/Austauschen der Gobos wie oben beschrieben. Überkopfmontage Die Aufhängevorrichtungen des Projektors muss so gebaut und bemessen sein, dass sie 1 Stunde lang ohne dauernde schädliche Deformierung das 10-fache der Nutzlast aushalten kann. Die Installation muss immer mit einer zweiten, unabhängigen Aufhängung, z. -
Página 13: Anschluss Ans Netz
Befestigen Sie den Projektor mit dem Hängebügel über einen geeigneten Haken an Ihrem Traversensystem. Sichern Sie den Projektor bei Überkopfmontage immer mit einem Sicherheitsfangseil, das mindestens für das 12-fache Gewicht des Gerätes ausgelegt ist. Es dürfen nur Fangseile mit Schnellverschlussgliedern vewendet werden. -
Página 14: Anschluss An Den Dmx-512 Controller / Verbindung Projektor - Projektor
Anschluss an den DMX-512 Controller / Verbindung Projektor - Projektor Achten Sie darauf, dass die Adern der Datenleitung an keiner Stelle miteinander in Kontakt treten. Die Geräte werden ansonsten nicht bzw. nicht korrekt funktionieren. Beachten Sie, dass die Startadresse abhängig vom verwendeten Controller ist. Unbedingt Bedienungsanleitung des verwendeten Controllers beachten. -
Página 15: Bedienung
BEDIENUNG Wenn Sie das Gerät an die Spannungsversorgung angeschlossen haben, nimmt der EVO-10 den Betrieb auf. Während des Reset justieren sich die Motoren aus und das Gerät ist danach betriebsbereit. Stand Alone-Betrieb Der EVO-10 lässt sich im Stand Alone-Betrieb ohne Controller einsetzen. -
Página 16: Dmx-Protokoll
DMX-Protokoll Steuerkanal 1 - Farbrad Lineare Farbänderung gemäß der Bewegung des Reglers. Sie können den Farbwechsler an jeder gewünschten Position anhalten. Decimal Hexad. Percentage S/F Eigenschaft 0 13 00 0D 0% 5% S Offen/weiß 14 27 0E 1B 5% 11% S Rot 28 41 1C 29... - Página 17 Steuerkanal 4 - Statisches Goborad, Gobo Shake Decimal Hexad. Percentage S/F Eigenschaft 0 13 00 0D 0% 5% S Offen 14 27 0E 1B 5% 11% S Gobo 1 28 41 1C 29 11% 16% S Gobo 2 42 55 2A 37 16% 22% S Gobo 3...
- Página 18 Steuerkanal 7 - Fokus Decimal Hexad. Percentage S/F Eigenschaft 0 255 00 FF 0% 100% F Allmähliche Einstellung von weit bis nah Steuerkanal 8 - Shutter, Strobe Decimal Hexad. Percentage S/F Eigenschaft 0 31 00 1F 0% 12% S Shutter geschlossen 32 63 20 3F 13% 25%...
-
Página 19: Control Board
Control Board Das Control Board bietet mehrere Möglichkeiten: so lassen sich z. B. die DMX-Startadresse eingeben, die Lampe ein- und ausschalten, das vorprogrammierte Programm abspielen oder ein Reset durchführen. Drücken Sie die Mode/Enter-Taste, bis das Display zu blinken beginnt. Über die Up-Taste können Sie sich im Hauptmenü... -
Página 20: Hauptfunktionen
Hauptfunktionen - Hauptmenü 0 • Drücken Sie die Mode/Enter-Taste, um ins Hauptmenü "MODE" zu gelangen (Display blinkt). • Drücken Sie die Mode/Enter-Taste und wählen Sie "ADDR", “RUN” oder "DISP" durch Drücken der Up/Down-Tasten. • Drücken Sie die Mode/Enter-Taste zur Auswahl des gewünschten Untermenüs. - Einstellen der DMX-Startadresse, Slave-Einstellung - Einstellen der DMX-Startadresse Mit dieser Funktion können Sie die DMX-Startadresse über das Control Board einstellen. - Página 21 - Programm aufrufen, Master-Einstellung Mit der Funktion "RUN" lässt sich das interne Programm aufrufen. Die Anzahl der Steps können Sie unter Step festlegen. Die einzelnen Szenen können Sie unter Edit abändern. Die Szenen lassen sich entweder automatisch (AUTO), d.h. mit der eingestellten Step-Time oder musikgesteuert (SOUN) abspielen.
- Página 22 Lamp - Hauptmenü 1 • Drücken Sie die Mode/Enter-Taste, um ins Hauptmenü zu gelangen (Display blinkt). • Drücken Sie die Up/Down-Tasten zur Auswahl von “LAMP”. - Lampenschaltung Mit dieser Funktion lässt sich die Lampe über das Control Board an- oder abschalten. •...
- Página 23 - Mikrofonempfindlichkeit Mit dieser Funktion lässt sich die Mikrofonempfindlichkeit zwischen 20 % und 70 % einstellen. • Wählen Sie "MIC" durch Drücken der Up/Down-Tasten. • Drücken Sie die Mode/Enter-Taste zur Bestätigung; auf dem Display erscheint “M-70”. • Drücken Sie die Up-Taste, um die gewünschte Empfindlichkeit einzustellen. •...
- Página 24 - Hauptmenü 3 • Drücken Sie die Mode/Enter-Taste, um ins Hauptmenü zu gelangen (Display blinkt). • Drücken Sie die Up/Down-Tasten zur Auswahl von “ADJU”. - Lampenjustierung Mit dieser Funktion lässt sich die Lampe über das Control Board justieren. Der Shutter öffnet sich und Sie können die Lampe beliebig justieren.
- Página 25 • Drücken Sie die Mode/Enter-Taste, um ins Hauptmenü zu gelangen (Display blinkt). • Drücken Sie die Up/Down-Tasten zur Auswahl von “TIME”. - Betriebsstunden Gerät Mit dieser Funktion lassen sich die Betriebsstunden des Gerätes auslesen. • Wählen Sie “MATI” durch Drücken der Up/Down-Tasten. •...
- Página 26 - Kanäle der einzelnen Szenen editieren Mit dieser Funktion lässt sich das Programm editieren, das dann in Run aufgerufen werden kann. a) Szenen editieren via Control Board • Wählen Sie “SC01” durch Drücken der Up/Down-Tasten. • Drücken Sie die Mode/Enter-Taste, auf dem Display erscheint “SCXX”, “X” steht für die zu editierende Szenennummer.
-
Página 27: Fehlermeldungen
Fehlermeldungen Wenn Sie das Gerät einschalten, wird zuerst ein Reset durchgeführt. Wenn auf dem Display “XXEr” erscheint, gibt es Fehler an einem oder mehreren Kanälen. “XX” steht für den entsprechenden Kanal mit einem Testsensor für die korrekte Position. Wenn auf dem Display z. B. “04Er” erscheint, bedeutet dies einen Fehler an Kanal 4. Gibt es gleich- zeitig einen Fehler an Kanal 4, 5 und 6 blinken die Fehlermeldungen “04Er”, “05Er”,”06Er”... -
Página 28: Reinigung Und Wartung
REINIGUNG UND WARTUNG Der Unternehmer hat dafür zu sorgen, dass sicherheitstechnische und maschinentechnische Einrichtungen mindestens alle vier Jahre durch einen Sachverständigen im Umfang der Abnahmeprüfung geprüft werden. Der Unternehmer hat dafür zu sorgen, dass sicherheitstechnische und maschinentechnische Einrichtungen mindestens einmal jährlich durch einen Sachkundigen geprüft werden. Dabei muss unter anderem auf folgende Punkte besonders geachtet werden: 1) Alle Schrauben, mit denen das Gerät oder Geräteteile montiert sind, müssen fest sitzen und dürfen nicht korrodiert sein. -
Página 29: Sicherungswechsel
PHILIPS MSR575/2 95V/575W GX-9,5 1000h Best.-Nr. 89107015 SYLVANIA BA575/2 SE NHR 95V/575W GX-9,5 Best.-Nr. 89107020 FUTURELIGHT CP-240 Controller Best.-Nr. 51834265 FUTURELIGHT CP-256/32 Controller 16bit Best.-Nr. 51834286 FUTURELIGHT CP-256/64 Controller 16bit Best.-Nr. 51834288 FUTURELIGHT CP-512/64 Controller 16bit Best.-Nr. 51834295 FUTURELIGHT CP-528 Controller 16bit Best.-Nr. -
Página 30: Introduction
- pass this manual on to every further owner or user of the product - download the latest version of the user manual from the Internet INTRODUCTION Thank you for having chosen a FUTURELIGHT EVO-10. You will see you have acquired a powerful and versatile device. Unpack your EVO-10. - Página 31 Important: Damages caused by the disregard of this user manual are not subject to warranty. The dealer will not accept liability for any resulting defects or problems. If the device has been exposed to drastic temperature fluctuation (e.g. after transportation), do not switch it on immediately.
-
Página 32: Health Hazard
HEALTH HAZARD! Never look directly into the light source, as sensitive persons may suffer an epileptic shock (especially meant for epileptics)! Keep away children and amateurs! Never leave this device running unattended. OPERATING DETERMINATIONS This device is a lighting effect for creating decorative effects. This product is only allowed to be operated with an alternating voltage of 230 V, 50 Hz and was designed for indoor use only. -
Página 33: Description Of The Device
Never use solvents or aggressive detergents in order to clean the device! Rather use a soft and damp cloth. Please use the original packaging if the device is to be transported. Please consider that unauthorized modifications on the device are forbidden due to safety reasons! Never remove the serial barcode from the device as this would make the guarantee void. -
Página 34: Overview
Overview (1) Fixation screw (2) Housing screws (3) Housing cover (4) Mounting bracket (5) Venting slots (6) Fresnell-lens (7) Power supply (8) DMX-Out socket (9) DMX-In socket (10) Fuseholder (11) Fan 34/104 51837570_V_1_0.DOC... - Página 35 (12) Mode/Enter-button (13) Down-button (14) Up-button (15) Exit-button (16) Display (17) Lamp system 35/104 51837570_V_1_0.DOC...
-
Página 36: Installation
INSTALLATION Installing/Replacing the lamp DANGER TO LIFE! Only install the lamp with the device switched off! Unplug from mains before! For the installation, you need one MSR 575/2 GX-9.5 lamp. The lamp must only be changed when wearing appropriate protective clothing (protection glasses, protection gloves, helmet with sight, leather apron). -
Página 37: Lamp Adjustment
Lamp adjustment The lampholder is aligned at the factory. Due to differences between lamps, fine adjustment improve light performance. Strike the lamp, open the shutter, set the dimmer intensity onto 100 % and direct the light towards a flat surface (wall). Center the hot-spot (the brightest part of the beam) using the 3 adjustment screws "A, B, C”. -
Página 38: Overhead Rigging
Overhead rigging The installation of the projector has to be built and constructed in a way that it can hold 10 times the weight for 1 hour without any harming deformation. The installation must always be secured with a secondary safety attachment, e.g. an appropriate catch net. This secondary safety attachment must be constructed in a way that no part of the installation can fall down if the main attachment fails. -
Página 39: Dmx-512 Connection / Connection Between Fixtures
Connect the fixture to the mains with the power-plug. The occupation of the connection-cables is as follows: Cable International Brown Live Blue Neutral Yellow/Green Earth The earth has to be connected! If the device will be directly connected with the local power supply network, a disconnection switch with a minimum opening of 3 mm at every pole has to be included in the permanent electrical installation. - Página 40 Occupation of the XLR-connection: If you are using controllers with this occupation, you can connect the DMX-output of the controller directly with the DMX-input of the first fixture in the DMX-chain. If you wish to connect DMX-controllers with other XLR-outputs, you need to use adapter-cables. Building a serial DMX-chain: Connect the DMX-output of the first fixture in the DMX-chain with the DMX-input of the next fixture.
-
Página 41: Operation
OPERATION After you connected the effect to the mains, the EVO-10 starts running. During the Reset, the motors are trimmed and the device is ready for use afterwards. Stand Alone operation In the Stand Alone mode, the EVO-10 can be used without controller. -
Página 42: Dmx-Protocol
DMX-protocol Control-channel 1 - Colour-wheel Linear colour change following the movement of the slider. In this way you can stop the colour-wheel in any position. Decimal Hexad. Percentage S/F Feature 0 13 00 0D 0% 5% Open / white 14 27 0E 1B 5% 11% 28 41... - Página 43 Control-channel 4 - Static gobo-wheel, gobo shake Decimal Hexad. Percentage S/F Feature 0 13 00 0D 0% 5% Open 14 27 0E 1B 5% 11% Gobo 1 28 41 1C 29 11% 16% Gobo 2 42 55 2A 37 16% 22% Gobo 3 56 69 38 45...
- Página 44 Control-channel 7 - Focus Decimal Hexad. Percentage S/F Feature 0 255 00 FF 0% 100% Continuous adjustment from far to near Control-channel 8 - Shutter, strobe Decimal Hexad. Percentage S/F Feature 0 31 00 1F 0% 12% Shutter closed 32 63 20 3F 13% 25% No function (shutter open)
-
Página 45: Control Board
Control Board The Control Board offers several features: you can simply set the starting address, switch on and off the lamp, run the pre-programmed program or make a reset. The main menu is accessed by pressing the Mode/Enter-button until the display starts flashing. Browse through the menu by pressing by pressing Up or Down. -
Página 46: Main Functions
Main functions - Main menu 0 • Press [MODE/ENTER] to enter the main menu "MODE" (display flashing) • Press [MODE/ENTER] and select "ADDR", “RUN” or "DISP" by pressing [UP] or [DN]. • Press [MODE/ENTER] for selecting the desired sub menu. - DMX address setting, Slave setting - DMX address setting With this function, you can adjust the desired DMX-address via the Control Board. - Página 47 • Select "AUTO" or "SOUN" by pressing [UP] or [DN]. • Press [MODE/ENTER] for selecting the desired extension menu. • Select "ALON" or "MAST" by pressing [UP] or [DN]. • Press [MODE/ENTER] to confirm. • Press [EXIT] in order to return to the main menu. Disp - Display the DMX-value, Reverse display, Shut off LED display - Display the DMX 512 value of each channel...
- Página 48 Lamp - Main menu 1 • Press [MODE/ENTER] to enter the main menu (display flashing). • Press [UP] or [DN] to select “LAMP”. - Lamp on/off With this function you can switch the lamp on or off via the Control Board. •...
- Página 49 - Mic sensitivity With this function, you can select the desired microphone sensitivity between 20 % and 70 %. • Select "MIC" by pressing [UP] or [DN]. • Press [MODE/ENTER] to confirm; the display shows “M-70”. • Press [UP] to select the desired sensitivity. •...
- Página 50 - Main menu 3 • Press [MODE/ENTER] to enter the main menu (display flashing). • Press [UP] or [DN] to select “ADJU”. - Lamp adjustment With this function you can adjust the lamp via the Control Board. The shutter opens and the lamp can be adjusted.
- Página 51 • Press [MODE/ENTER] to enter the main menu (display flashing). • Press [UP] or [DN] to select “TIME”. - Fixture running time With this function you can display the running time of the device. • Select “MATI” by pressing [UP] or [DN]. •...
-
Página 52: Error Messages
• Press [MODE/ENTER], the display shows “C-XX”, “XX” stands for the channel no. Such as “C-01”, it means you are editing channel 1 of the selected scene. • Select the channel no. you would like to edit by pressing [UP]. •... -
Página 53: Cleaning And Maintenance
04Er: (Static gobo-wheel error) This message will appear after the reset of the ficture if the magnetic-indexing circuit malfunctions (sensor failed or magnet missing) or the stepping-motor is defective (or its drive circuit on the main PCB). The static gobo-wheel is not located in the default position after the reset. 05Er: (Roating prism-wheel error) This message will appear after the reset of the fixture and if the magnetic- indexing circuit malfunctions (sensor failed or magnet missing) or the stepping-motor is defective (or its driver... -
Página 54: Replacing The Fuse
PHILIPS MSR575/2 95V/575W GX-9.5 1000h No. 89107015 SYLVANIA BA575/2 SE NHR 95V/575W GX-9,5 No. 89107020 FUTURELIGHT CP-240 controller No. 51834265 FUTURELIGHT CP-256/32 controller 16bit No. 51834286 FUTURELIGHT CP-256/64 controller 16bit No. 51834288 FUTURELIGHT CP-512/64 controller 16bit No. 51834295 FUTURELIGHT CP-528 controller 16bit No. -
Página 55: Introduction
- transmettre le mode d'emploi à un éventuel acheteur ou utilisateur de l'appareil - télécharger la version ultérieure du mode d'emploi d'Internet INTRODUCTION Nous vous remercions d'avoir choisi un FUTURELIGHT EVO-10. Vous êtes en possession d'un effet lumineux puissant aux possibilités multiples. Sortez le EVO-10 de son emballage. - Página 56 Attention: Tout dommage occasionné par la non observation des instructions de montage ou d'utilisation n'est pas couvert par la garantie. L'appareil ne doit pas être mis en service lorsqu'il à été transporté d'un endroit froid à un endroit chaud. Il se forme de la condensation qui pourrait endommager l'appareil.
-
Página 57: Emploi Selon Les Prescriptions
le séparer du secteur avec tous les pôles (tirer la fiche secteur). Des dysfonctionnements et court-circuits peuvent avoir des blessures mortelles comme conséquence. Lors de la première mise en service, il peut y avoir une émission de fumée et d'odeurs. Ceci n'est pas dû à un défaut de l'appareil. -
Página 58: Description De L'APpareil
Cet appareil a seulement été conçu pour une installation grâce à la lyre de montage. Afin d'assurer une ventilation optimale, il est nécéssaire de laisser un espace d'au moins 50 cm autour de l'appareil. L'appareil ne doit jamais toucher des objets ou surfaces dans l'ambiance. Lors de l'installation du projecteur, au démontage du projecteur et pendant l'exécution des travaux de service faites attention à... -
Página 59: Aperçue Des Parties
Aperçue des parties (1) Vis de la lyre (2) Vis de boîtier (3) Boîtier (4) Lyre de fixation (5) Grille d’aération (6) Lentille Fresnell (7) Alimentation (8) Sortie DMX (9) Entrée DMX (10) Porte-fusible (11) Ventilateur 59/104 51837570_V_1_0.DOC... - Página 60 (12) Touche Mode/Enter (13) Touche Down (14) Touche Up (15) Touch Exit (16) Affichage (17) Système de lampe 60/104 51837570_V_1_0.DOC...
-
Página 61: Installation
INSTALLATION Installer/Remplacer la lampe DANGER DE MORT! Toujours mettre hors tension avant de mettre en place l'ampoule! Débrancher avant toute manipulation! Pour l'installation, vous avez besoin d'une lampe MSR 575/2 GX-9,5. La lampe ne peut être changée que si les vêtements de protection apropriés sont utiliés (lunettes de protection, gants de protection, casque de protection avec visière, tablier de cuir). -
Página 62: Ajustage De La Lampe
Ajustage de la lampe Le porte-lampe de l’appareil est ajusté à l‘usine. Comme les lampes à utiliser diffèrent d’un fabricant à l’autre, il pourrait devenir nécessaire de procéder à un nouveau ajustage de la position du porte-lampe. Allumez la lampe, ouvriez le shutter et l'iris, ajustez l'intensité du dimmeur à... -
Página 63: Montage Par Dessus De La Tête
Montage par dessus de la tête Les dispositifs de suspension du projecteur doivent être construits et concus de telle manière qu’ils puissent supporter sa charge utile de 10 fois pour 1 heure sans déformation permanente nuisible. L’installation doit toujours être effectuée avec une deuxième suspension indépendante, par ex. un filet de sécurité... -
Página 64: Connexions Au Contrôleur Dmx-512 / Raccord Projecteur - Projecteur
La distance de chute maximale est de 20 cm. Une élingue de sécurité déjà utilisée ou defectueuse doit ne jamais etre réutilisée. Ajustez l'angle d'inclinaison grâce à la lyre de fixation et vissez bien les vis de fixation. Branchez l’appareil avec la fiche au secteur. L'occupation des câbles de connection est: Câble International... -
Página 65: Maniement
Protocôle DMX. Codage du projecteur L'unité de contrôle du EVO-10 permet de coder l'adresse initiale DMX des projecteurs. L'adresse initiale est le premier canal à partir le projecteur répond au contrôleur DMX. Assurez-vous qu'il n' y ait pas de canaux entrelacés pour assurer un contrôle correct et indépendant d'autres appareils DMX. - Página 66 Lorsque deux ou plus projecteurs EVO-10 sont codés à la même adresse initiale, ils fonctineront synchronement. Pressez les toches Up/Down pour coder l'adresse initiale DMX. Maintenant, vous pouvez commencer avec le maniement via vôtre contrôleur DMX. Attention: L'appareil indique les modes des signaux DMX-512 et de la lampe grâce à l'affichage: 1.
-
Página 67: Protocôle Dmx
Protocôle DMX Canal de contrôle 1 - Roue de couleurs Changement linéaire des couleurs selon le mouvement du régulateur. Vous pouvez arrêter le changeur de couleur à la position désirée. Decimal Hexad. Percentage S/F Caractéristique 0 13 00 0D 0% 5% Ouvert/blanc 14 27 0E 1B... - Página 68 Canal de contrôle 4 - Roue de gobos statiques, gobo shake Decimal Hexad. Percentage S/F Caractéristique 0 13 00 0D 0% 5% Ouvert 14 27 0E 1B 5% 11% Gobo 1 28 41 1C 29 11% 16% Gobo 2 42 55 2A 37 16% 22% Gobo 3...
- Página 69 Canal de contrôle 7 - Foyer Decimal Hexad. Percentage S/F Caractéristique 0 255 00 FF 0% 100% Ajustement graduel de loin à proche Canal de contrôle 8 - Shutter, Strobe Decimal Hexad. Percentage S/F Caractéristique 0 31 00 1F 0% 12% Shutter fermé...
-
Página 70: Control Board
Control Board L'unité de contrôle offre plusieurs caractéristiques, par exemple pour ajuster l’addresse DMX, allumer ou éteindre la lampe, commencer le programme integré ou faire un reset. Pressez et maintenez la touche Mode/Enter pour acceder au menu principal. Pressez la touche Up ou Down pour mouver dans le menu principal. -
Página 71: Fonctions Principales
Fonctions principales - Menu principal 0 • Pressez la touche Mode/Enter pour acceder au menu principal "MODE" (affichage clignote). • Pressez la touche Mode/Enter et choississez "ADDR", “RUN” ou "DISP" en pressant la touche Up ou Down. • Pressez la touche Mode/Enter pour choississer le sous-menu désiré. - DMX 512 Codage de l'adresse initiale, ajustement Slave - DMX 512 Codage de l'adresse initiale Cette fonction permêt d'ajuster l'adresse initiale DMX grâce au Control Board. - Página 72 - Appeler le programme interne, ajustement Master La fonction "RUN" permêt d'appeler le programme interne. Vous pouvez définer le numéro de steps sous Step. Vous pouvez éditer les scènes individuelles sous Edit. Vous pouvez appeler les scènes automatiquement (AUTO), c'est à dire avec le step-time ajusté, ou contrôlé par le son (SOUND). La sélection "ALON"...
- Página 73 Lamp - Menu principal 1 • Pressez la touche Mode/Enter pour acceder au menu principal (affichage clignote). • Pressez la touche Up pour choississer “LAMP”. - Allumer/éteindre la lampe Cette fonction permêt d'allumer et éteindre la lampe grâce à l'unité de contrôle. •...
- Página 74 - Sensibilité du microphone Cette fonction permêt d'ajuster la sensibilité du microphone désirée entre 20 et 70 %. Cette fonction permêt d'ajuster le délai jusqu'à la lampe soit allumée. • Choississez "MIC" en pressant la touche Up ou Down. • Pressez la touche Mode/Enter, l'affichage indique“M-70”. •...
- Página 75 - Menu principal 3 • Pressez la touche Mode/Enter pour acceder au menu principal (affichage clignote). • Pressez la touche Up pour choississer “ADJU”. - Ajuster la lampe Cette fonction permêt d'ajuster la lampe grâce à l'unité de contrôle. Le shutter ouvre et vous pouvez ajuster la lampe individuellement.
- Página 76 • Pressez la touche Mode/Enter pour acceder au menu principal (affichage clignote). • Pressez la touche Up pour choississer “TIME”. - Heures de foncionnement d'appareil Cette fonction permêt d'afficher les heures de foncionnement d'appareil. • Choississez“MATI” en pressant la touche Up ou Down. •...
-
Página 77: Avis D'eRreur Et D'iNformation
a) Editer via Control Board • Choississez “SC01” en pressant la touche Up ou Down. • Pressez la touche Mode/Enter, l'affichage indique “SCXX”, “X” signifique le numéro de la scène à editer. • Modifiez le numéro de scène en pressant la touche Up ou Down, •... -
Página 78: Nettoyage Et Maintenance
03Er: Erreur d'index sur le gobo rotatif. Cet avis est indiqué quand il y'a des fonctions d'erreur magnetiques (la photodiode est défectueuse ou le magnet manque) ou le moteur pas à pas est defectueux (ou le circuit réspectif sur la platine principale). Le gobo rotatif n'est pas à la position correcte. 04Er: Erreur à... -
Página 79: Remplacer Le Fusible
Wizard-512 USB DMX-Software + Interface N° d'art. 51860102 Wizard-1024 USB DMX-Software + Interface N° d'art. 51860110 FUTURELIGHT DES-3 Fiche termination 3pôle N° d'art. 51834001 Attention! Les donnés imprimée dans ce mode d’emploi sont susceptibles d’être modifiées sans préavis. 30.11.2005 ©... -
Página 80: Introducción
-pasar el manual a cada sucesivo poseedor o usuario del producto -descargar la última versión del manual del Internet INTRODUCCIÓN Gracias por haber elegido un FUTURELIGHT EVO-10. Verá que ha adquirido un aparato potente y versátil. Desembale su EVO-10. Inlcluido en la entraga... -
Página 81: Importante
Importante: Los daños causados por no hacer caso de las instrucciones de este manual del usuario no están sujetos a garantía. El proveedor no aceptará responsabilidad por ningún defecto o problema resultante. Si el aparato ha estado expuesto a grandes cambios de temperatura (p.e. tras el transporte), no lo enchufe inmediatamente. -
Página 82: Instrucciones De Manejo
INSTRUCCIONES DE MANEJO Este aparato es un efecto luminoso para crear efectos de decoración. El aparato sólo es permitido para una conexion con una tensión alternativa de 230 V, 50 Hz y ha sido diseñado para ser usado en interiores. Este aparato ha sido diseñado para usos profesionales, por ejemplo en escenas, discotecas, teatros etc. -
Página 83: Descripción Del Aparato
DESCRIPCIÓN DEL APARATO Features Efecto de decoración estático • Operación controlado por DMX o stand alone con función "Master/Slave" • Controlado por el sonido mediante microfono incorporado • Rueda de colores con 7 filtros de color, 1 filtro bicolor y 3 filtros cuatrocolor más abierto •... -
Página 84: Descripción De Las Partes
Descripción de las partes (1) Tornillo de fijación (2) Tornillos de caja (3) Caja (4) Lyra de montaje (5) Rejilla de ventilación (6) Lente Fresnell (7) Conexión a la red (8) Entrada DMX (9) Salida DMX (10) Portafusible (11) Ventilator 84/104 51837570_V_1_0.DOC... - Página 85 (12) Tecla Mode/Enter (13) Tecla Down (14) Tecla Up (15) Tecla Exit (16) Pantalla (17) Sistema de lámpara 85/104 51837570_V_1_0.DOC...
-
Página 86: Instalación
INSTALACIÓN Instalar/Reemplazar la lámpara ¡PELIGRO DE MUERTE! ¡Instale la lámpara únicamente con el aparato desenchufado! ¡Desenchufe-lo de la corriente! Para la instalación, Vd. necesita una lámpara MSR 575/2 GX-9,5. La lámpara debe ser cambiada únicamente con la indumentaria de protección adecuada (gafas de protección, guantes de protección, casco con visera y delantal de cuero). -
Página 87: Ajuste De La Lámpara
Ajuste de la lámpara El sistema de portalámparas está ajustado en la fábrica. Como las lámparas de los fabricantes diferentes son diferentes, puede ser necesario de reajustar la posición del sistema de portalámparas. Enciende la lámpara, abre el shutter, coloque la intensidad del dimmer a 100 % y direccione el rayo en una superficie plana (pared). -
Página 88: Montaje Por Encima De La Cabeza
Montaje por encima de la cabeza La suspensión del proyector debe ser fabricado de una manera que puede llevar 10 vezes la carga por una hora sin sufrir deformaciones dañosas permanentes. La instalación siempre debe ser efectuada con una segunda suspensión independiente, por ejemplo una red de anclaje apropriada. -
Página 89: Conexión Al Controlador Dmx / Conexión Proyector - Proyector
Un cable de anclaje ya utilizado u estropeado nunca debe ser utilizado otra vez. Ajuste el ángulo de inclinación a su gusto mediante la lira de montaje y fije los tornillos de fijación. Conectar el proyector a la red mediante la clavija de alimentación. La ocupación de los cables de conexión es: Cable Internacional... - Página 90 La ocupación de la conexión XLR es: Cuando Vd. utilice los controladores con la ocupación descrita, puede conectar la salida DMX del controlador directamente con la entrada DMX del primer aparato de la cadena DMX. Cuando Vd. quiere conectar controladores DMX con otros salidas DMX, se tiene que utilizar cables de adaptación. Instalación de una cadena DMX: Conecte la salida DMX del primero aparato de la cadena con la entrada DMX del próximo aparato.
-
Página 91: Operación
OPERACIÓN Tras la conexión del aparato a la red, el EVO-10 comienza a funcionar. Durante el Reset, los motores se ajustan y el aparato está listo para ser usado después. Operación Stand Alone En el modo Stand Alone, Vd. puede utilizar el EVO-10 sin controlador. -
Página 92: Protócolo Dmx
Protócolo DMX Canal de control 1 - Rueda de colores Cambio linear de los colores mediante el ajuste de los valores DMX. Puede parar la rueda de colores en cualquier posición que desee. Decimal Hexad. Percentage S/F Característica 0 13 00 0D 0% 5% Abierto/blanco... -
Página 93: Canal De Control 6 - Indicación Del Prisma Giratorio, Rotación Del Prisma
Canal de control 4 - Rueda de gobos estáticos, gobo shake Decimal Hexad. Percentage S/F Característica 0 13 00 0D 0% 5% Abierto 14 27 0E 1B 5% 11% Gobo 1 28 41 1C 29 11% 16% Gobo 2 42 55 2A 37 16% 22% Gobo 3... - Página 94 Canal de control 7 - Foco Decimal Hexad. Percentage S/F Característica 0 255 00 FF 0% 100% Ajuste gradual de lejos hasta cerca Canal de control 8 - Shutter, Strobe Decimal Hexad. Percentage S/F Característica 0 31 00 1F 0% 12% Shutter cerrado 32 63 20 3F...
-
Página 95: Control Board
Control Board La unidad de control ofrece varias posibilidades. Por ejemplo, Vd. puede ajustar la dirección de comienzo, encender y apagar la lámpara, comenzar el programa integrado o un Reset. Pulse y mantiene la tecla Mode/Enter para entrar en el menú principal. Vd. puede moverse en el menú principal mediante la tecla Up o Down. -
Página 96: Funciones Principales
Funciones principales - Menu principal 0 • Pulse la tecla Mode/Enter para entrar en el menú prinicipal "MODE" (pantalla parpadea). • Pulse la tecla Mode/Enter y la tecla Up o Down para seleccionar "ADDR", “RUN” o "DISP". • Pulse la tecla Mode/Enter para seleccionar el submenu deseado. - Ajustar la dirección de comienzo DMX-512, ajuste slave - Ajustar la dirección de comienzo DMX-512 Con esta función, Vd. - Página 97 • Seleccione "AUTO" o "SOUN" en pulsar la tecla Up o Down. • Pulse la tecla Mode/Enter para seleccionar el menu de extensión deseado. • Seleccione "ALON" o "MAST" en pulsar la tecla Up o Down. • Pulse la tecla Mode/Enter para confirmar. •...
- Página 98 Lamp - Menu principal 1 • Pulse la tecla Mode/Enter para entrar en el menú prinicipal (pantalla parpadea). • Pulse la tecla Up o Down para seleccionar “LAMP”. - Encender/apagar la lámpara Con esta función, Vd. puede encender u apagar la lámpara mediante el Control Board. •...
-
Página 99: Sensibilidad Del Micrófono
- Sensibilidad del micrófono Con esta función, Vd. puede ajustar la sensibilidad del micrófono entre 20 y 70 %. • Seleccione "MIC" en pulsar la tecla Up o Down. • Pulse la tecla Mode/Enter, la pantalla indique “M-70”. • Pulse la tecla Up o Down para ajustar la sensibilidad deseada. •... - Página 100 - Menu principal 3 • Pulse la tecla Mode/Enter para entrar en el menú prinicipal (pantalla parpadea). • Pulse la tecla Up o Down para seleccionar “ADJU”. - Ajustar la lámpara Con esta función, Vd. puede ajustar la lámpara mediante el Control Board. El shutter se abre y Vd. puede ajustar la lámpara individualmente.
- Página 101 • Pulse la tecla Mode/Enter para entrar en el menú prinicipal (pantalla parpadea). • Pulse la tecla Up o Down para seleccionar “TIME”. - Indicar las horas de servicio del aparato Con esta función, Vd. puede indicar las horas de servicio del aparato. •...
-
Página 102: Avisos De Error
- Editar el programa Mediante este menu, Vd. puede editar el programa y llamarlo en el “RUN”. a) Editar mediante el Control Board • Seleccione “SC01” en pulsar la tecla Up o Down. • Pulse la tecla Mode/Enter, la pantalla indica “SCXX”, “X” siginifica el número de la escena para editar. •... -
Página 103: Limpieza Y Mantenimiento
03Er: Defecto de index en el gobo giratorio. Este aviso aparece cuando hay errores magnéticos (fotodiodo defectuoso o no magneto) o cuando el motor paso a paso está defectuoso (o su excitador en la platina principal). El error es que el gobo giratorio no está en la posición predertiminada después del Reset. 04Er: Defecto en la rueda de gobos estáticos. -
Página 104: Reemplazar El Fusible
Referencia 51834315 Wizard-512 USB DMX-Software + Interface Referencia 51860102 Wizard-1024 USB DMX-Software + Interface Referencia 51860110 FUTURELIGHT DES-3 Clavija terminación 3-p Referencia 51834001 Nota: Todas las especificaciones dadas en este manual están sujetas a modificación sin previo aviso. 30.11.2005 © 104/104...