Tabla de contenido
Publicidad
Idiomas disponibles
Idiomas disponibles
Enlaces rápidos
Publicidad
Capítulos
Tabla de contenido

Manuales relacionados para eufy Security Outdoor Cam Pro


Resumen de contenidos para eufy Security Outdoor Cam Pro
- Página 1 Anker Innovations Limited. All rights reserved. eufy Security and eufy Security Logo are trademarks of Anker Innovations Limited, registered in the United States and other countries. All other trademarks are the property of their respective owners. 51005002640 V03...
- Página 2 QUICK START GUIDE Outdoor Cam Pro / Outdoor Cam...
- Página 3 English Deutsch Español Français Italiano Nederlands Português لع َ ر َ ب ِ ية...
-
Página 4: Tabla De Contenido
Table of Contents Product Overview Powering On the Camera Setting Up the System Mounting the Camera Notice EN 01... -
Página 5: Product Overview
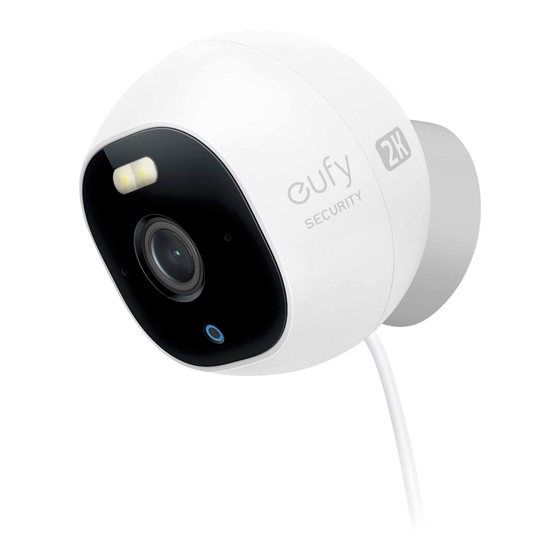
Product Overview Outdoor Cam Pro / Outdoor Cam ⑤ ① Micro USB port Spotlight ② • Connect to a USB charger Lens ⑥ ③ SYNC button Status LED ⑦ ④ microSD card slot Microphone • Insert a microSD card to... -
Página 6: Powering On The Camera
Powering On the Camera 1. Connect the micro USB connector to the OutdoorCam’s micro USB port and the other end to a power adapter. 2. Plug the power adapter into a power outlet. Wait until the camera status LED turns solid blue. EN 03... -
Página 7: Setting Up The System
Setting Up the System 1. Download the eufy Security app from the App Store (iOS devices) or Google Play (Android devices). 2. Create an account and tap “Add Device” to add OutdoorCam to your device list. 3. Follow the on-screen instructions to complete the setup. -
Página 8: Mounting The Camera
Mounting the Camera A. Place the camera on a table Attach the bottom of your camera to the magnetic base and place it on the table. EN 05... - Página 9 • Make sure the camera receives a strong Wi-Fi connection in the spot you want to mount it so that it can stream video to your eufy Security app. • A 3M adhesive strip is provided for people who don’t want to drill holes in the wall.
- Página 10 EN 07...
- Página 11 2. Attach the magnetic base to the metallic plate. Attach the OutdoorCam onto the magnetic base. 3. Rotate the camera to adjust the view and check it using the live stream which you can access in the eufy Security app. Tip: For more details, check the online manual: https:/ /www.eufylife.com/support...
-
Página 12: Notice
Notice This product complies with the radio interference requirements of the European Community. Declaration of Conformity Hereby, Anker Innovations Limited declares that this device is in compliance with the essential requirements and other relevant provisions of Directive 2014/53/ EU. For the declaration of conformity, visit the Web site: https:/ /uk.eufylife.com/. This product can be used across EU member states. - Página 13 Anker Innovations Deutschland GmbH I Georg-Muche-Strasse 3, 80807 Munich, Germany This product is designed and manufactured with high quality materials and components, which can be recycled and reused. This symbol means the product must not be discarded as household waste, and should be delivered to an appropriate collection facility for recycling.
- Página 14 INHALTSVERZEICHNIS Produktübersicht Kamera einschalten Einrichten des Systems Installieren der Kamera Hinweis DE 11...
-
Página 15: Produktübersicht
Produktübersicht Outdoor Cam Pro/Outdoor Cam ⑤ Micro-USB-Anschluss ① Spotlight • An USB-Ladegerät ② Objektiv anschließen ③ Status-LED ⑥ SYNC-Taste ④ Mikrofon ⑦ microSD-Kartensteckplatz • Eine microSD-Karte zum Speichern von Aufnahmen einsetzen 12 DE... -
Página 16: Kamera Einschalten
Kamera einschalten 1.Schließen Sie den Mikro-USB-Stecker an die OutdoorCam und das andere Ende an ein Netzteil an. 2.Stecken Sie das Netzteil in eine Steckdose ein. Warten Sie, bis die Status-LED der Kamera blau leuchtet. DE 13... -
Página 17: Einrichten Des Systems
Einrichten des Systems 1.Laden Sie die eufy Security-App aus dem App Store (iOS- Geräte) oder bei Google Play (Android) herunter. 2.Erstellen Sie ein Konto, und tippen Sie auf „Gerät h i n z u f ü g e n “, u m O u t d o o r C a m I h re r G e r ä t e l i s t e hinzuzufügen. -
Página 18: Installieren Der Kamera
Installieren der Kamera A. Tischmontage der Kamera Befestigen Sie die Unterseite der Kamera an den Magnetfuß und stellen Sie die Kamera auf den Tisch. DE 15... - Página 19 Steckdose angeschlossen werden kann. • Stellen Sie sicher, dass die Kamera am gewünschten Installationsort über eine starke WLAN-Verbindung verfügt, damit Sie die Videoaufnahmen auf die eufy Security App streamen können. • Ein 3M-Klebestreifen liegt für diejenigen bei, die keine Löcher in die Wand bohren möchten. Befestigen Sie den...
- Página 20 DE 17...
- Página 21 Befestigen Sie die OutdoorCam am Magnetfuß. 3.Drehen Sie die Kamera, um die Ansicht anzupassen, und überprüfen Sie diese im Live-Stream, auf den Sie in der eufy Security App zugreifen können. Tipp: Weiter Informationen finden Sie im Online- Handbuch: https:/ /www.eufylife.com/support...
-
Página 22: Hinweis
Hinweis Dieses Produkt entspricht den EU-Bestimmungen zur Störfestigkeit. Konformitätserklärung Anker Innovations Limited erklärt hiermit, dass dieses Gerät die grundlegenden Anforderungen und anderen relevanten Bestimmungen der Richtlinie 2014/53/EG erfüllt.Die Konformitätserklärung finden Sie auf der Website https:/ /www.uk.eufylife.com/. Dieses Produkt kann in den EU-Mitgliedstaaten verwendet werden. Das Netzteil muss in der Nähe des Geräts installiert werden und leicht zugänglich sein. - Página 23 Informationen zur HF-Belastung: Die maximal zulässige Belastung wurde basierend auf einem Abstand von d=20 cm zwischen dem Gerät und dem menschlichen Körper berechnet. Um die Anforderungen in Bezug auf die HF- Belastung zu erfüllen, muss zwischen dem Gerät und dem menschlichen Körper ein Abstand von mindestens 20 cm bestehen.
- Página 24 TABLA DE CONTENIDO Descripción del producto Encendido de la cámara Configuración del sistema Instalación de la cámara Aviso ES 21...
-
Página 25: Descripción Del Producto
Descripción del producto Cámara de exterior Pro/Cámara de exterior ⑤ Puerto micro-USB ① Foco • Conectar un cargador USB ② Lente ⑥ Botón Sincronizar ③ LED de estado ⑦ Ranura para tarjetas microSD ④ Micrófono • Insertar una tarjeta microSD para almacenar las grabaciones 22 ES... -
Página 26: Encendido De La Cámara
Encendido de la cámara 1.Conecte el conector micro-USB al puerto micro-USB de la OutdoorCam y el otro extremo a un adaptador de corriente. 2.Enchufe el adaptador a una toma de corriente. Espere hasta que el LED de estado de la cámara se ilumine en color azul fijo. -
Página 27: Configuración Del Sistema
Configuración del sistema 1.Descargue la aplicación eufy Security desde la App Store (dispositivos iOS) o Google Play (dispositivos Android). 2.Cree una cuenta y toque "Añadir dispositivo" para agregar OutdoorCam a la lista de dispositivos. 3.Siga las instrucciones en pantalla para completar la configuración. -
Página 28: Instalación De La Cámara
Instalación de la cámara A. Colocación de la cámara sobre una mesa Conecte la parte inferior de la cámara a la base magnética y colóquela sobre la mesa. ES 25... -
Página 29: Instalación De La Cámara En Una Pared
• Asegúrese de que la cámara reciba una señal Wi-Fi fuerte en la ubicación donde desea instalarla, de modo que pueda transmitir vídeo a la aplicación eufy Security. • Se incluye una tira adhesiva 3M para aquellos usuarios que no desean taladrar orificios en la pared. - Página 30 ES 27...
- Página 31 OutdoorCam en la base magnética. 3.Gire la cámara para ajustar la vista y compruébela mediante las imágenes en tiempo real, que se pueden visualizar a través de la aplicación eufy Security. Consejo: Para obtener más información, consulte el manual en línea: https:/ /www.eufylife.com/support...
-
Página 32: Aviso
Aviso Este producto cumple los requisitos de interferencias radioeléctricas de la Comunidad Europea. Declaración de conformidad Por la presente, Anker Innovations Limited declara que este dispositivo cumple los requisitos esenciales y otras disposiciones pertinentes de la Directiva 2014/53/UE.Para consultar la declaración de conformidad, visite el sitio web: https:/ /www.uk.eufylife.com/. - Página 33 de exposición a radiofrecuencia, mantenga el producto a una distancia de 20 cm del cuerpo. Intervalo de frecuencia de funcionamiento de Wi-Fi: 2412-2472 MHz; potencia de salida máxima de Wi-Fi: 17.6dBm Intervalo de frecuencia de funcionamiento de Bluetooth: 2402-2480 MHz; potencia de salida máxima de Bluetooth: 9.15dBm (EIRP) Anker Innovations Deutschland GmbH I Georg-Muche-Strasse 3, 80807 Múnich, Alemania...
- Página 34 SOMMAIRE Présentation du produit Mise sous tension de la caméra Configuration du système Fixer la caméra Avis FR 31...
-
Página 35: Présentation Du Produit
Présentation du produit Outdoor Cam Pro/Outdoor Cam ⑤ ① Port micro USB Projecteur ② • Se connecte à un chargeur USB Objectif ⑥ ③ Bouton SYNC LED d'état ⑦ ④ Emplacement de carte microSD Microphone • Insérez une carte microSD pour... -
Página 36: Mise Sous Tension De La Caméra
Mise sous tension de la caméra 1.Connectez le connecteur micro USB au port micro USB de l'OutdoorCam et l'autre extrémité à un adaptateur électrique. 2.Branchez l'adaptateur dans une prise murale. Attendez que le voyant d'état de la caméra passe au bleu fixe. FR 33... -
Página 37: Configuration Du Système
Configuration du système 1.Téléchargez l'application eufy Security sur l'App Store (appareils iOS) ou Google Play (Android). 2.Créez un compte et appuyez sur « Ajouter un appareil » pour ajouter l'OutdoorCam à votre liste d'appareils. 3.Suivez les instructions à l'écran pour effectuer le processus de configuration. -
Página 38: Fixer La Caméra
Fixer la caméra a. Placer la caméra sur une table Fixez le bas de la caméra au support magnétique, puis placez- la sur la table. FR 35... -
Página 39: Fixer La Caméra À Un Mur
• Assurez-vous que la caméra reçoit un signal Wi-Fi fort à l'endroit où vous souhaitez la fixer, pour qu'elle puisse diffuser la vidéo sur votre application eufy Security. • Une bande adhésive 3M est fournie, au cas où vous ne souhaiteriez pas percer de trou dans le mur. - Página 40 FR 37...
- Página 41 3.Faites pivoter la caméra pour ajuster l'angle de vue, puis vérifiez l'image filmée à l'aide de la diffusion en direct, accessible depuis l'application eufy Security. Conseil : pour plus d'informations, consultez le manuel en ligne : https:/ /www.eufylife.com/support...
-
Página 42: Avis
Avis Ce produit est conforme aux exigences en matière d'interférences radio de la Communauté européenne. Déclaration de conformité Anker Innovations Limited déclare par le présent document que cet appareil est conforme aux exigences essentielles et aux autres dispositions pertinentes de la directive 2014/53/EU.Pour lire la déclaration de conformité, accédez au site Web : https:/ /www.uk.eufylife.com/. - Página 43 d=20 cm entre l'appareil et le corps humain. Pour maintenir la conformité aux exigences en matière d'exposition aux radiofréquences, utiliser un produit qui maintient une distance de 20 cm entre l'appareil et le corps humain. Plage de fréquence de fonctionnement Wi-Fi : 2 412~2 472 MHz ; puissance de sortie maximale Wi-Fi: 17.6dBm Plage de fréquence de fonctionnement Bluetooth : 2 402 à...
- Página 44 SOMMARIO Panoramica del prodotto Accensione della telecamera Configurazione del sistema Montaggio della telecamera Avviso IT 41...
-
Página 45: Panoramica Del Prodotto
Panoramica del prodotto Telecamera per esterni professionale/Telecamera per esterni ⑤ Porta Micro-USB • Collegare a un caricabatterie ① Faretto ② Obiettivo ⑥ Pulsante SINC ③ LED di stato ⑦ Slot per scheda microSD ④ Microfono • Inserire una scheda microSD per archiviare le registrazioni 42 IT... -
Página 46: Accensione Della Telecamera
Accensione della telecamera 1.Collegare il connettore micro USB alla porta micro USB di OutdoorCam e l'altra estremità a un adattatore di alimentazione. 2.Collegare l'adattatore di alimentazione a una presa di corrente. Attendere che il LED di stato della telecamera diventi di colore blu fisso. IT 43... -
Página 47: Configurazione Del Sistema
Configurazione del sistema 1.Scaricare l’app eufy Security dall’App Store (dispositivi iOS) o da Google Play (dispositivi Android). 2.Creare un account e toccare "Aggiungi dispositivo" per aggiungere OutdoorCam all'elenco dei dispositivi. 3.Seguire le istruzioni visualizzate sullo schermo per completare la configurazione. -
Página 48: Montaggio Della Telecamera
Montaggio della telecamera a. Posizionare la telecamera su un tavolo Attaccare la parte inferiore della telecamera alla base magnetica e posizionarla sul tavolo. IT 45... -
Página 49: Montare La Telecamera Su Una Parete
B . Montare la telecamera su una parete Nota Operazioni da eseguire prima del montaggio della telecamera: • Scollegare il cavo USB dall’alimentatore. • Trovare un punto in cui la telecamera possa raggiungere facilmente una presa di corrente. • Assicurarsi che la telecamera riceva un forte segnale della connessione Wi-Fi nel punto in cui si desidera installarla in modo che possa trasmettere in streaming i video all’app eufy Security. - Página 50 IT 47...
- Página 51 2.Attaccare la base magnetica alla piastra metallica. Attaccare OutdoorCam alla base magnetica. 3.Ruotare la telecamera per regolare la vista e controllarla con lo streaming live a cui è possibile accedere tramite l’app eufy Security. Suggerimento: per ulteriori dettagli, consultare il manuale disponibile online all’indirizzo: https:/ /www.eufylife.com/ support 48 IT...
-
Página 52: Avviso
Avviso Il prodotto è conforme ai requisiti dell’Unione Europea relativi alle interferenze radio. Dichiarazione di conformità Con il presente documento, Anker Innovations Limited dichiara che questo dispositivo è conforme ai requisiti fondamentali e alle altre disposizioni correlate previste dalla direttiva 2014/53/UE.Per la dichiarazione di conformità, visitare il sito Web: https:/ /www.uk.eufylife.com/. - Página 53 Informazioni sull’esposizione alle radiofrequenze: il livello di esposizione massima consentito (MPE) è stato calcolato in base a una distanza di 20 cm tra il dispositivo e il corpo umano. Per mantenere la conformità ai requisiti di esposizione alle radiofrequenze, usare il prodotto in modo da mantenere una distanza di 20 cm tra il dispositivo e il corpo umano.
- Página 54 INHOUDSOPGAVE Productoverzicht Het apparaat inschakelen Het systeem instellen De camera monteren Kennisgeving NL 51...
-
Página 55: Productoverzicht
Productoverzicht Outdoor Cam Pro / Outdoor Cam ① ⑤ Schijnwerper Micro-USB-poort ② Lens • Sluit aan op een USB- ③ Status-led oplader ④ ⑥ Microfoon SYNC-knop ⑦ microSD-kaartsleuf • Plaats een microSD-kaart om opnamen op te slaan 52 NL... -
Página 56: Het Apparaat Inschakelen
Het apparaat inschakelen 1.Sluit de micro-USB-connector aan op de micro-USB- poort van de OutdoorCam en het andere uiteinde op een stroomaansluiting. 2.Steek de voedingsadapter vervolgens in een stopcontact. Wacht tot het camerastatuslampje blauw brandt. NL 53... -
Página 57: Het Systeem Instellen
Het systeem instellen 1.Download de eufy Security-app uit de App Store (iOS- apparaten) of Google Play (Android-apparaten). 2. Maak een account aan en tik op "Apparaat toevoegen" om OutdoorCam aan uw apparaatlijst toe te voegen. 3.Volg de instructies op het scherm om het instellen te voltooien. -
Página 58: De Camera Monteren
De camera monteren A. De camera op een tafel plaatsen Bevestig de onderkant van uw camera aan het magnetische voetstuk en plaats deze op de tafel. NL 55... - Página 59 • Zorg ervoor dat de camera op de plek waar u de camera wilt monteren een sterk wifi-signaal ontvangt, zodat de camera video kan streamen naar uw eufy Security-app. • Er wordt een 3M-kleefstrip meegeleverd voor mensen die geen gaten in de muur willen boren. Nadat u de oplaadkabel onder de haak van de metalen plaat hebt vastgemaakt, bevestigt de metalen plaat met de 3M-kleefstrip.
- Página 60 NL 57...
- Página 61 2.Bevestig de magnetische basis aan de metalen plaat. Bevestig de OutdoorCam op de magnetische voet. 3.Draai de camera om het zicht aan te passen en controleer het zicht met behulp van de livestream die u in de eufy Security-app kunt bekijken. Tip: Raadpleeg de online handleiding voor meer informatie: https:/ /www.eufylife.com/support 58 NL...
-
Página 62: Kennisgeving
Kennisgeving This product complies with the radio interference requirements of the European Community. Verklaring van overeenstemming Hierbij verklaart Anker Innovations Limited dat dit apparaat voldoet aan de essentiële vereisten en andere relevante bepalingen van Richtlijn 2014/53/ EU.Bezoek de website voor de verklaring van overeenstemming: https:/ /www.uk.eufylife.com/. - Página 63 menselijk lichaam. Zorg dus voor dat het apparaat minstens 20 cm verwijderd blijft van het menselijk lichaam om te voldoen aan de RF-blootstellingsnormen. Werkfrequentiebereik wifi: 2412~2472 MHz; max. wifi-vermogen: 17.6dBm Werkfrequentiebereik Bluetooth: 2402~2480 MHz; max. uitgangsvermogen Bluetooth: 9.15dBm(EIRP) Anker Innovations Deutschland GmbH I Georg-Muche-Strasse 3, 80807 München, Duitsland Dit product is ontworpen en gefabriceerd met materialen en componenten van hoge kwaliteit die kunnen worden gerecycled en...
- Página 64 ÍNDICE DESCRIÇÃO DO PRODUTO Ligar o dispositivo Configurar o sistema Instalar a câmara Informação PT 61...
-
Página 65: Descrição Do Produto
DESCRIÇÃO DO PRODUTO Câmara Profissional de Exterior/Câmara de Exterior ⑤ ① Holofote Porta para micro USB ② Lente • Ligar a um carregador USB ⑥ ③ LED de estado Botão SYNC ⑦ ④ Microfone Ranhura para cartão microSD • Inserir um cartão microSD para armazenar gravações 62 PT... -
Página 66: Ligar O Dispositivo
Ligar o dispositivo 1.Ligue o conector micro USB à porta micro USB da OutdoorCam e a outra extremidade a um transformador. 2.Em seguida, ligue o adaptador de alimentação a uma tomada elétrica. Aguarde que o LED de estado da câmara fique a azul sólido. -
Página 67: Configurar O Sistema
Configurar o sistema 1.Transfira a aplicação Eufy Security a partir da App Store (dispositivos iOS) ou da Google Play (dispositivos Android). 2.Crie uma conta e toque em " Adicionar dispositivo " para adicionar a OutdoorCam à lista de dispositivos. 3.Siga as instruções no ecrã para concluir a configuração. -
Página 68: Instalar A Câmara
Instalar a câmara A. Coloque a câmara em cima de uma mesa Fixe a parte de baixo da sua câmara à base magnética e coloque-a em cima da mesa. PT 65... - Página 69 • Certifique-se de que a câmara recebe uma ligação de Wi-Fi forte no local onde a quer instalar, para que possa transmitir vídeo para a sua aplicação eufy Security. • É fornecida uma fita adesiva 3M para os utilizadores que não querem perfurar a parede.
- Página 70 PT 67...
- Página 71 2.Fixe a base magnética à placa metálica. Fixe a OutdoorCam à base magnética. 3.Rode a câmara para ajustar a visualização e verifique-a através da transmissão em direto que pode aceder com a aplicação eufy Security. Dica: Para mais detalhes, consulte o manual online: https:/ /www.eufylife.com/support 68 PT...
-
Página 72: Informação
Informação Este produto cumpre as normas de interferências rádio da Comunidade Europeia. Declaration of Conformity A Anker Innovations Limited declara deste modo que este dispositivo cumpre os requsitos essenciais e outras provisões relevantes da Diretiva 2014/53/UE.Para ver a declaração de conformidade, visite o website: https:/ /www.uk.eufylife.com/. - Página 73 humano. Para manter o cumprimento dos requisitos de exposição a RF, utilize o produto mantendo uma distância de 20 cm entre o dispositivo e o corpo humano. Intervalo de frequências de funcionamento do Wi-Fi: 2412~2472 MHz; Potência de saída máxima do Wi-Fi: 17.6dBm Intervalo de frequências de funcionamento do Bluetooth: 2402~2480 MHz;...
- Página 74 جدول المحتويات نظرة عامة على المنتج تشغيل الكاميرا إعداد النظا م تركيب الكاميراأ. ضع الكاميرا على طاولة إشعار...
- Página 75 نظرة عامة على المنتج خارجية / كاميرا خارجيةCam Pro ① ضوء موضعي ميكروUSB ⑤ منفذ ② العدسة USB • قم بالتوصيل بشاحن ③ للحالةLED مؤشر ⑥ زر المزامنة ④ ميكروفون microSD ⑦ فتحة بطاقة فيmicroSD • أدخل بطاقة تخزين التسجيالت 72 AR...
- Página 76 تشغيل الكاميرا maCroodtuO الصغير الخاص بـBSU الصغير في منفذBSU 1قم بتوصيل موصل والطرف اآلخر بمحول طاقة الخاص بحالةLED 2.و ص ّل محوّ ل الطاقة بمنفذ الطاقة. انتظر حتى يتحول مؤشر الكاميرا إلى ال .لون األزرق الثابت...
- Página 77 إعداد النظام (لألجهزة التي تعمل بنظامApp Store منeufy Security 1.يمكنك تنزيل تطبيق .)Android (لألجهزة التي تعمل بنظامGoogle Play ) أو منiOS إلى قائمةmaCroodtuO 2.قم بإنشاء حساب وانقر على "إضافة جهاز" إلضافة .أجهزتك .3.اتبع التعليمات التي تظهر على الشاشة إلكمال اإلعداد 74 AR...
- Página 78 تركيب الكاميرا أ. ضع الكاميرا على طاولة تركيب الكاميرا أ. ضع الكاميرا على طاولة و ص ّل الجزء السفلي من الكاميرا بالقاعدة المغناطيسية وضعها على الطاولة...
- Página 79 ب.ر ك ّ ب الكاميرا على الحائط :مالحظة :قبل تركيب الكاميرا . من محوّ ل الطاقةUSB • افصل كبل .• ابحث عن مكان يمكن فيه للكاميرا الوصول بسهولة إلى مخرج الطاقة ® قوي في المكانWi-Fi • تأكد من استقبال الكاميرا التصال يجب تركيبها بحيث تتمكن من بث فيديو على . الخاص بكeufy Security تطبيق · يتوفر شريط الصق بسعة 3 ميغابايت لألشخاص الذين ال يرغبون في ثقب بعد ربط 3M ثقوب في الحائط. الصق اللوح المعدني بواسطة الشريط الالصق .كبل الشحن أسفل خطاف اللوحة المعدنية المرفق ليس مقاو م ً ا للماء. يوصى باستخدام صندوق مقبس مقاوم للماءBSU محول .عند تركيب الكاميرا في الخارج 1.اثقب فتحة دليلية باستخدام مثقاب كهربائي. ث ب ّت اللوحة المعدنية باستخدام المثبتات )اختياري( والبراغي المتوفرة. يتطلب مثبتات للحوائط المصنوعة من الطوب أو الخرسانة. تأكد من وجود مساحة كافية لتشغيل كبل...
- Página 81 بالقاعدةOutdoorCam 2.قم بتوصيل القاعدة المغناطيسية باللوحة المعدنية. قم بتوصيل .المغناطيسية 3.قم بتدوير الكاميرا لضبط العرض والتحقق منه باستخدام البث المباشر الذي يمكنك .eufy Security الوصول إليه في تطبيق :تلميح: لمزيد من التفاصيل، راجع الدليل على اإلنترنت https://www.eufylife.com/support 78 AR...
- Página 82 إشعار يتوافق هذا المنتج مع متطلبات تداخل ترددات الراديو الخاصة . باالتحاد األوروبي بيان المطابقة أنّ هذا الجهاز متوافق مع المتطلباتAnker Innovations Limited بموجب هذا المستند، تعلن شركة ،/35/410 2 .لالطالع على إعالن المطابقةEU األساسية واألحكام األخرى ذات الصلة الواردة في التوجيه .https://www.uk.eufylife.com قم بزيارة الموقع اإللكتروني .يمكن استخدام هذا المنتج في جميع الدول األعضاء في االتحاد األوروبي .يجب تركيب المحوّ ل بالقرب من الجهاز وفي مكان يسهل الوصول إليه ال تستخدم الجهاز في بيئة ذات درجة حرارة عالية ج د ً ا أو منخفضة ج د ً ا وال تعرّ ض الجهاز مطل ق ً ا ألشعة .الشمس القوية أو لبيئة مبللة ج د ً ا 45 والملحقات من 02- درجة مئوية إلىT8441X / T8442X تبلغ درجة الحرارة المناسبة للطراز درجة مئوية ي ُرجى التأكد من استخدام الشاحن الذي تقدمه الشركة ال م ُص ن ّ عة فحسب. قد يؤدي استخدام شاحن غير مصرح .به إلى نشوء خطر وانتهاك تصريح الجهاز ومادة الضمان...
- Página 83 )MPE( معلومات التعرض للترددات الالسلكية: تم حساب مستوى الحد األقصى للتعرض المسموح به استنا د ً ا إلى مسافة م=02 سم بين الجهاز اإلنسان. للحفاظ على االمتثال لمتطلبات التعرض للترددات .الالسلكية، استخدم المنتج الذي يحافظ على مسافة 02 سم بين الجهاز وجسم اإلنسان تنبيه خطر حدوث انفجار إذا تم استبدال البطارية بأخرى من نوع غير صحيح. التخلص من البطاريات المستعملة وف ق ً ا للتعليمات 17.6dBm : القصوىWi-Fi : 2142~2742 ميجا هرتز؛ طاقة خرجWi-Fi نطاق تردد تشغيل Bluetooth: 9.15 ميجاهرتز؛ أقصى قدرة خرجBluetooth: 2402~2480 نطاق التردد أثناء تشغيل )EIRP( ديسيبل ميللي واط Anker Innovations Deutschland GmbH I Georg-Muche-Strasse 3, 80807 Munich, Germany تم تصميم هذا المنتج وتصنيعه باستخدام مواد ومكونات عالية الجودة يمكن إعادة .تدويرها وإعادة استخدامها يشير هذا الرمز إلى أنه يجب عدم التخلص من المنتج باعتباره من النفايات المنزلية .العادية، بل يجب تسليمه إلى المنشأة المناسبة لتجميع النفايات بغرض إعادة التدوير يساعد التخلص وإعادة التدوير على نحو سليم في حماية الموارد الطبيعية وصحة اإلنسان والبيئة. لمزيد من المعلومات حول التخلص من هذا المنتج وإعادة تدويره، اتصل . بالبلدية المحلية أو خدمة التخلص من المنتج أو المتجر الذي اشتريت منه هذا المنتج بيان الوزارة الصناعية الكندية 80 AR...
-
Página 84: Customer Service
Customer Service Kundenservice | Servicio de atención al cliente Service client Servizio clienti | Klantenservice • Warranty Garantie | Garantía | Garantie | Garanzia | Garantie | 12-month limited warranty 12 Monate eingeschränkte Garantie Garantía limitada de 12 meses Garantie limitée de 12 mois Garanzia limitata di 12 mesi 12 maanden beperkte garantie ا... - Página 85 • Email Us Senden Sie uns eine E-Mail | Contacto por correo electrónico Par e-mail | E-mail | Email ons | Customer Support: support@eufylife.com Anker Innovations Limited Room 1318-19, Hollywood Plaza, 610 Nathan Road, Mongkok, Kowloon, Hong Kong 82 AR...