
Manuales relacionados para Zanussi ZRB835NW1


Resumen de contenidos para Zanussi ZRB835NW1
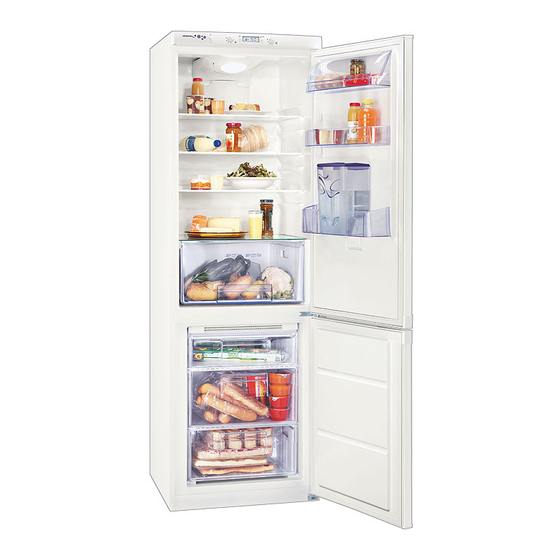
- Página 1 User manual Manual de instrucciones Fridge Freezer Frigorífico-congelador ZRB835NW1...
-
Página 2: Tabla De Contenido
Contents Safety information _ _ _ _ _ _ _ _ _ _ _ _ _ _ _ _ _ _ 2 Care and cleaning _ _ _ _ _ _ _ _ _ _ _ _ _ _ _ _ _ 10 Control panel _ _ _ _ _ _ _ _ _ _ _ _ _ _ _ _ _ _ _ _ 4 What to do if…... - Página 3 2. Make sure that the power plug is not squashed or Care and cleaning damaged by the back of the appliance. A squashed • Before maintenance, switch off the appliance and dis- or damaged power plug may overheat and cause a connect the mains plug from the mains socket.
-
Página 4: Control Panel
Environment Protection insulation foam contains flammable gases: the appliance shall be disposed according to the applicable regulations This appliance does not contain gasses which could to obtain from your local authorities. Avoid damaging the damage the ozone layer, in either its refrigerant cir- cooling unit, especially at the rear near the heat exchang- cuit or insulation materials. -
Página 5: Switching Off
First switch on The temperature indicator shows the set temperature. The set temperature will be reached within 24 hours. After plugging the plug into the power outlet, if the display Fluctuations of some degrees around set temperature are is not illuminated, press key (A), appliance on. normal and does not mean any fault in the appliance. -
Página 6: Drinks Chill Function
rapidly and to avoid warming the other food which is al- This function stops automatically after 52 hours. ready in the refrigerator. It is possible to deactivate the function at any time by The Shopping function is activated by pressing key (D) pressing key (D) until indicator will flash and then (several times if necessary) until the corresponding icon... -
Página 7: First Use
First use Cleaning the interior Important! Do not use detergents or abrasive powders, as these will damage the finish. Before using the appliance for the first time, wash the inte- rior and all internal accessories with lukewarm water and some neutral soap so as to remove the typical smell of a brand-new product, then dry thoroughly. -
Página 8: How To Use The Easywater Dispenser
FreeStore from the freezer, pull the basket towards yourself and, upon reaching the end point, remove the basket by tilting its front upwards. The refrigerator compart- At the time of putting it back, slightly lift the front of the ment is equipped with a basket to insert it into the freezer. -
Página 9: Helpful Hints And Tips
during the cleaning of the other components (in order • Use only drinking water. The use of any other drink to avoid cold air leakage from the fridge). type can leave residue, taste or odour in the reservoir and in the dispenser. 6. -
Página 10: Care And Cleaning
• If the ambient temperature is high and the Temperature • the freezing process takes 24 hours. No further food to Regulator is set to low temperature and the appliance is be frozen should be added during this period; fully loaded, the compressor may run continuously, •... -
Página 11: What To Do If
back of the appliance, over the motor compressor, where Important! Do not pull, move or damage any pipes and/or it evaporates. cables inside the cabinet. It is important to periodically clean the defrost water drain Never use detergents, abrasive powders, highly perfumed hole in the middle of the refrigerator compartment channel cleaning products or wax polishes to clean the interior as to prevent the water overflowing and dripping onto the... - Página 12 Problem Possible cause Solution Water flows on the rear plate of During the automatic defrosting proc- This is correct. the refrigerator. ess, frost defrosts on the rear plate. Water flows into the refrigerator. The water outlet is clogged. Clean the water outlet. Products prevent that water flows into Make sure that products do not touch the water collector.
-
Página 13: Technical Data
Closing the door 1. Clean the door gaskets. 2. If necessary, adjust the door. Refer to "Installation". 3. If necessary, replace the defective door gaskets. Con- tact the Service Center. Technical data Dimension Height 1850 mm Width 595 mm Depth 658 mm Rising Time 18 h... -
Página 14: Door Reversibility
Removing the shelf holders Your appliance is equipped with shelf retainers that make it possible to secure the shelves during transportation. To remove them proceed as follows: 1. Move the shelf hold- ers in the direction of the arrow (A). Rear spacers 2. -
Página 15: Environmental Concerns
m1 m2 m5 m6 • Open the doors. Un- • Unscrew the lower hinge • Remove the plugs (1) on • Unscrew the upper screw the middle hinge (b1) the upper side of both hinge pivot and place it (m2). Remove the plas- doors and move them to on the opposite side. -
Página 16: Índice De Materias
Índice de materias Información sobre seguridad _ _ _ _ _ _ _ _ _ _ _ _ 16 Mantenimiento y limpieza _ _ _ _ _ _ _ _ _ _ _ _ _ 25 Panel de mandos _ _ _ _ _ _ _ _ _ _ _ _ _ _ _ _ _ Qué... - Página 17 Advertencia Los componentes eléctricos (cable de • Se deben seguir estrictamente las recomendaciones alimentación, enchufe, compresor) debe sustituirlos del fabricante del aparato sobre el almacenamiento. un técnico autorizado o personal de reparaciones profe- Consulte las instrucciones correspondientes. sional a fin de evitar riesgos. •...
-
Página 18: Panel De Mandos
• Asegúrese de que es posible acceder al enchufe des- Protección del medio ambiente pués de instalar el electrodoméstico. Este aparato no contiene gases perjudiciales para la • Realice la conexión sólo con el suministro de agua po- capa de ozono, ni en el circuito de refrigerante ni en table. - Página 19 Indicador de Alarma por exceso de temperatura. Indicador de la función Bebidas frías. Se enciende cuando la temperatura indicada es la Indicador de la función Congelación rápida. temperatura ambiente. Indicador de temperatura positiva o negativa. Indicador de la función de modo Eco. Indicador de la temperatura.
- Página 20 Función Congelación rápida diente . La temperatura que aparece en el visor digi- tal es la temperatura ambiente. El compartimento congelador es apropiado para el alma- Confirme la selección pulsando la tecla (E) inmediata- cenamiento prolongado de los alimentos que se compran mente después.
-
Página 21: Primer Uso
• parpadea el icono • parpadeo del icono • emisión de una señal acústica • parpadea el icono Cuando se restablecen las condiciones normales se ob- • se emite una señal acústica hasta que se pulsa la tecla servará: • desconexión de la señal acústica Llegado este momento no olvide extraer la bebida del compartimento congelador. - Página 22 Es posible incluso cocinar piezas pequeñas congeladas, FreeStore tomadas directamente del congelador; en tal caso, el tiem- po de cocción será más prolongado. El compartimento frigorífi- co cuenta con un disposi- Estantes móviles tivo que permite enfriar los alimentos con más rapidez Las paredes del frigorífico y mantener una temperatu- cuentan con una serie de...
-
Página 23: Cómo Utilizar El Dispensador Easywater
Cómo utilizar el dispensador EasyWater 4. Gire la válvula hacia la derecha para desenroscarla Componentes internos: (preste especial atención para no aflojar la junta de la 1. Depósito de agua válvula, ya que es necesaria para que la unidad fun- 2. -
Página 24: Consejos Útiles
• Puede que se escuche algún ruido provocado por el ai- gente para el agua de consumo) o con agua procedente re que penetra en el depósito al salir el agua. de manantiales privados y bajo las pruebas y controles de seguridad necesarios. -
Página 25: Mantenimiento Y Limpieza
poder descongelar posteriormente sólo las cantidades Consejos para el almacenamiento de alimentos necesarias; congelados • envuelva los alimentos en papel de aluminio o polieti- Para obtener el máximo rendimiento de este aparato, de- leno y compruebe que los envoltorios quedan herméti- berá: camente cerrados;... -
Página 26: Qué Hacer Si
Descongelación del congelador El compartimento congelador de este modelo es de tipo "no frost" y no produce escarcha. Esto significa que, du- rante el funcionamiento, no se forma escarcha ni en las paredes internas del aparato ni sobre los alimentos. La ausencia de escarcha se debe a la continua circulación del aire frío en el interior del compartimento impulsado por un ventilador controlado automáticamente. - Página 27 Problema Causa posible Solución Gotea agua al suelo. El agua de la descongelación no fluye Fije la salida de agua de descongelación hacia la bandeja de evaporación situa- a la bandeja de evaporación. da sobre el compresor. Hay demasiada escarcha y hielo. Los productos no están bien envuel- Envuelva mejor los productos.
-
Página 28: Datos Técnicos
Cierre de la puerta 1. Limpie las juntas de la puerta. 2. Si es necesario, ajuste la puerta. Consulte "Instala- ción". 3. Si es necesario, cambie las juntas de puerta defectuo- sas. Contacte al Centro de servicio técnico. Datos técnicos Dimensiones Altura 1850 mm... - Página 29 Extracción de las sujeciones de estante El aparato está equipado con sujeciones de estante que permiten asegurarlos durante el transporte. Retire las sujeciones como se indica a continuación: 1. Desplace las sujecio- nes de los estantes en la dirección de la fle- Separadores traseros cha (A).
-
Página 30: Aspectos Medioambientales
m1 m2 m5 m6 • Abra las puertas. Desa- • Desatornille la bisagra • Retire los tacos (1) de la • Desatornille el pivote de tornille la bisagra inter- inferior (b1). parte superior de ambas la bisagra superior y co- media (m2). - Página 31 salud pública, lo cual podría ocurrir si este producto no producto, póngase en contacto con el Ayuntamiento de su se gestionara de forma adecuada. Para obtener Municipio, ó con la tienda donde lo compró. información más detallada sobre el reciclaje de este...
- Página 32 www.zanussi.com/shop...