Tabla de contenido
Publicidad
Idiomas disponibles
Idiomas disponibles
Enlaces rápidos
DIGITALES
NACHTSICHTGERÄT
DE
DIGITALES NACHTSICHTGERÄT mit Foto- & Videoaufnahmefunktion
BEDIENUNGSANLEITUNG
GB
DIGITAL NIGHT VISION BINOCULARS with photo & video recording
INSTRUCTION MANUAL
FR
JUMELLES DE VISION NOCTURNE NUMÉRIQUE avec fonction d'enregistrement de photos & vidéos
NOTICE D'UTILISATION
ES
PRISMÁTICOS DE VISIÓN NOCTURNA DIGITALES con función de toma de imágenes & vídeos
MANUAL DE INSTRUCCIONES
IT
BINOCOLO DIGITALE PER VISIONE NOTTURNA con funzione di scattare di foto & video
MANUALE DI ISTRUZIONI
ZB-200 PV
doerr-outdoor.de
Publicidad
Tabla de contenido

Manuales relacionados para Dörr ZB-200 PV

Resumen de contenidos para Dörr ZB-200 PV
- Página 1 JUMELLES DE VISION NOCTURNE NUMÉRIQUE avec fonction d’enregistrement de photos & vidéos NOTICE D’UTILISATION PRISMÁTICOS DE VISIÓN NOCTURNA DIGITALES con función de toma de imágenes & vídeos MANUAL DE INSTRUCCIONES BINOCOLO DIGITALE PER VISIONE NOTTURNA con funzione di scattare di foto & video MANUALE DI ISTRUZIONI ZB-200 PV doerr-outdoor.de...
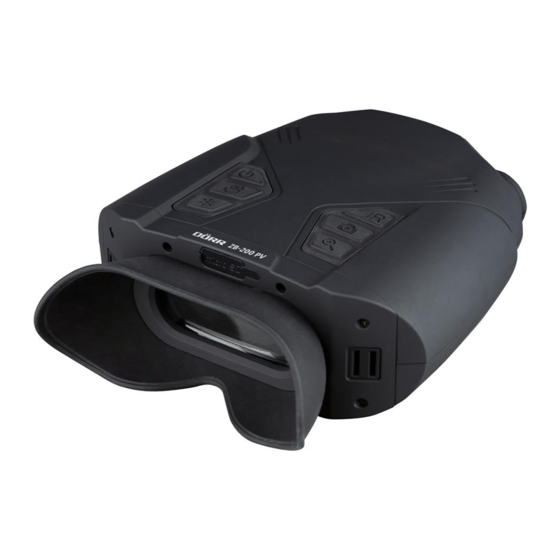
- Página 2 TEILEBESCHREIBUNG | NOMENCLATURE | NOMENCLATURA doerr-outdoor.de...
-
Página 3: Sicherheitshinweise
DE | BEDIENUNGSANLEITUNG VIELEN DANK, dass Sie sich für ein Qualitätsprodukt aus dem Hause DÖRR entschieden haben. Bitte lesen Sie vor dem ersten Gebrauch die Bedienungsanleitung und die Sicherheitshinweise aufmerksam durch. Bewahren Sie die Bedienungsanleitung zusammen mit dem Gerät für den späteren Gebrauch auf. Sollten andere Personen dieses Gerät nutzen, so stellen Sie ihnen diese Anleitung zur Verfügung. - Página 4 02 | BATTERIE WARNHINWEISE Verwenden Sie nur hochwertige Markenbatterien. Beim Einlegen der Batterien auf die richtige Polung achten (+/-). Legen Sie keine Batterien unterschiedlichen Typs ein und ersetzen Sie immer alle Batterien gleichzeitig. Mischen Sie keine gebrauchten Batterien mit neuen Batterien. Bei längerem Nichtgebrauch, bitte die Batterien entnehmen. Werfen Sie die Batterien nicht ins Feuer, schließen Sie sie nicht kurz und nehmen Sie sie nicht auseinander.
-
Página 5: Einlegen/Austauschen Der Batterien
04 | TEILEBESCHREIBUNG 01 Objektiv 02 Infrarotbeleuchtung Ein/Aus Taste Taste Video Modus/Aufnehmen Taste Helligkeit 06 IR Taste Infrarotbeleuchtung Taste Foto Modus/Auslösen Zoom Taste 09 micro SD Kartenslot 09a) Gummiabdeckung 10 Ösen für Umhängeriemen 11 LCD Display 12 Fokussierrad 13 Batteriefachdeckel 14 Batteriefachdeckel-Verriegelung 15 ¼... - Página 6 05.2 Einlegen/Entfernen der micro SD Speicherkarte ACHTUNG: Zum Einlegen und Entnehmen der micro SD Speicherkarte muss das Nachtsichtgerät ausgeschaltet sein (keine Anzeige im Display)! Öffnen Sie die Gummiabdeckung (09a) und schieben Sie eine micro SD Speicherkarte (optional) in den micro SD Kartenslot (09), bis diese mit einem Klick einrastet.
- Página 7 06.3 Digital Zoom Um die Live-Ansicht heran zu zoomen, drücken Sie die Zoom Taste (08). Unten rechts im LCD Display (11) erscheint das Symbol mit dem minimalen Zoomfaktor von 1,07. Durch wiederholtes Drücken der Zoom Taste (08) kann die Ansicht schrittweise bis zu 2- fach vergrößert werden.
-
Página 8: Reinigung Und Aufbewahrung
06.10 Betrachten Ihrer Aufnahmen Zum Betrachten Ihrer Foto- und Videoaufnahmen entnehmen Sie die micro SD Speicherkarte und lesen Sie diese mit einem geeigneten micro SD Kartenlesegerät (optional von DÖRR erhältlich) an Ihrem PC/Netbook aus. Achtung: Zum Entnehmen der micro SD Speicherkarte muss das Nachtsichtgerät ausgeschaltet sein (keine Anzeige im Display)! 07 | REINIGUNG UND AUFBEWAHRUNG Reinigen Sie das Gerät nicht mit Benzin oder scharfen Reinigungsmitteln. - Página 9 10 | ENTSORGUNG, CE KENNZEICHNUNG 10.1 BATTERIE/AKKU ENTSORGUNG Batterien und Akkus sind mit dem Symbol einer durchgekreuzten Mülltonne gekennzeichnet. Dieses Symbol weist darauf hin, dass leere Batterien oder Akkus, die sich nicht mehr aufladen lassen, nicht im Hausmüll entsorgt werden dürfen. Möglicherweise enthalten Altbatterien Schadstoffe, die Schaden an Gesundheit und Umwelt verursachen können.
-
Página 10: Safety Hints
GB | INSTRUCTION MANUAL THANK YOU for choosing this DÖRR quality product. Please read the instruction manual and safety hints carefully before first use. Keep this instruction manual together with the device for future use. If other people use this device, make this instruction manual available. -
Página 11: Product Description
02 | SAFETY HINTS FOR BATTERIES Only use high-quality batteries of popular brands. When inserting the batteries, please respect the correct polarity (+/-). Do not insert batteries of different types and always replace all batteries at the same time. Do not combine used batteries with fresh batteries. Please remove batteries when device is not in use for a longer period. -
Página 12: First Steps
04 | NOMENCLATURE 01 Lens 02 Infrared illumination On/Off button Button video mode/recording Button brightness 06 IR Button infrared illumination Button photo mode/releasing Button zoom 09 micro SD card slot 09a) Rubber cover 10 Eyelets for neck strap 11 LCD display 12 Focussing wheel 13 Battery compartment cover 14 Battery compartment cover lock... - Página 13 05.2 Inserting/removing the micro SD memory card CAUTION: When inserting or removing the micro SD memory card, the night vision binoculars must be switched off (no live view display)! Open the rubber cover (09a) and insert a micro SD memory card (optional) into the micro SD card slot (09), until it clicks into place. Please make sure that the labelled side of micro SD card is facing upwards.
-
Página 14: Battery Indicator
06.4 Adjusting the brightness of the LCD display To increase the brightness of the live view in the LCD display (11), press the button for brightness (05) repeatedly until the desired brightness is reached. Possible settings from 0 - 9. The value is displayed at the left bottom of the LCD display (17), e.g. 06.5 Infrared illumination (for use in the dark) When using in the dark, press the IR button (06) once, to switch on the infrared illumination (02). -
Página 15: Cleaning And Storage
07 | CLEANING AND STORAGE Never use aggressive cleansing agents or benzine to clean the device. We recommend a soft, slightly damp microfiber cloth to clean the outer parts of the device. Remove batteries before cleaning! Store the device in a dust-free, dry and cool place. This device is not a toy - keep it out of reach of children. - Página 16 10 | DISPOSAL, CE MARKING 10.1 DISPOSAL OF BATTERIES/ACCUMULATORS Batteries are marked with the symbol of a crossed-out bin. This symbol indicates that empty batteries or accumulators which can no longer be charged should not be disposed of with household waste. Waste batteries may contain harmful substances that can cause damage to health and to the environment.
-
Página 17: Consignes De Sécurité
FR | NOTICE D’UTILISATION NOUS VOUS REMERCIONS d’avoir choisi un produit de qualité de la société DÖRR. Veuillez lire soigneusement la notice d'utilisation et les consignes de sécurité avant la première utilisation. Veuillez garder cette notice d’utilisation ensemble avec l’appareil pour une utilisation postérieure. Dans le cas où l’appareil est utilisé par plusieurs personnes, veuillez mettre cette notice à... -
Página 18: Description Du Produit
02 | REMARQUES DE PRÉVENTION POUR PILES Utiliser toujours des piles haut de gamme. Insérer les piles du même type en veillant à respecter le sens des polarités (+/-). Veillez à ne pas insérer des piles de différents types et veuillez remplacer toutes les piles à la fois. Veillez à ce que des piles usagées ne soient pas mélangées avec des piles neuves. -
Página 19: Mise En Service
04 | NOMENCLATURE 01 Objectif 02 Éclairage infrarouge Touche marche/arrêt Touche mode vidéo/enregistrement Touche luminosité 06 IR Touche éclairage infrarouge Touche mode photo/déclencheur Touche zoom 09 Rainure carte mémoire micro SD 09a) Couvercle en caoutchouc 10 Œillets pour bandoulière 11 Écran LCD 12 Roue de focalisation 13 Couvercle compartiment piles 14 Verrou du couvercle du compartiment à... - Página 20 05.2 Insertion/Extraction de la carte mémoire micro SD (en option) ATTENTION: Pour insérer et extraire la carte mémoire SD, l’appareil de vision nocturne doit être éteint (aucun affichage sur l’écran) ! Veuillez ouvrir le couvercle en caoutchouc (09a) et insérez une carte mémoire micro SD (en option) dans la rainure pour cartes micro SD (09), jusqu’à...
-
Página 21: Zoom Digital
06.3 Zoom digital Afin de zoomer la vue live, veuillez appuyer sur la touche zoom (08). Le symbole apparait en bas sur la partie droite de l‘écran LCD (11) pour la valeur de zoom minimale de 1,07. En appuyant à plusieurs reprises la touche zoom (08) la vue peut être augmentée jusqu’à... -
Página 22: Nettoyage Et Stockage
06.9 Éteindre l’appareil Après chaque utilisation, veuillez éteindre l’appareil de vision nocturne. Pour cela veuillez appuyer la touche marche/arrêt (03) pendant 2 secondes. 06.10 Regarder vos enregistrements Pour regarder vos enregistrements photo et vidéo, retirez la carte mémoire micro SD et lisez-la sur votre PC/Netbook avec un lecteur de carte micro SD adapté... - Página 23 10 | GESTION DES DÉCHETS, MARQUAGE CE 10.1 GESTION DES DÉCHETS DE PILES ET D'ACCUMULATEURS Les piles sont marquées avec un symbole d’une poubelle barrée. Ce symbole indique que les piles et batteries rechargeables usagées ne doivent pas être traitées comme de simples déchets ménagers. Les piles et batteries peuvent contenir des substances dangereuses qui ont des conséquences négatives sur l’environnement et sur la santé...
-
Página 24: Instrucciones De Seguridad
ES | MANUAL DE INSTRUCCIONES GRACIAS por adquirir un producto de calidad de la casa DÖRR. Le rogamos que lea el manual de instrucciones y las instrucciones de seguridad detenidamente antes de utilizarlo por la primera vez. Quisiera Usted guardar este manual juntamente con el aparato para una utilización posterior. En caso de que el aparato sea utilizado por varias personas, por favor ponga este manual a su disposición. -
Página 25: Instrucciones De Advertencia Para Pilas
02 | INSTRUCCIONES DE ADVERTENCIA PARA PILAS Utilice siempre pilas de marca. Coloque pilas del mismo tipo, asegúrese de la polaridad correcta (+/-). Asegúrese de no insertar pilas de tipos distintos y quisiera Usted cambiar todas las pilas al mismo tiempo. Asegúrese que las pilas usadas no sean mezcladas con pilas nuevas. -
Página 26: Puesta En Marcha
04 | NOMENCLATURA 01 Objetivo 02 Iluminación infrarroja Botón apagado/encendido Botón de modo de video/grabación Botón luminosidad 06 IR Botón iluminación infrarroja Botón de modo de foto/disparo Botón de zoom 09 Ranura de carta memoria micro SD 09a) Cubierta de goma 10 Corchetes para correa 11 Pantalla LCD 12 Rueda de enfoque... -
Página 27: Inserción/Extracción De La Tarjeta Memoria Micro Sd (En Opción)
05.2 Inserción/Extracción de la tarjeta memoria micro SD (en opción) Atención: ¡Para insertar o extraer la tarjeta de memoria SD, el aparato de visión nocturna debe estar apagado (la pantalla está apagada)! Quisiera Ud abrir la cubierta de goma (09a) e inserte una tarjeta memoria micro SD (en opción) en la ranura para tarjetas micro SD (09), hasta que este encaje con un clic. -
Página 28: Iluminación Infrarroja (Por Utilización En La Oscuridad)
06.3 Zoom digital Para enfocar con el zoom la imagen live, quisiera Ud pulsar el botón zoom (08). El símbolo aparece en bajo en la parte derecha de la pantalla LCD (11) para el valor mínimo de zoom de 1,07. Pulsando varias veces el botón zoom (08) la imagen puede ser aumentada hasta 2 veces. -
Página 29: Apagar El Aparato
06.9 Apagar el aparato Después de cada utilización, quisiera Ud apagar el aparato de visión nocturna. Para eso quisiera Ud pulsar el botón apagado/encendido (1) durante 2 segundos. 06.10 Ver sus grabaciones Para ver sus fotografías y grabaciones de vídeo, extraiga la tarjeta de memoria micro SD y léala en su PC/Netbook con un lector de tarjetas micro SD adecuado (disponible opcionalmente en DÖRR). -
Página 30: Gestión De Pilas/Acumuladores Usadas
10 | GESTIÓN, MARCA CE 10.1 GESTIÓN DE PILAS/ACUMULADORES USADAS Las pilas y baterías están marcadas con un cubo de basura tachado. Este símbolo indica que las pilas descargadas y baterías recargables en final de su vida útil no pueden ser tratadas como residuos domésticos normales. Las pilas y baterías pueden contener substancias peligrosas que tienen consecuencias negativas para el medio ambiente y para la salud humana. -
Página 31: Suggerimenti Per La Sicurezza
IT | MANUALE DI ISTRUZIONI GRAZIE per aver scelto questo prodotto di qualità DÖRR. Si prega di leggere il manuale di istruzioni e i suggerimenti sulla sicurezza accuratamente prima dell'uso. Conservare il manuale di istruzioni insieme con il dispositivo per un uso futuro. Se altre persone usano questo dispositivo, fa si che questo manuale di istruzioni sia disponibile. -
Página 32: Descrizione Del Prodotto
02 | SUGGERIMENTI DI SICUREZZA PER BATTERIE Utilizzare solo batterie di alta qualità e di marche popolari. Quando si inseriscono le batterie, si prega di rispettare la corretta polarità (+/). Non inserire batterie di tipi diversi e sempre sostituire tutte le batterie nello stesso momento. Non utilizzate allo stesso momento batterie vecchie con quelle nuove. - Página 33 04 | NOMENCLATURA 01 Lenti 02 Illuminazione a infrarossi Pulsante On/Off Pulsante modalità video/registrazione Pulsante luminosità 06 IR Pulsante illuminazione a infrarossi Pulsante modalità foto/ripresa Pulsante zoom 09 Slot della scheda micro SD 09a) Coperchio in gomma 10 Occhielli per il laccio da collo 11 Display LCD 12 Ghiera per la messa a fuoco 13 Coperchio vano batteria...
- Página 34 05.2 Inserire/Togliere la scheda di memoria micro SD (opzionale) Attenzione: Per inserire e rimuovere la scheda di memoria micro SD assicurarsi che il binocolo per la visione notturna sia spento (nessuna immagine mostrata sul display)! Aprire il coperchio in gomma (09a) e inserire una scheda di memoria micro SD (opzionale) nello slot per schede micro SD (09) fino a quando non scatta in posizione.
- Página 35 06.3 Zoom digitale Per zoomare l‘immagine visualizzata, premere il pulsante per lo zoom (08). In basso a destra sul display LCD (11) appare il simbolo e indica il fattore di zoom minimo di 1,07. Premendo ripetutamente il tasto zoom (08), l‘immagine può essere ingrandita a stadi fino a 2 volte.
-
Página 36: Pulizia E Stoccaggio
06.09 Spegnimento Dopo l‘utilizzo, si prega di spegnere il binocolo per la visione notturna premendo il pulsante On/Off (03) per circa 2 secondi. 06.10 Visualizzazione delle registrazioni Per visualizzare le tue foto e le tue registrazioni video, rimuovi la scheda di memoria micro SD e leggila sul tuo PC/Netbook con un lettore di schede micro SD adatto (opzionalmente disponibile da DÖRR). - Página 37 10.4 MARCHIO CE La marcatura CE è conforme agli standard europei e indica che il prodotto soddisfa i requisiti delle direttive UE applicabili. Digitales Nachtsichtgerät ZB-200 PV Artikel Nr 490338 Made in China DÖRR GmbH...