Publicidad
Idiomas disponibles
Idiomas disponibles
Enlaces rápidos
OPERATOR'S MANUAL
INCLUDING: SERVICE KITS, DISASSEMBLY / REASSEMBLY, PARTS, TROUBLESHOOTING
65106-X, 65108-X and 66496-X LOWER PUMP END
ALSO COVERS SERVICE KITS 637010, 637010-4, 637010-5, 637010-6 AND 637011
READ THIS MANUAL CAREFULLY BEFORE INSTALLING,
It is the responsibility of the employer to place this information in the hands of the operator. Keep for future reference.
LOWER PUMP END DISASSEMBLY
NOTE: All threads are right hand.
1.
Secure the lower pump assembly in a vise, clamping on flats of
(12) pump body.
2.
Securely hold (21) suction tube with a strap wrench and un-
thread and remove (26) foot valve body.
3.
Remove (25) dowel pin, (24) ball, (22) snap ring and (23) "O"
ring.
4.
Using a strap wrench, unthread and remove (21) suction tube
and O" ring seal from (12) pump body.
5.
Loosen (3) spacer tube and push (1) plunger and components
out thru the bottom end of (12) pump body. NOTE: Be careful
not to damage the finish on (1) plunger.
6.
Unthread and remove (18) inner check seat, releasing (17) ball,
(16) flat washer and two (15) cups.
7.
Unthread and remove (3) spacer tube and (5) solvent cup from
(12) pumpbody, releasing (11) gasket, (10) spring, (9)male pack-
ing washer, (8) "V" packings, (7) female packing washer and (6)
washer.
8.
Unthread and remove (5) solvent cup from (3) spacer tube and
remove (4) "O" ring.
9.
Unthread and remove (13) connector rod from (1) plunger.
10.
Unthread and remove (14) cup follower from (13) connector
rod.
LOWER PUMP END ASSEMBLY
NOTE: Thoroughly clean and lubricate all seals. Replace all soft
parts with new ones included in the repair kit. Note: Refer to
the illustration (figure 2, page 2) for "V" packing lip direction.
1.
Assemble (4) "O" ring to groove in (3) spacer tube and assemble
(5) solvent cup to (3) spacer tube.
2.
Assemble (6)washer, (7) female packing washer, (8) "V" pack-
ings, (9) male packing washer and (10) spring into (3) spacer
tube.
3.
Assemble (11) gasket and (3) spacer tube and components into
(12) pump body. NOTE: Do not tighten at this time.
4.
Slide (1) plunger into (3) spacer tube and (12) pump body, be-
ing careful not to damage (8) "V" packings.
5.
Assemble (13) connector rod and (14) cup follower to (1)
plunger. NOTE: Apply Loctite nickel anti-seize to threads of
connector rod and tighten to 50 ft lbs (67.8 Nm).
6.
Assemble (15) cup, (16) flat washer, (15) cup and (17) ball to
(14)cup follower, securing with (18) inner check seat. NOTE:
Apply Loctite nickel anti-seize to threads and tighten to 65 - 70
ft lbs (88.1 - 94.8 Nm).
7.
Assemble (19) "O" ring seal onto (21) suction tube.
INGERSOLL RAND COMPANY LTD
209 NORTH MAIN STREET – BRYAN, OHIO 43506
(800) 495-0276
FAX (800) 892-6276
arozone.com
OPERATING OR SERVICING THIS EQUIPMENT.
© 2016
CCN 99441636
8.
Apply Loctite nickel anti-seize to threads of (21) suction tube
and assemble to (12) pump body, being careful not to damage
(15) cups. NOTE: Tighten to 125 - 150 ft lbs (169.5 - 203.4 Nm).
NOTE: (15) cups can be rolled on a clean flat surface or ARO
tool #637403 is available for easier insertion into (21) suction
tube.
9.
Tighten (3) spacer tube to 125 - 150 ft lbs (169.5 - 203.4 Nm).
10.
Assemble (24) ball, (23) "O" ring seal, (22) snap ring and (25)
dowel pin to (26) foot valve body.
11.
Apply Loctite nickel anti-seize to threads of (26) foot valve
body and assemble body and components to (21) suction tube.
NOTE: Tighten to 125 - 150 ft lbs (169.5 - 203.4 Nm).
TROUBLESHOOTING
Material leakage out of solvent cup.
Worn packings. Replace (8) packings.
Material on one stroke only (fast upstroke).
(17) ball may not be seating on (18) inner check seat. Remove
ball from assembly, clean and inspect the ball seat area. If either
the ball or the inner check seat is damaged, replace.
Material on one stroke only (fast downstroke).
(24) ball may not be seating on (26) foot valve body. Remove
ballfrom foot valve, clean and inspect the ball and seat area. If
either the ball or the foot valve body is damaged, replace. Also,
restriction on the suction inlet will cause fast downstroke (col-
lapsed hose).
65106-X
65108-X
66496-X
RELEASED / LIBERADO / DECHARGE: 4-28-93
REVISED / REVISADO / REVISE:
(REV: R)
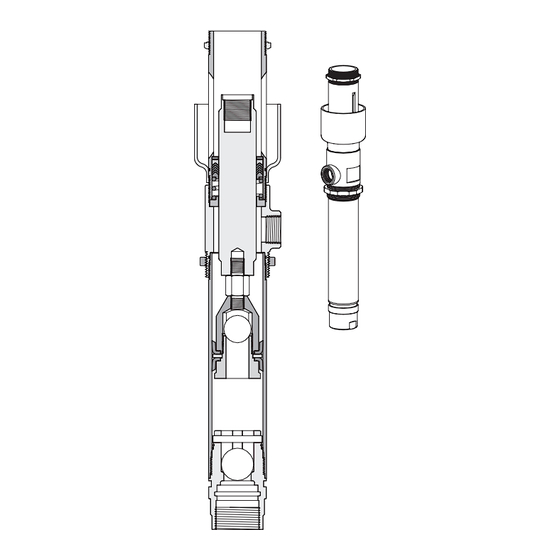
Figure 1
11-18-16
Publicidad

Resumen de contenidos para Ingersoll Rand 65106-X
- Página 1 OPERATOR’S MANUAL 65106-X 65108-X INCLUDING: SERVICE KITS, DISASSEMBLY / REASSEMBLY, PARTS, TROUBLESHOOTING 65106-X, 65108-X and 66496-X LOWER PUMP END 66496-X ALSO COVERS SERVICE KITS 637010, 637010-4, 637010-5, 637010-6 AND 637011 RELEASED / LIBERADO / DECHARGE: 4-28-93 REVISED / REVISADO / REVISE:...
- Página 2 Qty Part No. (size) MATERIAL CODE Plunger (1) 91075 [SH] (66496-X) = Nitrile (65106-X, 65106-10, -11, -12, & 65108, (1) 90615 [SS] [CSS] = Ceramic Coated 65108-4, -8, -9, -10, -11, -12) Stainless Steel (1) 90615-2 [CSS] (65108-5, 65108-6, 65108-7, -13, -14, -15)
- Página 3 65108-X INCLUYE: JUEGOS DE SERVICIO, DESMONTAJE / VOLVER A MONTAR, PIEZAS, LOCALIZACIÓN DE AVERÍAS 66496-X 65106-X, 65108-X y 66496-X EXTREMO DE LA BOMBA INFERIOR TAMBIÉN CUBRE LOS JUEGOS DE SERVICIO 637010, 637010-4, 637010-5, 637010-6 Y 637011 DESENSAMBLAJE Instale (19) la junta toroidal al (21) tubo de succión.
- Página 4 65108-X COMPREND KITS D’ENTRETIEN, DÉMONTAGE / MONTAGE, PIECES, DEPANNAGE 66496-X 65106-X, 65108-X et 66496-X EXTRÉMITÉ DE LA POMPE INFÉRIEURE COUVRE AUSSI LES KITS D’ENTRETIEN 637010, 637010-4, 637010-5, 637010-6 ET 637011 DÉMONTAGE Installer (19) le joint torique sur (21) le tube d’aspiration.


