Publicidad
Enlaces rápidos
EN
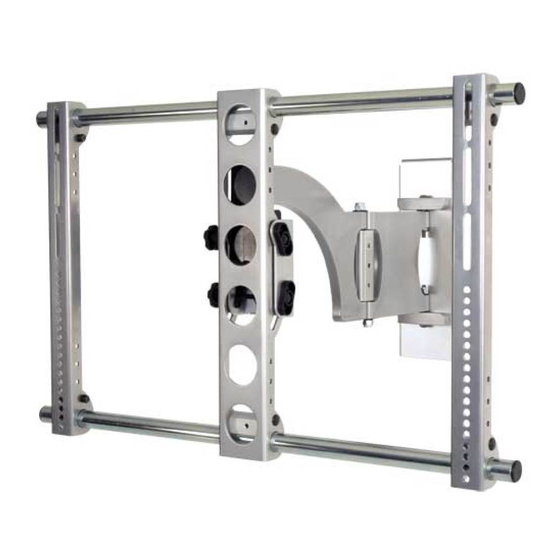
Thank you for choosing the Sanus Systems LRF118 wall mount. The Sanus Systems LRF118 wall mount is designed to
support a monitor sized up to 50 in. (127cm) and weighing up to 59 kg (130 lbs). The mount is adjustable; it will tilt +5° to
-15°, swivel to ±90°, and roll ±6°. This product must be used with the Sanus Systems LR1A, sold separately.
Do not use this product for any purpose not explicitly specified by Sanus Systems. Improper
installation may cause property damage or personal injury. If you do not understand these
directions, or have doubts about the safety of the installation, contact Sanus Systems
Customer Service or call a qualified contractor. Sanus Systems is not liable for damage or
injury caused by incorrect mounting, assembly, or use.
Gracias por optar por el soporte de pared LRF118 de Sanus Systems. Este soporte está diseñado para sostener un monitor
ES
de hasta 50 pulgadas (127 cm) con un máximo de 59 kg de peso. El soporte es ajustable, permitiendo una inclinación
de + 5º a -15º, un giro de ± 90º y un basculamiento de ± 6º. Este producto debe usarse juntamente con LR1A de Sanus
Systems, que se vende por separado.
No utilice este producto para ningún fin que no sea explícitamente especificado por
Sanus Systems. Una instalación inadecuada puede provocar daños materiales o lesiones
personales. Si no entiende las instrucciones de montaje o tiene alguna duda sobre la
seguridad de la instalación, contacte con Sanus Systems o llame a un operario cualificado.
Sanus Systems no es responsable de daños o lesiones causados por el montaje, ensamblaje
o uso incorrectos.
FR
Merci d'avoir choisi le support mural Sanus Systems LRF118. Le support mural Sanus Systems LRF118 est conçu pour un
moniteur de dimension jusqu'à 50 po (127 cm) pesant jusqu'à 59 kg (130 lb). Le support est réglable; il peut basculer de
+5° à -15°, pivoter de ±90° et s'orienter de ±6°. Ce produit doit être utilisé avec le Sanus Systems LR1A vendu séparément.
N'utilisez pas ce produit à une fin non spécifiée expressément par Sanus Systems. Une
installation incorrecte peut entraîner des préjudices corporels ou des dommages matériels.
Si vous ne comprenez pas ces instructions ou si vous avez des doutes quant à la sécurité
de l'installation, veuillez contacter le service clientèle de Sanus Systems ou un installateur
qualifié. Sanus Systems n'est pas responsable des dommages ou des préjudices causés par
un montage, un assemblage ou une utilisation incorrects.
Customer Service: 1-800-359-5520 • info@sanus.com • www.sanus.com
LRF118
Sanus Systems 2221 Hwy 36 West, Saint Paul, MN 55113 USA
(6901-300125 <00>)
CauTION
PRECauTION
aTTENTION
Publicidad

Manuales relacionados para Sanus VisionMount LRF118


Resumen de contenidos para Sanus VisionMount LRF118
- Página 1 Gracias por optar por el soporte de pared LRF118 de Sanus Systems. Este soporte está diseñado para sostener un monitor de hasta 50 pulgadas (127 cm) con un máximo de 59 kg de peso. El soporte es ajustable, permitiendo una inclinación de + 5º...
- Página 2 3/16 in. Supplied Parts and Hardware Before starting assembly, verify all parts are included and undamaged. If any parts are missing or damaged, do not return the item to your dealer; contact Sanus Systems Customer Service. Never use damaged parts! WaRNING This product contains small items that could be a choking hazard if swallowed.
- Página 3 [02] x 2 [04] x 4 [03] x 2 [01] x 1 [05] x 2 [06] x 7 [07] x 7 [08] x 1 1/4-20 x 2.0 in. 1/4-20 [09] x 4 [10] x 4 [11] x 4 [12] x 4 [13] x 4 [14] x 4 M6 x 12mm...
- Página 4 [15], [16], [17], [18] [09], [10], 001427.eps [11], [12] FPM70-Flat and Curved Back Brackets [23], [24] [02] 001429.eps FPM70-Brackets not level 1-1: Attach brackets to monitor, for monitors with a flat back. 1-1: Fijar los soportes al monitor, para monitores de dorso plano. 1-1: Fixer les pattes au moniteur, pour les moniteurs à...
- Página 5 [19], [20], [21], [22] [23] [09], [10], [11], [12] [25], [26] [25], [26] [02] 001427.eps FPM70-Flat and Curved Back Brackets 001428.eps FPM70-Curved Back Hardware 001429.eps FPM70-Brackets not level 1-2: Attach brackets to monitor, for monitors with a curved back or obstruction. Use washer [23] with M4 or M5 hardware only.
- Página 6 [04] [13] 001430.eps FPM70-Vise assemblies installed [14] [02] 001431.eps FPM70-Detail, vise installation 2: Install vise assemblies. NOTE: Do not overtighten the nut [14]. The vise assembly [04] must rotate freely around the carriage bolt [13]. 2: Instalar los conjuntos de abrazadera. NOTA: No sobreapretar la tuerca [14].
- Página 7 [27] [03] [02] [01] [03] [02] [04] [03] 001438.eps FPM70-Arm Attachment Detail 3: Install arm assembly to monitor. NOTE: Do not overtighten the fastener in the vise assemblies [04]. Tighten only enough to prevent the tubes [03] from moving. 3: Montar el conjunto del brazo en el monitor. NOTA: No apretar demasiado el perno situado en el conjunto de abrazadera [04].
- Página 8 [08] [05] 4: Install preventer. Install the preventer [08] on the left side if you want the arm to fold to the left. Install the preventer on the right side if you want the arm to fold to the right. 4: Instalar el obturador.
- Página 9 [01] 5: Attach arm to wall mount. NOTE: Refer to the instructions included with the LR1A for proper installation of the wall mount [a]. HEAVY! You will need assistance with this step. 5: Fijar el brazo al soporte de pared. NOTA: Para montar adecuadamente el soporte de pared [a], deberán consultarse las instrucciones incluidas en el LR1A.
- Página 10 [27] 6: Secure arm to wall mount. CauTION Avoid potential injuries or property damage! Refer to the instructions included with the LR1A for proper installation of the safety fasteners [a], [B], and [C]. Periodic maintenance may be required. 6: Asegurar el brazo al soporte de pared. PRECauTION ¡Evitar posibles lesiones o daños materiales! Para montar adecuadamente los pernos de seguridad [a], [B] y [C], consultar las instrucciones incluidas en el LR1A.
- Página 11 [07] [06] [02] 7: Install cable management. NOTE: Be sure to leave enough slack in the cables to allow the monitor to move freely. Use the cable ties [06] and wire clips [07] to secure the cables to the brackets [02] and arm [01]. 7: Instalar gestión de cables.
- Página 12 [27] 001449.eps FPM70-Back of Assembly 8-1: Adjust monitor position--adjust level. 8-1: Ajustar la posición del monitor--ajustar el nivel. 8-1: Régler la position du moniteur--régler l’horizontalité. 6901-300125 <00>...
- Página 13 001451.eps 001451.eps FPM70-Left / Right Angle FPM70-Left / Right Angle 8-2: Adjust monitor position--adjust left / right swivel. CauTION Avoid potential injuries or property damage! Remove the safety bracket [B] only to adjust the swivel tension nut [C]. Be sure to replace the safety bracket after adjusting the swivel tension nut. The hex hole in the safety bracket must seat over the swivel tension nut.
- Página 14 8-3: Adjust monitor position--adjust up / down pitch. NOTE: Adjust the pitch tension by tightening or loosening the tension knobs [D]. 001453.eps 8-3: Ajustar la posición del monitor--ajustar el cabeceo arriba / abajo. FPM70-Full Assem NOTA: Ajustar la tensión de cabeceo apretando o aflojando los botones de tensión [D]. 001450.eps FMP70-Up / Down Pitch 8-3: Régler la position du moniteur--réglez l’inclinaison haut/bas...
- Página 15 [27] 8-4: Adjust monitor position--extend or retract arm. CauTION Avoid potential injuries or property damage! Do not remove the adjustment nut [E]; tighten or loosen only as necessary for easy arm adjustment. 8-4: Ajustar la posición del monitor--extender o replegar el brazo. PRECauTION ¡Evitar posibles lesiones o daños materiales! No retirar la tuerca de ajuste [E];...
- Página 16 CSAV, Inc. and its affiliated corporations and subsidiaries (collectively, “CSAV”), intend to make this manual accurate and complete. However, CSAV makes no claim that the information contained herein covers all details, conditions, or variations. Nor does it provide for every possible contingency in connection with the installation or use of this product. The information contained in this document is subject to change without notice or obligation of any kind.