Tabla de contenido
Publicidad
Idiomas disponibles
Idiomas disponibles
Enlaces rápidos
Quickstart Guide
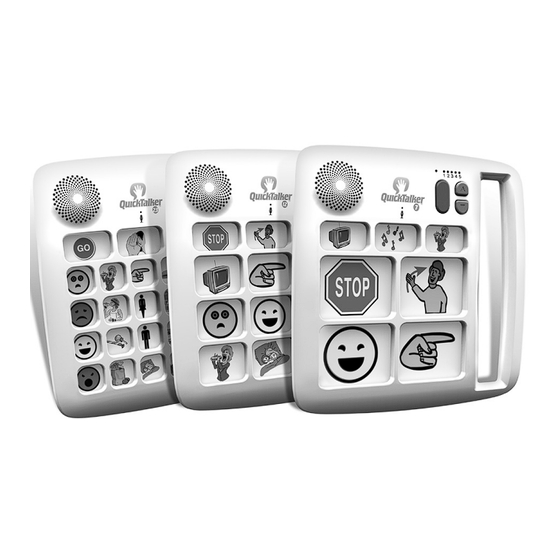
QuickTalker
7
™
QuickTalker
12
™
QuickTalker
23
™
Step 2 - Select Level
Select Level
Select LEVEL (1-5) by pressing the red button on the
front of the device.
Level Selection
Key Features
Recording Indicator Light
Speaker
Core Message
Locations
Individual
Message
Locations
Record Button
www.ablenetinc.com
Step 3 - Recording Messages
a) Entering Record Mode
Press and hold the RECORD button on the back of device
until the red light is on, then release.
Level Indicators
Level Selection
Level Indicators
Volume
Adjust
Buttons
Symbols
Overlay +
Storage
Full Length
Handle
Power On/Off
Battery Compartment
Recording Indicator Light
Record Button
Step 1 - Powering QuickTalker
Powering QuickTalker™
Turn the device to the back side. Insert 4 AA batteries
into the device where shown. Use the On/Off switch to
power the device.
Power On/Off
Battery Compartment
b) Recording Messages
Press and hold the desired message location, begin
speaking after the beep, then release. Repeat for other
locations.
Tip! Speak 6-8" from the microphone for loud, clear sound.
c) Exiting Record Mode
Press and release the RECORD button. Lights turn off.
Note: The device will automatically exit Record Mode
after 20 seconds of no activity.
™
Publicidad
Tabla de contenido

Manuales relacionados para AbleNet QuickTalker 7


Resumen de contenidos para AbleNet QuickTalker 7
- Página 1 Quickstart Guide Key Features Step 1 - Powering QuickTalker ™ QuickTalker ™ QuickTalker ™ Level Selection QuickTalker Powering QuickTalker™ ™ Recording Indicator Light Level Indicators Turn the device to the back side. Insert 4 AA batteries into the device where shown. Use the On/Off switch to Volume power the device.
-
Página 2: Erasing Messages
Warranty in full text is available at www.ablenetinc.com. More Information You can find warranty, guarantee and return/repair information online. For more information on AbleNet products and services, or for contact: AbleNet, Inc. Note: Pressing another location will stop the current Message and light function Mpls./Saint Paul, MN 55113... - Página 3 Guide de mise en route rapide Caractéristiques Étape 1 – Mise sous tension du QuickTalker ™ QuickTalker ™ QuickTalker ™ Sélecteur de niveau QuickTalker Mise sous tension du QuickTalker™ ™ Voyant d’enregistrement Indicateurs de niveau Retournez l’appareil. Insérez quatre piles AA dans l’appareil comme illustré.
-
Página 4: Garantie Et Entretien
Boutons de réglage du volume Garantie Les produits AbleNet sont assortis d’une garantie limitée de 2 ans. Cette garantie protège contre les défauts de matériel et les vices de fabrication pendant 2 ans à partir de la date d’achat. La garantie complète se trouve sur www.ablenetinc.com. - Página 5 Kurzanleitung Produktmerkmale Schritt 1 – Einschalten des QuickTalker ™ QuickTalker ™ QuickTalker ™ Ebenen-Auswahl QuickTalker QuickTalker™ einschalten ™ Aufnahme-Anzeigelampe Ebenen-Anzeigen Das Gerät umdrehen. In das Gerät vier AA-Batterien (Mignonzellen) einlegen. Beziehen Sie sich dabei auf Lautstärketasten die Abbildung. Den Ein/Aus-Schalter betätigen, um das Lautsprecher Gerät einzuschalten.
- Página 6 Lautstärke eingestellt werden. Tuch abwischen. Lautstärketasten Garantie Die von AbleNet gefertigten Produkte sind durch eine zweijährige beschränkte Garantie gedeckt. Diese Garantie beschränkt sich auf Material- und Verarbeitungsfehler und gilt für zwei Jahre ab Kaufdatum. Der Volltext der Garantie kann auf www.ablenetinc.com eingesehen werden.
-
Página 7: Características Clave
Guía de inicio rápido Características clave Paso 1: Encendido del QuickTalker ™ QuickTalker ™ QuickTalker ™ Selección de nivel QuickTalker Encendido del QuickTalker™ ™ Luz indicadora de grabación Indicadores de nivel Dele la vuelta al dispositivo de manera que la parte trasera quede hacia arriba. -
Página 8: Paso 4: Reproducción De Mensajes
Botones de ajuste del volumen Garantía Los productos fabricados por AbleNet tienen una garantía limitada de dos años. Esta garantía los cubre contra defectos de materiales y fabricación durante dos años a partir de la fecha de compra. El texto completo de la garantía está...