Tabla de contenido
Publicidad
Idiomas disponibles
Idiomas disponibles
Enlaces rápidos
Publicidad
Tabla de contenido

Manuales relacionados para Watts Industries MILUX


Resumen de contenidos para Watts Industries MILUX
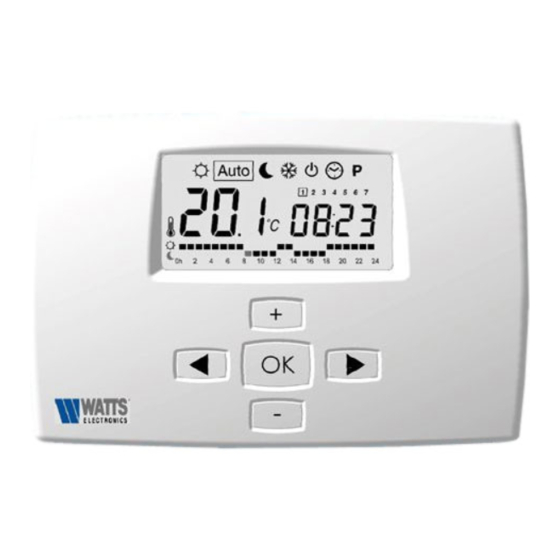
- Página 1 USER GUIDE 030725 – GB FR ES ITA MILUX Chrono-thermostat...
- Página 2 OVERVIEW The MILUX Chrono-thermostat is a programmable digital thermostat able to control and regulate directly your central heating (Electric, Gas, Oil) or cooling system. It’s weekly programmable function enables power savings according to your every day life. EATURES • •...
-
Página 3: Technical Characteristics
ECHNICAL CHARACTERISTICS Measured temperature precision 0.1°C (or 0.2°F) Set temperature precision 0.5°C (or 0.5°F) Set temperature range in comfort & reduced : 5°C – 35°C (or 41°F – 95°F) in anti-freeze : 0,5°C – 10°C (or 33°F – 50°F) Regulation characteristics - regulation speed: 7.5 cycle per hour (8 minutes cycle) - regulation band: 2°K of proportional band (adjusted power) Driving element... - Página 4 & W NSTALLATION IRING Place the MILUX thermostat (A) on a plain wall away from windows and doors and not to close to the heater. Put the connection wires (B) thru the back hole of the rear part. Use the screws (C) to mount the rear part on the wall.
-
Página 5: Quick Start
+/ - keys (Default comfort temp. is 21°C) Go to reduced mode and adjust reduced temperature required with +/ - keys (Default reduced temp. is 17°C) Go to Finally go to automatic mode. Your MILUX Chrono-thermostat is now working and follows the program. - 4 -... - Página 6 Use this mode if your Heating or cooling installation needs to be turned OFF. MILUX Chrono-thermostat will switch off the installation and then switch itself OFF (blank screen). User programs are saved, time is kept running and battery consumption becomes very low.
- Página 7 When you press on the last day you will exit the User program edition and return to the top menu. Now your user program will be followed if you put the MILUX in automatic operating mode - 6 -...
-
Página 8: Special Functions
OFF mode, maintain + and – keys pressed and press simultaneously on the Go to key. All the segments will lit up during a few seconds showing that the MILUX has been erased and restarted with factory defaults parameters. Factory parameters are : 21°C 17°C... -
Página 9: Batteries Replacement
How to change the batteries ATTERIES REPLACEMENT To close the MILUX, Press on then left side button and Replace the three LR6 AA 1.5V pull the front panel to remove it. batteries with new ones Place the front panel in front of (Alkaline cells recommended) the rear part. -
Página 10: Presentation
PRESENTATION Le Chrono-thermostat MILUX est un thermostat digital programmable capable de contrôler et de réguler directement votre chauffage (Electrique, Gaz, Fuel) ou votre climatisation. Sa programmation hebdomadaire engendre des économies d’énergie en accord avec votre vie quotidienne. ARACTERISTIQUES • •... -
Página 11: Donnees Techniques
ONNEES ECHNIQUES Précision de la mesure de température 0.1°C (ou 0.2°F) Précision des températures ajustables 0.5°C (ou 0.5°F) Plages de température en confort et réduit : 5°C – 35°C (ou 41°F – 95°F) en hors-gel : 0,5°C – 10°C (ou 33°F – 50°F) Paramètres de régulation - vitesse de régulation: 7.5 cycle par heure (cycle de 8 minutes) - bande de régulation: 2°K de bande proportionnelle... - Página 12 & C NSTALLATION ABLAGE Placez le thermostat MILUX (A) sur un mur libre à distance de toute fenêtre ou porte et éloigné d’un radiateur. Passez les câbles de connexion (B) à travers le trou au fond de la boîte. Utilisez les vis (C) pour monter le fond sur le mur.
-
Página 13: Demarrage Rapide
(Par défaut elle est à 21°C) et ajustez la température de réduction requise avec les touches +/ - (Par défaut elle est à 17°C) Allez sur Finalement allez sur le mode automatique . Votre MILUX est en fonctionnement et suit le programme. - 12 -... -
Página 14: Description Des Modes
Evite l’installation de geler indéfiniment ou pour quelques heures ou jours (voir fonction Vacances). En appuyant sur + ou – la température d’Hors-gel clignote et peut être ajustée. Après quelques secondes la température ambiante réapparaît. Votre MILUX maintien la température au dessus du gel. Mode d’ARRET : Utilisez ce mode si votre chauffage ou climatisation doit être coupé. -
Página 15: Menu Programme
En appuyant sur sur le dernier jour vous sortirez du mode d’édition du programme utilisateur et retournez au menu. Maintenant votre programme utilisateur sera suivi si vous placez le MILUX en mode - 14 -... -
Página 16: Fonctions Speciales
, maintenir les touches + et – appuyées et appuyez simultanément sur la touche Allez au mode . Tous les segments s’allument montrant que le MILUX a été effacé et redémarré avec les paramètres d’usine par défaut. Par défaut : 21°C 17°C... - Página 17 Comment changer les piles EMPLACEMENT DES ILES Pour fermer le MILUX, Appuyez sur le bouton du côté Remplacez les trois piles LR6 AA gauche et tirez sur la face avant 1.5V par des neuves Placez la face avant an face du pour l’enlever.
-
Página 18: Presentación
PRESENTACIÓN El cronotermostato MILUX es un termostato digital programable capaz de controlar y regular su sistema de calefacción central (eléctrico, de gas o con fuel oil) o de climatización. Gracias a su función de programación semanal, se obtiene un ahorro de energía conforme a su ritmo de vida cotidiano. -
Página 19: Características Técnicas
CARACTERÍSTICAS TÉCNICAS Precisión en la medición de la temperatura 0.1°C (ou 0.2°F) Precisión en el ajuste de temperaturas 0.5°C (ou 0.5°F) Intervalos de temperatura Para confort y reducida : 5°C – 35°C (o 41°F – 95°F) Para antihielo 0,5°C – 10°C (o 33°F –... -
Página 20: Instalación Y Cableado
INSTALACIÓN Y CABLEADO Coloque el termostato MILUX (A) en una pared de manera que esté a cierta distancia de puertas y ventanas y alejado de cualquier radiator. Pase los cables para establecer la conexión (B) por el orificio que se encuentra en la parte trasera del dispositivo. -
Página 21: Instrucciones
INSTRUCCIONES Cómo utilizar el termostato MILUX Función vacaciones activada Utilice las teclas para cambiar de función Anulación de temperatura Sistema de calefacción en MENÚ de funciones Batería baja marcha Días de la semana Temperatura Hora Utilice las teclas + / -... -
Página 22: Puesta En Marcha
+/ - Seleccione y ajuste la temperatura reducida mediante las teclas (la temperatura por defecto es de 17 ºC). Finalmente, seleccione el modo automático De este modo, el termostato MILUX se pone en funcionamiento según el programa escogido. - 21 -... -
Página 23: Descripción De Las Funciones
Pulsando las teclas + o –, la temperatura de confort comienza a parpadear de manera que puede ajustarse. Pasados unos segundos, vuelve a aparecer la temperatura ambiente . El termostato MILUX se rige a partir de ese momento por la temperatura de confort Modo de funcionamiento AUTOMÁTICO:... - Página 24 “Función vacaciones”). Pulsando las teclas + o –, la temperatura antihielo comienza a parpadear de manera que puede ajustarse. Pasados unos segundos, vuelve a aparecer la temperatura ambiente . El termostato MILUX mantiene una temperatura que impide la formación de hielo.
-
Página 25: Edición De Un Programa Por El Usuario
OK después de ajustar el último día, se sale automáticamente de la función “Edición de un programa” y se regresa al menú principal. Si se ajusta el termostato MILUX en modo de funcionamiento , se ejecuta el nuevo programa configurado. -
Página 26: Functiones Especiales
+, – y OK. Todos los iconos aparecen en pantalla para Seleccione indicar que se ha borrado la memoria del termostato MILUX y que se reinicia con los parámetros prefijados en fábrica. Valores por defecto: 21 ºC... -
Página 27: Cambio De Pilas
CAMBIO DE PILAS Cómo cambiar las pilas Para cerrar de nuevo el Presione la lengüeta situada en el Sustituya las tres pilas AA LR6 de dispositivo, disponga la tapa lado izquierdo del dispositivo y 1’5 V por otras nuevas (se frontal frente a la parte trasera. - Página 28 MANUALE DI ISTRUZIONI Cronotermostato MILUX - 27 -...
-
Página 29: Caratteristiche
GENERALITÁ Il cronotermostato MILUX è un termostato digitale programmabile, in grado di controllare e regolare direttamente gli impianti di riscaldamento (elettrici, a gas, a gasolio) oppure i sistemi di condizionamento dell’aria. La funzione di programmazione settimanale consente il risparmio energetico grazie ad un programma personalizzabile a seconda delle abitudini di ciascun utente. - Página 30 ARATTERISTICHE ECNICHE Tolleranza nei valori di temperatura rilevati 0,1°C (o 0,1°F) Tolleranza nei valori di temperatura impostati 0,5°C (o 0,5°F) Campi di temperatura impostabili 5°C - 35°C (41°F – 95°F) per temperature “Comfort” e “Ridotta” 0,5°C - 10°C (33°F – 50°F) per temperatura “Anti-gelo” Regolazione - velocità...
-
Página 31: Installazione E Cablaggio
NSTALLAZIONE E ABLAGGIO Posizionare il termostato MILUX (A) su una parete piana, lontano da porte, finestre e termosifoni. Far passare i fili di collegamento (B) attraverso il foro che si trova sulla parte posteriore del contenitore, che dovrà essere poi fissata (C) alla parete mediante le apposite viti. - Página 32 ISTRUZIONI Come usare il termostato MILUX Funzione “Vacanze” attivata Usare i tasti MENU delle modalità operative cambiare la modalità Intervento manuale Indicatore batterie scariche Funzionamento caldaia Giorni della setti Temperatura Usare i tasti + / - per cambiare la temperatura...
-
Página 33: Avvio Rapido
+/ - (La Selezionare la modalità “Temperatura Ridotta” temperatura “ridotta” di default è 17°C) Selezionare infine la modalità “Automatica” . Il cronotermostato MILUX inizia a funzionare in base al programma impostato. - 32 -... - Página 34 “Comfort” e sarà così possibile procedere alla sua regolazione. Dopo pochi secondi, il display visualizzerà di nuovo la temperatura ambiente . Da questo momento in poi, il cronotermostato MILUX manterrà la temperatura “Comfort” appena impostata. Modalità operativa AUTOMATICA: Il cronotermostato MILUX seguirà...
- Página 35 “anti-gelo” e sarà così possibile procedere alla sua regolazione. Dopo pochi secondi, il display visualizzerà di nuovo la temperatura ambiente . Da questo momento in poi, il cronotermostato MILUX manterrà la temperatura “anti-gelo” appena impostata. Modalità OFF (disattivazione): Selezionare questa modalità...
- Página 36 Menu di impostazione dell’orologio interno: Accedere a questo menu per regolare l’orologio interno del cronotermostato, impostando l’ora ed il giorno correnti. sare +/ - per Usare +/ - per Usare +/ - per Premere Premere Premere regolare le ore selezionare regolare i minuti il giorno Menu PROGRAMMAZIONE:...
- Página 37 PERSONALIZZAZIONE DEI PROGRAMMI L’indicazione dell’ora comincerà a lampeggiare Il tasto + imposta la temperatura “Comfort” da mantenere in corrispondenza dell’ora che lampeggia sul display. Il tasto - imposta la temperatura “ridotta” da mantenere in corrispondenza dell’ora che lampeggia sul display. Usare i tasti per passare ai giorni successivi della settimana, per impostare o modificare con facilità...
-
Página 38: Funzioni Speciali
. Mediante i tasti + o - selezionare il numero di ore Usare i tasti per attivare la funzione “Vacanze” oppure il numero di giorni da lasciar passare prima che il cronotermostato MILUX ritorni automaticamente alla modalità (modalità automatica) e continui ad eseguire il programma correntemente impostato. Funzione BLOCCO DEI TASTI: Questa funzione evita che qualcuno (ad esempio, i bambini) possa accidentalmente modificare i parametri impostati sul cronotermostato MILUX. - Página 39 ) oppure premere il tasto – per selezionare l’opzione CONDIZIONAMENTO ( Funzione di RESET: Cancella tutti i programmi personalizzati e ripristina le impostazioni di fabbrica del cronotermostato MILUX. ; premere e mantenere premuti i tasti + e – e contemporaneamente Selezionare la modalità OFF (disattivazione) premere il tasto .
- Página 40 Come sostituire le batterie OSTITUZIONE DELLE ATTERIE Richiudere il cronotermostato MILUX Premere il pulsante che si trova Sostituire le tre batterie LR6 AA da Posizionare il pannello anteriore di sul lato sinistro del contenitore e 1.5V fronte alla parte posteriore del tirare verso di sé...