
Manuales relacionados para VWR SAS Super IAQ


Resumen de contenidos para VWR SAS Super IAQ
- Página 1 ® Microbiological Air Sampler SAS Super IAQ INSTRUCTION MANUAL European catalogue numbers: 710-0868 710-0919 Version: 1.2 Issued: July 2016...
-
Página 2: Legal Address Of Manufacturer
Legal address of manufacturer Europe VWR International Srl Via S. Giusto 85 20153 Milano Italy Tel.: + 39 02-3320311 http://it.vwr.com Country of origin: Italy... -
Página 3: Tabla De Contenido
Principle ............................7 The basic idea..........................7 Brief operating instructions ....................... 8 Brief operating instruction for SAS Super IAQ ................. 8 Installation ........................... 8 Practical use of contact plates ......................8 List of menus and utility sub menus ....................9 ... - Página 4 “INDENTIFY” ..........................15 “SAMPLING SITE” ......................... 15 List of system messages ....................... 15 Accessories ..........................16 Troubleshooting ........................17 Technical service ........................18 Warranty ............................. 18 Compliance with local laws and regulations ................18 Equipment disposal ........................19 ...
-
Página 5: Warning
Warning This document is the property of VWR International PBI S.r.l. - Milan - Italy It may not be duplicated or distributed without the owner’s authorisation. Patent pending Manufactured by VWR International PBI S.r.l. - Milan, Italy Safety information Use the device only for the indicated purposes. -
Página 6: Kit And Unit Description
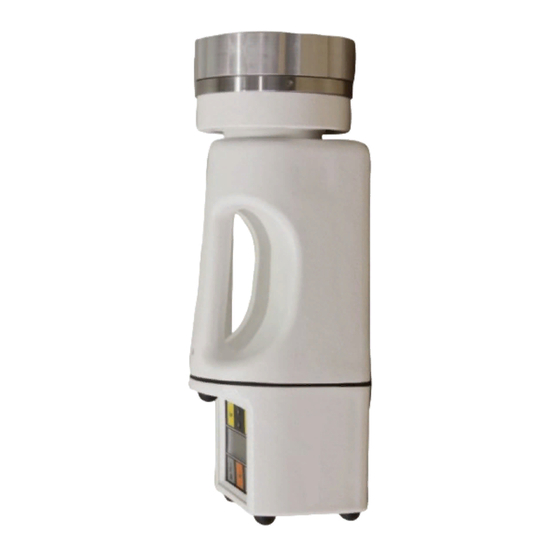
Kit and unit description 1. Soft carrying case 9. “Start” button 2. SAS IAQ control unit 10. Arrow “Down” 3. Aluminium head 11. Standing feet 4. Battery charger 12. Printer connection (not used) 5. Remote control 13. Main switch 6. “Clear” button 14. -
Página 7: Technical Features
Technical features Model SAS IAQ Contact SAS IAQ Petri Cat. No. 710-0868 710-0919 Airflow 100 l/min 100 l/min Use with 55 mm contact plates 90 mm Petri dishes Portable Battery Rechargeable Rechargeable Battery life 70 000 l 70 000 l Intended use Principle The Surface Air System (SAS) encompasses several models which use the same principle. -
Página 8: Brief Operating Instructions
Brief operating instructions Brief operating instruction for SAS Super IAQ 1. Press main switch. 2. Press ‘START’ button to sample the same air volume as the last sampling cycle. 3. To change the air volume, use the arrow buttons and select ‘USER MODE’ from the menu. -
Página 9: List Of Menus And Utility Sub Menus
List of menus and utility sub menus START FOR XXX This message indicates the air sampler is ready to sample the volume shown (XXX) after pressing the ‘Start’ button USER MODE Choose from 8 programmable sampling volumes PROGRAM MODE Modify the 8 programmable sampling volumes DELAY MODE Set a delayed start UTILITY MODE... -
Página 10: Mm Petri Dish Filling
Tripod installation (optional) The SAS SUPER IAQ can be fixed to a table, floor tripod or wall support. The screw thread connection is located under the unit, between the two front feet. -
Página 11: Program Volume" (Modification Of The Value Of A Stored Volume)
Switch on the instrument and wait until the main screen is displayed: Press the “Up” or “Down” arrows to reach the: Press the ‘ENTER’ button, now you can scroll the eight user-defined sampling volumes. Once the desired sampling volume has been reached press the ‘ENTER’ button to confirm. Press the ‘START’... -
Página 12: Delay Mode
Once the sampling volume has been set, press the ‘ENTER’ button to confirm. The display will show the old and new volume. Press the “Up or “Down” arrows to select the first digit and press ‘ENTER’ to confirm. Press the Up or “Down” arrows to select the second digit and press ‘ENTER’ to confirm. ‘DELAY MODE’... -
Página 13: Set Time
Set time; Set Autoswitch; Display Record; Clear Record; Language; Identify; Sampling site. Always start from ‘UTILITY MODE’ to reach one of these sub menus. Switch on the instrument and wait until the main screen is displayed: Press the “Up” or “Down” arrows to reach the: Press the ‘“ENTER’... -
Página 14: Display Record
‘DISPLAY RECORD’ The last 99 samples are memorised in the file ‘DISPLAY RECORD’. Each sample is identified in chronological order and shows the date, time, operator, site and volume of air sampled. From the UTILITY MODE select ‘DISPLAY RECORD’. Press ‘ENTER’ to see the memorised values: The following parameters are recorded: Progressive number;... -
Página 15: Indentify
Press ‘ENTER’ to list all the available languages: Use the “Up” or “Down” arrows to select the desired language and press ‘ENTER’ to confirm. There are six available languages: English, French, Spanish, German, Portuguese and Italian. ‘INDENTIFY’ This option is used to identify the operator. This should be changed if different operators use the sampler and especially if the data is to be printed. -
Página 16: Accessories
**LOW BATTERY** Battery must be recharged MOTOR ERROR Motor not working or not connected - OFF The instrument is switching off Accessories Description Cat. No. Spare parts Aluminium aspirating head for contact plates, Ø 55 mm 710-0892 Aluminium aspirating head for Petri dishes, Ø 90 mm 710-0886 SAS Super universal battery charger 710-0993... -
Página 17: Troubleshooting
Troubleshooting Review the information in the table below to troubleshoot operating problems. Problem Cause Solution Unit does not start Battery is low Recharge battery Battery charger is not working Check battery charger and replace if required (Cat. No. 710-0993) Battery is too old Check battery and replace if required Battery discharges after few minutes Battery is low... -
Página 18: Technical Service
(2) years from date of delivery. If a defect is present, VWR will, at its option and cost, repair, replace, or refund the purchase price of this product to the customer, provided it is returned during the warranty period. -
Página 19: Equipment Disposal
Equipment disposal This equipment is marked with the crossed out wheeled bin symbol to indicate that this equipment must not be disposed of with unsorted waste. Instead it's your responsibility to correctly dispose of your equipment at lifecycle end by handing it over to an authorised facility for separate collection and recycling. - Página 20 Table des matières Avertissement..........................21 Informations de sécurité ......................22 Description de l'unité et du kit ....................23 Caractéristiques techniques ....................24 Usage prévu ..........................24 Instructions d'utilisation préliminaires ................... 25 Installation ..........................25 Fonctions ........................... 27 Accessoires ..........................33 Résolution des problèmes .......................
-
Página 21: Avertissement
Avertissement Ce document est la propriété de VWR International PBI S.r.l. - Milan - Italie Il ne peut pas être reproduit ni distribué sans l'autorisation du propriétaire. Brevet en attente Fabriqué par VWR International PBI S.r.l. - Milan, Italie Informations de sécurité... -
Página 22: Description De L'uNité Et Du Kit
Description de l'unité et du kit 1. Mallette de transport souple 9. Bouton « Start » 2. Unité de commande du système SAS IAQ 10. Flèche vers le bas 3. Tête en aluminium 11. Pieds 4. Chargeur de batterie 12. Connexion pour l'imprimante (non utilisée) 5. -
Página 23: Caractéristiques Techniques
Caractéristiques techniques Modèle Boîte de contact SAS IAQ Boîte de Petri SAS IAQ Code Art. 710-0868 710-0919 Débit d'air 100 l/min 100 l/min À utiliser avec Boîtes contact de 55 mm Boîtes de Petri de 90 mm Portable Pile Rechargeable Rechargeable Autonomie des piles 70 000 l... -
Página 24: Instructions D'uTilisation Préliminaires
Instructions d'utilisation préliminaires Instructions d'utilisation préliminaires pour le système SAS Super IAQ 1. Appuyez sur l'interrupteur principal. 2. Appuyez sur le bouton « START » pour prélever le même volume d'air que lors du dernier cycle d'échantillonnage. 3. Pour modifier le volume d'air, utilisez les flèches et sélectionnez « USER MODE » dans le menu. -
Página 25: Clear Record
Liste des menus et des sous-menus d'utilitaires Ce message indique que le préleveur d'air est prêt à échantillonner le volume START FOR XXX indiqué (XXX) une fois le bouton « Start » actionné. Choisissez parmi 8 volumes d'échantillonnage programmables USER MODE Choisissez parmi 8 volumes d'échantillonnage programmables PROGRAM MODE Permet de programmer un démarrage différé... -
Página 26: Fonctions
Installation sur un trépied (en option) Le préleveur SAS SUPER IAQ peut être fixé à une table, sur un trépied de sol ou sur un support mural. Le point de fixation à vis se trouve sous l'unité, entre les deux pieds avant. - Página 27 fonction « PROGRAM MODE » décrite au paragraphe suivant. Mettez l'instrument sous tension et attendez que l'écran principal s'affiche : Appuyez sur les flèches orientées vers le haut ou vers le bas pour atteindre l'affichage suivant : Appuyez sur le bouton « ENTER ». Maintenant, vous pouvez faire défiler les huit volumes d'échantillonnage que l'utilisateur peut définir.
- Página 28 Une fois le volume d'échantillonnage défini, appuyez sur le bouton « ENTER » pour confirmer. L'affichage indique l'ancien volume et le nouveau volume. Appuyez sur les flèches orientées vers le haut ou vers le bas pour sélectionner le premier caractère, puis appuyez sur «...
- Página 29 « UTILITY MODE » Avec cette fonction, il est possible de modifier tous les réglages du préleveur d'air. « UTILITY MODE » est divisé en dix sous-menus : Set time, Set Autoswitch, Display Record, Clear Record, Language, Identify et Sampling site. Passez toujours par «...
- Página 30 Sélectionnez les options souhaitées, puis appuyez sur « ENTER » pour confirmer et quitter. Ce réglage est perdu une fois que l'instrument est hors tension. « DISPLAY RECORD » Les 99 derniers échantillons sont mémorisés dans le fichier « DISPLAY RECORD ». Chaque échantillon est identifié...
- Página 31 « LANGUAGE » Le texte des menus peut être affiché dans différentes langues. Sélectionnez « LANGUAGE » à partir de « UTILITY MODE » : Appuyez sur « ENTER » pour afficher la liste de toutes les langues disponibles : Utilisez les flèches orientées vers le haut ou vers le bas pour sélectionner la langue souhaitée, puis appuyez sur «...
-
Página 32: Accessoires
Sélectionnez le caractère désiré à l'aide des flèches orientées vers le haut ou vers le bas, puis confirmez en appuyant sur « ENTER ». Sélectionnez les caractères suivants et confirmez-les en appuyant sur « ENTER ». Les valeurs sélectionnées sont mémorisées, et elles sont conservées même après la mise hors tension de l'instrument. -
Página 33: Résolution Des Problèmes
Résolution des problèmes Pour résoudre les problèmes de fonctionnement, reportez-vous aux informations figurant dans le tableau ci-dessous. Problème Cause Solution Niveau de batterie faible Rechargez la batterie L'unité ne démarre pas Le chargeur de batterie ne fonctionne Vérifiez le chargeur de batterie et remplacez-le si nécessaire (code art. -
Página 34: Service Technique
VWR International garantit ce produit pièces et main-d'œuvre pour une durée de deux (2) ans à compter de la date de livraison. En cas de vice, VWR pourra, à sa discrétion et à ses frais, réparer, remplacer ou rembourser au client le prix d'achat du produit, à condition qu'il lui soit retourné au cours de la période de garantie. -
Página 35: Elimination Des Déchets De Cet Équipement
Elimination des déchets de cet équipement Cet équipement est muni du symbole de la poubelle rayée, cela veut dire que cet équipement ne peut pas être éliminé comme les déchets résiduels. Au lieu de cela, vous êtes responsable d’éliminer l'équipement dûment en donnant celui-ci à... - Página 36 Inhaltsverzeichnis Warnung ............................. 37 Sicherheitshinweise ........................37 Beschreibung des Geräts ......................38 Technische Daten ........................39 Verwendungszweck ........................39 Kurzanleitung ..........................40 Installation ..........................41 Funktionen ..........................42 Zubehör ............................48 Problembehebung ........................49 ...
-
Página 37: Warnung
Warnung Das vorliegende Dokument ist Eigentum von VWR International PBI S.r.l., Mailand, Italien Es darf ohne Genehmigung des Eigentümers nicht dupliziert oder verteilt werden. Zum Patent angemeldet Hergestellt von VWR International PBI S.r.l., Mailand, Italien Sicherheitshinweise Das Gerät nur für den vorgesehen Zweck verwenden. -
Página 38: Beschreibung Des Geräts
Beschreibung des Geräts 1. Gerätetasche 9. Taste „Start“ 2. SAS-IAQ-Steuereinheit 10. Pfeil nach unten 3. Aluminiumkopf 11. Standfüße 4. Ladegerät 12. Drucker-Anschluss (nicht verwendet) 5. Fernsteuerung 13. Hauptschalter 6. Taste „Clear“ 14. Seriennummer 7. Taste „Enter“ 15. CE-Kennzeichnung 8. Pfeil nach oben 16. -
Página 39: Technische Daten
Technische Daten Modell SAS-IAQ-Kontakt SAS-IAQ-Petri Best.-Nr. 710-0868 710-0919 Luftstrom 100 l/min 100 l/min Verwendung mit 55-mm-Abklatschplatten 90-mm-Petrischalen Tragbar Batterie Wiederaufladbar Wiederaufladbar Batterielaufzeit 70 000 l 70 000 l Verwendungszweck Funktionsprinzip Das Surface Air System (SAS, Oberflächen-Luft-System) umfasst mehrere Modelle, die auf dem gleichen Funktionsprinzip beruhen: Luft wird mit einer festen Geschwindigkeit über einen variablen Zeitraum durch einen Entnahmekopf angesaugt, der eine Reihe von speziell konstruierten kleinen Bohrungen aufweist. -
Página 40: Kurzanleitung
Kurzanleitung Kurzanleitung für SAS Super IAQ 1. Hauptschalter drücken. 2. Die Taste „START“ drücken, um das gleiche Luftvolumen wie beim letzten Probenahmezyklus zu entnehmen. 3. Zur Änderung des Luftvolumens mit Hilfe der Pfeiltasten „USER MODE“ im Menü wählen. 4. Für Änderungen der Einstellungen die Bedienungsanleitung heranziehen. -
Página 41: Clear Record
Menüs und Untermenüs Diese Meldung gibt an, dass der Luftkeimsammler nach dem Drücken der Taste START FOR XXX „Start“ zur Entnahme des angezeigten Volumens bereit ist. Auswahl zwischen 8 programmierbaren Sammelvolumen USER MODE Anpassung der 8 programmierbaren Sammelvolumen PROGRAM MODE Einstellung eines verzögerten Starts DELAY MODE Führt zum folgenden Untermenü:... -
Página 42: Funktionen
Nährmedium mit der Innenfläche des Ansaugkopfs in Kontakt kommt. Installation des Stativs (optional) Das SAS SUPER IAQ kann an einem Tisch-/Bodenstativ oder einer Wandhalterung befestigt werden. Das Schraubgewinde befindet sich unten am Gerät zwischen den beiden vorderen Standfüßen. - Página 43 Das Gerät einschalten und warten, bis das Hauptbild angezeigt wird: Den Pfeil nach oben oder nach unten drücken, um zu folgender Anzeige zu gelangen: Die Taste „ENTER“ drücken. Nun kann durch die acht benutzerdefinierten Sammelvolumen geblättert werden. Nach Anwahl des gewünschten Entnahmevolumens die Taste „ENTER“ zur Bestätigung drücken. Die Taste „START“...
- Página 44 Auf dem Display werden das alte und das neue Volumen angezeigt. Den Pfeil nach oben oder nach unten drücken, um die erste Ziffer auszuwählen, und zur Bestätigung „ENTER“ drücken. Den Pfeil nach oben oder nach unten drücken, um die zweite Ziffer auszuwählen, und zur Bestätigung „ENTER“...
- Página 45 Der „UTILITY MODE“ ist in die folgenden sieben Untermenüs gegliedert: Set time; Set Autoswitch; Display Record; Clear Record; Language; Identify; Sampling site. Diese Untermenüs sind jeweils aus dem „UTILITY MODE“ zu erreichen. Das Gerät einschalten und warten, bis das Hauptbild angezeigt wird: Den Pfeil nach oben oder nach unten drücken, um zu folgender Anzeige zu gelangen: Nach Drücken der Taste „ENTER“...
- Página 46 „DISPLAY RECORD“ Die letzten 99 Proben werden in der Datei „DISPLAY RECORD“ gespeichert. Die einzelnen Proben sind in chronologischer Reihenfolge sortiert und Datum, Uhrzeit, Benutzer, Ort und Volumen der entnommenen Luft (nur nach vollständig durchlaufenem Zyklus) werden angegeben. Im UTILITY MODE die Option „DISPLAY RECORD“ wählen. „ENTER“...
- Página 47 ENTER drücken, um alle verfügbaren Sprachen anzuzeigen: Den Pfeil nach oben oder nach unten drücken, um die gewünschte Sprache auszuwählen, und zur Bestätigung „ENTER“ drücken. Sechs Sprachen stehen zur Verfügung: Englisch, Französisch, Spanisch, Deutsch, Portugiesisch und Italienisch. „IDENTIFY“ Diese Option dient zur Identifikation des Benutzers. Die Identität sollte geändert werden, wenn der Sammler von verschiedenen Benutzern verwendet wird, und insbesondere dann, wenn die Daten gedruckt werden sollen.
-
Página 48: Zubehör
Liste der Systemmeldungen Neben den zuvor bereits beschriebenen Meldungen können folgende Meldungen angezeigt werden: **LOW BATTERY** Der Akku muss aufgeladen werden. MOTOR ERROR Der Motor funktioniert nicht oder ist nicht angeschlossen. - OFF Das Gerät wird ausgeschaltet. Zubehör Bezeichnung Best.-Nr. Ersatzteile Aluminium-Ansaugkopf für Abklatschplatten, Ø... -
Página 49: Problembehebung
Problembehebung In der nachstehenden Tabelle finden Sie Informationen zur Behebung von Problemen beim Betrieb. Problem Ursache Lösung Der Akku ist leer. Akku aufladen. Gerät startet nicht. Das Akkuladegerät funktioniert nicht. Akkuladegerät prüfen und ggf. ersetzen (Best.-Nr. 710-0993). Der Akku ist zu alt. Akku prüfen und ggf. -
Página 50: Technischer Kundendienst
Bewilligungen zu beantragen und zu erhalten, die erforderlich sind, das erworbene Produkt an seinem Standort zu betreiben und zu nutzen. VWR kann nicht haftbar gemacht werden, wenn der Kunde es unterlässt, die hierzu erforderlichen Handlungen vorzunehmen, oder dafür, dass die notwendigen Genehmigungen oder Bewilligungen nicht erteilt werden, es sei denn, eine entsprechende Ablehnung ist auf einen Mangel des Produktes zurückzuführen. -
Página 51: Entsorgung Des Produktes
Entsorgung des Produktes Dieses Produkt ist mit dem Symbol der „durchgestrichenen Mülltonne“ versehen. Das bedeutet, dass dieses Produkt nicht mit dem Restmüll entsorgt werden darf. Stattdessen ist es in Ihrer Verantwortung, das Produkt am Ende der Nutzungsdauer ordnungsgemäß zu entsorgen, indem Sie es an eine autorisierte Entsorgungseinrichtung geben, die das Produkt separat sammelt und dem Recycling zuführt. - Página 52 Sommario Avvertenze ..........................53 Norme di sicurezza ........................53 Descrizione del kit e dello strumento ..................54 Caratteristiche tecniche ......................55 Uso previsto ..........................55 Istruzioni operative in breve ....................56 Installazione ..........................56 Funzioni ............................. 57 Accessori ........................... 64 Risoluzione dei problemi ......................
-
Página 53: Avvertenze
Avvertenze Il presente documento è di proprietà di VWR International PBI S.r.l. - Milano (Italia) È vietata la duplicazione o la distribuzione senza l'autorizzazione del proprietario. In attesa di brevetto Fabbricato da VWR International PBI S.r.l. - Milano (Italia) Norme di sicurezza Utilizzare il dispositivo solo per gli scopi indicati. -
Página 54: Descrizione Del Kit E Dello Strumento
Descrizione del kit e dello strumento 1. Valigetta di trasporto morbida 10. Freccia giù 2. Unità di controllo SAS IAQ 11. Piedini di appoggio 3. Testata in alluminio 12. Collegamento per stampante (non 4. Caricabatterie utilizzato) 5. Comando a distanza 13. -
Página 55: Caratteristiche Tecniche
Caratteristiche tecniche Modello SAS IAQ Contact SAS IAQ Petri Cod. prod. 710-0868 710-0919 Flusso d'aria 100 l/min 100 l/min Utilizzare con Piastre a contatto da 55 mm Capsule di Petri da 90 mm Portatile Sì Sì Batteria Ricaricabile Ricaricabile Durata delle batterie 70.000 l 70.000 l Uso previsto... -
Página 56: Istruzioni Operative In Breve
Istruzioni operative in breve Istruzioni operative in breve per SAS Super IAQ 1. Premere l'interruttore principale. 2. Premere il pulsante "START" per campionare lo stesso volume d'aria dell'ultimo ciclo di campionamento. 3. Per modificare il volume d'aria, utilizzare i tasti freccia e selezionare "USER MODE" dal menu. -
Página 57: Sampling Site
Elenco dei menu principali e secondari Questo messaggio indica che il campionatore d'aria è pronto per campionare il START FOR XXX volume indicato (XXX) dopo aver premuto il pulsante "Start" Scegliere tra 8 volumi di campionamento programmabili USER MODE Modificare gli 8 volumi di campionamento programmabili PROGRAM MODE Impostare l'avvio in ritardo DELAY MODE... -
Página 58: Funzioni
Montaggio del cavalletto (opzionale) Il campionatore SAS SUPER IAQ può essere montato sul tavolo, su un cavalletto da pavimento o su un supporto a parete. Il collegamento a vite si trova sotto l'unità, tra i due piedini anteriori. - Página 59 Premere le frecce su e giù fino a visualizzare: Premere il pulsante "ENTER"; scorrere tra gli otto volumi di campionamento definiti dall'utente. Dopo aver individuato il volume di campionamento desiderato, premere il pulsante "ENTER" per confermare. Premere il pulsante "START" per avviare il ciclo di campionamento: In totale, sono disponibili otto programmi "USER MODE".
- Página 60 Premere le frecce su o giù per selezionare la prima cifra e premere "ENTER" per confermare. Premere le frecce su o giù per selezionare la seconda cifra e premere "ENTER" per confermare. "DELAY MODE" Questa funzione consente di ritardare l'inizio del ciclo di campionamento. Se è stato selezionato un ritardo, il ciclo di campionamento inizia allo scadere di tale ritardo.
- Página 61 Premere le frecce su e giù fino a visualizzare: Premere il pulsante "ENTER"; viene mostrato il primo menu secondario. "SET TIME" Questa opzione consente di programmare giorno, mese, anno e ora. Premere "ENTER" e le frecce su e giù per modificare il mese Premere "ENTER"...
- Página 62 Premere "ENTER" per visualizzare i valori memorizzati: Vengono registrati i parametri seguenti: Numero progressivo, mese e giorno, ora, identificazione/sito, volume di campionamento. Se la memoria non contiene dati, sul display viene visualizzato: "CLEAR RECORDS" Questa opzione consente di cancellare tutti i dati memorizzati in "DISPLAY RECORD". Prima di iniziare questa procedura, accertarsi che i dati esistenti non siano necessari o che siano stati scaricati.
- Página 63 Inglese, francese, spagnolo, tedesco, portoghese e italiano. "IDENTIFY" Questa opzione consente di identificare l'operatore; può essere modificata se il campionatore viene utilizzato da diversi operatori e specialmente se i dati devono essere stampati. In "UTILITY MODE", selezionare "IDENTIFY". Premere "ENTER" per modificare il codice identificativo: Selezionare il carattere desiderato utilizzando le frecce su o giù...
-
Página 64: Accessori
Accessori Descrizione Cod. prod. Pezzi di ricambio Testata di aspirazione in alluminio per piastre a contatto, Ø 55 mm 710-0892 Testata di aspirazione in alluminio per capsule di Petri, Ø 90 mm 710-0886 Caricabatterie universale SAS Super 710-0993 Comando a distanza 710-0962 Valigetta di trasporto morbida 710-0896... -
Página 65: Risoluzione Dei Problemi
Risoluzione dei problemi Leggere le informazioni riportate nella tabella seguente per risolvere eventuali problemi di funzionamento. Problema Causa Soluzione La batteria è scarica Ricaricare la batteria Lo strumento non si avvia Caricabatterie non funzionante Controllare il caricabatterie e sostituire, se necessario (Cod. Prod. 710-0993) Batteria troppo vecchia Controllare la batteria e sostituire, se necessario... -
Página 66: Assistenza Tecnica
VWR International garantisce per questo prodotto l'assenza da difetti nei materiali e di fabbricazione per un periodo di due (2) anni dalla data di consegna. In caso contrario, VWR provvederà, a sua discrezione e a proprie spese, alla riparazione, sostituzione o al rimborso del prezzo di acquisto del prodotto al cliente, purché... -
Página 67: Smaltimento Dell'aPparecchio
Smaltimento dell’apparecchio Questo apparecchio è provvisto del simbolo del cassonetto barrato, il che significa che il prodotto non può essere smaltito con i rifiuti non riciclabili. Avete invece la responsabilità di smaltire regolarmente il prodotto al termine della vita in servizio, consegnandolo ad un servizio autorizzato che lo raccolga separatamente e lo avvii al riciclaggio. Siete inoltre responsabili della decontaminazione dell’apparecchio in caso di inquinamento biologico, chimico o radiologico, per non danneggiare la salute delle persone incaricate dello smaltimento e del riciclaggio. - Página 68 Índice Advertencia ..........................69 Información de seguridad ......................69 Kit y descripción de la unidad ....................70 Características técnicas ......................71 Uso previsto ..........................71 Breves instrucciones de funcionamiento ................72 Instalación ..........................72 Funciones ..........................74 Accesorios ..........................80 Resolución de problemas ......................
-
Página 69: Advertencia
Advertencia Este documento es propiedad de VWR International PBI S.r.l. - Milán - Italia Queda prohibida su reproducción o distribución sin la autorización del propietario. Pendiente de patente Fabricado por VWR International PBI S.r.l. - Milán, Italia Información de seguridad Utilice el dispositivo solo para los fines indicados. -
Página 70: Kit Y Descripción De La Unidad
Kit y descripción de la unidad 1. Maletín de transporte blando 9. Botón “Start” (Inicio) 2. Unidad de control SAS IAQ 10. Flecha “abajo” 3. Cabezal de aluminio 11. Pies de soporte 4. Cargador de batería 12. Conexión a impresora (no se usa) 5. -
Página 71: Características Técnicas
Características técnicas Modelo SAS IAQ Contact SAS IAQ Petri Referencia 710-0868 710-0919 Flujo de aire 100 l/min 100 l/min Usar con Placas de contacto de 55 mm Placas Petri de 90 mm Portátil Sí Sí Batería Recargable Recargable Vida útil de la batería 70 000 l 70 000 l Uso previsto... -
Página 72: Breves Instrucciones De Funcionamiento
55 mm o placas de Petri estándar de 90 mm. Breves instrucciones de funcionamiento Breves instrucciones de funcionamiento para SAS Super IAQ 1. Pulse el interruptor principal. 2. Pulse el botón ‘START’ para muestrear el mismo volumen de aire que en el último ciclo de muestreo. -
Página 73: Display Record
Realice la incubación. Haga recuento de las colonias, registre los resultados en el informe de muestreo microbiológico de aire y lea los resultados. Lista de menús y submenús Este mensaje indica que el muestreador de aire está preparado para muestrear el START FOR XXX volumen que aparece (XXX) tras pulsar el botón ‘Start’... -
Página 74: Funciones
Petri desechable de 90 mm con no más de 18 - 20 ml de agar. Instalación del trípode (opcional) El SAS SUPER IAQ se puede fijar a una mesa, a un trípode para suelo o a un soporte de pared. La conexión roscada se encuentra debajo de la unidad, entre los dos pies frontales. -
Página 75: 'PRogram Volume' (Modificación Del Valor De Un Volumen Almacenado)
‘USER MODE’ Se pueden programar hasta ocho volúmenes adicionales en la unidad. Los volúmenes seleccionables por el usuario se pueden seleccionar en ‘USER MODE’, mientras que los volúmenes seleccionables se pueden modificar con la función ‘PROGRAM MODE’ que se explica en el siguiente párrafo. Encienda el instrumento y espere hasta que aparezca la pantalla principal: Pulse las flechas “arriba”... - Página 76 Una vez establecido el volumen de la muestra, pulse el botón ‘ENTER’ para confirmarlo. En la pantalla se verá el nuevo volumen y el anterior. Pulse las flechas “arriba” o “abajo” para seleccionar el primer dígito y pulse ‘ENTER’ para confirmarlo. Pulse las flechas “arriba”...
-
Página 77: Utility Mode
‘UTILITY MODE’ Con esta función es posible modificar todos los parámetros del muestreador de aire. ‘UTILITY MODE’ se divide en diez submenús: Set time; Set Autoswitch; Display Record; Clear Record; Language; Identify; Sampling site. Para llegar a uno de estos submenús, empiece siempre a partir de ‘UTILITY MODE’. Encienda el instrumento y espere hasta que aparezca la pantalla principal: Pulse las flechas “arriba”... - Página 78 ‘DISPLAY RECORD’ Las últimas 99 muestras se memorizan en el archivo ‘DISPLAY RECORD’. Cada muestra se identifica por orden cronológico y muestra la fecha, la hora, el operador, el lugar y el volumen del aire muestreado. En UTILITY MODE seleccione ‘DISPLAY RECORD’. Pulse ‘ENTER’...
-
Página 79: Lista De Mensajes Del Sistema
Utilice las flechas “arriba” o “abajo” para seleccionar el idioma que desee y pulse ‘ENTER’ para confirmarlo. Hay disponibles seis idiomas: Inglés, francés, español, alemán, portugués e italiano. ‘INDENTIFY’ Esta opción se usa para identificar al operario. Debe cambiarse si varios operarios usan el muestreador y especialmente si se van a imprimir los datos. -
Página 80: Accesorios
Además de los mensajes descritos en el apartado anterior, también pueden aparecer los mensajes siguientes: **LOW BATTERY** Debe recargarse la batería. MOTOR ERROR El motor no funciona o no está conectado. - OFF El instrumento está apagado. Accesorios Descripción Referencia Piezas de repuesto Cabezal de aspiración de aluminio para placas de contacto de 55 mm de Ø... -
Página 81: Resolución De Problemas
Resolución de problemas Revise la información de la tabla siguiente para solucionar los problemas de funcionamiento. Problema Causa Solución La batería está agotada Recargue la batería La unidad no se enciende El cargador de la batería no funciona Compruebe el cargador de la batería y cámbielo si fuera necesario (referencia 710-0993) La batería es demasiado vieja... -
Página 82: Servicio Técnico
El cliente tiene la responsabilidad de solicitar y conseguir las autorizaciones reglamentarias necesarias o cualquier otro tipo de autorización necesaria para utilizar el producto en su entorno local. VWR no se responsabiliza de cualquier omisión relacionada o de la no obtención de la autorización necesaria, a... -
Página 83: Eliminación Del Equipo
Eliminación del equipo Este equipo se halla identificado con el símbolo de un cubo de basura tachado, lo que significa que no debe eliminarse en los desechos residuales habituales. En lugar de ello, usted es responsable de eliminar el equipo de forma adecuada al finalizar su vida útil, llevándolo a un centro autorizado que lo recoja y proceda a su reciclaje. - Página 84 Índice Aviso............................82 Informações de segurança ....................... 85 Descrição da unidade e do kit ....................86 Especificações técnicas ......................87 Fins a que se destina ........................ 87 Instruções de funcionamento resumidas ................88 Instalação ........................... 88 Funções ............................. 90 Acessórios ..........................97 Resolução de problemas ......................
-
Página 85: Aviso
Aviso O presente documento é propriedade da VWR International PBI S.r.l. - Milão - Itália Não pode ser reproduzido nem distribuído sem autorização do proprietário. Patente pendente Fabricado pela VWR International PBI S.r.l. - Milão, Itália Informações de segurança Utilize o dispositivo somente para os fins indicados. -
Página 86: Descrição Da Unidade E Do Kit
Descrição da unidade e do kit 1. Bolsa de transporte maleável 9. Botão "Start" (Iniciar) 2. Unidade de controlo SAS IAQ 10. Seta "Down" (Para baixo) 3. Cabeça em alumínio 11. Pés verticais 4. Carregador de pilhas 12. Ligação da impressora (não utilizada) 5. -
Página 87: Especificações Técnicas
Especificações técnicas Modelo SAS IAQ Contact SAS IAQ Petri Ref.ª 710-0868 710-0919 Fluxo de ar 100 l/min 100 l/min Utilização com Placas de contacto de 55 mm Placas de Petri de 90 mm Portátil Pilha Recarregável Recarregável Vida útil da pilha 70 000 l 70 000 l Fins a que se destina... -
Página 88: Instruções De Funcionamento Resumidas
6. Flexibilidade de seleção entre placas de contacto de 55 mm ou placas de Petri standard de 90 mm. Instruções de funcionamento resumidas Instruções de funcionamento resumidas do SAS Super IAQ 1. Prima o interruptor principal. 2. Prima o botão "START" (Iniciar) para uma amostragem do volume de ar igual à do último ciclo de amostragem. -
Página 89: Program Mode
No final do ciclo, retire a cabeça de aspiração. Feche e retire a placa. Efetue a respetiva incubação. Conte as colónias, registe os resultados no relatório de amostragem de ar e leia os resultados. Lista de menus e submenus de utilitários Esta mensagem indica que o amostrador de ar está... -
Página 90: Funções
Instalação em tripé (opcional) O SAS SUPER IAQ pode ser fixado a uma mesa, a um tripé ou a um suporte de parede. A ligação roscada situa-se sob a unidade entre os dois pés frontais. -
Página 91: "User Mode" (Modo De Utilizador)
Prima o botão "START" (Iniciar) para começar um ciclo de amostragem com o volume de ar apresentado. "USER MODE" (Modo de utilizador) É possível programar, no máximo, oito volumes adicionais na unidade. Pode selecionar os volumes selecionáveis pelo utilizador no "USER MODE" (Modo de utilizador), sendo que é possível modificar os volumes selecionáveis através da função "PROGRAM MODE"... -
Página 92: "Delay Mode" (Modo De Retardamento)
Prima o botão "ENTER" para navegar pelos oito volumes de amostragem selecionáveis pelo utilizador. Selecione um volume premindo as setas "UP" (Para cima) ou "DOWN" (Para baixo) e, em seguida, prima "ENTER": Após a definição do volume de amostragem, prima o botão "ENTER" para confirmar. O ecrã... -
Página 93: "Utility Mode" (Modo De Utilitários)
Selecione o tempo de retardamento pretendido com as setas "Up" (Para cima) ou "Down" (Para baixo). Os valores de retardamento selecionáveis são de 1, 2, 3, 5, 10 ou 20 minutos. Prima o botão "ENTER" para confirmar. Após premir o botão "START" (Iniciar) para selecionar um retardamento, é apresentada uma mensagem de aviso de retardamento. -
Página 94: "Display Record" (Display De Registos)
"SET AUTOSWITCH" (DEFINIR ATIVAÇÃO/DESATIVAÇÃO AUTOMÁTICA) Para poupar o consumo das pilhas, o SAS desliga-se automaticamente após 4 minutos. A opção "SET AUTOSWITCH" (Definir ativação/desativação automática) é utilizada para ativar ou desativar a desativação automática. No "UTILITY MODE" (Modo de utilitários), selecione "SET AUTOSWITCH" (Definir ativação/desativação automática): Prima "ENTER"... -
Página 95: "Identify" (Identificar)
transferidos. No "UTILITY MODE" (Modo de utilitários), selecione "CLEAR RECORD" (Eliminar registos). Prima "ENTER" para eliminar todos os dados registados e o ecrã apresentará o estado de reposição: "LANGUAGE" (Idioma) Pode selecionar um dos diferentes idiomas para a apresentação do texto de menu. No "UTILITY MODE"... -
Página 96: "Sampling Site" (Local De Amostragem)
"SAMPLING SITE" (LOCAL DE AMOSTRAGEM) A identificação do local deve ser alterada caso as amostras tenham sido colhidas em diferentes locais, especialmente se for necessário imprimir os resultados. No "UTILITY MODE" (Modo de utilitários), selecione "SAMPLING SITE" (Local de amostragem). Prima "ENTER"... -
Página 97: Resolução De Problemas
Outras cabeças de aspiração para placas de Petri, Ø de 90 mm Cabeça de aspiração em aço inoxidável para placas de Petri, Ø de 90 mm 710-0878 Cabeça diária esterilizada para caixas de Petri, Ø de 90 mm 710-0891 Outros acessórios Bolsa de transporte em alumínio 710-0875 Bolsa de transporte autoclavável para transporte biológico... -
Página 98: Conformidade Com Leis E Normas Locais
A VWR International garante que este produto está isento de defeitos de material e de fabrico por um período de dois (2) anos a partir da data de fornecimento. Caso seja detectado um defeito, a VWR irá, a seu crédito e custos, reparar, substituir ou reembolsar o preço de compra deste produto ao cliente, desde que o produto seja devolvido durante o período de garantia. -
Página 99: Eliminação Do Equipamento
Eliminação do equipamento Este equipamento contém o símbolo do contentor do lixo com uma cruz para indicar que não deve ser eliminado no lixo comum. Em vez disso, é da sua responsabilidade eliminar o seu equipamento corretamente no fim da vida útil, entregando-o a uma empresa autorizada para a recolha e reciclagem. -
Página 100: Your Distributor
Your Distributor Australia Germany Poland VWR International Pty. LTD VWR International GmbH VWR International Sp. z o.o. Level 1, Unit 1a/60 Enterprise Place Hilpertstraße 20a Limbowa 5 Tingalpa D - 64295 Darmstadt 80-175 Gdansk QLD 4173 Australia Freecall: 0800 702 00 07 Tel.: 058 32 38 200...