Fermax VEO DUOX Manual De Instalador
Ocultar thumbs
Ver también para VEO DUOX:
- Manual de instalador (112 páginas) ,
- Manual del usuario (33 páginas) ,
- Guía inicio rápida (17 páginas)

Manuales relacionados para Fermax VEO DUOX


Resumen de contenidos para Fermax VEO DUOX
- Página 1 MONITOR VEO DUOX DUOX VEO MONITOR MANUAL DE INSTALADOR Y USUARIO E S P A Ñ O L USER& INSTALLER’S MANUAL E N G L I S H...
- Página 2 Fermax Electrónica desarrolla y fabrica equipos de prestigio que cumplen los más altos estándares de diseño y tecnología. Su monitor de videoportero FERMAX le permitirá comunicarse con la placa de calle, ver la persona que le está llamando y abrirle la puerta de entrada si así lo desea.
-
Página 3: Tabla De Contenido
DUOX X X X X VEO DUOX X X X X VEO INDICE MONITOR DUOX ......................4 Instalación Monitor .................... 4 Conexiones ......................4 Funciones disponibles ..................5 Monitor Veo: Descripción botones ..............5 Características Técnicas .................. 6 Pantallas: Menú Administrador y Menú Usuario........... 7 Programación: Pantalla Menú... -
Página 4: Instalación Monitor
DUOX X X X X VEO DUOX X X X X VEO INSTALACIÓN MONITOR Montaje Desmontaje CONEXIONES CASCADA DISTRIBUCIÓN ACTIVADOR DE LUCES ADS ADS LIGHT COMMANDER REF. 2438 Max. 2A 110-240Vac 50-60Hz +A -A F1 2A 110-240Vac 110-240Vac ref. 2040 AMPLIACIONES Pag 4... -
Página 5: Funciones Disponibles
DUOX X X X X VEO DUOX X X X X VEO Bin, Bin: datos, audio y video entrada. Bout, Bout: datos, audio y video salida (conexión en cascada). T, -: pulsador de llamada puerta vivienda (P1). A+, -: conexión Prolongador de llamada ref 2040 / Activador de Luces y timbres ref. 2438 F1: Funciones adicionales. -
Página 6: Características Técnicas
DUOX X X X X VEO DUOX X X X X VEO Si se configura modo Pánico en la Conserjería, automáticamente se configurará en los monitores el modo de Llamada Pánico. Al desactivar el modo en la conserjería también se desactivará en los monitores. Al pulsar el botón F1 se transmite el comando correspondiente por el bus. -
Página 7: Pantallas: Menú Administrador Y Menú Usuario
DUOX X X X X VEO DUOX X X X X VEO PANTALLAS: MENÚ ADMINISTRADOR y MENÚ USUARIO. Cómo acceder a éstas. Pantalla: Menú USUARIO Pantalla: Menú ADMINISTRADOR Para acceder al Menú de Administrador cuando el monitor está programado se deben realizar los siguientes pasos: - Pulsar el botón MENÚ, se accede a la pantalla del Menú... -
Página 8: Programación: Pantalla Menú Administrador
DUOX X X X X VEO DUOX X X X X VEO Programación: Pantalla MENÚ ADMINISTRADOR Existen tres opciones: 1. Programación Monitor Veo. 2. Reset de parámetros. 3. Acceso código QR del manual del producto. 1. Menú ADMINISTRADOR: PROGRAMACIÓN MONITOR VEO. ¡El monitor no funcionará... - Página 9 DUOX X X X X VEO DUOX X X X X VEO Opción seleccionada mediante la línea blanca abajo del icono. Pulsar ü, se escucha un bip en el monitor. Automáticamente el monitor se conecta con la placa de calle activando la cámara. Introducir desde la placa el código de llamada para ese monitor.
- Página 10 DUOX X X X X VEO DUOX X X X X VEO 2. Menú ADMINISTRADOR: RESET DE PARÁMETROS El instalador puede resetear los parámetros para dejar al monitor con la configuración por defecto, seleccionando y confirmando la opción. Los parámetros son: dirección del monitor, melodías de placa y conserjería, volumen de llamada y conversación, ajustes de video: brillo/contraste/color, modo no molestar desactivado y borrado de direcciones de envío a Conserjerías estándars y de pánico.
-
Página 11: Sección: Manual De Usuario
Gracias a su menú en pantalla se incluyen nuevas prestaciones para la configuración de los parámetros del monitor. Esperamos disfrute de sus funcionalidades. www.fermax.com Pag 11... -
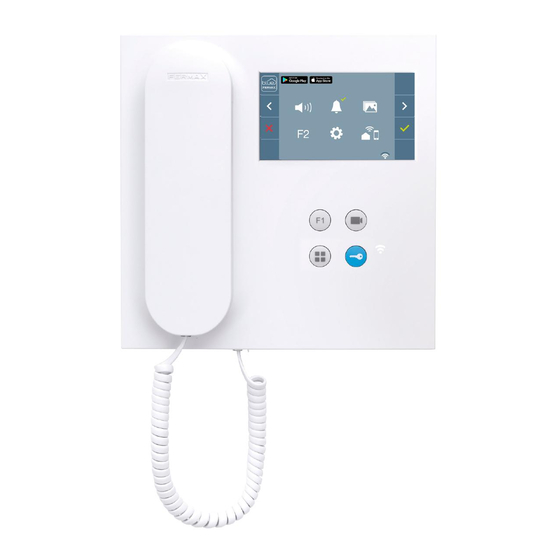
Página 12: Monitor Veo
DUOX X X X X VEO DUOX X X X X VEO MONITOR VEO Botones Botón de abrepuertas / llamada a conserje. · Estando en comunicación con la Placa de Calle (audio solo o video sólo o audio+video), al pulsar este botón se activa el abrepuertas. ·... -
Página 13: Programación: Pantalla Menú Usuario
DUOX X X X X VEO DUOX X X X X VEO Programación: Pantalla MENÚ USUARIO Existen las siguientes opciones: 1. Volumen. 2. Modo no molestar 3. F2 4. Configuración. 1. Menú USUARIO: Ajuste volumen melodías. En primer lugar se muestra y se escucha el volumen actual que podrá ir aumentando o decrementando con los botones correspondientes a las flechas indicadas en pantalla. -
Página 14: Menú Usuario: Configuración
DUOX X X X X VEO DUOX X X X X VEO 3. Menú USUARIO: Función F2. La función F2 envía un comando de activación auxiliar para: relés, decoders...etc. En la pan- talla se notificará la acción: F2 OK durante 3 segundos. -
Página 15: 2) Selección Melodía Conserjería
DUOX X X X X VEO DUOX X X X X VEO 4.1.2) Selección melodía conserjería Seleccionando esta opción se puede cambiar la melodía que se escuchará en el monitor cuando la conserjería realice una llamada al monitor. Una vez seleccionada esta opción, muestra y se escucha la melodía actual, pulsando el botón «+»... -
Página 16: Ajustes: Video Y Audio
DUOX X X X X VEO DUOX X X X X VEO AJUSTES: Video y Audio Ajuste Video: Brillo - Contraste - Color El monitor permite realizar los ajustes de brillo, contraste y color mientras se haya recibido una llamada (sin descolgar) o realizando un autoencendido «cámara» , (ver capítulo Funcionamiento: Autoencendido). -
Página 17: Audio
DUOX X X X X VEO DUOX X X X X VEO Ajuste Audio Durante el tiempo que está abierto el canal de audio se puede regular el volumen del audio. mediante un menú contextual que aparecerá en pantalla. Para realizar el ajuste de audio, pulsar el botón «MENU»... - Página 18 Fermax Electronica manufactures and develops top class equipment which fulfil the highest design and technology standards. Your FERMAX video door entry system will allow you to communicate with the entry panel, see who is calling you and open the front door if you wish.
- Página 19 DUOX X X X X VEO DUOX X X X X VEO INDEX DUOX MONITOR ......................4 Installing the Monitor ..................4 Connections ....................... 4 Available Functions ................... 5 Veo Monitor: Button description ............... 5 Technical Characteristics ................. 6 Screens: Administrator Menu and User Menu..........7 Programming: Administrator Menu Screen ............
-
Página 20: Installing The Monitor
DUOX X X X X VEO DUOX X X X X VEO INSTALLING THE MONITOR Assembly Disassembly CONNECTIONS CASCADE DISTRIBUTION ACTIVADOR DE LUCES ADS ADS LIGHT COMMANDER REF. 2438 Max. 2A 110-240Vac 50-60Hz +A -A F1 2A 110-240Vac 110-240Vac Ref. 2040 EXTENSIONS Page 4... -
Página 21: Available Functions
DUOX X X X X VEO DUOX X X X X VEO Bin, Bin: data, audio and video input. Bout, Bout: data, audio and video output (cascade connection) T, -: Call Button for Residential Door (P1) A+, -: Call extension connection ref 2040 / Light and bell activator ref. 2438 F1: Additional functions Available Functions... - Página 22 DUOX X X X X VEO DUOX X X X X VEO If Panic Mode is configured in the Guard Unit, Panic Call mode is automatically configured in the monitors. Upon deactivating this mode in the guard unit, it also deactivates the monitors.
-
Página 23: Screens: Administrator Menu And User Menu
DUOX X X X X VEO DUOX X X X X VEO SCREENS: ADMINISTRATOR MENU AND USER MENU. How to access these. Screen: USER Menu Screen: ADMINISTRATOR Menu To access the Administrator Menu when the monitor is programmed you must follow these steps: - Press the MENU button, access the screen on the User Menu. -
Página 24: Programming: Administrator Menu Screen
DUOX X X X X VEO DUOX X X X X VEO Programming: ADMINISTRATOR MENU Screen There are three options: 1. Programming the Veo monitor 2. Resetting parameters 3. QR access code for the product manual 1. ADMINISTRATOR Menu: PROGRAMMING THE VEO MONITOR. The monitor will not function until it has been programmed! The red led blinking rapidly indicates that the monitor has not been programmed. - Página 25 DUOX X X X X VEO DUOX X X X X VEO The selected option is displayed with the white line under the icon. Press ü, and you hear a beep on the monitor. The monitor will automatically connect with the entry panel, activating the camera. Enter the calling code for this monitor from the panel.
- Página 26 DUOX X X X X VEO DUOX X X X X VEO 2. ADMINISTRATOR Menu: RESETTING PARAMETERS The installer may reset the parameters to their monitor's default configuration, selecting and confirming this option. The parameters are: monitor address, panel and guard unit ring tone, call volume and conversation, video settings: brightness/contrast/colour, do not disturb mode deactivated and delete addresses sent to standard guard units and panic mode.
-
Página 27: Section User Manual
Thanks to its on-screen menu new features are included for configuring the monitor's parameters. We hope you enjoy its range of functions. www.fermax.com. Page 11... -
Página 28: Veo Monitor
DUOX X X X X VEO DUOX X X X X VEO VEO MONITOR Buttons Lock Releases / Call Guard Unit Button. · While in conversation with the Street Panel (only audio, only video or audio+video), pressing it will activate the open door lock-release. ·... -
Página 29: Programming: User Menu Screen
DUOX X X X X VEO DUOX X X X X VEO Programming: USER MENU Screen There are the following options: 1. Volume 2. Do not disturb mode 3. F2 4. Configuration 1. USER Menu: Adjust ring tone volume First of all you see and hear the current volume which can be increased or decreased with the corresponding arrow buttons indicated on the screen. -
Página 30: F2 Function
DUOX X X X X VEO DUOX X X X X VEO 3. USER Menu: F2 Function. The F2 function sends an auxiliary activation command for: relays, decoders...etc. The screen notifies of the action: F2 OK for 3 seconds. This function is the default on the main screen of the user menu. -
Página 31: 2) Select Guard Unit Ring Tone
DUOX X X X X VEO DUOX X X X X VEO 4.1.2) Select guard unit ring tone Selecting this option you can change the ring tone that is heard on the monitor when the guard unit makes a call to a monitor. Once this option is selected, it displays and sounds the current ring tone, pressing the "+"... -
Página 32: Settings: Video And Audio
DUOX X X X X VEO DUOX X X X X VEO SETTINGS: Video and Audio Video adjustments: Brightness - Contrast - Colour The monitor allows you to adjust brightness, contrast and colour while you have received a call (without hanging up) or when performing an auto-start "camera" , (see Functions chapter: Auto-start). -
Página 33: Function
DUOX X X X X VEO DUOX X X X X VEO Audio settings While the audio channel is open the audio's volume can be regulated via a contextual menu on the screen. In order to set the audio, press MENU and a menu screen appears for this setting.