
Resumen de contenidos para HEB inControl Premium BP3NQ1 4BHEB
- Página 1 Premium Blood Pressure Monitor ® with Bluetooth Connectivity Instruction Booklet for model# BP3NQ1-4BHEB...
- Página 3 Important Product and Safety Information Follow Instructions for Use. This document provides important product operation and safety information regarding this Blood Pressure Monitor. Please read this document thoroughly before using the device and keep for future reference. This blood pressure monitor is an automatic digital blood pressure measuring device for use by adults on the upper arm at home or in the doctor’s office.
- Página 4 present tubes or cables may provide a risk of strangulation. • Ensure the cuff tubing is not kinked during use as harmful injury may occur due to the effect of blood flow interference caused by high pressure in the cuff not releasing. DO NOT: Use this device if you think it is damaged or anything appears unusual (e.g.
- Página 5 the batteries to avoid potential battery leakage and damage to the monitor. • When replacing the batteries, ensure all the batteries are replaced simultaneously to avoid battery damage and potential damage to the monitor. Microlife USA does not recommend using rechargeable batteries. •...
- Página 6 TYPE IP20 Protected against solid foreign particles with a diameter of more than 12.5 mm, no protection against water. Keep Dry. Type BF Applied Part Batteries and electronic instruments must be disposed of in accordance with the locally applicable regulations, not with domestic waste. Expected Life Monitor 5 Years Cuff...
- Página 7 Trademark Usage: • Apple, the Apple logo, iPad, and iPhone are trademarks of Apple Inc., regis- tered in the U.S. and other countries. App Store is a service mark of Apple Inc. • Android and Google Play are both trademarks of Google Inc. •...
-
Página 8: Tabla De Contenido
Automatic Blood Pressure Monitor - Instruction Manual Table of contents 1. Introduction 1.1. Your automatic blood pressure monitor ™ 1.2. Gentle+ Measurement System 2. How is blood pressure measured? 2.1. What is blood pressure, and why does it fluctuate? 2.2. Measurement guidelines 2.3. - Página 9 7. Error messages/troubleshooting 8. Care and maintenance 9. Limited warranty 10. Technical specifications 11. How to contact us...
-
Página 10: Introduction
1. Introduction 1.1. Your automatic blood pressure monitor Thank you for purchasing a fully automatic blood pressure monitor. Your moni- tor is designed to provide fast and reliable digital readings of your pulse, and systolic / diastolic blood pressure using the oscillometric method on your upper arm. -
Página 11: How Is Blood Pressure Measured
2. How is blood pressure measured? 2.1. What is blood pressure, and why does it fluctuate? Your level of blood pressure is determined in the circulatory center of the brain and adjusts to a variety of situations through feedback from the nervous system. -
Página 12: What Can I Do To Change My Blood Pressure
Which values are normal? The following standards for assessing high blood pressure in adults have been established by the American Heart Association (AHA) and American College of Cardiology (ACC) in 2017. Additional information • This chart reflects a 2017 update to blood pressure standards. •... - Página 13 own increased blood pressure values. d) There are measures which you can take to reduce and even prevent high blood pressure. These measures must be permanent lifestyle changes. A) Eating habits • Strive for a normal weight corresponding to your age. See your doctor for your ideal weight.
-
Página 14: Components Of Your Blood Pressure Monitor
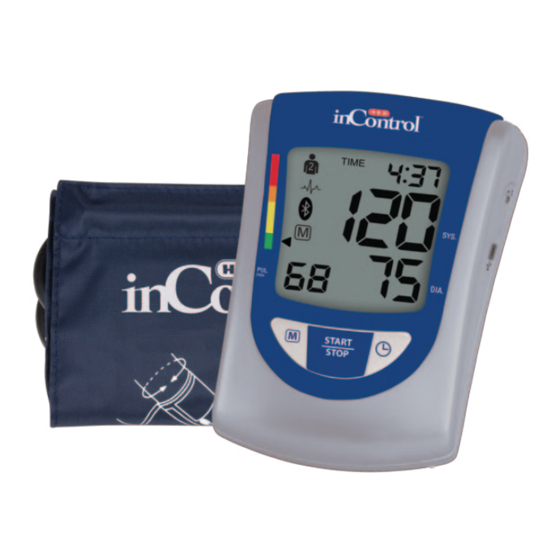
3. Components of your blood pressure monitor a) Monitor Cuff Storage Cuff Socket Hypertension Indicator AC Adapter Port Kickstand Memory Recall Button START/STOP Time/Date Button Button b) Wide range cuff The cuff is for arm circumference 8.7-16.5” (included) or 22-42 cm. Additonal cuffs are available for purchase by calling 1-800-568-4147. -
Página 15: How Do I Get Started
4. How do I get started? 4.1. Inserting the batteries Insert batteries immediately after unpacking the unit. The battery compartment is located on the bottom of the device. a) Remove cover. b) Insert the batteries (4 x size AA 1.5 V), observing the indicated polarity. -
Página 16: Setting The Date And Time
4.2. Setting the date and time 1. After the new batteries are activated, the year num- ber flashes in the display. You can advance the year by pressing the "M" button. To confirm and then set the month, press the time button. 2. -
Página 17: Tube Connection
4.3. Tube connection Insert the black cuff tube connector into the side of the monitor indicated by the drawing of a cuff. 4.4. Select the user This blood pressure monitor is designed to store 99 measurements for each of two users. Before taking a measurement, be certain that the correct user has been selected. -
Página 18: How Do I Take A Measurement
5. How do I take a measurement? Please note: You should always be seated before and during measurement. 5.1. Preparing to take a measurement • Avoid eating and smoking as well as all forms of exertion directly before measurement. These factors influence the measurement result. Find time to relax by sitting in an armchair in a quiet atmosphere for about 5 minutes before taking a measurement. -
Página 19: Using The Cuff
• With repeated measurements, blood accumulates in the arm, which can lead to false results. • Consecutive blood pressure measurements should be repeated after a 1 minute pause in order to allow the accumulated blood to flow away. 8.7” - 16.5” ½... - Página 20 f) Lay your arm on a table (palm upward) so the cuff is at the same height as your heart. Make sure the tube is not kinked. g) Remain seated quietly for at least 5 minutes before you begin the measurement. Cuff on right arm Comment:...
-
Página 21: Taking A Measurement
5.4. Taking a measurement After the cuff has been appropriately positioned on the arm and connected to the blood pressure monitor, the measurement can begin. Remain still during your measurement, do not flex muscles. a) Remain seated quietly for 5 minutes before you begin the measurement. -
Página 22: Irregular Heartbeat Detection
5.5. Irregular heartbeat detection This symbol indicates that certain pulse irregularities were detected during the measurement. In this case, the result may deviate from your normal basal blood pressure– repeat the measurement. In most cases, this is no cause for concern. However, if the symbol appears on a regular basis (e.g. -
Página 23: Hypertension Risk Indicator
5.6. Hypertension risk indicator The bars on the left-hand edge of the display show you the range within which the indicated blood pressure value lies. Depending on the height of the bar, the readout value is either within the normal (green), borderline (yellow) or danger (orange, red) range. -
Página 24: Memory: Reviewing Readings
5.7. Memory: reviewing readings At the end of a measurement, this monitor automatically stores each result with date and time. This unit stores 99 memories for each of 2 users. Viewing the stored values With the unit off, press the "M" button. The display first shows "A", then shows an average of all measurements stored in the unit. -
Página 25: Battery Change Indicator
5.9. Battery change indicator Batteries almost discharged When the batteries are approximately 75% used the battery symbol will flash as soon as the instrument is switched on. Although the instrument will continue to measure reliably, you should obtain replacement batteries. Batteries discharged–... -
Página 26: Using The Ac Adapter
5.10. Using the AC adapter You may also operate this monitor using the included AC Adapter (output 6V DC/600 mA with DIN plug). Use only the included AC Adapter to avoid damaging the unit. 1. Ensure that the AC adapter and cable are not damaged. 2. -
Página 27: Bluetooth® Functions & Application (App)
6. Bluetooth® functions and application (App) Please download the Microlife Connected Health App (referred to as App in this document) from Apple’s App ® ® Store or Google Play before pairing your devices.: Questions? • To access the tutorial, go to the App home screen (Microlife Connected Health) and press the “Settings &... -
Página 29: Error Messages/Troubleshooting
7. Error messages/troubleshooting If an error occurs during a measurement, the measurement is discontinued and a corresponding error code is displayed. (Example Error no. 1) Error No. Possible cause(s) / Solutions ERR 1 The systolic pressure was determined but after wards the cuff pressure fell below 20 mmHg. - Página 30 Other possible errors and their solutions If problems occur when using the device, the following points should be checked: Malfunction Remedy The display remains blank when the • Check battery installation. instrument is switched ON although • If the display is unusual, remove the the batteries are in place.
-
Página 31: Care And Maintenance
8. Care and maintenance a) Do not store the unit under direct sunlight, at a high temperature, or in high humidity or dust. Performance may be degraded. b) The cuff contains a sensitive air-tight bubble. Handle this cuff carefully and avoid all types of stress through twisting or buckling. -
Página 32: Limited Warranty
9. Limited warranty Your Blood Pressure Monitor is warrantied for 5 years by Microlife USA Inc, against manufacturer defects for the original purchaser only, from date of purchase. The 5 year warranty applies to the monitor only. The following accessories are warranted for 1 year: cuff and adapter. -
Página 33: Technical Specifications
10. Technical specifications: Weight: 445 g (with batteries) Size: 150 (W) x 115 (L) x 45 (H) mm) Storage temperature: –20 to +55°C (-4°F to +131°F) Humidity: 15 to 90% relative humidity maximum Operation temperature: 10 to 40°C ( 50°F - 104°F) Display: LCD-Display (Liquid Crystal Display) Measuring method:... -
Página 34: How To Contact Us
11. How to contact us MADE WITH PRIDE AND CARE FOR H-E-B San Antonio, TX 78204 Toll Free Help Line: 1-800-568-4147... - Página 35 Monitor de Presión Arterial Manual de Instrucción para el modelo # BP3NQ1-4BHEB...
- Página 36 Información importante sobre el producto y la seguridad Siga las instrucciones de uso. Este documento proporciona información importante sobre el producto y la seguridad referentes a este tensióme- tro. Lea este documento completamente antes de utilizar el dispositivo y conserva para futuras consultas. Este tensiómetro es un dispositivo digital automático para medir la presión arterial que está...
- Página 37 • Aunque no está diseñado para su uso con menores de 12 años, supervise a todos los niños que estén cerca de este dispositivo; algunas partes son lo suficientemen- te pequeñas como para ser tragadas y cualquiera de los tubos o cables existentes pueden representar un riesgo de estrangulación •...
- Página 38 PRECAUCIÓN - Situación potencialmente peligrosa que, si no se evita, puede provocar lesiones menor o moderadas, daños a la propiedad y / o daños al dispositivo. • Este dispositivo contiene componentes electrónicos sensibles. Evite los campos eléctricos o electromagnéticos en las inmediaciones del dispositivo (por ejemplo, teléfonos móviles, hornos de microondas).
- Página 39 NORMAS Además de las normas establecidas en el Manual de instrucciones: • Este dispositivo médico cumple con las normas relativas a los dispositivos médicos y tensiómetros no invasivos IEC 60601-1, IEC 60601-1-2, IEC 60601-1-11 y AAMI/ANSI/IEC 80601-2-30 y • Con las normas electromagnéticas IEC 60601-1-2, junto con la Sección 15 de las normas de la FCC (Comisión Federal de Comunicaciones) y •...
- Página 40 causar interferencias perjudiciales en las comunicaciones de radio. Sin embargo, no hay garantía de que no se produzcan interferencias en una instalación en particular. Si este equipo causa interferencias perjudiciales para la recepción de radio o televisión, lo cual puede determinarse apagando y encendiendo el equipo, se recomienda al usuario que intente corregir la interferencia mediante una o más de las siguientes medidas: 1) reorientar o reubicar la antena receptora, 2) aumentar la separación entre...
- Página 42 Monitor de Presión Arterial Automático – Manual de Instrucción Tabla de contenido 1. Introducción 1.1. Su monitor de presión arterial automático ™ 1.2. Sistema Gentle+ 2. ¿Cómo se mide la presión arterial? 2.1. ¿Qué es la presión arterial, y por qué fluctúa? 2.2.
- Página 43 7. Mensajes de error/como se detectan y eliminan 8. Cuidado y mantenimiento 9. Garantía limitada 10. Especificaciones técnicas 11. Contacto para la ayuda...
-
Página 44: Introducción
1. Introducción 1.1. Su monitor de presión arterial automático Gracias por comprar un monitor de presión arterial automático. Su monitor está diseñado para proporcionar lecturas digitales rápidas y confiables de su pulso y presión arterial sistólica / diastólica usando el método oscilométrico en su muñeca. -
Página 45: Directrices De Medición
Los valores de la presión sanguínea deben encontrarse entre parámetros nor- males para prevenir enfermedades particulares. 2.2. Directrices de medición La tensión arterial es excesiva si en reposo la presión arterial sistólica es superior a 160 mmHg y/o la presión diastólica es superior a 100 mmHg, durante un perio- do de descanso. -
Página 46: Información Adicional
Cuales son los valores normales? La tabla siguiente es para la clasificación de los valores de tensión arterial en adultos según los establecidos por el American Heart Association (AHA) y el American College of Cardiology (ACC) en 2017. Categoría Sistólica Diastólica (mm Hg) (mm Hg) - Página 48 D) Su estado físico • Luego de un examen médico, con el consentimiento del doctor y bajo su dirección; haga ejercicios. • Elija deportes que requieran aguante y evite los que demandan fuerza. • Evite alcanzar el límite de su capacidad •...
- Página 49 3. Componentes de su monitor para la presión a) Monitor Soporte del brazalete Conección del Brazalete Indicador de hipertensión Portal Adaptador Kickstand Botón de memoria Encendido/Apagad Botón de hora o. Botón de inicio y fecha b) Brazaletes Para brazos de circunferencia 22-42 cm o 8.7”-16.5” (inclusivo) Se pueden comprar brazaletes adicionales llamando al 1-800-568-4147.
-
Página 50: Cómo Se Empieza
4. ¿Cómo se empieza? 4.1. Inserción de baterías Una vez desempaquetado el aparato, inserte primero las baterías. El compartimento de la batería está situado en la parte inferior del aparato. a) Remueva la cubierta de las baterías. b) Inserte las baterías (4, AA 1.5 V), observando la indicada polaridad (+ - ). -
Página 51: Fijación De La Fecha Y Hora
4.2 Fijación de la hora y la fecha 1. Luego de que las baterías nuevas estén activadas, las cifras del año se observarán en forma intermitente en la pantalla. Usted puede avanzar el año presionando el botón de la memoria “M”. Para confirmar y luego fijar el mes, presione el botón de la hora. -
Página 52: Conexión Del Tubo
4.3 Conexión del tubo Inserte el connector del tubo del brazalete negro en el lateral del monitor. 4.4. Selección del usuario Este monitor de presión está designado para guardar 99 mediciones para cada uno de los dos usuarios. Antes de tomarse una medición, asegúrese que haber escogido el usuario correcto. -
Página 53: Cómo Se Toma Una Medida
5. ¿Cómo se toma una medida? Nota: Usted siempre debe estar sentado antes y durante la medición. 5.1 Preparándose para tomar una medida • Evite comer y fumar como también toda forma de ejercicio inmediatamente antes de la medición. Estos factores influencian el resultado de la misma. Siéntese en una silla confortable en una atmósfera de calma por aproxima- damente 5 minutos antes de la medición. -
Página 54: Uso Del Brazalete
• Mediciones consecutivas deben repetirse luego de una pausa de 1 minuto para que la sangre acumula- da fluya. 5.3 Uso del brazalete a) Pase el extremo de el brazalete através del pasador de metal para formar un lazo. La parte que tiene el material de gancho y bucle debe quedar orientada hacia afuera (Ignore este paso si el brazalete ya ha sido preparada). - Página 55 e) Descanse el brazo sobre la mesa (la palma de la mano hacia arriba) para que el brazalete esté a la misma altura que el Corazón. Asegúrese que el tubo no esté doblado. f) Permanezca sentado y tranquilo por un mínimo de 5 minutos antes de iniciar la medición.
-
Página 56: Tomando Una Medida
5.4. Tomando una medida Después de que el brazalete se ha posicionado adecuadamente puede comenzar la medición. Permanecer quieto durante la medición, no flexione Aumento de los músculos. la presión a) Permanezca tranquilamente sentado durante 5 minutos, antes de comenzar con la medición. b) Pulse el botón de POWER botón para comenzar. -
Página 57: Detector De Latido Irregular
5.5. Detector de latido irregular El símbolo indica que se ha detectado un pulso irregular durante la medición. En este caso, el resultado puede variar su presión básica. Repita la medición, esto no es motivo de inquietud. Sin embargo, si el símbolo aparece con regularidad (ej. Varias veces a la semana durante mediciones dia- rias), le aconsejamos consulte con su médico. -
Página 58: Indicador De Hipertensión
5.6 Indicador de hipertensión Las barras en el lado izquierdo de la pantalla muestran el alcance de la pre- sión arterial. Dependiendo de la altura de la barra, la lectura está dentro de los parámetros normales (verde), al borde (amarillo) o en peligro (rojo). La clasificación está... -
Página 59: Memoria - La Revisión De Las Lecturas
5.7. Memoria – la revisión de las lecturas Al final de una medición, este monitor almacena automática- mente cada resultado con la fecha y la hora. Esta unidad guar- da 99 memorias para cada uno de los dos usuarios. Visualización de los valores almacenados Estando la unidad apagada, presione el botón“M”. - Página 60 5.9. Baterías casi completamente descargadas. Cuando las baterías llegan a estar aproximadamente 75% descargados, se podrá observar el siguiente símbolo centelle- ando en la pantalla al momento de encender la unidad. A pesar de que el instrumento continuará tomando las medicio- nes correctamente, usted ya debería reemplazar las baterías.
-
Página 61: Utilización Del Adaptador De Corriente Alterna Ca
5.10. Utilización del adaptador de corriente alterna CA Usted también puede utilizar este monitor con el adaptador de corriente alterna con el cual viene equipado. Para evitar daños a la unidad, utilice únicamente el adaptador que viene con la unidad. 1. -
Página 62: Funciones Y Aplicación De Bluetooth
6. Funciones y aplicación de Bluetooth® Descargue del App Store® de Apple o de Google Play® la Microlife connected health app (a la que nos referimos como "la aplicación" en este documento) antes de emparejar sus dispositivos. ¿Preguntas? • Para acceder al tutorial, visite la pantalla de inicio de la aplicación (Microlife Connected Health) y presione el botón “Settings &... -
Página 63: Emparejamiento De Su Dispositivo
6.2 Emparejamiento de su dispositivo: • Descargue la aplicación en su teléfono. • Crea un perfil de usario (en “User Profiles”) en la aplicación. • Confirme que la función del Bluetooth® del telefono esté encendida. • Abre la aplicación en su teléfono. •... -
Página 64: Mensajes De Error/Como Se Detectan Y Eliminan
7. Mensajes de error / como se detectan y eliminan Si ocurre un error durante la medición, la misma será des- continuada y el código de error se observará en la pantalla. Recomendamos apagar el dispositivo y efectuar una nueva medición, siempre y cuando usted se tome el tiempo nece- sario para relajarse. - Página 65 Otros posibles errores y soluciones Si ocurren problemas durante el uso del dispositivo, verifique los siguientes puntos: Solución Mal funcionamiento • Revise la polaridad de las baterías La pantalla permanece en blanco cuando se enciende el dispositivo • Si el despliegue es inusual, remueva las baterías y cámbielas por nuevas.
-
Página 66: Cuidado Y Mantenimiento
8. Cuidado y mantenimiento a) Los brazaletes contienen burbujas de aire muy sensitivas. Manéjelos con cuidado para evitar todo tipo de stress al doblarlos o abrocharlos. Gasoline b) Limpie el dispositivo con un paño limpio y seco. No use ninguna clase de solventes ni gas. Manchas en el brazalete pueden ser removidas muy cuidadosamente con un paño humedo. -
Página 67: Garantía Limitada
9. Garantía limitada Su monitor automático de presión sanguínea está garantizado por Microlife USA Inc., por 5 años, por defectos de manufactura solamente para el comprador original desde la fecha de compra. La garantía de 5 años aplica al monitor. Los siguientes accesorios tienen garantía por un año: brazalete y adaptador de corriente. -
Página 68: Especificaciones Técnicas
10. Especificaciones técnicas Peso: 445 g (con baterías) Tamaño: 150 (W) x 115 (L) x 45 (H) (mm) Temperatura de almacenamiento: –20 to +55°C (-4°F to +131°F) Humedad: 15 to 90% relativa humedad máxima Temperatura de operación: 10 to 40°C ( 50°F - 104°F) Pantalla: Pantalla LCD (Pantalla Cristal Liquido) Método de Medición:... -
Página 69: Contacto Para La Ayuda
11. Contacto para la ayuda HECHO CON ORGULLO Y CUIDA DE H E B San Antonio, TX 78204 Número sin cargo: 1-800-568-4147... - Página 72 BP3NQ1-4B-HEB-1219-1...