Tabla de contenido
Publicidad
Idiomas disponibles
Idiomas disponibles
Enlaces rápidos
ALLEN + ROTH and logo design are trademarks or registered
trademarks of LF, LLC. All rights reserved.
ATTACH YOUR RECEIPT HERE
Serial Number__________________ Purchase Date__________________
Questions, problems, missing parts? Before returning to your retailer, call our customer service
department at 1-866-439-9800, 8 a.m. - 8 p.m., EST, Monday - Sunday.
RR20232
welcoming
•
sophisticated
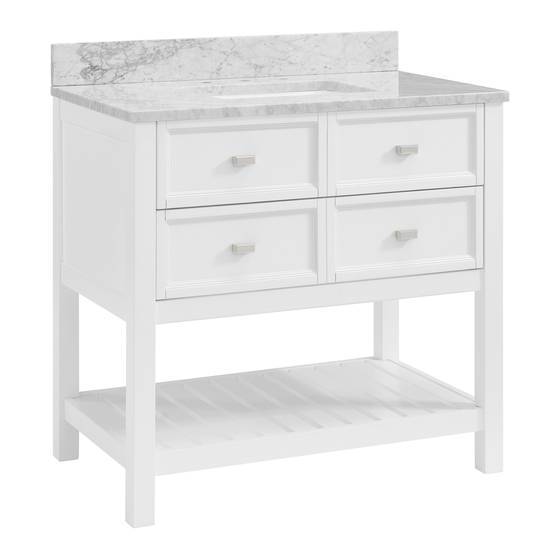
VANITY WITH TOP
1
•
inspiring
ITEM #0819968
MODEL #1227VA-36-201
Français p. 10
Español p. 19
Publicidad
Capítulos
Tabla de contenido

Manuales relacionados para allen+roth 1227VA-36-201


Resumen de contenidos para allen+roth 1227VA-36-201
- Página 1 ALLEN + ROTH and logo design are trademarks or registered ITEM #0819968 trademarks of LF, LLC. All rights reserved. VANITY WITH TOP MODEL #1227VA-36-201 Français p. 10 Español p. 19 ATTACH YOUR RECEIPT HERE Serial Number__________________ Purchase Date__________________ Questions, problems, missing parts? Before returning to your retailer, call our customer service department at 1-866-439-9800, 8 a.m.
-
Página 2: Tabla De Contenido
TABLE OF CONTENTS Package Contents...........................3 Hardware Contents..........................3 Safety Information..........................3 Preparation.............................4 Assembly or Installation Instructions....................4 Care and Maintenance........................8 Warranty............................8 Replacement Parts List........................9... -
Página 3: Package Contents
PACKAGE CONTENTS PART DESCRIPTION QUANTITY Vanity Shelf Top (preassembled to vanity (A)) Backsplash HARDWARE CONTENTS (NOT SHOWN ACTUAL SIZE) Bolt Washer Touch Up Pen Allen Wrench Spring Washer Qty. 12 Qty. 12 Qty. 1 Qty. 1 Qty. 12 SAFETY INSTRUCTIONS Please read and understand this entire manual before attempting to assemble, operate or install the product. -
Página 4: Preparation
PREPARATION Before beginning assembly of product, make sure all parts are present. Compare parts with package contents list and hardware contents list. If any part is missing or damaged, do not attempt to assemble the product. Estimated Installation Time: 20-30 minutes (24 hours for silicone caulk to dry). Tools Required for Installation (not included): Phillips screwdriver, utility knife or scissors, silicone caulk, power drill with drill bit Helpful Tools (not included): Measuring tape, level... - Página 5 INSTALLATION INSTRUCTIONS 2. With the help of another person, place vanity (A) upside down on a scratch free surface. Place leg (B) into correct position on vanity (A). Insert bolts (AA), spring washers (EE) and washers (BB) into the predrilled holes on the inside of the vanity (A).
- Página 6 INSTALLATION INSTRUCTIONS 4. Insert bolts (AA), spring washers (EE) and washers (BB) into the predrilled holes on the inside of the legs (B), tighten with allen wrench (DD). Hardware used Bolt Washer Allen wrench Spring washer Note: Clean area where the vanity (A) will be permanently located prior to beginning installation, ensuring the vanity (A) will not interfere with any water supply and drain lines once mounted.
- Página 7 INSTALLATION INSTRUCTIONS 6. To reinstall drawers into vanity (A), fully extend metal glide tracks. Gently lower and slide drawer box into rear glide catch. Next lower drawer box down to completely rest on extended glides. Then, push plastic levers to lock the drawer box in place.
-
Página 8: Care And Maintenance
CARE AND MAINTENANCE • Dust the vanity regularly with a soft, non-lint producing cloth or household dusting product. • You can clean the vanity with a gentle, non-abrasive household cleaner. • Make sure to dry the wood immediately with a soft cloth or towel. •... -
Página 9: Replacement Parts List
REPLACEMENT PARTS LIST For replacement parts, call our customer service department at 1-866-439-9800, 8 a.m. - 8 p.m., EST, Monday - Sunday. PART DESCRIPTION PART# PU17-1227-201-LEG Shelf 1227VA-36-201-002 1227VA-36-EC TOP Backsplash 1227-36EC-BS Drawer front 1227VA-36-201-003 Sink PU17-18x14-SQUARE Bolt Washer PU17-1227-KD-... - Página 10 ARTICLE #0819968 marques de commerce déposées de LF, LLC. Tous droits réservés. MEUBLE-LAVABO AVEC COMPTOIR MODÈLE #1227VA-36-201 JOIGNEZ VOTRE REÇU ICI Numéro de série__________________ Date d’achat__________________ Des questions, des problèmes, des pièces manquantes? Avant de retourner l’article au détaillant, appelez notre service à la clientèle au 1 866 439-9800, entre 8 h et 20 h (HNE), du lundi au dimanche.
- Página 11 TABLE DES MATIÈRES Contenu de l’emballage.........................12 Quincaillerie incluse........................12 Consignes de sécurité........................12 Préparation............................13 Instructions pour l’assemblage ou l’installation................13 Entretien............................17 Garantie............................17 Liste des pièces de rechange......................18 2459...
-
Página 12: Contenu De L'eMballage
CONTENU DE L’EMBALLAGE 1142 PIÈCE DESCRIPTION QUANTITÉ Meuble-lavabo Pied Tablette Comptoir (préassemblé au meuble-lavabo [A]) Dosseret 1142 QUINCAILLERIE INCLUSE (NON ILLUSTRÉE À LA GRANDEUR RÉELLE) 2048FM Boulon Rondelle Crayon à retouche Clé hexagonale Rondelle à ressort Qté : 12 Qté : 12 Qté... -
Página 13: Préparation
PRÉPARATION Avant de commencer l’assemblage de l’article, assurez-vous d’avoir toutes les pièces. Comparez le contenu de l’emballage avec la liste des pièces et celle de la quincaillerie incluse. S’il y a des pièces manquantes ou endommagées, ne tentez pas d’assembler l’article. Temps d’installation approximatif : de 20 à... - Página 14 INSTRUCTIONS POUR L'INSTALLATION 2. Avec l’aide d’une autre personne, placez le meuble-lavabo (A) à l’envers sur une surface non abrasive. Placez le pied (B) dans la bonne position sur le meuble-lavabo (A). Insérez les boulons (AA), les rondelles à ressort (EE) et les rondelles (BB) dans les trous prépercés à...
- Página 15 INSTRUCTIONS POUR L'INSTALLATION 4. Insérez les boulons (AA), les rondelles à ressort (EE) et les rondelles (BB) dans les trous prépercés à l’intérieur des pieds (B), puis serrez avec la clé hexagonale (DD). 2048FM Quincaillerie utilisée Boulon Rondelle Clé hexagonale Rondelle à...
- Página 16 1142 INSTRUCTIONS POUR L'INSTALLATION 6. Pour réinstaller les tiroirs du meuble-lavabo (A), allongez complètement les glissières en métal. Abaissez doucement le tiroir et glissez-le dans le serre-joint de la glissière arrière. Ensuite, abaissez le tiroir pour qu’il repose complètement sur les glissières que vous avez allongées. Finalement, appuyez sur les leviers en plastique pour fixer le tiroir en place.
-
Página 17: Entretien
1142 ENTRETIEN • Époussetez régulièrement le meuble-lavabo à l’aide d’un linge doux et non pelucheux ou d’un accessoire pour l’époussetage domestique. • Vous pouvez nettoyer le meuble-lavabo à l’aide d’un nettoyant doux et non abrasif. • Essuyez immédiatement le bois à l’aide d’un linge doux ou d’une serviette. •... -
Página 18: Liste Des Pièces De Rechange
Pour obtenir des pièces de rechange, communiquez avec notre service à la clientèle au 1 866 439-9800, entre 8 h et 20 h (HNE), du lundi au dimanche. PIÈCE DESCRIPTION N° DE PIÈCE PU17-1227-201-LEG Pied Tablette 1227VA-36-201-002 Comptoir 1227VA-36-EC TOP Dosseret 1227-36EC-BS Devant de tiroir 1227VA-36-201-003 Évier... - Página 19 ARTÍCULO #0819968 o marcas registradas de LF, LLC. Todos los derechos reservados. TOCADOR CON CUBIERTA MODELO #1227VA-36-201 ADJUNTE SU RECIBO AQUÍ Número de serie__________________ Fecha de compra__________________ ¿Preguntas, problemas, piezas faltantes? Antes de volver a la tienda, llame a nuestro Departamento...
- Página 20 ÍNDICE Contenido del paquete........................21 Aditamentos........................21 Información de seguridad......................21 Preparación..........................22 Instrucciones de ensamblaje o instalación...................22 Cuidado y mantenimiento......................26 Garantía............................26 Lista de piezas de repuesto......................27 2459...
-
Página 21: Contenido Del Paquete
CONTENIDO DEL PAQUETE 1142 PIEZA DESCRIPCIÓN CANTIDAD Tocador Pata Estante Cubierta (preensamblada al tocador (A)) Protector contra salpicaduras 1142 ADITAMENTOS ( NO SE MUESTRAN EN TAMAÑO REAL 2048FM Perno Arandela Aplicador de retoque Llave allen Arandela de resorte Cant. 12 Cant. -
Página 22: Preparación
PREPARACIÓN Antes de comenzar a ensamblar el producto, asegúrese de tener todas las piezas. Compare las piezas con la lista del contenido del paquete y la lista de aditamentos. No intente ensamblar el producto si falta alguna pieza o si estas están dañadas. Tiempo de instalación estimado: de 20 a 30 minutos (24 horas para que seque la masilla de 2459 calafateo de silicona). - Página 23 INSTRUCCIONES DE INSTALACIÓN 2. Con la ayuda de otra persona, coloque el tocador (A) boca abajo sobre una superficie que no propicie los rayones. Coloque la pata (B) en la posición correcta en el tocador (A). Inserte los pernos (AA), las arandelas de resorte (EE) y las arandelas (BB) en los orificios pretaladrados en el interior del tocador (A).
- Página 24 INSTRUCCIONES DE INSTALACIÓN 4. Inserte los pernos (AA), las arandelas de resorte (EE) y las arandelas (BB) en los orificios pretaladrados en el interior de las patas (B), apriete con la llave Allen (DD). 2048FM Aditamentos utilizados Perno Arandela Llave Allen Arandela de resorte Nota: limpie el área donde se colocará...
- Página 25 1142 INSTRUCCIONES DE INSTALACIÓN 6. Para reinstalar las gavetas en el tocador (A), extienda los rieles de deslizamiento metálicos por completo. Baje con cuidado la gaveta y deslícela hasta el cerrojo posterior de los rieles deslizantes. A continuación, baje la caja de la gaveta para que se asiente por completo sobre los rieles deslizantes extendidos.
-
Página 26: Cuidado Y Mantenimiento
1142 CUIDADO Y MANTENIMIENTO • Limpie el tocador regularmente con un paño suave que no deje pelusas o con un producto de limpieza doméstico. • Puede limpiar el tocador con un limpiador doméstico suave no abrasivo. • Asegúrese de secar la madera inmediatamente con un paño o una toalla suave. •... -
Página 27: Lista De Piezas De Repuesto
Para obtener piezas de repuesto, llame a nuestro Departamento de Servicio al Cliente al 1-866-439-9800, de lunes a domingo de 8 a.m. a 8 p.m., hora estándar del Este. PIEZA DESCRIPCIÓN PIEZA # PU17-1227-201-LEG Pata Estante 1227VA-36-201-002 Cubierta 1227VA-36-EC TOP Protector contra 1227-36EC-BS salpicaduras Parte frontal de la gaveta...