
Manuales relacionados para Klarstein MR. FROST


Resumen de contenidos para Klarstein MR. FROST
- Página 1 MR. FROST Eiswürfelmaschine Ice Cube Maker Máquina de hielo Machine à glaçons Macchina per cubetti di ghiaccio 10020109 10020110 www.klarstein.com...
-
Página 3: Tabla De Contenido
Sehr geehrter Kunde, wir gratulieren Ihnen zum Erwerb Ihres Gerätes. Lesen Sie die folgenden Hinweise sorgfältig durch und befolgen Sie diese, um möglichen Schäden vorzubeugen. Für Schäden, die durch Missachtung der Hinweise und unsachgemäßen Gebrauch entstehen, übernehmen wir keine Haftung. Scannen Sie den folgenden QR-Code, um Zugriff auf die aktuellste Bedienungsanleitung und weitere Informationen rund um das Produkt zu erhalten:... -
Página 4: Sicherheitshinweise
SICHERHEITSHINWEISE • Schließen Sie das Gerät nur an geerdete Steckdosen an, die der Spannung des Geräts entsprechen. • Wenn Sie das Gerät bewegen benutzen Sie die Griffe. • Stellen Sie das Gerät auf einen ebenen Untergrund. • Benutzen Sie das Gerät nur in Innenräumen. •... - Página 5 WARNUNG Gefahr durch Feuer/brennbare Materialien. Bitte beachten Sie die örtlichen Vorschriften zur Entsorgung von Geräten mit brennbaren Kältemitteln und Gasen. • Halten Sie Lüftungsöffnungen im Gerätegehäuse frei von Hindernissen. • Beschädigen Sie nicht den Kältemittelkreislauf. • Verwenden Sie keine mechanischen Vorrichtungen oder andere Mittel, um den Auftauprozess oder den Eisgewinnungsprozess zu beschleunigen •...
-
Página 6: Geräteübersicht
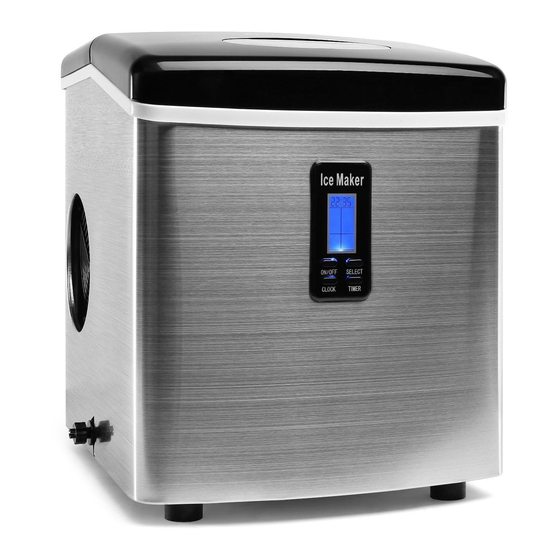
GERÄTEÜBERSICHT Deckel mit Sichtfenster Wasserauslass-Kappe Klappe Lüfter Eisschaufel Eiswürfelbehälter Kontroll-Display A. LCD-Display Uhrzeit Wasserleerstandswarnung (blinkt bei leerem Wassertank) Füllstand (leuchtet bei vollständig gefülltem Eiswürfelbehälter) An/Aus - Anzeige (blinkt wenn ausgeschaltet, leuchtet konstant bei Betrieb) 5: Reinigung (blinkt bei Reinigungsbedarf) Gewählte Eiswürfelgröße (klein, mittel, groß) Timer-Restlaufzeit B. -
Página 7: Inbetriebnahme
INBETRIEBNAHME 1. Entfernen Sie das Verpackungsmaterial vom Gerät. 2. Reinigen Sie das Geräteinnere gründlich mit lauwarmen Wasser und einem weichen Tuch. 3. Stellen Sie das Gerät auf eine ebene, trockene Fläche ohne direkte Sonnenlicht und fern von anderen Wärmequellen (z.B. Ofen, Herd oder Heizung). Lassen Sie an allen Seiten mindestens 10 cm Abstand zwischen Gerät und Wänden oder anderen Gegenständen. -
Página 8: Bedienung Des Timers
5. Prüfen Sie den Wasserstand während des Betriebes regelmäßig. Sobald der Wassertank leer ist, stoppt das Gerät automatisch den Betrieb und das blinkende Symbol [ ] erscheint auf dem Display. Füllen Sie Wasser bis maximal zu Füllgrenze nach und war nie mindestens drei Minuten, damit sich die Kühlflüssigkeit wieder richtig ablagern kann. -
Página 9: Uhrzeitanzeige
UHRZEITANZEIGE Das Gerät verfügt über eine Uhrzeitanzeige-Funktion. Sie können die angezeigte Uhrzeit mit der „CLOCK“- und der „SELECT“-Taste einstellen. Drücken Sie einmal die „CLOCK“-Taste, woraufhin die Stunden-Anzeige zu blinken beginnt. Drücken Sie nun die „SELECT“-Taste, um die Stunden-Anzeige zu ändern. Durch jedes Drücken der „SELECT“-Taste erhöht sich die Eingabe um 1 Stunde. -
Página 10: Reinigung Und Pflege
REINIGUNG UND PFLEGE • Entnehmen Sie den Eiswürfelbehälter • Reinigen Sie das Geräteinnere mit einem milden, verdünnten Reinigungsmittel sowie lauwarmen Wasser und einem weichen Tuch. • Spülen Sie die inneren Geräteteile mit Wasser aus und entleeren Sie das Wasser durch Öffnen der Abfl usskappe. •... -
Página 11: Fehlerbehebung
FEHLERBEHEBUNG Problem Mögliche Ursache Lösung Symbol [ ] blinkt. Kein Wasser im Tank. Beenden Sie den Gefriervorgang indem Sie die „ON/OFF“-Taste drücken und füllen Sie Wasser ein. Drücken Sie die „ON/OFF“-Taste erneut, um das Gerät wieder einzuschalten. Symbol [ ] leuchtet. Eiswürfelbehälter ist voll. -
Página 12: Hinweise Zur Entsorgung
HINWEISE ZUR ENTSORGUNG Wenn es in Ihrem Land eine gesetzliche Regelung zur Entsorgung von elektrischen und elektronischen Geräten gibt, weist dieses Symbol auf dem Produkt oder auf der Verpackung darauf hin, dass dieses Produkt nicht im Hausmüll entsorgt werden darf. Stattdessen muss es zu einer Sammelstelle für das Recycling von elektrischen und elektronischen Geräten gebracht werden. - Página 13 Dear Customer, Congratulations on purchasing this device. Please read the following instructions carefully and follow them to prevent possible damages. We assume no liability for damage caused by disregard of the instructions and improper use. Scan the QR code to get access to the latest user manual and more product information.
-
Página 14: Safety Instructions
SAFETY INSTRUCTIONS • Check that the mains voltage corresponds to the rating of the appliance before operating. • Use handles or knobs when moving. Place on a flat stable surface for use. Do not use outdoors. • Do not use near or in the immediate vicinity of a bath or swimming pool or any source of liquid. - Página 15 WARNING Danger from fi re/fl ammable materials. Please observe the local regulations for the disposal of units with fl ammable refrigerants and gases. • Keep ventilation openings in the unit housing free of obstacles. • Do not damage the refrigerant circuit. •...
-
Página 16: Product Overview
PRODUCT OVERVIEW Cover Water drain cap Ice scoop Air Outlet Ice shovel Ice basket Control panel A. LCD display window Time Empty water warning (flashes when water tank is empty) Filling level (lights up when the ice cube tray is completely filled) On/Off display (flashes when switched off, lights up constantly during operation) 5: Cleaning (flashes when cleaning is required) Selected ice cube size (small, medium, large) -
Página 17: Getting Started
GETTING STARTED 1. Remove the exterior and interior packaging. Check that ice basket and ice scoop is included. If any parts are missing, please contact our customer service. 2. Clean the interior with lukewarm water and a soft cloth. Take out the ice basket and clean it 3. -
Página 18: Timer Setting
5. While the icemaker is on, verify water leve periodically. If water pump can’t inject water, the ice maker will stop automatically, and the [ ] symbol will flash in LCD display window. Fill water up to the level mark and press “ON/OFF” button two times again to turn on the unit again. -
Página 19: Clock Display
CLOCK DISPLAY This unit is supplied with CLOCK dipalying function. If the displayed time is not correct, you can adjust it to the correct digit through the CLOCK and SELECT button. First press the CLOCK button once, the digit meaning hour will start to flash first, then you can press SELECT button to change it, each press will increase 1 hour. -
Página 20: Cleaning And Maintanance
CLEANING AND MAINTANANCE • Take out the ice basket. • Clean the interior with diluted detergent, warm water and a soft cloth. • Then use the water to rinse the inside parts, and drain out the water by unplugging the drain cap on the side. •... -
Página 21: Troubleshooting
TROUBLESHOOTING PROBLEM POSSIBLE CAUSE SOLUTION Symbol [ ] flashs. Lack of Water. Stop the ice maker, fill water, and press “ON/ OFF” button again to restart the unit. Symbol [ ] display in There is too much ice. Remove ice from ice LCD display window. -
Página 22: Disposal Considerations
DISPOSAL CONSIDERATIONS If there is a legal regulation for the disposal of electrical and electronic devices in your country, this symbol on the product or on the packaging indicates that this product must not be disposed of with household waste. Instead, it must be taken to a collection point for the recycling of electrical and electronic equipment. -
Página 23: Datos Técnicos
Estimado cliente: Le felicitamos por la adquisición de este producto. Lea atentamente el siguiente manual y siga cuidadosamente las instrucciones de uso con el fin de evitar posibles daños. La empresa no se responsabiliza de los daños ocasionados por un uso indebido del producto o por haber desatendido las indicaciones de seguridad. -
Página 24: Indicaciones De Seguridad
INDICACIONES DE SEGURIDAD • Conecte el aparato solamente a tomas de corriente con toma de tierra que se adecuen a la tensión del mismo. • Si desea desplazar el aparato, utilice las asas. • Coloque el aparato en una superficie plana y estable. •... - Página 25 ADVERTENCIA Peligro por fuego/materiales infl amables. Tenga en cuenta las normas locales para la eliminación de aparatos que contengan refrigerantes y gases infl amables. • Mantenga las aberturas de ventilación de la carcasa del aparato libres de obstáculos. • No dañar el circuito de refrigeración. •...
-
Página 26: Visión General Del Aparato
VISIÓN GENERAL DEL APARATO Tapa con visor Desagüe Tapa Ventilador Pala para el hielo Recipiente para los cubitos de hielo Display de control A. Display LCD Hora Aviso depósito vacío (parpadea cuando no hay agua en el depósito) Estado lleno (se ilumina con el recipiente de cubitos lleno) Indicador on/off (parpadea cuando se enciende, se ilumina de manera constante en funciona- miento) Limpieza (parpadea cuando es necesario limpiar el aparato) -
Página 27: Puesta En Marcha
PUESTA EN MARCHA 1. Retire todo el material de embalaje del aparato. 2. Limpie el interior con agua tibia y un paño suave. 3. Coloque el aparato en una superficie plana, seca, fuera de la exposición directa del sol y lejos de otras fuentes de calor (p. ej. hornos, hornillos o radiadores). Deje una distancia a los lados de al menos 10 cm entre el aparato y las paredes u otros objetos. -
Página 28: Utilización Del Temporizador
5. Compruebe el nivel del agua durante el funcionamiento de manera p iód ca. En cuanto se vacíe el depósito de agua, el aparato se detiene automáticamente y el símbolo [ ] parpadea en el display. Rellene agua hasta la marca máxima y espere 3 minutos para que el lí... -
Página 29: Indicador De La Hora
INDICADOR DE LA HORA El aparato cuenta con una función de indicación de hora. Puede configurar la hora con los botones CLOCK y SELECT. Pulse una vez el botón CLOCK antes de que el indicador de horas parpadee de nuevo. Pulse ahora el botón SELECT para modificar las horas. -
Página 30: Limpieza Y Cuidado
LIMPIEZA Y CUIDADO • Extraiga el recipiente de cubitos de hielo. • Limpie el interior con agua tibia y un producto de limpieza neutro disuelto en el agua y un paño suave. • Enjuague las partes interiores con agua y vacíe siempre el agua abriendo el desagüe. -
Página 31: Resolución De Problemas
RESOLUCIÓN DE PROBLEMAS Problema Posible causa Solución En el d play parpadea el No hay agua en el Si el proceso de símbolo depósito. congelación finaliza, pulse el botón «ON/ OFF» y rellene agua. Pulse el botón «ON/OFF» de nuevo para volver a en- cender el aparato. -
Página 32: Indicaciones Sobre La Retirada Del Aparato
INDICACIONES SOBRE LA RETIRADA DEL APARATO Si en su país existe una disposición legal relativa a la eliminación de aparatos eléctricos y electrónicos, este símbolo estampado en el producto o en el embalaje advierte que no debe eliminarse como residuo doméstico. En lugar de ello, debe depositarse en un punto de recogida de reciclaje de aparatos eléctricos y electrónicos. - Página 33 Cher client, Toutes nos félicitations pour l’acquisition de ce nouvel appareil. Veuillez lire attentivement les instructions suivantes de branchement et d’utilisation afin d’éviter d’éventuels dommages. Le fabricant ne saurait être tenu pour responsable des dommages dus au non-respect des consignes de sécurité et à la mauvaise utilisation de l’appareil.
-
Página 34: Consignes De Sécurité
CONSIGNES DE SÉCURITÉ • Brancher uniquement l’appareil à une prise de terre dont la tension correspond à celle de l’appareil. • Utiliser les poignées pour déplacer l’appareil. • Placer l’appareil sur une surface plane. • Utiliser l’appareil uniquement en intérieur. •... - Página 35 AVERTISSEMENT Danger d‘incendie/de matières infl ammables. Veuillez respecter les réglementations locales concernant l‘élimination des appareils contenant des fl uides frigorigènes et des gaz infl ammables. • Veillez à ce que les ouvertures de ventilation dans le boîtier de l‘appareil soient libres d‘obstacles.
-
Página 36: Éléments De Commande
ÉLÉMENTS DE COMMANDE Couvercle avec fenêtre Sortie d‘eau (pour vider le réservoir) Clapet Pelle à glace Ventilateur Affichage de contrôle Récipient à glace A. Affichage LCD Heure Signal du niveau d‘eau(clignote quand le réservoir est vide) 3 Niveau d‘eau (s‘allume quand le récipient à glave est plein) Interrupteur lumineux(clignote quant éteind, allumé... -
Página 37: Installation
INSTALLATION 1. Sortir l‘appareil de son emballage. 2. Bien nettoyer l‘intérieur de l‘appareil avec de l‘eau tiède et un chiffon doux. 3. Poser l‘appareil sur une surface plane et sèche à l‘abris des rayons direct sdu soleil et éloigné de toute source de chaleur ( poele, chauffage, cuisinière…). Laisser un espace d‘au moins 10 cm tout autour de l‘appareil. -
Página 38: Utilisation Du Timer
5. Vérifier régulièrement le niveau d‘eau pendant le processus. Dès que le réservoir est vide, l‘appareil s‘arrête automatiquement et le symbole [ ] clignote sur l‘affichage LCD. Remplir le réservoir jusqu‘à la limite maximale et attendre au moins 3 minutes afin que le liquide de refroidissement repose complètement. -
Página 39: Affichage De L'hEure
AFFICHAGE DE L‘HEURE L‘appareil possède une fonction « affichage de l‘heure ». L‘heure se règle avec les touches CLOCK et SELECT. Appuyer une fois sur la touche „CLOCK“, les heures se mettent à clignoter. Utiliser la touche SELECT pour régler les heures. -
Página 40: Nettoyage Et Entretien
NETTOYAGE ET ENTRETIEN • Retirer le récipient à glace. • Nettoyer l‘intérieur de l‘appareil avec un peu de liquide nettoyant dilué, de l‘eau tiède et un chif- fon doux. • Rincer l‘intérieur avec de l‘eau et vider l‘eau en ouvrant le clapet d‘évacuation de l‘eau. -
Página 41: Dépannage
DÉPANNAGE Problèmes Causes probables Solution Le symbole [ ] clignote. Pas d'eau dans le réservoir Arrêter la fabrication de glace avec ON/ OFF. Remplir le réservoir puis appuyer à nouveau sur ON/OFF pour redémarrer. Le symbole [ ] clignote. Le récipient à glace est Vider la glace du plein récipient. -
Página 42: Informations Sur Le Recyclage
INFORMATIONS SUR LE RECYCLAGE S‘il existe une réglementation pour l‘élimination ou le recyclage des appareils électriques et électroniques dans votre pays, ce symbole sur le produit ou sur l‘emballage indique que cet appareil ne doit pas être jeté avec les ordures ménagères. - Página 43 Gentile cliente, La ringraziamo per aver acquistato il dispositivo. La preghiamo di leggere attentamente le seguenti istruzioni per l’uso e di seguirle per evitare possibili danni tecnici. Non ci assumiamo alcuna responsabilità per danni scaturiti da una mancata osservazione delle avvertenze di sicurezza e da un uso improprio del dispositivo.
-
Página 44: Avvertenze Di Sicurezza
AVVERTENZE DI SICUREZZA • Leggere attentamente tutte le istruzioni e conservare il presente libretto per consultazioni future. • Per garantire il corretto funzionamento, il dispositivo deve essere collegato ad una presa dotata di messa a terra. Consultare un elettricista se non si è sicuri che la presa a disposizione corrisponda ai requisiti richiesti. - Página 45 ATTENZIONE Pericolo di incendio/materiali infi ammabili. Osservare le norme locali per lo smaltimento di apparecchi contenenti refrigeranti e gas infi ammabili. • Mantenere libere da ostacoli le aperture di ventilazione nell‘alloggiamento dell‘apparecchio. • Non danneggiare il circuito frigorifero. • Non utilizzare dispositivi meccanici o altri mezzi per accelerare lo sbrinamento o il recupero del ghiaccio.
-
Página 46: Panoramica Del Dispositivo
PANORAMICA DEL DISPOSITIVO Coperchio con finestra Scarico Sportello Ventola Paletta ghiaccio Contenitore cubetti di ghiaccio Display di controllo A. Display LCD Orario Avviso livello dell‘acqua basso (lampeggia se il serbatoio è vuoto) Livello di riempimento (si accende quando il contenitore dei cubetti di ghiaccio è pieno) Spia On/Off (lampeggia quando è... -
Página 47: Prima Messa In Funzione
PRIMA MESSA IN FUNZIONE 1. Rimuovere il materiale di imballaggio dalla confezione. 2. Pulire a fondo la parte interna del dispositivo con acqua tiepida e con un panno morbido. 3. Collocare il dispositivo su una superficie piana e asciutta lontano dalla luce diretta del sole e lon- tano da altre fonti di calore (ad es. -
Página 48: Utilizzo Del Timer
5. Controllare regolarmente il livello dell´ac ua. Se il serbatoio è vuoto, il dispositivo si arresta automaticamente e il simbolo lampeggiante [ ] compare sul display. Versare l´acqua fino al limite massimo e attendere almeno tre minuti in modo che il liquido refrigerante possa distribuirsi. -
Página 49: Display Orario
DISPLAY ORARIO Il dispositivo è dotato di display orario. E´ possibile impostare l´ora indicata con il tasto “CLOCK” oppure con il tasto “SE- LECT”. Premere una volta il tasto „CLOCK“, l‘ora inizia a lampeggiare. Ora premere il tasto „SELECT“ per modificare l‘ora. Ad ogni pressione del tasto „SELECT“, il valore au- menta di 1 ora. -
Página 50: Pulizia E Manutenzione
PULIZIA E MANUTENZIONE • Rimuovere il contenitore dei cubetti di ghiaccio. • Pulire l‘interno del dispositivo con un detersivo delicato e con un po´ di acqua tiepida. Utilizzare un panno morbido. • Lavare le parti interne del dispositivo con acqua e far defl uire l´acqua aprendo il tappo di scarico. -
Página 51: Risoluzione Dei Problemi
RISOLUZIONE DEI PROBLEMI Problema Causa possibile Soluzione Il simbolo [ ] lampeggia. Non c’è acqua nel Arrestare il processo di serbato- io. congelamento pre- mendo il tasto “ON/OFF” e versare l´acqua. Premere di nuovo il tasto “ON/ OFF” per ac- cendere di nuovo il dispositivo. -
Página 52: Avviso Di Smaltimento
AVVISO DI SMALTIMENTO Se nel proprio paese si applicano le regolamentazioni inerenti lo smaltimento di dispositivi elettrici ed elettronici, questo simbolo sul prodotto o sulla confezione segnala che questi prodotti non possono essere smaltiti con i rifiuti normali e devono essere portati a un punto di raccolta di dispositivi elettrici ed elettronici.