
Manuales relacionados para ADInstruments True RMS AD-9962


Resumen de contenidos para ADInstruments True RMS AD-9962
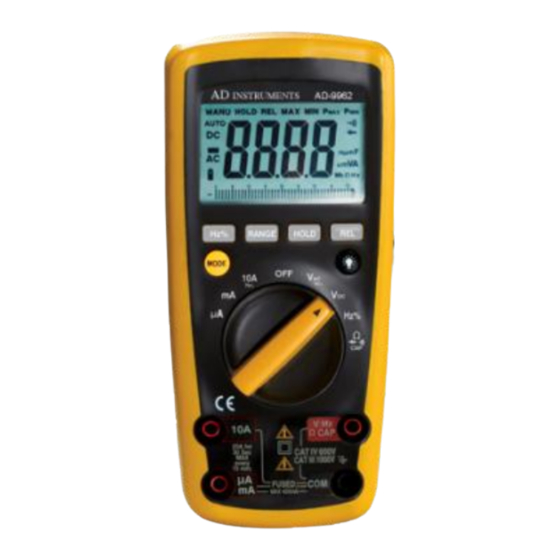
- Página 1 ADInstruments Manual de Usuario ¦ ¸ ¦ ¸ Multímetro Digital Auto-rango True RMS AD-9962...
- Página 2 AD Instruments _______________________________________________________________________________ Copyright © Abacanto Digital SA, Reservados todos los derechos. La información de esta publicación reemplaza a toda la anterior que corresponda con el mismo material. Abacanto Digital SA, se reserva el derecho de modificar o cambiar parte o todas ...
-
Página 3: Tabla De Contenido
AD Instruments _______________________________________________________________________________ Contenido Precauciones de seguridad……………………………………………………………………..…….4 Símbolos usados en este equipo……………………………………………………………………4 Símbolos e indicadores……………..…………………..……………………………………………..5 Funcionamiento……….…..……………………………………………………………………………..5 Medidas de tensión AC / DC……………………………………………………………………….…7 Medidas de corriente continua DC………………………………………………………………..7 Medidas de corriente alterna AC……….……………………………………………………..…..7 Medida de resistencia………………………………………………………………………………...…8 Comprobación de continuidad………………………………………..…………………….………8 Comprobación de diodos…..…………………………………………………………………………..9 Medida de capacidades……………………………………….………………………………………..9 Medida de frecuencia……………………………………………………………….………………….10 Medida de temperatura…………………………………………………………………..…………..10... -
Página 4: Precauciones De Seguridad
AD Instruments _______________________________________________________________________________ Precauciones de Seguridad Deben seguirse las siguientes informaciones de seguridad para garantizar la máxima seguridad personal durante el manejo de este multímetro. No deben de realizarse medidas por encima del rango máximo seleccionado. Deben de extremarse las precauciones cuando se midan tensiones superiores a 50 V, especialmente en cables activos. -
Página 5: Símbolos E Indicadores
AD Instruments _______________________________________________________________________________ Este símbolo advierte al usuario de que el/los terminal/es marcados de esta forma, no deben conectarse a un circuito en el que la tensión respecto a tierra 500V exceda 1.000 V en AC o DC. Equipo protegido mediante aislamiento doble (Clase II) Cumple con las reglamentaciones actuales de la Comunidad Europea Símbolos e indicadores... - Página 6 AD Instruments _______________________________________________________________________________ MODE Esta tecla permite seleccionar entre medidas alternas AC o continuas DC en tensión, Amperios, mA, A, Ω, , ))), Capacidad, HZ, % HOLD La tecla HOLD permite controlar la retención de los datos en la pantalla. Al pulsar la tecla, el valor actual permanecerá...
-
Página 7: Medidas De Tensión Ac/Dc
AD Instruments _______________________________________________________________________________ Medidas de tensión AC/DC 1. Inserte la punta de prueba negra en terminal negativo (COM) y la punta de prueba roja en el terminal positivo (V). 2. Ponga el conmutador giratorio en tensión alterna V o continua V 3. -
Página 8: Medida De Resistencia
AD Instruments _______________________________________________________________________________ 4. Para la medida de corrientes hasta 10 A DC, ponga el conmutador giratorio en la posición de A e inserte el conector de la punta de prueba roja en el terminal (10A). 5. Pulse la tecla MODE. El modo de medida cambiará entre AC o DC según se requiera. -
Página 9: Comprobación De Diodos
AD Instruments _______________________________________________________________________________ 2. Inserte el conector de la punta de prueba negra en el terminal negativo (COM) y el conector de la punta de prueba roja en el terminal positivo ))) 3. Pulse la tecla MODE hasta que aparezca))) en la pantalla. 4. -
Página 10: Medida De Frecuencia
AD Instruments _______________________________________________________________________________ 3. toque con las puntas de prueba el condensador a medir. 4. Lea el valor de la capacidad en la pantalla, en la que se indicará el punto decimal y el valor adecuado. Nota: Para medir grandes capacidades se necesitarán varios minutos hasta que la lectura final se estabilice. -
Página 11: Especificaciones
AD Instruments _______________________________________________________________________________ Especificaciones El multímetro AD-9962 dispone de 4.000 cuentas, es una combinación de características, precisión, facilidad de uso, seguro y fiable; dispone de medidas de tensión y corriente AC True RMS. Especificaciones técnicas: Aislamiento: Clase 2, aislamiento doble. Sobre tensión: CAT IV 600V, CAT III 1.000V NOTA: Este multímetro cumple con las especificaciones de CAT III y CAT IV IEC 61010. - Página 12 AD Instruments _______________________________________________________________________________ Altura máxima: En funcionamiento: 3.000 m, almacenado: 10.000 m Grado de polución: 2 Seguridad: El equipo cumple con IEC/EN 61010-1:2001 y IEC/EN 61010-031:2002 Alimentación: Una batería de 9 V, NEDA 1604, IEC 6F22. Dimensiones: 182 (L) x 82 (A) x 55 (Al) mm Peso: Aproximadamente 375 gr.
- Página 13 AD Instruments _______________________________________________________________________________ Entrada máxima: 400 A DC en el rango de A 400 mA DC en el rango de mA 10 A DC en el rango de 10 A Corriente alterna AC (rango automático) Rango Resolución Comentarios 400,0uA 0,1uA +1.5% de la lectura + 5 dígitos 4.000uA 40,00mA...
-
Página 14: Frecuencia (Rango Automático) Rango
AD Instruments _______________________________________________________________________________ Frecuencia (rango automático) Rango Resolución Comentarios 4,000Hz 0,001Hz +1.0% de la lectura + 3 dígitos 40,00 Hz 0,01Hz 400,0 Hz 0,1Hz 4,000KHz 1 Hz 40,00kHz 10Hz 400,0kHz 100Hz 10,00MHz 1kHz +1.2% de la lectura + 4 dígitos Sensibilidad: >0,5 V para ... -
Página 15: Mantenimiento
AD Instruments _______________________________________________________________________________ Mantenimiento El exterior del instrumento deberá limpiarse regularmente usando un plumero o un paño. La suciedad que resulte difícil de quitar en la carcasa, podrá limpiarse con un paño humedecido con una solución compuesta por el 99% de agua y 1% de detergente suave. -
Página 16: Sustitución De Fusibles
AD Instruments _______________________________________________________________________________ PRECAUCIÓN: Para evitar descargas eléctricas, no use el instrumento mientras tenga la tapa de la batería quitada. 1. Desconecte las puntas de prueba del multímetro. 2. Abra la tapa de la batería aflojando el tornillo usando un destornillador Phillips. 3. -
Página 17: Safety Warnings
AD Instruments _______________________________________________________________________________ SAFETY WARNINGS The following safety information must be observed to insure maximum personal safety during the operation at this meter: Measurements beyond the maximum selected range must not be attempted. Extreme care must be taken when measuring above 50 V, especially on live bus-bars. -
Página 18: Symbols And Annunciators
AD Instruments _______________________________________________________________________________ Equipment protected throughout by Double Insulation (Class II) Equipment complies with current EU directives. SYMBOLS AND ANNUNCIATORS ))) Continuity Low Battery Diode test HOLD Data Hold AUTO AutoRanging Alternating Current or Voltage Direct Current or Voltage Volts A, mA,uA Current range OPERATION To turn on the instrument turn the range knob from the OFF position to any... -
Página 19: Max/Min Button
AD Instruments _______________________________________________________________________________ locked and keep unchanged .To press the key again, the locked status will be erased and enter the normal measurement status. RANGE button When the meter is first turned on, it automatically goes into AutoRanging. This automatically selects the best range for the measurements being made and is generally the best mode for most measurements. -
Página 20: Dc Current Measurement
AD Instruments _______________________________________________________________________________ 3.Use the MODE button to select AC or DC Voltage 4.Connect the test leads in parallel to the circuit under test. 5.Read the voltage measurement on the LCD display DC CURRENT MEASUREMENT 1. Insert the black test lead banana plug into the negative (COM) jack. 2. -
Página 21: Resistance Measurement
AD Instruments _______________________________________________________________________________ 8. Apply power to the circuit. 9. Read the current in the display. The display will indicate the proper decimal point, value and symbol. RESISTANCE [Ω] MEASUREMENT WARNING: To avoid electric shock, disconnect power to the unit under test and discharge all capacitors before taking any resistance measurements. -
Página 22: Capacitance Measurement
AD Instruments _______________________________________________________________________________ Note the meter reading. 5. Reverse the probe polarity by switching probe position. Note this reading. 6. The diode or junction can be evaluated as follows: A. If one reading shows a value and the other reading shows OL, the diode is good. -
Página 23: Temperature Measurement
AD Instruments _______________________________________________________________________________ TEMPERATURE MEASUREMENT 1. Set the function switch to the Temperature position. 2. Insert the Temperature Probe into the input jacks, making sure to observe the correct polarity. 3. Press the “ºF/ºC” button until “ºF or ºC” appears in the display. 4. - Página 24 AD Instruments _______________________________________________________________________________ Over-range: “OL” mark indication. Low battery indication: A battery “ “symbol is displayed when the battery voltage drops below the operating level. Measurement rate: 2 times per second nominal. Auto power off: Meter automatically shuts down after approx. 30 minutes of inactivity.
- Página 25 AD Instruments _______________________________________________________________________________ AC Response: 50 Hz to 400Hz Maximum Input: 1000V dc or 1000V ac rms. DC Current (Auto-ranging) Range Resolution Remarks 400.0uA 0.1uA +1.2% of rdg + 5 digits 4000uA 40.00mA 10uA 400.0mA 100uA 10mA +1.5% of rdg + 5 digits Overload Protection: FF500mA / 1000V and F10A / 1000V Fuse.
- Página 26 AD Instruments _______________________________________________________________________________ Capacitance (Auto-ranging) Range Resolution Remarks 40.00nF 10pF +5.0% of rdg + 7 dgts 400.0nF 0.1nF +3.0% of rdg + 5 dgts 4.000uF 40.00uF 10nF 400.0uF 0.1uF 4.000mF 1 uF +5.0% of rdg + 7 dgts 40.00mF 10 uF Input Protection: 1000V dc or 1000V ac rms.
-
Página 27: Maintenance
AD Instruments _______________________________________________________________________________ Audible continuity Audible threshold: Less than 35Ω Test current MAX. 1.5mA Overload protection: 1000V dc or ac rms. Maintenance WARNING: To avoid electric shock, disconnect the test leads from any source of voltage before removing the battery door. 1. - Página 28 AD Instruments _______________________________________________________________________________ 5. Always use a fuse of the proper size and value (0.5A/1000V fast blow for the 400mA range, 10A/1000V fast blow for the 10A range). 6. Put the fuse door back in place. Insert the screw and tighten it securely. WARNING: To avoid electric shock, do not operate your meter until the fuse door is in place and fastened securely.