Tabla de contenido
Publicidad
Idiomas disponibles
Idiomas disponibles
Enlaces rápidos
Publicidad
Tabla de contenido

Resumen de contenidos para Stanley TIMEIT BND-60/U49A
- Página 1 TIMEIT SWITCH ™ Mechanical Time Switch Temporizador Mecánico con Interruptor Commutateur de Temps Mécanique Customer Service / Servicio al Cliente / Service à la Clientèle 1-800-730-3707 • 10AM - 6PM, EST Monday to Friday / Lunes a Viernes / Lundi au Vendredi Model/Modelo/Modèle# BND-60/U49A...
- Página 2 TIMEIT SWITCH ™ Mechanical Time Switch ITEM #31255...
-
Página 3: Technical Information
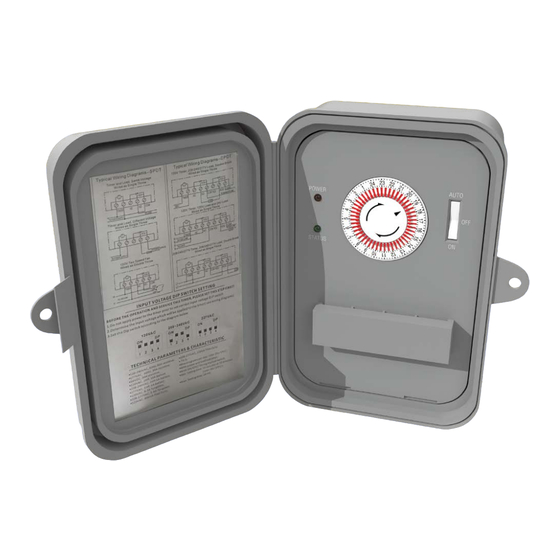
READ INSTRUCTIONS CAREFULLY IN ORDER OPERATING INSTRUCTIONS TO SET UP YOUR OUTDOOR TIMER PROPERLY PRODUCT SUMMARY This mechanical timer can be configured for various voltages: 120/VAC, 208VAC, 240VAC and 277VAC. Selecting the desired voltage is done so by simply positioning the dip switch to the required voltage. -
Página 4: Dip Switch Configuration
INPUT VOLTAGE DIP SWITCH SETTING CAUTION: DIP SWITCH VOLTAGE SELECTION MUST BE FINALIZED PRIOR TO APPLYING POWER TO THE TIME CONTROL. 1. Do not apply power to the timer prior to setting correct input voltage using the DIP switch. 2. Determine the input voltage using the DIP switch (see wiring diagrams). 3. - Página 5 Monday to Friday PURCHASED, OR SHIP IT PREPAID WITH PROOF OF PURCHASE TO THE NCC, 1840 MCDONALD AVENUE, STANLEY® and the STANLEY® logo are BROOKLYN, NY 11223. UNITS THAT FAIL TO OPERATE registered trademarks of Stanley Black & DURING THE SECOND OR THIRD YEAR FROM DATE OF Decker, Inc., or one of its affiliates, and...
- Página 6 OPERATING INSTRUCTIONS When the Time Control is installed and power applied, the timer’s dial will turn clockwise maintaining time. The pointer on the face of the dial points to the current time. 1. Locate the segments around on the outer edge of the timer’s dial. These segments, each representing 15 minutes, can be pushed down and away from the edge of the dial (using a small slotted screwdriver or other fine point instrument) to set the load “ON”...
- Página 7 TIMEIT SWITCH ™ Temporizador Mecánico con Interruptor ARTICULO #31255...
-
Página 8: Resumen Del Producto
LEA LAS INSTRUCCIONES ATENTAMENTE PARA INSTRUCCIONES DE USO CONFIGURAR EL TEMPORIZADOR ADECUADAMENTE RESUMEN DEL PRODUCTO Este temporizador mecánico puede configurarse para varios voltajes: 120 Vca, 208 Vca, 240 Vca y 277 Vca. La selección del voltaje deseado se hace simplemente colocando el interruptor DIP en el voltaje requerido. -
Página 9: Colocación De Interruptor Dip Del Voltaje De Entrada
COLOCACIÓN DE INTERRUPTOR DIP DEL VOLTAJE DE ENTRADA PRECAUCIÓN: LA SELECCIÓN DEL VOLTAJE DEL INTERRUPTOR DIP DEBE TERMINARSE ANTES DE APLICAR ENERGÍA AL CONTROL DE TIEMPO. 1. No aplique energía al temporizador antes de configurar el voltaje de entrada correcto utilizando el interruptor DIP. -
Página 10: Diagramas De Conexiones De Cable
Lunes a Viernes PREPAGADO POR ADELANTADO CON LA PRUEBA DE LA COMPRA A THE NCC, 1840 MCDONALD AVENUE, STANLEY® y el STANLEY® logo son BROOKLYN, NY 11223. LAS UNIDADES QUE DEJAN DE marcas registradas de Stanley Black & FUNCIONAR DURANTE EL SEGUNDO O TERCER AÑO DE Decker, Inc., o uno de sus afiliados, y se... -
Página 11: Función Del Interruptor De Anulación
INSTRUCCIONES DE OPERACIÓN Cuando se instala el control de tiempo y se aplica energía, el marcador del temporizador girará a la derecha manteniendo el tiempo. El puntero en la cara del marcador apunta a la fecha actual. 1. Ubique los segmentos alrededor del borde externo del marcador del temporizador. Estos segmentos, cada uno representando 15 minutos, pueden presionarse hacia abajo y lejos del borde del marcador (utilizando un desarmador ranurado u otro instrumento de punta fina) para establecer el periodo de carga en “ENCENDIDO”. - Página 12 TIMEIT SWITCH ™ Commutateur de Temps Mécanique ARTICLE #31255...
-
Página 13: Informations Techniques
LIRE ATTENTIVEMENT LES INSTRUCTIONS POUR MODE D’OPÉRATION BIEN RÉGLER VOTRE MINUTERIE EXTÉRIEURE RÉSUMÉ DU PRODUIT Ce minuteur mécanique peut être configuré pour différentes tensions : 120/VAC, 208VAC, 240VAC et 277VAC. La sélection de la tension souhaitée est faite par un simple positionnement du commutateur DIP sur le niveau de tension désiré. -
Página 14: Indicateurs Led
RÉGLAGE DE LA TENSION D’ENTRÉE SUR LE COMMUTATEUR DIP MISE EN GARDE : LE RÉGLAGE DE LA TENSION D’ENTRÉE SUR LE COMMUTATEUR DOIT ÊTRE FINALISÉ AVANT D’ALIMENTER LE MINUTEUR. 1. Ne pas alimenter le minuteur avant d’avoir réglé une tension d’entrée correcte en utilisant le commutateur DIP. -
Página 15: Schémas De Câblage
D’UN DÉFAUT, ÉCHANGEZ-LE LÀ OÙ IL A ÉTÉ ACHETÉ OU Lundi au Vendredi EXPÉDIEZ-LE EN PORT PAYÉ CCOMPAGNÉ D’UNE PREUVE STANLEY® et le STANLEY® logo sont D’ACHAT À THE NCC, 1840 MCDONALD AVENUE, BROOKLYN, des marques déposées de Stanley NY 11223. LES APPAREILS QUI TOMBENT EN PANNE AU Black &... - Página 16 MODE D’EMPLOI Lorsque le minuteur est installé et alimenté, son cadran tourne dans le sens des aiguilles d’une montre au fil du temps. Le pointeur indique l’heure actuelle. 1. Repérez les segments situés autour de la bordure extérieure du cadran du minuteur. Ces segments, dont chacun représente 15 minutes, peuvent être poussés vers le bas et hors du cadran (à...