Publicidad
Idiomas disponibles
Idiomas disponibles
Enlaces rápidos
Owner's Manual
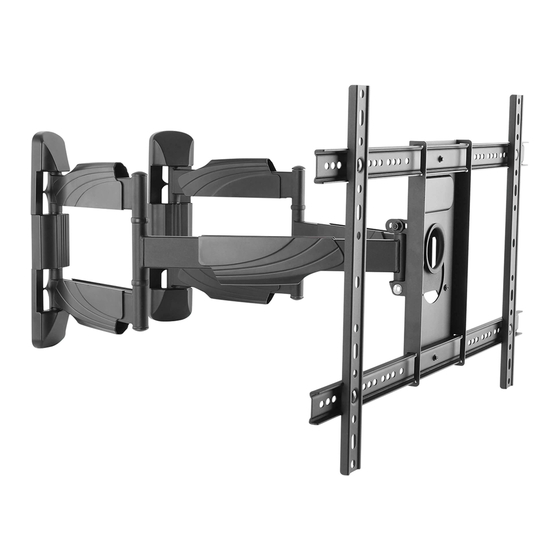
Corner Wall Mount
Curved Screens
Español 12 • Français 23 • Русский 34 • Deutsch 45
Register your product for quicker service and ultimate peace of mind.
You could also win an ISOBAR6ULTRA surge protector—a $100 value!
1111 W. 35th Street, Chicago, IL 60609 USA • www.tripplite.com/support
19-02-090-933920.indb 1
for Flat or
Model: DMWC3770M
200x200 / 300x200
300x300 / 400x200
400x300 / 400x400
600x400
PROTECT YOUR INVESTMENT!
www.tripplite.com/warranty
Copyright © 2019 Tripp Lite. All rights reserved.
1
70"
99 lb.
MAX
(45 kg)
3/8/2019 4:27:22 PM
Publicidad

Manuales relacionados para Tripp-Lite DMWC3770M


Resumen de contenidos para Tripp-Lite DMWC3770M
- Página 1 Owner’s Manual Corner Wall Mount for Flat or Curved Screens Model: DMWC3770M 200x200 / 300x200 70" 300x300 / 400x200 99 lb. 400x300 / 400x400 (45 kg) 600x400 Español 12 • Français 23 • Русский 34 • Deutsch 45 PROTECT YOUR INVESTMENT! Register your product for quicker service and ultimate peace of mind.
-
Página 2: Warranty And Product Registration
NOTE: Read the entire instruction manual before you start assembly and installation. WARNING • Do not begin the installation until you have read and understood the instructions and warnings contained in this manual. If you have any questions regarding any of the instructions or warnings, please visit www.tripplite.com/support. - Página 3 Component Checklist IMPORTANT: Ensure you have received all parts according to the component checklist prior to installing. If any parts are missing or faulty, visit www.tripplite.com/support for service. (x2) (x2) (x2) (x4) (x4) (x1) (x1) Package M M5x14 (x4) M6x14 (x4) M6x30 (x4) M8x30 (x4) M8x50 (x4)
- Página 4 Assembly Mount on Wood Stud Wall 55 mm (2.2") O / 4.5 mm (O / 3/16") Find and mark the exact location of mounting holes W-A W-C Drill pilot holes Screw the assembled wall plate to the wall WARNING • Make sure the mounting screws are anchored into the center of the studs. Use of a stud finder is highly recommended.
- Página 5 Assembly Mount on Solid Brick and Concrete Block 60 mm (2.4") O / 10 mm (O / 3/8") Find and mark the exact location of mounting holes W-A W-C Drill pilot holes Screw the assembled wall plate to the wall WARNING •...
- Página 6 Assembly 23.6 in. (600 mm) 15.75 in. (400 mm) 11.8 in. (300 mm) 7.9 in. (200 mm) 19-02-090-933920.indb 6 3/8/2019 4:27:26 PM...
- Página 7 Assembly For Flat Back Screens Note: Choose appropriate screws and washers according to the type of screen. • Position the adapter brackets as close as possible to the center of the display. • Firmly secure the adapter brackets onto the display using the screws and any other necessary hardware components included with the unit.
- Página 8 Assembly For Recessed Back Screen or to Access A/V Inputs Note: Choose appropriate screws, washers and spacers (if necessary) according to the type of screen. • Position the adapter brackets as close as possible to the center of the display. •...
- Página 9 Assembly Using an assistant or mechanical lifting equipment, hook the display with attached adapter brackets over the top of the wall-mount bracket. Tighten the bolt on the bottom of the wall- mount bracket to secure the unit. 19-02-090-933920.indb 9 3/8/2019 4:27:30 PM...
- Página 10 Assembly 180° +5° –5° +5° –5° 19-02-090-933920.indb 10 3/8/2019 4:27:31 PM...
- Página 11 Maintenance • Check that the bracket is secure and safe to use at regular intervals (at least every three months). • Please visit www.tripplite.com/support if you have any questions. 1111 W. 35th Street, Chicago, IL 60609 USA • www.tripplite.com/support 19-02-090 93-3920_RevA 19-02-090-933920.indb 11 3/8/2019 4:27:32 PM...
- Página 12 Manual del Propietario Soporte de Servicio Pesado para Pantallas Planas o Curvas para Instalación en Esquina Modelo: DMWC3770M 200x200 / 300x200 70" 300x300 / 400x200 45 kg 400x300 / 400x400 MÁXIMO [99 lb] 600x400 English 1 • Français 23 • Русский 34 • Deutsch 45 1111 W.
- Página 13 NOTA: Lea todo el manual de instrucciones antes de iniciar la instalación y ensamble. ADVERTENCIA • No inicie la instalación hasta que haya leído y entendido las instrucciones y advertencias contenidas en este manual. Si tiene cualquier pregunta con respecto a cualquiera de las instrucciones o advertencias, visite www.tripplite.com/support.
-
Página 14: Accesorios Y Partes Incluidas En El Empaque
Accesorios y Partes Incluidas en el Empaque IMPORTANTE: Asegúrese antes de instalar, de haber recibido todas las piezas de acuerdo a la lista de comprobación de componentes. Si faltase cualquier parte o estuviese dañada, visite www.tripplite.com/support para solicitar servicio. (x2) (x2) (x2) (x4) -
Página 15: Ensamble
Ensamble Instalación en Pared con Entramado de Madera 55 mm [2.2"] O / 4.5 mm [O / 3/16"] Encuentre y marque la posición exacta de los orificios de instalación W-A W-C Barrene los orificios piloto Atornille la placa de pared ensamblada a la pared ADVERTENCIA... - Página 16 Ensamble Instalación sobre Ladrillos Sólidos y Bloques de Concreto 60 mm [2.4"] O / 10 mm [O / 3/8"] Encuentre y marque la posición exacta de los orificios de instalación W-A W-C Barrene los orificios piloto Atornille la placa de pared ensamblada a la pared ADVERTENCIA...
- Página 17 Ensamble 600 mm [23.6"] 400 mm [15.75"] 300 mm [11.8"] 200 mm [7.9"] 19-02-090-933920.indb 17 3/8/2019 4:27:37 PM...
-
Página 18: Para Pantallas Con Respaldo Plano
Ensamble Para Pantallas con Respaldo Plano Nota: Elija los tornillos y arandelas apropiados de acuerdo al tipo de pantalla. • Coloque los soportes adaptadores tan cerca como sea posible al centro de la pantalla. • Asegure firmemente los soportes adaptadores en la pantalla usando los tornillos y cualquier otro componente necesario incluido en la unidad. - Página 19 Ensamble Para Pantalla con Parte Posterior Cóncava o para Acceder a Entradas de audio y video Nota: Elija los tornillos, arandelas y espaciadores (si fueran necesarios) apropiados de acuerdo al tipo de pantalla. • Coloque los soportes adaptadores tan cerca como sea posible al centro de la pantalla. •...
- Página 20 Ensamble Usando un ayudante o equipo de elevación mecánico, cuelgue la pantalla con los soportes del adaptador colocados sobre la parte superior del soporte para instalación en pared. Apriete el tornillo en la parte inferior de la abrazadera de montaje a la pared para asegurar la unidad.
- Página 21 Ensamble 180° +5° –5° +5° –5° 19-02-090-933920.indb 21 3/8/2019 4:27:42 PM...
-
Página 22: Mantenimiento
Mantenimiento • Compruebe a intervalos regulares (al menos trimestralmente) que el soporte esté bien instalado y sea seguro para usarse. • Si tiene alguna pregunta, visite por favor a www.tripplite.com/support. 1111 W. 35th Street, Chicago, IL 60609 EE UU • www.tripplite.com/support 19-02-090 93-3920_RevA 19-02-090-933920.indb 22 3/8/2019 4:27:42 PM... - Página 23 Manuel de l'utilisateur Montage mural d'angle pour écrans plats ou incurvés Modèle : DMWC3770M 200 x 200/300 x 200 177,8 cm 300 x 300/400 x 200 (70 po) 45 kg 400 x 300/400 x 400 MAX. (99 lb) 600 x 400 English 1 •...
- Página 24 REMARQUE : Lire le manuel d'instructions en entier avant de commencer l'assemblage et l'installation. AVERTISSEMENT • Ne pas commencer l'installation avant d'avoir lu et compris les instructions et les avertissements contenus dans le présent manuel. Pour toute question concernant les instructions ou les avertissements, veuillez visiter www.tripplite.com/support.
- Página 25 Liste de vérification des composants IMPORTANT : S'assurer d'avoir reçu toutes les pièces conformément à la liste de vérification des composants avant de procéder à l'installation. Si des pièces sont manquantes ou défectueuses, visiter www.tripplite.com/support pour obtenir de l'aide. (x2) (x2) (x2) (x4)
- Página 26 Assemblage Montage sur des montants muraux 55 mm (2,2 po) O / 4,5 mm (O / 3/16 po) Déterminer et marquer l'emplacement exact des trous de montage. W-A W-C Percer des avant-trous. Visser la plaque murale assemblée au mur. AVERTISSEMENT •...
- Página 27 Assemblage Montage sur de la brique solide ou des blocs en béton 60 mm (2,4 po) O / 10 mm (O / 3/8 po) Déterminer et marquer l'emplacement exact des trous de montage. W-A W-C Percer des avant-trous. Visser la plaque murale assemblée au mur.
- Página 28 Assemblage 600 mm (23,6 po) 400 mm (15,75 po) 300 mm (11,8 po) 200 mm (7,9 po) 19-02-090-933920.indb 28 3/8/2019 4:27:46 PM...
- Página 29 Assemblage Pour les écrans à dos plat Remarque : Choisir les vis et les rondelles appropriées en fonction du type d'écran. • Positionner les supports d'adaptateur aussi près du centre de l'écran que possible. • Retenir fermement les supports d'adaptateur sur l'écran en utilisant les vis et tout autre composant de quincaillerie nécessaire inclut avec l'appareil.
- Página 30 Assemblage Pour les écrans à dos encastré ou entrées d'accès A/V Remarque : Choisir les vis, les rondelles et les entretoises appropriées (le cas échéant) en fonction du type d'écran. • Positionner les supports d'adaptateur aussi près du centre de l'écran que possible. •...
- Página 31 Assemblage Avec l'aide d'un assistant ou de l'équipement de levage mécanique, accrocher l'écran avec les supports d'adaptateur attachés sur le dessus du support de montage mural. Serrer le boulon dans la partie inférieure du support de montage mural pour fixer l'appareil en place. 19-02-090-933920.indb 31 3/8/2019 4:27:48 PM...
- Página 32 Assemblage 180° +5° –5° +5° –5° 19-02-090-933920.indb 32 3/8/2019 4:27:49 PM...
- Página 33 Entretien • Vérifier à intervalles réguliers que le support peut être utilisé de façon sûre et sécuritaire (au moins tous les trois mois). • Pour toute question, visiter www.tripplite.com/support. 1111 W. 35th Street, Chicago, IL 60609 USA • www.tripplite.com/support 19-02-090 93-3920_RevA 19-02-090-933920.indb 33 3/8/2019 4:27:49 PM...
-
Página 34: Руководство Пользователя
Руководство пользователя Угловой кронштейн для настенного монтажа плоских и вогнутых экранов Модель: DMWC3770M 200x200 / 300x200 300x300 / 70" 400x200 400x300 / 400x400 МАКС. 45 кг 600x400 English 1 • Español 12 • Français 23 • Deutsch 45 1111 W. 35th Street, Chicago, IL 60609 USA • www.tripplite.com/support Охраняется... -
Página 35: Гарантийные Обязательства
ПРИМЕЧАНИЕ. Перед началом установки и сборки модуля внимательно изучите все разделы руководства. ВНИМАНИЕ! • Не начинайте установку до тех пор, пока не ознакомитесь со всеми указаниями и предупреждениями в настоящем руководстве и не поймете их смысл. При возникновении вопросов относительно любых указаний или предупреждений посетите страницу www. tripplite.com/support. - Página 36 Перечень комплектации ВНИМАНИЕ! Перед началом установки убедитесь в наличии всех деталей согласно перечню комплектации. В случае отсутствия или повреждения каких-либо деталей обратитесь за помощью на страницу www.tripplite.com/support. (2 шт.) (2 шт.) (2 шт.) (4 шт.) (4 шт.) (1 шт.) (1 шт.) Упаковочный...
- Página 37 Порядок сборки Крепление к стене с деревянным каркасом 55 мм O / 4,5 мм Определите и разметьте точное местоположение монтажных отверстий W-A W-C Высверлите направляющие отверстия Привинтите собранную крепежную пластину к стене ВНИМАНИЕ! • Необходимо обеспечить ввертывание крепежных винтов по центру элементов каркаса. С этой целью настоятельно...
- Página 38 Порядок сборки Крепление к сплошному кирпичу или бетонному блоку 60 мм O / 10 мм Определите и разметьте точное местоположение монтажных отверстий W-A W-C Высверлите направляющие отверстия Привинтите собранную крепежную пластину к стене ВНИМАНИЕ! • При монтаже настенных кронштейнов на бетонный строительный блок (известный также как БСБ или "шлакобетонный...
- Página 39 Порядок сборки 600 мм 400 мм 300 мм 200 мм 19-02-090-933920.indb 39 3/8/2019 4:27:52 PM...
- Página 40 Порядок сборки Для экранов с плоской задней поверхностью ТВ ТВ ТВ Примечание. Выбирайте подходящие винты и шайбы в соответствии с типом экрана. • Разместите переходные кронштейны как можно ближе к центру дисплея. • Прочно прикрепите переходные кронштейны к дисплею с помощью...
- Página 41 Порядок сборки Для экранов, устанавливаемых заподлицо, или для получения доступа к разъемам аудио-/видеовхода ТВ ТВ ТВ Примечание. Выбирайте подходящие винты, шайбы и проставки (при необходимости) в соответствии с типом экрана. • Разместите переходные кронштейны как можно ближе к центру дисплея. •...
- Página 42 Порядок сборки Обратившись за помощью или воспользовавшись механическим подъемным оборудованием, зацепите дисплей с прикрепленными к нему переходными кронштейнами за верхний край кронштейна для крепления к стене. Для фиксации устройства затяните нижний болт кронштейна для крепления к стене. 19-02-090-933920.indb 42 3/8/2019 4:27:54 PM...
- Página 43 Порядок сборки 180° +5° –5° +5° –5° 19-02-090-933920.indb 43 3/8/2019 4:27:56 PM...
-
Página 44: Уход За Изделием
Уход за изделием • Регулярно (не реже, чем раз в три месяца) проверяйте надежность крепления кронштейна и безопасность его использования. • В случае возникновения каких-либо вопросов посетите страницу www.tripplite.com/support. 1111 W. 35th Street, Chicago, IL 60609 USA • www.tripplite.com/support 19-02-090 93-3920_RevA 19-02-090-933920.indb 44 3/8/2019 4:27:56 PM... - Página 45 Benutzerhandbuch Eck-Wandhalterung für flache oder gekrümmte Bildschirme Modell: DMWC3770M 200x200 / 300x200 70" 300x300 / 400x200 45 kg 400x300 / 400x400 max. (99 lb.) 600x400 English 1 • Español 12 • Français 23 • Русский 34 1111 W. 35th Street, Chicago, IL 60609 USA • www.tripplite.com/support Copyright ©...
- Página 46 HINWEIS: Lesen Sie das gesamte Handbuch, bevor Sie mit der Installation und Montage beginnen. WARNUNG • Beginnen Sie nicht mit dem Einbau, bevor Sie die Anweisungen und Warnhinweise in diesem Handbuch gelesen und verstanden haben. Sollten Sie Fragen bezüglich der Anweisungen oder Warnhinweise haben, besuchen Sie bitte www.tripplite.com/support.
- Página 47 Komponentenliste WICHTIG: Überprüfen Sie, ob Sie alle in der Komponentenliste aufgeführten Teile erhalten haben, bevor Sie mit der Installation beginnen. Sollten Teile beschädigt oder nicht vorhanden sein, besuchen Sie www.tripplite.com/support. (x2) (x2) (x2) (x4) (x4) (x1) (x1) Paket M M5x14 (x4) M6x14 (x4) M6x30 (x4) M8x30 (x4)
- Página 48 Montage Befestigen am Holzwandbalken 55 mm (2,2") O / 4,5 mm (O / 3/16") Suchen und markieren Sie die genaue Position der Befestigungslöcher W-A W-C Bohren Sie Führungslöcher Schrauben Sie die montierte Wandplatte an der Wand fest WARNUNG • Stellen Sie sicher, dass die Befestigungsschrauben in der Mitte der Balken verankert sind.
- Página 49 Montage Montage an Backstein oder Beton 60 mm (2,4") O / 10 mm (O / 3/8") Suchen und markieren Sie die genaue Position der Befestigungslöcher W-A W-C Bohren Sie Führungslöcher Schrauben Sie die montierte Wandplatte an der Wand fest WARNUNG •...
- Página 50 Montage 23,6 Zoll (600 mm) 15,75 Zoll (400 mm) 11,8 Zoll (300 mm) 7,9 Zoll (200 mm) 19-02-090-933920.indb 50 3/8/2019 4:27:59 PM...
- Página 51 Montage Für Bildschirme mit glatter Rückseite Hinweis: Verwenden Sie für diesen Bildschirmtyp geeignete Schrauben und Beilagscheiben. • Positionieren Sie die Adapterhalterungen so nah wie möglich an der Mitte des Bildschirms. • Schrauben Sie die Adapterhalterungen unter Verwendung der Schrauben und aller anderen notwendigen Befestigungsteile, die mit der Einheit mitgeliefert werden, sicher am Bildschirm fest.
- Página 52 Montage Für versenkte Hinterfolie oder den Zugriff auf A/V-Eingänge Hinweis: Verwenden Sie für diesen Bildschirmtyp geeignete Schrauben, Beilagscheiben und Abstandhalter (falls erforderlich). • Positionieren Sie die Adapterhalterungen so nah wie möglich an der Mitte des Bildschirms. • Schrauben Sie die Adapterhalterungen unter Verwendung der Schrauben und aller anderen notwendigen Befestigungsteile, die mit der Einheit mitgeliefert werden, sicher am Bildschirm fest.
- Página 53 Montage Heben Sie mit Hilfe einer weiteren Person oder eines Hebegerätes den Bildschirm mit den daran befestigten Adapterwinkeln über die Wandhalterung und haken Sie ihn ein. Ziehen Sie die Schraube an der Unterseite der Wandhalterung an, um das Gerät zu sichern. 19-02-090-933920.indb 53 3/8/2019 4:28:01 PM...
- Página 54 Montage 180° +5° –5° +5° –5° 19-02-090-933920.indb 54 3/8/2019 4:28:02 PM...
- Página 55 Wartung • Stellen Sie in regelmäßigen Abständen (mindestens alle drei Monate) sicher, dass die Wandhalterung sicher angebracht ist. • Falls Sie Fragen haben, besuchen Sie www.tripplite.com/support. 1111 W. 35th Street, Chicago, IL 60609 USA • www.tripplite.com/support 19-02-090 93-3920_RevA 19-02-090-933920.indb 55 3/8/2019 4:28:02 PM...