Publicidad
Idiomas disponibles
Idiomas disponibles
Enlaces rápidos
TimeSphere
Wireless Projection Clock
Model No: RM382P / RM382PA
USER MANUAL
CONTENTS
.............................................................. 2
................................................................... 2
Front View ............................................................. 2
Base View ............................................................. 3
LCD Display .......................................................... 3
........................................................ 3
Power .................................................................... 3
Clock Display Modes ............................................ 4
...................................................... 4
Reception Signal .................................................. 5
......................................................... 5
......................................................................... 5
.................................................................. 6
............................................................. 7
......................................................................... 7
.............................................................. 7
......................................................... 8
........................................................ 9
Declaration of Conformity ................................... 10
1
........................................ 9
........................... 9
Publicidad
Capítulos

Manuales relacionados para Oregon Scientific TimeSphere


Resumen de contenidos para Oregon Scientific TimeSphere
-
Página 1: Tabla De Contenido
TimeSphere About Oregon Scientific ........9 EU-Declaration of Conformity ......9 Wireless Projection Clock FCC Statement ............9 Model No: RM382P / RM382PA Declaration of Conformity ........10 USER MANUAL CONTENTS Introduction .............. 2 Overview ..............2 Front View ............. 2 Base View ............. -
Página 2: Introduction
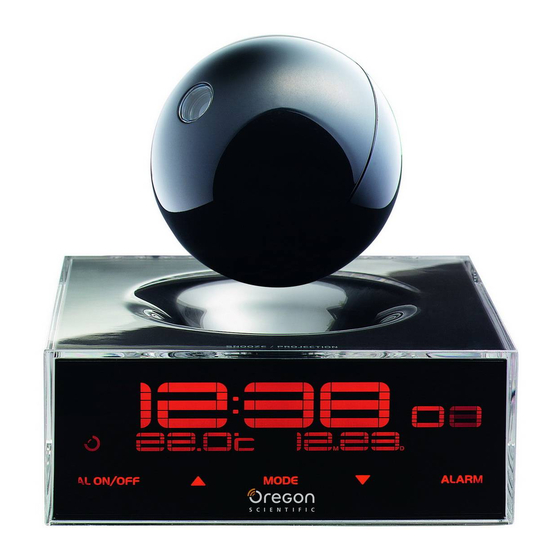
1. Projection ball: Projects time on the wall or ceiling. INTRODUCTION (Twist the closed projection unit to adjust the Thank you for selecting the Oregon Scientific™ focus.) projection clock (RM382P / RM382PA). 2. Charging pad 3. SNOOZE / PROJECTION: Activates 8-minute NOTE Please keep this manual handy as you use snooze;... -
Página 3: Base View
BASE VIEW LCD DISPLAY 1. Time 2. Clock radio reception signal 3. Rechargeable battery icon 4. Indoor temperature reading 5. Time zone / day of the week 6. Alarm 1 / 2 is activated 7. Alarm time / calendar GETTING STARTED 1. -
Página 4: Clock Display Modes
PROJECTION UNIT twisting beyond the click noise or you may break the unit. Insert rechargeable batteries (2 x AAA 1.5V) before first use, matching the polarity (+ and -): NOTE appears with the projected time when the 1. Twist the ball counter-clockwise until it loosens. projection unit batteries are low. -
Página 5: Reception Signal
RM382P: signal, it will temporarily turn the projection charging • DCF-77 generated from Frankfurt, Germany for function off. Central Europe • MSF-60 generated from Rugby, England CLOCK SETTINGS The radio signal range is 1500 km (932 miles). You only need to do this if you have disabled the clock RM382PA: radio reception, or if you are too far from the radio •... -
Página 6: Projector
1. Press ALARM to toggle between the alarm displays NOTE When the snooze function is activated, the alarm and select either alarm 1 or 2, for setting. icon will flash. 2. Press and hold ALARM to enter alarm setting mode. The alarm setting will blink. -
Página 7: Temperature
To use the projector remotely: • Placement of this product on wood surfaces with 1. Make sure the projection unit has been fully charged certain types of finishes, such as clear varnish, may (see Power section). result in damage to the finish. Consult the furniture 2. -
Página 8: Specifications
instructions. Do not mix new and old batteries as the SPECIFICATIONS old ones may leak. • Do not dispose this product as unsorted municipal TYPE DESCRIPTION waste. Collection of such waste separately for special Calendar Day of week treatment is necessary. Current date / month •... -
Página 9: About Oregon Scientific
ABOUT OREGON SCIENTIFIC EU-DECLARATION OF CONFORMITY Hereby, Oregon Scientific, declares that the Projection Visit website (www.oregonscientific.com) Clock (Model RM382P) is in compliance with the learn more about Oregon Scientific products such as essential requirements and other relevant provisions of digital cameras; MP3 players; children’s electronic Directive 1999/5/EC. -
Página 10: Declaration Of Conformity
DECLARATION OF CONFORMITY B ISM equipment, pursuant to Part 18 of the FCC Rules. These limits are designed to provide reasonable The following information is not to be used as contact protection against harmful interference in a residential for support or sales. Please call our customer service installation. - Página 11 TimeSphere Vorsichtsmaßnahmen ......... 8 Technische Daten ..........9 Projektionsfunkuhr Über Oregon Scientific (RM382P / RM382PA) ........9 EG-Konformitätserklärung ........ 9 BEDIENUNGSANLEITUNG INHALT Einleitung ..............2 Übersicht ..............2 Vorderansicht ............2 Boden ..............3 Anzeige ..............3 Erste Schritte ............3 Stromversorgung ............
-
Página 12: Einleitung
1. Projektionskugel: Uhrzeit auf Wand oder Zimmerdecke EINLEITUNG projizieren. (Die geschlossene Projektionseinheit Wir danken Ihnen, dass Sie sich für die Projektionsfunkuhr drehen, um die Schärfeeinzustellen.) mit kabelloser Projektionseinheit von Oregon Scientific ™ 2. Ladefeld (RM382P / RM382PA) entschieden haben. 3. SNOOZE PROJEKTION: 8-Minuten- Schlummerfunktion aktivieren;... -
Página 13: Anzeige
BASISANSICHT LCD-ANZEIGE 1. Uhrzeit 2. Empfangssignal für Funkzeit 3. Symbol für wiederaufladbare Batterie 4. Messwert für Innentemperatur 5. Zeitzone / Wochentag 6. Alarm 1 / 2 aktiviert 7. Alarmzeit / Kalender 1. Kreisflächen für Ladebasis: Einheit positionieren, ERSTE SCHRITTE um die Uhrzeit vertikal in 3 unterschiedlichen Winkeln zu projizieren STROMVERSORGUNG 2. -
Página 14: Uhranzeige-Modi
PROJEKTIONSEINHEIT HINWEIS Beim Öffnen oder Schließen der Kugel Legen Sie die wiederaufladbaren Batterien (2 x AAA können Sie durch ein Klicken hören, dass diese 1,5V) vor der ersten Verwendung ein und achten Sie geöffnet oder geschlossen wurde. Drehen Sie nach auf die Übereinstimmung der Polarität (+ und -): dem Klickgeräusch nicht mehr weiter, da die Einheit 1. -
Página 15: Zeitsignalempfang
ermittelt den Beleuchtungsgrad im Raum und stimmt Das Empfangssignal beginnt zu blinken, wenn eine die Uhranzeige darauf ab. Stellen Sie die Rückseite Signalsuche erfolgt. Wenn das Funksignal schwach der Uhr daher nicht zu nahe an eine Wand oder einen ist, kann es bis zu 24 Stunden dauern, bis ein gültiges Gegenstand, da der Lichtsensor ansonsten nicht Signal empfangen wird. -
Página 16: Alarm
aktiviert ist. Monats-Format, Monat, Tag und Anzeigesprache. Das Alarmsymbol erscheint auf der Anzeige und gibt HINWEIS Wenn Sie +1 in der Einstellung der Zeitzone an, welcher Alarm eingestellt wurde: eingeben, ergibt dies Ihre Ortszeit plus 1 Stunde. Wenn Sie sich in den USA (nur RM382PA) befinden, stellen SYMBOL BEDEUTUNG Sie die Uhr auf:... -
Página 17: Projektor
vollständig aufgeladen wurde (siehe Abschnitt PROJEKTOR Stromversorgung). Wenn die Projektionseinheit auf die Haupteinheit gestellt 2. Öffnen Sie die Projektionseinheit durch Drehen und wird, werden ihre Batterien automatisch aufgeladen und drücken Sie auf , der Projektionsstrahl sollte nun ihre Zeit mit der Haupteinheit synchronisiert. angezeigt werden. -
Página 18: Vorsichtsmaßnahmen
beschädigten Batterien und verformten Einzelteilen VORSICHTSMASSNAHMEN führen kann. Dieses Gerät wurde entworfen, um Ihnen jahrelang • Bei Auftreten von Funkstörungen in der Umgebung Freude zu bereiten, wenn Sie es sorgfältig handhaben. könnte dieses Produkt vorübergehend nicht Hier sind einige Vorsichtsmaßnahmen: funktionieren. -
Página 19: Technische Daten
TECHNISCHE DATEN ÜBER OREGON SCIENTIFIC Besuchen Sie unsere Website (www.oregonscientific. BESCHREIBUNG de) und erfahren Sie mehr über unsere Oregon Kalender Wochentag Scientific-Produkte wie zum Beispiel Wetterstationen, Aktuelles Datums- / Projektions-Funkuhren, Produkte für Gesundheit Monatsformat und Fitness, Digitalkameras, MP3-Player, DECT-/ Uhrzeit 12- oder 24-Stundenformat Konferenztelefone und elektronische Lernprodukte für... - Página 20 TimeSphere Ficha técnica ............9 Sobre Oregon Scientific ........9 Reloj proyector inalámbrico EU - Declaración de conformidad Modelo: RM382P / RM382PA ....9 MANUAL DE USUARIO ÍNDICE Introducción ............2 Resumen ..............2 Vista frontal ............2 Vista de la base ............3 Pantalla LCD ............
-
Página 21: Introducción
1. Esfera-proyector: Proyecta la hora en la pared o el INTRODUCCIÓN techo. (Haga girar la unidad de proyección cerrada Gracias por elegir el reloj proyector de Oregon para enfocar.) Scientific (RM382P / RM382PA). ™ 2. Bloque de carga 3. REPETICIÓN DE ALARMA / PROYECCIÓN: NOTA Tenga este manual a mano cuando use el nuevo Activa un intervalo de 8 minutos;... -
Página 22: Vista De La Base
VISTA DE LA BASE PANTALLA LCD 1. Hora 2. Recepción de la señal del reloj/radio 3. Icono de la pila recargable 4. Lectura de temperatura interior 5. Zona horaria / día de la semana 6. Alarma 1 / 2 activada 7. -
Página 23: Unidad De Proyección
UNIDAD DE PROYECCIÓN NOTA Cuando abra o cierre la esfera oirá un clic, eso Antes de utilizar el dispositivo por primera vez, introduzca significa que se ha abierto o cerrado. No siga girando las pilas recargables (2 x AAA 1,5V) haciendo coincidir la esfera después de oír el clic, o podría romper la la polaridad (+ y -): unidad. -
Página 24: Recepción Del Reloj
Para conseguir una mejor recepción, coloque el reloj objeto, porque la luz podría no funcionar. alejado de objetos de metal y aparatos eléctricos, y cerca de una ventana. RECEPCIÓN DEL RELOJ Este producto está diseñado para sincronizar su Para activar / desactivar la recepción del reloj por calendario y reloj automáticamente en cuanto está... -
Página 25: Alarma
dos alarmas ON o OFF. 0 para hora del Pacífico +1 para hora de de Montaña O bien +2 para hora Central +3 para hora del Este • Pulse ALARM para seleccionar alarma 1 ó 2 y pulse AL ON / OFF. NOTA Las opciones de idioma son (E) inglés, (F) francés, (D) alemán, (I) italiano y (S) español. -
Página 26: Descripción
Para cambiar el ángulo de proyección: ICONO DESCRIPCIÓN Coloque la unidad en uno de los tres círculos planos La unidad de proyección no de la base para mostrar la hora verticalmente en tres está sincronizada con la unidad ángulos distintos. principal y se está... -
Página 27: Ficha Técnica
de que los objetos cercanos, como diarios, manteles, • Los contenidos de este manual no pueden cortinas, etc. no cubran accidentalmente los orificios reproducirse sin permiso del fabricante. de ventilación. • No sumerja el dispositivo en agua. Si se vertiera NOTA La ficha técnica de este producto y los contenidos líquido en la unidad, límpiela con un paño suave y de este manual de usuario pueden cambiarse sin aviso. -
Página 28: Sobre Oregon Scientific
Directiva 1999/5/CE. Tiene a su disposición una copia firmada SOBRE OREGON SCIENTIFIC y sellada de la Declaración de Conformidad, solicítela Visite nuestra página web (www.oregonscientific.com) al Departamento de Atención al Cliente de Oregon para conocer más sobre los productos de Oregon... - Página 29 TIME SPHERE A propos d’Oregon Scientific ......10 EU - Déclaration de conformité ..... 10 (Modèles RM382P / RM382PA) MANUEL DE L’UTILISATEUR SOMMAIRE ............2 Introduction Vue d’ensemble ............ 2 Face avant ............. 2 Vue de la base ............3 Affichage LCD ............
-
Página 30: Introduction
1. Boule de projection Projette l’heure sur le mur ou INTRODUCTION au plafond. (Tournez la boule de projection fermée Nous vous remercions d’avoir acheté ce réveil à pour effectuer la mise au point.) projection sans fil d’Oregon Scientific (modèles RM382P 2. -
Página 31: Affichage Lcd
VUE DE LA BASE AFFICHAGE LCD 1. Heure 2. Signal de réception de l’horloge 3. Icône de piles rechargeables 4. Indicateur de température intérieure 5. Fuseau horaire / jour de la semaine 6. L’Alarme 1 / 2 est activée 7. Heure de l’alarme / calendrier 1. -
Página 32: Appareil De Projection
APPAREIL DE PROJECTION Insérez les piles rechargeables avant la première utilisation (2 x AAA 1,5V) en respectant les polarités. 1. Tournez la boule dans le sens inverse des aiguilles d’une montre jusqu’ à ce qu’elle soit desserrée. 2. Enlevez la partie supérieure. 3. -
Página 33: Mode D'aFfichage De L'hOrloge
Laissez le en charge pendant 12 heures lors de la du signal radio est de 1 500 km (932 miles). première utilisation et pendant 8 heures pour les Modèle RM382PA : suivantes. L’appareil pourra ainsi projeter l’heure • WWVB-60 généré depuis Fort Collins, Colorado pendant 10 heures. -
Página 34: Alarme
de l’alarme et sélectionnez l’alarme 1 ou l’alarme 2. Vous ne devez suivre les étapes suivantes que dans 2. Appuyez et maintenez enfoncée la touche ALARM le cas où vous avez désactivé la réception radio de pour entrer dans le mode de réglage de l’alarme. Le l’horloge ou si vous êtes trop loin d’un signal radio. -
Página 35: Projecteur
minutes plus tard. Appuyez sur ALARM ou AL ON ICONE DESCRIPTION / OFF pour la désactiver pendant les 8 minutes de L’appareil de projection est en snooze (rappel d’alarme). cours de synchronisation avec l’appareil principal et en cours de • Appuyez sur n’importe quelle touche sauf SNOOZE mise à... -
Página 36: Température
Pour changer l’angle de projection : posés à proximité ne couvrent pas les trous de Placez l’appareil sur un des trois cercles plats de sa ventilation. • base pour afficher l’heure verticalement sur 3 angles Ne plongez pas l’appareil dans l’eau. S’il se trouve différents. - Página 37 REMARQUE Les caractéristiques techniques de cet CARACTERTISTIQUES appareil et le contenu de ce manuel sont sujets à TYPE DESCRIPTION changement sans préavis. Calendrier Jour de la semaine Format date actuelle /mois Heure de l’horloge Format 12 ou 24 H Fréquence Radio DCF-77 (EU) MSF-60 (UK) WWVB-60 (US)
-
Página 38: A Propos D'ORegon Scientific
A PROPOS D’OREGON SCIENTIFIC En consultant notre site internet (www.oregonscientific. fr), vous pourrez obtenir des informations sur les PAYS CONCERNES RTT&E produits Oregon Scientific: photo numérique; lecteurs Tous les pays de l’UE, Suisse CH MP3; produits et jeux électroniques éducatifs; réveils;... - Página 39 Time Sphere Funzione reset ............7 Precauzioni ............. 7 Orologio radiocontrollato con Dati tecnici .............. 8 proiettore dell’ora senza fili Informazioni su Oregon Scientific ....9 (RM382P / RM382PA) Dichiarazione di conformita’ UE ...... 9 MANUALE PER L’UTENTE INDICE Introduzione ............
-
Página 40: Proiettore Dell'oRa Senza FIli
1. Sfera di proiezione: Proietta l’ora su parete o INTRODUZIONE soffitto. (Per regolare la messa a fuoco, ruotare la Grazie per aver scelto l’orologio Oregon Scientific ™ parte superiore dell’unità di proiezione). proiettore dell’ora senza fili (RM382P / RM382PA). 2. Supporto di caricamento 3. -
Página 41: Vista Della Base
11. Sensore di luminosità: Consente di controllare VISTA DELLA BASE la luminosità della retroilluminazione DISPLAY LCD 1. Ora 2. Segnale ricezione radiocontrollo dell’orologio 3. Icona batteria ricaricabile 4. Rilevazione temperatura interna 5. Fuso orario / giorno della settimana 6. Sveglia 1 / 2 attiva 1. -
Página 42: Modalità Di Visualizzazione Dell'oRologio
chiusura. Non continuare il movimento di rotazione UNITÀ DI PROIEZIONE dopo aver udito il click per evitare di rompere l’unità. Prima del primo utilizzo, inserire le batterie ricaricabili (2 x AAA da 1,5V) rispettando la polarità (+ e -): NOTA Quando le batterie dell’unità di proiezione sono 1. -
Página 43: Ricezione Orologio
occorrere fino a 24 ore per ricevere un segnale valido. RICEZIONE OROLOGIO Questo prodotto è progettato per sincronizzare Per una ricezione migliore, posizionare l’orologio automaticamente il proprio orologio quando si trova nel lontano da oggetti metallici e da elettrodomestici e raggio di un segnale radio: vicino a una finestra. -
Página 44: Sveglia
fuso orario, verrà visualizzata la propria ora locale più ICONA SIGNIFICATO un’ora. Se ci si trova negli Stati Uniti (solo per il modello Sveglia 1 / sveglia 2 impostata RM382PA) impostare l’orologio come segue: Nessuna icona Non è impostata nessuna sveglia 0 per l’ora del Pacifico +1 per l’ora della zona Per attivare / disattivare la sveglia:... -
Página 45: Temperatura
sull’unità principale: NOTA Ogni volta che viene aperta l’unità di proiezione, Premere PROJECTION sull’unità principale. è necessario regolare la messa a fuoco della proiezione stessa dopo averla chiusa. ICONA DESCRIZIONE L’unità di proiezione non è Per modificare l’angolazione della proiezione: sincronizzata con quella principale Appoggiare l’unità... -
Página 46: Dati Tecnici
eventuali oggetti come giornali, tovaglie, tende, etc. NOTA Le specifiche tecniche di questo prodotto e il non coprano accidentalmente i fori di aerazione. contenuto del manuale sono soggetti a modifiche senza • Non immergere l’unità nell’acqua. Se si sparge del preavviso. -
Página 47: Informazioni Su Oregon Scientific
INFORMAZIONI SU OREGON SCIENTIFIC Per avere maggiori informazioni sui nuovi prodotti Oregon Scientific, come le fotocamere digitali, i lettori MP3, i computer didattici per ragazzi, gli orologi con PAESI CONFORMI ALLA DIRETTIVA R&TTE proiezione dell’ora, le stazioni barometriche, gli orologi... - Página 48 TimeSphere Specificaties ............9 Over Oregon Scientific ........9 (RM382P / RM382PA) EU Conformiteits verklaring ......9 HANDLEIDING INHOUDSOPGAVE Introductie .............. 2 Overzicht ..............2 Voorkant ..............2 Onderstel ..............3 LCD scherm ............3 Beginnen ..............3 Stroom ..............3 Weergavemodi klok ..........
-
Página 49: Introductie
1. Projectiebal: Projecteert de tijd op de muur of het INTRODUCTIE plafond. (Draai de gesloten projectie-eenheid om Dank u voor de aanschaf van de Oregon Scientific ™ scherp te stellen.) 2. Laadpad projectieklok (RM382P / RM382PA). 3. SNOOZE / PROJECTION: Activeert 8-minuten snooze;... -
Página 50: Onderstel
ONDERSTEL LCD SCHERM 1. Tijd 2. Kloksignaalontvangst 3. Icoon oplaadbare batterijen 4. Binnentemperatuurgegevens 5. Tijdzone / dag van de week 6. Alarm 1 / 2 is geactiveerd 7. Alarmtijd / kalender BEGINNEN 1. Cirkels oplaadbasis: Plaats het apparaat in 3 STROOM verschillende hoeken om de tijd te projecteren HET APPARAAT... -
Página 51: Weergavemodi Klok
PROJECTIE-EENHEID Wanneer u de bal opent of sluit hoort u een Plaats oplaadbare batterijen (2 x AAA 1,5V) voor het duidelijke klik die aangeeft dat de bal geopend of eerste gebruik, volgens de aangegeven polariteit (+ en gesloten is. Blijf nadat u de klik gehoord heeft niet doordraaien, want dan kunt u het apparaat breken. -
Página 52: Klokontvangst
van metalen voorwerpen en elektrische apparaten en in KLOKONTVANGST de buurt van een raam. Dit product is ontworpen om zijn kalenderklok automatisch te synchroniseren zodra deze zich binnen Om het radiosignaal van de klok in / uit te schakelen: bereik van een radiosignaal bevindt: Houd ingedrukt. -
Página 53: Alarm
dan AL ON / OFF. NB De taalopties zijn (E) Engels, (F) Frans, (D) Duits, (I) Italiaans en (S) Spaans. Om het alarm uit te zetten: • Druk SNOOZE, om het 8 minuten uit te zetten. Druk ALARM ALARM of AL ON / OFF om het uit te zetten tijdens De klok heeft 2 alarmen. -
Página 54: Temperatuur
Om de projectiehoek te wijzigen: ICOON BESCHRIJVING Plaats de eenheid op 1 van de 3 platte cirkels op de De projectie-eenheid is niet onderkant, om de tijd onder 3 verschillende hoeken te gesynchroniseerd met het projecteren. apparaat en wordt bijgewerkt De projectie-eenheid is zojuist TEMPERATUUR op het apparaat geplaatst en... - Página 55 • buurt liggende objecten, zoals kranten, tafelkleed, De in houd van deze handleiding mag niet worden gordijnen enz. niet per ongeluk de ventilatiegaten vermenigvuldigd zonder toestemming van de kunnen afdekken. fabrikant. • Dompel het product nooit onder in water. Als u water over het apparaat morst, droog het dan onmiddellijk NB De technische specificaties van dit product en de af met een zachte stofvrije doek.
-
Página 56: Specificaties
SPECIFICATIES OVER OREGON SCIENTIFIC Bezoek onze website (www.oregonscientific.com) om TYPE Beschrijving meer te weten over uw nieuwe product en andere Kalender Dag van de week Oregon Scientific producten zoals digitale fototoestellen, Huidige datum / maand gezondheids- en fitnessuitrusting en weerstations. - Página 57 TimeSphere Especificações ............9 Sobre a Oregon Scientific ......... 9 (RM382P / RM382PA) Declaração de conformidade ......9 MANUAL DO USUÁRIO CONTEÚDO Introdução .............. 2 Visão geral .............. 2 Vista frontal ............2 Visão geral ............. 3 Display LCD ............3 Primeiros passos ..........
-
Página 58: Introdução
1. Esfera de projeção: Projeta a hora na parede ou INTRODUÇÃO teto. (Gire a unidade de projeção fechada para Obrigado por selecionar o relógio de projeção Oregon ajustar o foco.) Scientific (RM382P / RM382PA). 2. Base de carregamento 3. SNOOZE / PROJECTION (SONECA / PROJEÇÃO): NOTA Tenha este manual em mãos na primeira Ativa a soneca de 8 minutos;... -
Página 59: Visão Geral
VISÃO GERAL DISPLAY LCD 1. Hora 2. Sinal de recepção de rádio do relógio 3. Ícone da bateria recarregável 4. Leitura de temperatura interna 5. Fuso horário / dia da semana 6. Alarme 1 / 2 está ativado 7. Hora do alarme / calendário PRIMEIROS PASSOS 1. -
Página 60: Modo De Exibição Do Relógios
clique, indicando que a esfera foi aberta ou fechada. UNIDADE DE PROJEÇÃO Não gire além do som de clique, pois poderá danificar Insira as baterias recarregáveis (2 x AAA 1.5V) antes a unidade. de utilizar o produto pela primeira vez, seguindo a polaridade (+ e -): NOTA aparece com a hora projetada quando as... -
Página 61: Recepção Do Relógio
a parte traseira do relógio muito próxima à parede ou O ícone de recepção piscará quando estiver buscando outro objeto, pois pode causar o mal funcionamento da um sinal. Se o sinal de rádio estiver fraco, pode levar luz. até 24 horas para obter uma recepção válida de sinal. Para obter a melhor recepção, posicione o relógio longe RECEPÇÃO DO RELÓGIO de objetos metálicos e aparelhos elétricos, colocando-o... -
Página 62: Alarme
isso resultará na exibição de seu horário local mais 1 ÍCONE REPRESENTAÇAÕ hora. Se estiver nos EUA (apenas RM382PA ) ajuste Alarme 1 / alarme 2 está ativado o relógio em: Sem ícone Nenhum alarme ativado 0 para hora Pacific time +1 para hora Mountain time +2 para hora Central time +3 para hora Eastern time... -
Página 63: Temperatura
Para ligar (ON / desligar (OFF) o projetor quando ele NOTA Sempre que você abrir a unidade de projeção, está sobre a unidade principal: será preciso ajustar o foco da projeção após tê-la Pressione PROJECTION na unidade principal. fechado. ÍCONE DESCRIÇÃO Para mudar o ângulo de projeção: A unidade de projeção está... - Página 64 usadas, pois estas podem vazar. madeira. A Oregon Scientific não será responsável • Devido às limitações de impressão, as imagens por nenhum dano causado em superfícies de apresentadas neste manual podem diferir da madeira devido ao contato com este produto. •...
-
Página 65: Especificações
ESPECIFICAÇÕES SOBRE A OREGON SCIENTIFIC Visite nosso site (www.oregonscientific.com.br) para TIPO DESCRIÇÃO aprender mais sobre nossos outros produtos, tais como Calendário Dia da semana Câmeras Digitais; Produtos de Aprendizagem; Relógios Formato de data / mês de Projeção; Equipamentos de Esporte e Saúde;... - Página 66 TimeSphere Försiktighetsåtgärder ......... 7 Specifikationer Trådlös Projektionsklocka ............8 Om Oregon Scientific (RM382P / RM382PA) .......... 9 EU-Försäkran om överensstämmelse ....9 BRUKSANVISNING INNEHÅLL Introduktion ............2 Produktöversikt ............ 2 Vy framsida ............2 Vy basstation ............3 LCD display ............3 Att komma igång...
-
Página 67: (Rm382P / Rm382Pa)
1. Projektionsklot Projicerar tid på väggen eller taket INTRODUKTION (Vrid på klotet för att justera fokus.) Tack för att du har valt ett Trådlöst Projektionsur från 2. Laddningsplats Oregon Scientific (RM382P / RM382PA) ™ 3. SNOOZE / PROJECTION: Aktiverar 8-minuters snooze;... -
Página 68: Vy Basstation
VY BASSTATION bakgrundsbelysningen LCD DISPLAY 1. Tid 2. Radiomottagningssignal 3. Ikon för låg batterinivå 4. Inomhustemperaturavläsning 5. Tidszonsfunktion / Veckodag 6. Alarm 1 / 2 är aktiverat 7. Alarmtid / kalender 1. Laddningscirklar: Positionera enheten för att ATT KOMMA IGÅNG projicera tiden vertikalt med 3 olika vinklar STRÖMFÖRSÖRJNING 2. -
Página 69: Klockdisplaylägen
stängts. Sluta vrid efter att klicket har hörts annars PROJEKTIONSENHET riskerar du att ha sönder enheten. Sätt i de laddningsbara batterierna (2 x AAA 1,5V) med matchande polaritet innan du börjar använda NOTERING visas med den projicerade tiden när produkten batterinivån är låg. -
Página 70: Klockinställning
För att aktivera / inaktivera RF-funktionen: Tryck och KLOCKMOTTAGNING håll inne Denna produkt är konstruerad för att automatiskt synkronisera kalenderklockan så snart den är inom NOTERING När huvudenheten synkroniseras med en radiomottagningsradien. radiosignal kommer projektionen att stängas av för ett RM382P: kort ögonblick. -
Página 71: Alarm
Tryck in ALARM eller AL ON / OFF för att stänga av ALARM det under en 8-minuters snooze-period. Klockan har 2 alarm: Att ställa alarmet: ELLER 1. Tryck in ALARM för att växla mellan alarmdisplayerna • För att stoppa alarmet och återställa det så att det och för att välja inställning av antingen alarm 1 eller går igång samma tid nästa dag, tryck på... -
Página 72: Temperatur
undersidan för att visa projektionen i tre olika vinklar. IKON BESKRIVNING Projektionsenheten är inte TEMPERATUR synkroniserad med huvudenheten men håller på att uppdateras För att ändra inomhustemperaturenheten på displayen, Projektionsenheten har precis tryck °C / °F på undersidan av huvudenheten. placerats på... -
Página 73: Specifikationer
innehåller repande eller korroderande material. SPECIFIKATIONER Detta kan repa plastdetaljer samt korrodera elektroniska delar. BESKRIVNING • Utsätt inte apparaten för extrem påverkan av, slag, Datum Veckodag damm, temperatur eller fuktighet, då det kan orsaka Dag / månadsformat driftstörningar, kortare livslängd, skadade batterier Klocktid 12 / 24 timmarsformat och delar. -
Página 74: Om Oregon Scientific
överensstämmelse med de väsentliga egenskapskrav och övriga relevanta bestämmelser som framgår direktiv 1999/5/EG. signerad kopia “DECLARATION OF CONFORMITY” kan erhållas vid hänvändelse till OREGON SCIENTIFIC servicecenter. LÄNDER SOM OMFATTAS RTTE-DIREKTIVET Alla länder inom EU, Schweiz CH och Norge N...