Tabla de contenido
Publicidad
Idiomas disponibles
Idiomas disponibles
Enlaces rápidos
FR CHEMINEE ELECTRIQUE
EN ELECTRIC FIREPLACE
NL ELEKTRISCHE HAARD
ES CHIMENEA ELECTRICA
Modèle/Model/Modelo : WFP-26/X2X
REF. 002360
220-240V~50Hz 1800W
Ce produit ne peut être utilisé que dans des locaux bien isolés ou de manière occasionnelle.
This product may only be used in well insulated areas or occasionally.
Dit product mag alleen worden gebruikt in goed geïsoleerde gebieden of af en toe in een goed
geïsoleerde omgeving.
Este producto sólo puede ser utilizado en áreas bien aisladas u ocasionalmente.
Photo non contractuelle
Non-contractual photo
Foto niet bindend
Fotografia no contractual
Produit importé par / Product imported by / Product ingevoerd door /
Producto importado por :
Euro-Tech Distribution
37A rue César Loridan 59910 Bondues – France/ Frankrijk / Francia
1
Publicidad
Tabla de contenido

Resumen de contenidos para evatronic WFP-26/X2X
- Página 1 FR CHEMINEE ELECTRIQUE EN ELECTRIC FIREPLACE NL ELEKTRISCHE HAARD ES CHIMENEA ELECTRICA Modèle/Model/Modelo : WFP-26/X2X REF. 002360 220-240V~50Hz 1800W Ce produit ne peut être utilisé que dans des locaux bien isolés ou de manière occasionnelle. This product may only be used in well insulated areas or occasionally.
-
Página 2: Consignes Importantes De Securite
Lisez attentivement cette notice avant la première utilisation de cet appareil et conservez-la pour toute utilisation ultérieure. CONSIGNES IMPORTANTES DE SECURITE Cet appareil peut être utilisé par des enfants âgés d’au moins 8 ans et par des personnes ayant des capacités physiques, sensorielles ou mentales réduites ou dénués d’expériences ou de connaissances s’ils (si elles) sont correctement surveillé(e)s ou si des instructions relatives... -
Página 3: Consignes De Securite
Les enfants âgés entre 3 ans et 8 ans ne doivent ni brancher, ni régler ni nettoyer l'appareil, et ni réaliser l'entretien de l'utilisateur. ATTENTION - Certaines parties de ce produit peuvent devenir très chaudes et provoquer des brûlures. Il faut prêter une attention particulière en présence d'enfants et de personnes vulnérables. - Página 4 • Ne mettez pas l’appareil en marche s’il est endommagé. Aucune pièce ne peut être remplacée par l’utilisateur, adressez-vous à votre service après-vente pour écarter tout danger. • Ne déplacez l’appareil lorsqu’il fonctionnement. Débranchez-le puis laissez-le refroidir complètement avant de le déplacer. •...
- Página 5 • Evitez de faire tomber l’appareil. • Tenez le cordon éloigné des surfaces chaudes. • La garantie s’applique si les consignes de sécurités sont respectées et l’utilisation faite conformément à la présente notice. • L’appareil de chauffage ne doit pas être placé juste en dessous d’une prise de courant.
- Página 6 est régulièrement mis sous tension et hors tension par le fournisseur d’électricité. NOTES : 1. Ne pas insérer d’objets en métal ou autres dans les trous d’aération. 2. L’appareil doit toujours être positionné au minimum à 1 mètre de tout objet facilement inflammable, rideaux, vêtements etc. 3.
-
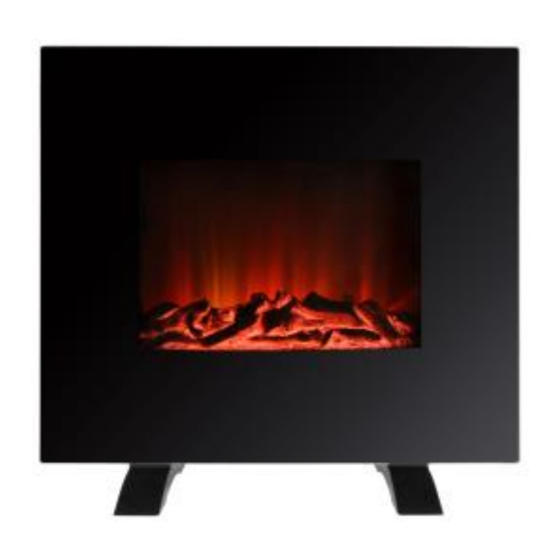
Página 7: Description De L'APpareil
DESCRIPTION DE L APPAREIL Sortie d’air Panneau de contrôle Touche marche/arrêt Support de fixation murale Façade en verre Pieds Faux charbon PANNEAU DE CONTRÔLE Touche marche/arrêt Touche “haut” Touche “bas” Touche “flamme” Minuteur Touche “chauffe” 1. Touche « haut » : Pour augmenter la température... - Página 8 2. Touche « bas » : Pour diminuer la température 3. Touche « flamme » : Pour régler la luminosité des flammes 4. Touche « chauffe » : Pour contrôler la fonction de chauffage TELECOMMANDE Avant d'utiliser la télécommande, veuillez retirer le film isolant (voir image ci-dessous).
- Página 9 1. Touche « chauffe » : Pour contrôler la fonction de chauffage 2. Touche « plus » : Pour augmenter la température 3. Touche « moins » : Pour diminuer la température 4. Touche « flamme » : Pour régler la luminosité des flammes 5.
-
Página 10: Installation Murale
- Vis 4*45mm x 3 (Pour fixer le support mural) - Chevilles x 3 (Pour fixer le support mural) - Vis 4*12mm x 2 (Pour fixer le chauffage au support mural) INSTALLATION MURALE Important : - Toujours s'assurer que l'appareil est débranché avant de commencer le montage. - Página 11 Etape 2 : Fixez d'abord les trois chevilles au mur en respectant les espaces indiqués sur la photo ci-dessous, puis enfoncez les trois vis 4*45mm dans le support de suspension murale et dans les chevilles qui ont été fixées au mur.
- Página 12 Etape 3 : Alignez les supports situés à l’arrière du chauffage électrique avec la fente du support mural, comme indique ci-dessous : Vis 4*12mm REMARQUE : SI VOUS CHOISISSEZ D’ACCROCHER LE CHAUFFAGE AU MUR, VOUS NE POURREZ PAS FIXER LES PIEDS AU PRODUIT. ASSEMBLAGE DES PIEDS POUR L’OPTION AUTOPORTANTE Vis 4*18mm...
- Página 13 Huit vis de 4*18mm sont utilisées pour fixer le pied de support sur le produit, comme indiqué dans l'image ci-dessus. Toujours utiliser votre appareil avec les pieds installés. A noter : si vous choisissez de poser la cheminée au sol, vous n'avez pas besoin de fixer le support mural.
- Página 14 s'arrête et le ventilateur du chauffage s'arrête après un délai de 30 secondes. 4. Minuteur Appuyez sur le bouton minuteur pour régler l'heure de mise en marche/arrêt. Pour régler la fonction de minuterie du chauffage, appuyez sur le bouton de minuterie du panneau de contrôle ou de la télécommande lorsque le chauffage est en état d'arrêt.
-
Página 15: Entretien Et Nettoyage
ENTRETIEN ET NETTOYAGE ÉTEINDRE TOUJOURS l'appareil et débrancher le cordon d'alimentation de la prise avant de nettoyer, d'effectuer l'entretien ou de déplacer le chauffage. Le non-respect de cette consigne peut entraîner un choc électrique, un incendie ou des blessures corporelles. AVERTISSEMENT ! Aucun entretien ne doit être effectué... - Página 16 - N'UTILISEZ PAS de produits à polir ou de nettoyants ménagers pour laiton, car ces produits endommageront la garniture métallique. Parties en verre : - Utilisez un nettoyant pour vitres de bonne qualité et séchez soigneusement avec un essuie-tout ou un chiffon non pelucheux.
-
Página 17: Conditions De Garantie
CONDITIONS DE GARANTIE Ce produit est garanti pour une durée déterminée avec le distributeur à partir de la date d’achat contre toute défaillance résultant d’un vice de fabrication ou de matériau. Cette garantie ne couvre pas les vices ou les dommages résultant d’une mauvaise installation, d’une utilisation incorrecte ou de l’usure anormale du produit. - Página 18 Référence(s) du modèle : WFP-26/X2X Caractéristique Symbole Valeur Unité Caractéristique Unité Type d'apport de chaleur, pour les dispositifs de Puissance thermique chauffage décentralisés électriques à accumulation uniquement Puissance Contrôle thermique manuel de la charge avec thermique Pnom thermostat intégré nominale Puissance Contrôle thermique manuel de la charge avec...
-
Página 19: Important Safety Instructions
Read this manual carefully before using this unit for the first time and keep it for future use. IMPORTANT SAFETY INSTRUCTIONS This appliance can be used by children aged from 8 years and above and persons with reduced physical, sensory or mental capabilities or lack of experience and knowledge if they have been given supervision or instruction concerning use of the appliance in a safe way and understand the... -
Página 20: Safety Instructions
SAFETY INSTRUCTIONS • Before connecting the unit, check that the mains voltage corresponds to the voltage indicated on the unit's rating label. The unit may only be connected to a power supply system that has been installed in accordance with the safety regulations. - Página 21 • Always turn off and unplug your device when cleaning or when not in use. • Keep this appliance out of the reach of children and do not use it near them. • Never carry or hang the unit by the power cord. Never pull the cord to unplug the unit.
- Página 22 • WARNING: This heater is not equipped with a device to control the room temperature. Do not use this heater in small rooms when they are occupied by persions not capable of leaving the room on their own, unless constant supervision is provided. •...
-
Página 23: Detailed Description
9. Do not leave your device in a damp place (such as the bathroom). 10. Do not connect this unit to a timer or remote control system. 11. For information on how to assemble the feet or wall mount, please refer to the following section of the manual. DETAILED DESCRIPTION Air outlet Control panel... -
Página 24: Control Panel
CONTROL PANEL On/Off key “UP” key “Down” key “Flame” key Timer Heat key 1. « Up » key: To increase the temperature 2. « Down » key: To decrease the temperature 3. « Flame » key: To adjust the brightness of the flames 4. - Página 25 On/Off key “Plus” button “Heat” key “Flame” key “Minus” key Day key Hour key Minute key Week timer 1. « Heat » key : To control the heating function 2. « Plus » key : To increase the temperature 3. « Minus » key : To decrease the temperature 4.
-
Página 26: Parts And Accessories
buttons to set the day, hour and minutes. The user can set it independently. When the unit is turned on, if the ON time is set earlier than the OFF time, the unit will not turn on at the set time. If the off time is set earlier than the on time, the unit will turn on and off at the on time. - Página 27 Disclaimer : To avoid any risk of fire, make sure that nothing is placed on top of the heater. The minimum distances indicated below must be respected for good fire prevention. Step 2 : First, fix the three dowels to the wall according to the distances shown in the picture below, then drive the three 4*45mm screws into the wall mounting bracket and into the dowels that have been fixed to the wall.
- Página 28 Step 3 : Align the brackets on the back of the electric heater with the slot in the wall bracket as shown below : 4*12mm screws NOTE: IF YOU CHOOSE TO HANG THE HEATER ON THE WALL, YOU WILL NOT BE ABLE TO ATTACH THE FEET TO THE PRODUCT.
- Página 29 Always use your appliance with feet fixed. Note: if you choose to place the heater on the floor, you do not need to fix the wall support. 1. Switching on the power First, turn on the switch located on the right side of the heater. This is the main power supply to the appliance.
-
Página 30: Cleaning And Maintenance
4.Timer Press the timer button to set the on/off time. To set the heater timer function, press the timer button on the control panel or remote control when the heater is off. The heater will then go into standby mode and the start time can then be set. - Página 31 WARNING! No maintenance should be performed by the consumer. DO NOT repair or service the unit yourself. For maintenance, call a certified electrician. - NEVER immerse the unit in water or spray with water. Doing so may result in electric shock, fire or injury.
- Página 32 Ventilation holes : - Use a vacuum cleaner or dry cloth to remove dust and dirt from the heater and ventilation areas. TROUBLESHOOTING If the heater does not work, please check the following points before seeking repair advice : Check if the power cord is plugged into an electrical outlet, if not, plug it in. Check that the main switch (at the rear) is working.
- Página 33 Please contact your local authority or dealer for recycling advice. Model : WFP-26/X2X Item Symbol Value Unit Item Unit Type of heat input, for electric storage local space Heat output heaters only (select one) Nominal heat Manual heat charge control, with integrated...
-
Página 34: Belangrijke Veiligheidsinstructies
Lees deze instructies zorgvuldig door voordat u dit product voor het eerst gebruikt en bewaar ze voor toekomstig gebruik. BELANGRIJKE VEILIGHEIDSINSTRUCTIES Dit apparaat kan worden gebruikt door kinderen van 8 jaar en ouder en door personen met verminderde fysieke, zintuiglijke of mentale capaciteiten of zonder ervaring of kennis, als zij goed worden begeleid of geïnstrueerd in het veilige gebruik van het apparaat en de risico's ervan worden begrepen. - Página 35 LET OP - Delen van dit product kunnen zeer heet worden en brandwonden veroorzaken. Er moet bijzondere aandacht worden besteed aan de omgang met kinderen en kwetsbare personen. VEILIGHEIDSAANWIJZINGEN • Controleer voor het aansluiten van het apparaat of de netspanning overeenkomt met de spanning die op het typeplaatje van het apparaat staat aangegeven.
- Página 36 neem contact op met uw klantendienst om elk gevaar te vermijden. • Verplaats het toestel niet terwijl het in werking is. Trek de stekker uit het stopcontact en laat hem volledig afkoelen voordat u hem verplaatst. • Laat uw apparaat nooit onbeheerd achter. •...
- Página 37 • De garantie is geldig als de veiligheidsinstructies in acht worden genomen apparatuur overeenstemming met deze instructies wordt gebruikt. • De verwarming mag niet direct onder een stopcontact worden geplaatst. • Gebruik deze verwarming niet in de buurt van een bad, douche of zwembad.
- Página 38 OPMERKINGEN : 1. Steek geen metalen of andere voorwerpen in de ventilatiegaten. 2. Het apparaat moet altijd op minstens 1 meter afstand van licht ontvlambare voorwerpen, gordijnen, kleding enz. worden geplaatst. 3. Deze verwarming is niet ontworpen om urenlang in uw afwezigheid te werken.
-
Página 39: Front Panel
APPARAATBESCHRIJVING Luchtuitlaat Bedieningspaneel Aan/uit-knop Wandmontagebeugel Glazen gevel Voeten Valse steenkool FRONT PANEL Aan/uit-knop Omhoog “sleutel” Omlaag-toets Vlammenknop Timer Verwarmingsknop... -
Página 40: Afstandsbediening
1. Omhoog-toets : Om de temperatuur te verhogen 2. Omlaag-toets : Om de temperatuur te verlagen 3. Vlammenknop : om de helderheid van de vlammen aan te passen 4. Verwarmingsknop : om de verwarmingsfunctie te regelen AFSTANDSBEDIENING Voordat u de afstandsbediening gebruikt, dient u de isolerende folie te verwijderen (zie onderstaande afbeelding). - Página 41 Touche marche/arrêt Plusknop Verwarmingsknop Vlammenknop Minus toets Daglichtknop Tijd knop Minuutknop Weekdagtimer 1. Knop "Verwarmen": om de verwarmingsfunctie te regelen 2. Plusknop: Om de temperatuur te verhogen 3. Minus knop: Om de temperatuur te verlagen 4. Vlammenknop: om de helderheid van de vlammen aan te passen 5.
-
Página 42: Onderdelen En Toebehoren
op de timer en de verwarming uit te schakelen. ON is de ON-tijd en OFF is de OFF-tijd. Druk op de knoppen "HOUR"/"MIN"/"+"/"-" om de dag, het uur en de minuten in te stellen. De gebruiker kan het zelfstandig instellen. Wanneer het toestel wordt ingeschakeld en de instelling van de ON-tijd vroeger is dan de instelling van de OFF-tijd, zal het toestel niet worden ingeschakeld op het ingestelde tijdstip. - Página 43 Stap 1 : Kies een locatie met een minimale vrije ruimte van 0,5m aan elke kant en 1m hoog. Kies een plaats in de buurt van een stopcontact, zodat een verlengsnoer niet nodig is. Plaats het apparaat NIET direct onder een stopcontact. Disclaimer : Om elk risico op brand te vermijden, moet u ervoor zorgen dat er niets boven op de schoorsteen wordt geplaatst.
- Página 44 Stap 3 : Lijn de beugels aan de achterzijde van de elektrische kachel uit met de gleuf in de muurbeugel zoals hieronder afgebeeld : 4*12mm schroeven LET OP: ALS U ERVOOR KIEST OM DE KACHEL AAN DE MUUR TE HANGEN, KUNT U DE VOETEN NIET AAN HET PRODUCT BEVESTIGEN.
- Página 45 VOETMONTAGE VOOR DE VRIJSTAANDE OPTIE Vis 4*18mm Acht 4*18mm schroeven worden gebruikt om de steunvoet aan het product te bevestigen, zoals op de foto hierboven. Bedien uw toestel altijd met de voeten geïnstalleerd. Let op: als u ervoor kiest om de schoorsteen op de vloer te leggen, hoeft u de muursteun niet te bevestigen.
- Página 46 2. Instellen van de vlamhelderheid In de stand-by/aanstand drukt u op de vlammenknop om de helderheid te verminderen. Elke keer dat de vlamknop wordt ingedrukt (tot 4 keer), zal de helderheid afnemen. Wanneer de vlamtoets voor de vijfde keer wordt ingedrukt, keert de helderheid terug naar de oorspronkelijke toestand.
-
Página 47: Verzorging En Reiniging
Druk op de "DOWN" knop op de afstandsbediening of het bedieningspaneel om de temperatuur te verlagen (het temperatuurbereik is 15-30℃). VERZORGING EN REINIGING Schakel het apparaat ALTIJD UIT en trek de stekker uit het stopcontact voordat u de verwarming schoonmaakt, onderhoudt of verplaatst. - Página 48 Metalen onderdelen : - Om de verwarming schoon te houden, kunnen de buitenste delen worden gereinigd met een zachte, vochtige doek. U kunt indien nodig een mild reinigingsmiddel gebruiken. Na het schoonmaken droogt u het apparaat af met een zachte doek. LET OP: Laat geen vloeistof in de verwarming komen.
- Página 49 HET OPLOSSEN VAN PROBLEMEN Als de verwarming niet werkt, controleer dan eerst de volgende punten voordat u reparatieadvies vraagt : Controleer of het netsnoer is aangesloten op een stopcontact, zo niet, sluit het dan aan. Controleer of de hoofdschakelaar (aan de achterzijde) werkt. Controleer of de stroomschakelaar is ingeschakeld.
- Página 50 Model : WFP-26/X2X Eenhe Eenh Item Symbool Waarde Item Soort warmte-input, alleen voor elektrische opslag Warmteafgifte lokale ruimteverwarmers (selecteer een) Nominale Handmatige warmtelaadregeling, met Pnom niet warmteafgifte geïntegreerde thermostaat Minimale niet Handmatige warmtelaadregeling met kamer- warmteafgifte Pmin en/of buitentemperatuurterugkoppeling (indicatief)
-
Página 51: Instrucciones De Seguridad Importantes
Lea estas instrucciones cuidadosamente antes de usar este producto por primera vez y guárdelas para un uso futuro. INSTRUCCIONES DE SEGURIDAD IMPORTANTES Este aparato puede ser utilizado por niños de 8 años o más y por personas con capacidades físicas, sensoriales o mentales reducidas o sin experiencia o conocimientos si se les supervisa o instruye adecuadamente en el uso seguro del aparato y se han identificado los riesgos que conlleva. -
Página 52: Instrucciones De Seguridad
especial cuidado al tratar con niños y personas vulnerables. INSTRUCCIONES DE SEGURIDAD • Antes de conectar el aparato, compruebe que la tensión de la red eléctrica se corresponde con la tensión indicada en la placa de características del aparato. La unidad sólo puede conectarse a un sistema de alimentación que haya sido instalado de acuerdo con las normas de seguridad. - Página 53 • No mueva la unidad mientras esté en funcionamiento. Desenchúfalo y deja que se enfríe completamente antes de moverlo. • Nunca deje su dispositivo desatendido. • No utilice la unidad cuando haya caído al agua. • No utilice la cámara con las manos mojadas, o si sus manos están mojadas para evitar el peligro de una descarga eléctrica.
- Página 54 • El calentador no debe colocarse directamente debajo de una toma de corriente. • No use este calentador cerca de una bañera, ducha o piscina. • ADVERTENCIA: Para evitar sobrecalentamiento, no cubra el calentador. • ADVERTENCIA: Este calentador no está equipado con un dispositivo para controlar la temperatura de la habitación.
- Página 55 2. El aparato debe colocarse siempre a una distancia mínima de 1 metro de cualquier objeto fácilmente inflamable, cortinas, ropa, etc. 3. Este calentador no está diseñado para funcionar en su ausencia durante horas. Siempre apague el calentador si sale de su casa. 4.
-
Página 56: Descripción Del Dispositivo
DESCRIPCIÓN DEL DISPOSITIVO Salida de aire Panel de control Botón de encendido/apagado Soporte de montaje en la pared Fachada de vidrio Pies Falso carbón PANEL DE CONTROL Botón de encendido/apagado Tecla “arriba” Tecla “abajo” Tecla “llama” Temporizador Tecla “calentamiento”... - Página 57 1. Tecla « Arriba »: Para aumentar la temperatura 2. Tecla « Abajo »: Para disminuir la temperatura 3. Tecla « llama»: Para ajustar el brillo de las llamas. 4. Tecla « calentamiento »: Para controlar la función de calentamiento TELECOMANDOS Antes de usar el mando a distancia, por favor, retire la película aislante (ver foto abajo).
-
Página 58: Partes Y Accesorios
1. Tecla « » : Para controlar la función de calentamiento calentamiento 2. Tecla « » : Para aumentar la temperatura más 3. Tecla « menos » : Para bajar la temperatura 4. Tecla « llama » : Para ajustar el brillo de la llama 5. -
Página 59: Instalación Mural
- Tornillo 4*45mm x 3 (Para fijar el soporte de la pared) - Chevilles x 3 (Para fijar el soporte de la pared) - Tornillo 4*12mm x 2 (Para fijar el calentador al soporte de la pared) INSTALACIÓN MURAL Importante : - Asegúrese siempre de que la unidad esté... - Página 60 Paso 2 : Primero fije los tres tacos de la pared de acuerdo con los espacios que se muestran en la imagen de abajo, luego introduzca los tres tornillos de 4*45mm en el soporte del colgador de la pared y en los tacos que se han fijado en la pared. Paso 3 : Alinee los soportes de la parte posterior del calentador eléctrico con la ranura del soporte de la pared como se muestra a continuación :...
-
Página 61: El Ensamblaje De Los Pies Para La Opción Independiente
4*12mm tornillos NOTA: SI ELIGE COLGAR EL CALENTADOR EN LA PARED, NO PODRÁ FIJAR LOS PIES AL PRODUCTO. EL ENSAMBLAJE DE LOS PIES PARA LA OPCIÓN INDEPENDIENTE Tornillo 4*18mm Se utilizan ocho tornillos de 4*18mm para fijar el pie de soporte al producto, como se muestra en la imagen de arriba. - Página 62 1. Encendido Primero, encienda el interruptor situado en el lado derecho de la chimenea. Esta es la fuente de alimentación principal del aparato. Presione el botón de encendido para pasar al modo de espera y activar el efecto de la llama. Presione el botón de encendido para entrar en el modo de funcionamiento o de espera, y la función de calentamiento y el efecto de la llama se detendrán (el ventilador se detendrá...
-
Página 63: Cuidado Y Limpieza
4. Temporizador Presione el botón del temporizador para ajustar la hora de encendido/apagado. Para configurar la función de temporizador del calentador, pulse el botón del temporizador en el panel de control o el mando a distancia cuando el calentador esté apagado. El calentador pasará... - Página 64 ¡ADVERTENCIA! El consumidor no debe realizar ningún mantenimiento. NO repare o repare la unidad usted mismo. Para el mantenimiento, llame a un electricista certificado. - NUNCA sumerja la unidad en agua o rocíe con agua. Hacerlo puede resultar en una descarga eléctrica, fuego o lesiones.
-
Página 65: Las Partes Y Los Distantes
Las partes y los distantes : - Use un limpiador de vidrios de buena calidad y séquelo bien con una toalla de papel o un paño sin pelusas. - NUNCA use limpiadores abrasivos, sprays líquidos o cualquier otro producto de limpieza que pueda rayar la superficie. -
Página 66: Recogida Selectiva De Electrónicos
La unidad debe ser devuelta en su embalaje original y acompañada por el recibo de venta, siempre que haya sido manipulada adecuadamente. Por lo tanto, por favor, observe las instrucciones de funcionamiento y seguridad anteriores. Además, no podremos garantizar su dispositivo si usted o un tercero ha realizado modificaciones o reparaciones. - Página 67 Referencia del modelo : WFP-26/X2X Unida Unida Característica Símbolo Valor Característica Tipo de suministro de calor, sólo para calentadores Energía térmica eléctricos descentralizados Potencia Control manual de carga térmica con termostato térmica Pnom integrado nominal Capacidad Control manual de carga térmica con recepción mínima de...