Tabla de contenido
Publicidad
Idiomas disponibles
Idiomas disponibles
Enlaces rápidos
Item #1000248593
1000248617
Model #HBI-4192-BK-D
HBI-4192-WH-D
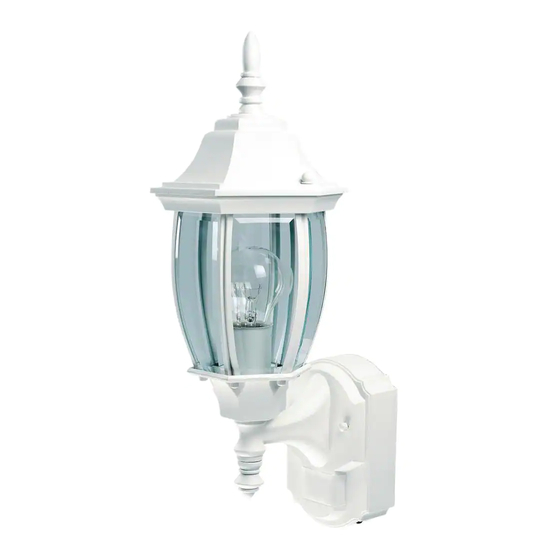
USE AND CARE GUIDE
DECORATIVE MOTION LIGHT
Questions, problems, missing parts?
Before returning to the store, call Hampton Bay Customer Service
8 a.m.-7 p.m., EST, Monday-Friday, 9 a.m. - 6 p.m., EST, Saturday
1-855-HD-HAMPTON
HAMPTONBAY.COM
THANK YOU
We appreciate the trust and confidence you have placed in Hampton Bay through the purchase of this decorative
motion light. We strive to continually create quality products designed to enhance your home. Visit us online to see
our full line of products available for your home improvement needs. Thank you for choosing Hampton Bay!
Publicidad
Capítulos
Tabla de contenido

Manuales relacionados para HAMPTON BAY HBI-4192-WH-D


Resumen de contenidos para HAMPTON BAY HBI-4192-WH-D
- Página 1 HAMPTONBAY.COM THANK YOU We appreciate the trust and confidence you have placed in Hampton Bay through the purchase of this decorative motion light. We strive to continually create quality products designed to enhance your home. Visit us online to see...
-
Página 2: Tabla De Contenido
Table of Contents Hardware Included .........4 Table of Contents ........2 Package Contents ........4 Safety Information ........2 Installation ..........5 Warranty ...........2 Wiring Options ..........7 2-Year Limited Warranty ......2 Operation...........8 Pre-Installation .........3 Care and Cleaning ........10 Planning Installation ......3 Troubleshooting ........10 Specifications ........3 Tools Required ........3 Safety Information PRECAUTIONS... -
Página 3: Pre-Installation
Pre-Installation PLANNING INSTALLATION Before installing the light fixture, ensure that all parts are present. Compare parts with the Hardware Included and Package Contents sections. If any part is missing or damaged, do not attempt to assemble, install, or operate this light fixture. -
Página 4: Hardware Included
Pre-Installation (continued) HARDWARE INCLUDED NOTE: Hardware shown to actual size. Part Description Quantity Mounting bracket screw Wire connector Decorative fixture nut (pre-installed) Large mounting screw (pre-installed) Decorative screw Mounting bracket (pre-installed, not to scale) PACKAGE CONTENTS Part Description Quantity Light fixture Fixture cap Motion sensor... -
Página 5: Installation
Installation Removing the mounting bracket □ Remove the two decorative fixture nuts (CC) from the light fixture (A). □ Remove the mounting bracket (FF) from the light fixture (A). Installing the mounting bracket WARNING: Turn the power off at the circuit breaker or fuse. -
Página 6: Wiring The Light Fixture
Installation (continued) □ Connect all ground wires to the pigtail Wiring the light fixture wire (1) attached to the green ground screw. NOTE: This light fixture can be wired to control another standard or motion sensing light fixture(s). See Wiring Black to black Options for additional wiring methods. -
Página 7: Wiring Options
Installation (continued) Installing the light bulb □ Install the bulb (tungsten incandescent, medium base, type “A”, 60 watt maximum - not included) into the light fixture (A). □ Place the fixture cap (B) onto the light fixture (A). □ Secure the fixture cap (B) with the two decorative screws (EE). -
Página 8: Operation
Wiring Options (continued) Controlling a motion sensing White to white light fixture(s) Black to Primary Controlled IMPORTANT: Total fixture ratings must not exceed 360 Watts (3.0 A). black Light Light When wiring to control another motion sensing light to black fixture (Primary / Controlled): □... - Página 9 Operation (continued) Determining the motion sensor coverage area □ Perform a “walk test”: walk in an arc in front of the motion sensor (C). □ Watch the light (A). The light (A) will come on when motion has been detected. □...
-
Página 10: Using Manual Mode
Operation (continued) Using manual mode NOTE: If the power to the light fixture is off for more than 5 seconds, allow the motion sensor to warm up prior to switching to manual mode. NOTE: Manual mode overrides the motion sensor and “ON-TIME”... - Página 11 Troubleshooting (continued) Problem Possible Cause Solution □ □ The light comes on for no The motion sensor may be sensing Decrease the “Sensitivity” apparent reason. small animals or automobile traffic. setting. □ □ The “Sensitivity” setting is set too Decrease the “Sensitivity” high.
- Página 12 Questions, problems, missing parts? Before returning to the store, call Hampton Bay Customer Service 8 a.m.-7 p.m., EST, Monday-Friday, 9 a.m. - 6 p.m., EST, Saturday 1-855-HD-HAMPTON HAMPTONBAY.COM Retain this manual for future use. 208434-05A...
-
Página 13: Guía Para El Uso Y Cuidado
HAMPTONBAY.COM GRACIAS Agradecemos la confianza que ha depositado en Hampton Bay al comprar esta luz decorativa detectora de movimiento. Procuramos crear continuamente productos de calidad diseñados para mejorar su hogar. Visítenos en internet para ver nuestra línea completa de productos disponibles que necesita para el mejoramiento de su hogar. -
Página 14: Contenido
Contenido Ferretería Incluida ........16 Contenido ..........14 Contenido del Paquete ......16 Información de seguridad ......14 Instalación ..........17 Garantía...........14 Opciones de cableado ......19 2 años de garantía limitada ....14 Operación ..........20 Antes de la instalación ......15 Cuidado y limpieza .........22 Planificación de la Instalación .....15 Análisis de averías .........22 Especificaciones ........15 Herramientas Requeridas ....15... -
Página 15: Antes De La Instalación
Antes de la instalación PLANIFICACIÓN DE LA INSTALACIÓN Antes de instalar el aparato de luz, esté seguro que estén todas las piezas. Compare las piezas con la Ferretería incluida y las secciones de Contenidos del paquete. Si cualquier pieza falta o está dañada, no intente ensamblar, instalar ni operar este aparato de luz. -
Página 16: Ferretería Incluida
Antes de la instalación (continuación) FERRETERÍA INCLUIDA NOTA: La ferretería se muestra en su tamaño real Pieza Descripción Cantidad Tornillo del soporte de montaje Capuchón para cable Tuerca decorativa del aparato (pre-instalado) Tornillo grande de montaje (pre-instalado) Anillos decorativos Soporte de montaje (pre-instalado, no está a escala) CONTENIDO DEL PAQUETE Pieza Descripción... -
Página 17: Instalación
Instalación Retiro del soporte de montaje □ Retire los dos tornillos decorativos (CC) de la lámpara (A). □ Retire el soporte de montaje (FF) de la lámpara (A). Instalación del soporte de □ Hale con firmeza el soporte de montaje (FF) montaje para verificar que esté... -
Página 18: Cableado Del Aparato De Luz
Instalación (continuación) □ Conecte todos los cables de tierra al cable Cableado del aparato de luz flexible (1) sujetado al tornillo verde de tierra. NOTA: Este aparato puede cablearse para controlar otro(s) aparato(s) de luz estándar o detectores de Negro a Negro movimiento. -
Página 19: Instalación De La Bombilla
Instalación (continuación) Instalación de la bombilla □ Instale la bombilla (incandescente de tungsteno, de base mediana, de tipo “A”, de 60 vatios máximo - no incluida) en la lámpara (A). □ Coloque el sombrerete del aparato (B) sobre la lámpara (A). □... -
Página 20: Cómo Controlar Una(S) Lámpara(S) Detectora(S) De Movimiento
Opciones de cableado (continuación) Cómo controlar una(s) □ Conecte todos los cables de tierra juntos. lámpara(s) detectora(s) de Blanco a Blanco movimiento IMPORTANTE: La capacidad total no debe exceder los 360 Vatios Negro a (3,0 A). Negro primaria controlada Cuando prepare una conexión para controlar otro Rojo a aparato de luz detector de movimiento (Primaria / Negro... -
Página 21: Ajuste Del Control Sens
Operación (continuación) Determinación de la área de □ Continúe este proceso hasta que la zona de cobertura del detector de detección haya sido establecida. movimiento □ Haga una “prueba caminando”: camine formando un arco frente al detector de movimiento (C). □... -
Página 22: Uso Del La Fase Manual
Operación (continuación) Uso del la fase manual NOTA: Si la energía eléctrica al aparato de luz es apagada por más de 5 segundos, deje que el detector de movimiento se caliente antes del cambio a la fase manual. NOTA: La fase manual anula el detector de movimiento y el control de duración (“ON-TIME”), de esta forma la lámpara operará... - Página 23 Análisis de averías (continuación) Problema Causa Probable Solución □ □ La luz se enciende El detector de movimiento puede estar Reduzca el ajuste de sensibilidad sin razón aparente. detectando pequeños animales o tráfico (“SENS”). automotor. □ □ El ajuste “Sensibilidad” es demasiado Reduzca el ajuste de sensibilidad alto.
- Página 24 ¿Tiene preguntas, problemas o piezas faltantes? Antes de devolverlo a la tienda, llame a Servicio al Cliente de Defiant de 08 a.m.-7 p.m., EST, Lunes - Viernes, 09 a.m.-6 p.m., EST, sábado. 1-855-HD-HAMPTON HAMPTONBAY.COM Guarde este manual para uso futuro. 208434-05A...