
Manuales relacionados para Lockncharge Joey 10


Resumen de contenidos para Lockncharge Joey 10
- Página 1 USER INSTRUCTIONS Joey 10 Charging Station™ www.pclocs.com.au www.lockncharge.com...
- Página 2 Joey 10 Charging Station Congratulations on your purchase. Follow these instructions for easy and fast set-up of your Joey 10 Charging Station. PC Locs, LocknCharge and the Padlock device are Trademarks of IWS Global Pty Ltd. Copyright IWS Global Pty Ltd, October 2015.
- Página 3 STEP 1 - Optional: Wall mounting guide Before tightening the mounting screws, please If you are going to mount the Joey 10 Charging ensure the door has an even gap all around to avoid Station to a wall, refer to the mounting hole any scraping during opening and closing.
- Página 4 Joey 10 Charging Station STEP 2 - Setting up the Joey 10 Charging Station. Undo the screw that is holding down the top Removing the charger panel cover: charger cover panel. It is located inside the Joey 1. Slide to lift the tabs out.
- Página 5 Ensure the excess device cable length is bundled 1. Insert the front side first under the flap. neatly in the rear of the Joey 10 Charging Station. 2. Then the tab side at the rear and slide in. Sectional side view:...
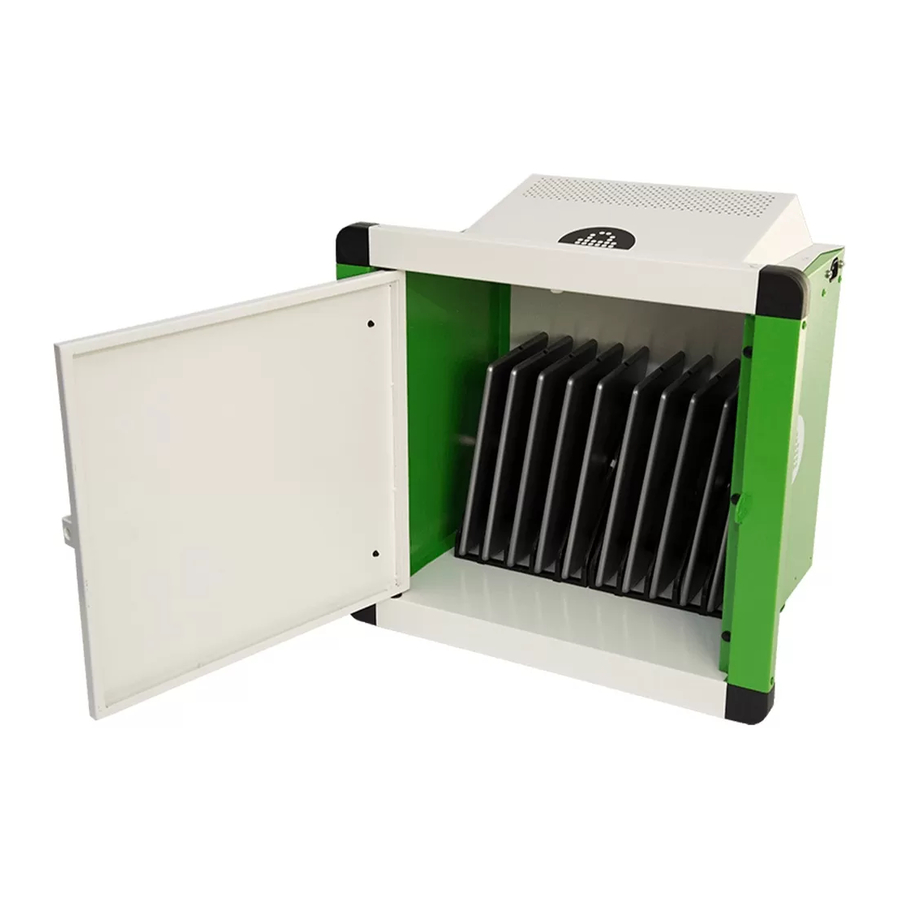
- Página 6 Joey 10 Charging Station STEP 3 - Connecting your devices in the Joey 10 Charging Station. Insert and connect your devices. Plug the power cable into the Joey 10 Charging Station and into a wall socket and switch it on.
- Página 7 PC Locs/LocknCharge has been advised of the possibility of such damages. PC Locs/LocknCharge obligation is strictly and exclusively limited to the replacement or repair of any defective products.
- Página 8 www.lockncharge.com...
- Página 9 BEDIENUNGSANLEITUNG Joey 10 Charging Station™ www.pclocs.com.au www.lockncharge.com...
- Página 10 Joey 10 Charging Station Herzlichen Glückwunsch zu Ihrem Kauf. Folgen Sie diesen Anweisungen für eine einfache und zügige Inbetriebnahme. PC Locs, LocknCharge und die Padlock-Vorrichtung sind Marken der IWS Global Pty Ltd. Copyright IWS Global Pty Ltd, Oktober 2015. Haftungsausschluss Diese Informationen sind geistiges Eigentum von IWS Global Pty Ltd.
- Página 11 BEDIENUNGSANLEITUNG Schritt 1 (optional): Wandmontage Achten Festziehen Befestigungsschrauben bitte darauf, dass die Tür rundherum einen gleichmäßigen Spalt besitzt, um Nutzen für eine Wandmontage Kratzer beim Öffnen und Schließen zu vermeiden. vorgegebenen Befestigungslöcher. Bitte beachten: Lösen Sie ggf. die Schrauben und korrigieren Sie Verwenden Sie von diesen VIER.
- Página 12 Joey 10 Charging Station SCHRITT 2: Joey 10 Charging Station einrichten Entfernen der Geräteabdeckung: 1. Schieben, um die Befestigungslaschen zu Lösen Sie die Befestigungsschraube der oberen entsichern. Abdeckung. Diese befindet sich innerhalb der 2. Geräteabdeckung von der Befestigungsseite Joey 10 Charging Station.
- Página 13 BEDIENUNGSANLEITUNG Ziehen Sie die Kabel innerhalb der Joey 10 Führen Sie die Kabel durch die Rückseite der Charging Station in der gewünschten Länge durch Joey 10 Charging Station. die gummibeschichtete Kabelführung. Geräteabdeckung einsetzen: 1. Vorderseite unter den Verschluss einsetzen. Wickeln Sie überschüssige Gerätekabel sauber an 2.
- Página 14 Joey 10 Charging Station SCHRITT 3: Geräte mit der Joey 10 Charging Station verbinden Setzen Sie Ihre Geräte ein und schließen Sie diese an. Stecken Sie das Netzkabel in die Joey 10 Charging Station und verbinden Sie das Gerät mit einer Wandsteckdose.
- Página 15 Entwicklungs-, Material- und Herstellungsfehlern sind. Zur Inanspruchnahme der Garantieleistung ist ein Nachweis über das Erstverkaufsdatum vorzulegen. Sollte in der Garantiezeit ein Defekt, eine Störung oder ein Ausfall auftreten, wird PC Locs/LocknCharge nach einer Prüfung die als fehlerhaft bestätigten Produkte in eigenem Ermessen reparieren oder ersetzen. Alle Transportkosten sind vom Eigentümer zu tragen.
- Página 16 www.lockncharge.com...
- Página 17 INSTRUCCIONES PARA EL USUARIO Joey 10 Charging Station™ www.pclocs.com.au www.lockncharge.com...
- Página 18 Joey 10 Charging Station Enhorabuena por su compra. Siga estas instrucciones para instalar de forma fácil y rápida la Joey 10 Charging Station. Locs, LocknCharge y el dispositivo Padlock son marcas comerciales de IWS Global Pty Ltd. Derechos de autor de IWS Global Pty Ltd, octubre de 2015.
- Página 19 PASO 1 - Opcional: Guía para montar en la pared Antes de apretar los tornillos de montaje, Si se dispone a montar la Joey 10 Charging Station asegúrese de que la puerta tiene una holgura en una pared, consulte las ubicaciones de los uniforme alrededor para evitar cualquier roce al orificios de montaje.
- Página 20 Joey 10 Charging Station PASO 2 – Instalación de la Joey 10 Charging Station. Retirada de la cubierta del panel del cargador: 1. Deslice para levantar y mover hacia fuera las Quite el tornillo que sujeta el panel de la cubierta pestañas.
- Página 21 MANUAL DE INSTRUCCIONES Tire de los cables desde dentro de la Joey 10 Inserte los cables por la parte posterior de la Charging Station hasta la longitud deseada a Joey 10 Charging Station. través del sujetacables de goma. Volver a poner la cubierta del panel del cargador: 1.
- Página 22 Joey 10 Charging Station PASO 3 – Conexión de los dispositivos a la Joey 10 Charging Station. Inserte y conecte los dispositivos. Enchufe el cable de alimentación a la Joey 10 Charging Station y a un tomacorriente; luego enciéndalo. La carga comenzará.
-
Página 23: Cumplimiento De Normativas Y Aprobaciones
PC Locs/LocknCharge haya sido avisado de la posibilidad de que ocurran esos daños. La obligación de PC Locs/LocknCharge se limita única y exclusivamente a sustituir o reparar cualquier producto defectuoso. - Página 24 www.lockncharge.com...
- Página 25 INSTRUCTIONS D'UTILISATION Joey 10 Charging Station™ www.pclocs.com.au www.lockncharge.com...
- Página 26 Joey 10 Charging Station Félicitations pour votre achat ! Suivez les instructions suivantes pour installer facilement et rapidement votre Joey 10 Charging Station. PC Locs, LocknCharge et the Padlock device sont des marques déposées d'IWS Global Pty Ltd. Copyright IWS Global Pty Ltd, octobre 2015.
- Página 27 ÉTAPE 1 - En option : guide de montage au mur Avant de visser à bloc les vis de montage, veuillez Si vous montez la Joey 10 Charging Station au vérifier que le jeu autour de la porte est homogène mur, référez-vous aux emplacements des trous...
- Página 28 Joey 10 Charging Station ÉTAPE 2 – Installation de la Joey 10 Charging Station Démontage du panneau de recouvrement du chargeur : Dévissez la vis du panneau de recouvrement du 1. Faites coulisser pour extraire les pattes par le haut.
- Página 29 NOTICE D'UTILISATION Tirez les câbles de l'intérieur de la Joey 10 Charging Insérez les câbles par l'arrière de la Joey 10 Station à la longueur voulue en les faisant passer Charging Station. par le passe-câble en caoutchouc. Remise en place du panneau de recouvrement du Vérifiez que la longueur excédentaire de câble...
- Página 30 Joey 10 Charging Station ÉTAPE 3 — Raccordement de vos équipements dans la Joey 10 Charging Station Insérez et raccordez vos équipements. Branchez le câble électrique dans la Joey 10 Charging Station, puis dans la prise secteur murale et mettez l'unité sous tension. La régénération commence.
-
Página 31: Conformité Et Homologations
En cas de défaut, dysfonctionnement ou panne survenant pendant la période de garantie, PC Locs/ LocknCharge s'engage à réparer ou à remplacer, à sa discrétion, les produits jugés défectueux par le fabricant selon des critères raisonnables d'appréciation. Tous les frais de transport sont à la charge du propriétaire. La partie prenant la décision du transport prend la responsabilité... - Página 32 www.lockncharge.com...
-
Página 33: Istruzioni Per L'UTente
ISTRUZIONI PER L’UTENTE Joey 10 Charging Station™ www.pclocs.com.au www.lockncharge.com... - Página 34 Joey 10 Charging Station Congratulazioni per il tuo acquisto. Seguire queste istruzioni per la configurazione semplice e veloce della tua Joey 10 Charging Station. PC Locs, LocknCharge e il dispositivo Padlock sono marchi commerciali di IWS Global Pty Ltd. Copyright IWS Global Pty Ltd, ottobre 2015.
-
Página 35: Manuale D'IStruzioni
Prima di serrare le viti di montaggio, assicurarsi che il portello abbia uno spazio regolare tutto intorno Se si monta il Joey 10 Charging Station a una per evitare scorticamento durante l’apertura e la parete, fare riferimento alle posizioni dei fori di chiusura. - Página 36 Joey 10 Charging Station PASSO 2 - Sistemazione del Joey 10 Charging Station Rimuovere il coperchio del pannello del caricatore. Svitare la vite che sostiene il coperchio del 1. Far scorrere per sollevare le alette. pannello del caricatore superiore. Si trova 2.
- Página 37 Assicurarsi che il cavo in eccesso del dispositivo sia 1. Inserire prima il lato anteriore sotto l’aletta. arrotolato in modo ordinato sul retro del Joey 10 2. Poi il lato della linguetta sul retro e far scorrere Charging Station.
- Página 38 Joey 10 Charging Station PASSO 3 - Collegamento dei propri dispositivi nel Joey 10 Charging Station Inserire e collegare i propri dispositivi. Collegare l’alimentazione al Joey 10 Charging Station e in una presa a muro e accendere. La ricarica quindi inizia.
-
Página 39: Conformità E Approvazioni
In caso di difetto, malfunzionamento o guasto durante il periodo di garanzia, PC Locs/LocknCharge riparerà o sostituirà, a sua scelta i prodotti che a giudizio di PC Locs/LocknCharge sono considerati difettosi. Tutti i costi di trasporto saranno a carico del proprietario e il rischio di perdite sarà a carico della parte che inizia il trasporto. - Página 40 www.lockncharge.com...
-
Página 41: Instruções De Utilização
INSTRUÇÕES DE UTILIZAÇÃO Joey 10 Charging Station™ www.pclocs.com.au www.lockncharge.com... - Página 42 Parabéns pela sua aquisição. Siga estas instruções para uma configuração rápida e fácil da sua Joey 10 Charging Station. PC Locs, LocknCharge e o dispositivo Padlock são marcas comerciais da IWS Global Pty Ltd. Copyright IWS Global Pty Ltd, novembro de 2015.
- Página 43 MANUAL DE INSTRUÇÕES PASSO 1 - Opcional: guia para montagem na parede Antes de apertar os parafusos de montagem, Se for montar a Joey 10 Charging Station numa certifique-se de que a porta tem um espaço parede, consulte as localizações dos orifícios uniforme à...
- Página 44 Joey 10 Charging Station PASSO 2 - Montagem da Joey 10 Charging Station. Remover a cobertura do painel do carregador: Desaparafuse o parafuso que está a fixar o painel 1. Deslize para elevar as patilhas para fora. da cobertura do carregador superior. Encontra-se 2.
- Página 45 MANUAL DE INSTRUÇÕES Puxe os cabos da Joey 10 Charging Station até ao Insira os cabos através da parte posterior da Joey comprimento pretendido através do suporte de 10 Charging Station. cabos de borracha. Voltar a colocar a cobertura do painel do carregador: Certifique-se de que o excesso do cabo do 1.
- Página 46 Joey 10 Charging Station PASSO 3 - Ligação dos dispositivos na Joey 10 Charging Station. Insira e ligue os dispositivos. Ligue o cabo de alimentação à Joey 10 Charging Station e a uma tomada de parede e ligue. O carregamento terá início.
-
Página 47: Garantia
Na ocorrência ou deteção de um defeito, avaria ou falha durante o período de garantia, a PC Locs/ LocknCharge reparará ou substituirá, ao seu critério, os produtos que de acordo com uma análise razoável da PC Locs/LocknCharge sejam considerados defeituosos. Todos os custos de transporte serão suportados pelo proprietário e o risco de perda será... - Página 48 www.lockncharge.com...
- Página 49 GEBRUIKSINSTRUCTIES Joey 10 Charging Station™ www.pclocs.com.au www.lockncharge.com...
- Página 50 Joey 10 Charging Station Gefeliciteerd met uw aankoop. Volg deze instructies om uw Joey 10 Charging Station snel en gemakkelijk op te zetten. PC Locs, LocknCharge en het Padlock apparaat zijn handelsmerken van IWS Global Pty Ltd. Copyright IWS Global Pty Ltd, oktober 2015.
- Página 51 STAP 1 - Optioneel: Handleiding voor wandmontage Controleer voordat de bevestigingsschroeven aangedraaid worden dat de deur een gelijkmatige Als u de Joey 10 Charging Station aan de wand speling heeft zodat deze nergens tegenaan wilt bevestigen bekijk dan waar de gaten voor schuurt bij het openen en sluiten.
- Página 52 Joey 10 Charging Station STAP 2 - De Joey 10 Charging Station opzetten. Draai de schroef los waarmee de bovenste Verwijder de afdekplaat van de oplader. afdekplaat bevestigd is. Deze bevindt zich 1. Schuif de lipjes eruit. binnenin de Joey 10 Charging Station.
- Página 53 HANDLEIDING Trek de kabels die zich in de Joey 10 Charging Steek de kabels door de achterkant van de Joey 10 Station bevinden tot de juiste lengte door de Charging Station. rubberen kabelhouder. Vervang de afdekplaat van de oplader. Zorg ervoor dat het overtollige deel van de kabels 1.
- Página 54 Joey 10 Charging Station STAP 3 - Uw apparaten aansluiten in de Joey 10 Charging Station. Uw apparaten aansluiten. Steek de voedingskabel in de Joey 10 Charging Station, steek deze in een wandstopcontact en schakel deze aan. De Joey 10 Charging Station begint met opladen.
-
Página 55: Naleving En Goedkeuringen
HANDLEIDING Garantie PC Locs/LocknCharge garandeert dat het ontwerp, materiaal, de montage en ambacht van het product vanaf de aankoopdatum tot de oorspronkelijke koper vrij van gebreken is. Bewijs van oorspronkelijke aankoop is vereist voor het verkrijgen van service onder de garantie. - Página 56 www.lockncharge.com...