Capítulos
Tabla de contenido

Manuales relacionados para Engel RS 4800 S

Resumen de contenidos para Engel RS 4800 S
- Página 1 RECEPTOR SATÉLITE HD PVR MINI RÉCEPTEUR SATELLITE HD PVR MINI RICEVITORE SATELLITARE HD PVR MINI MINI PVR HD SATELLITE RECEIVER RS 4800 S MANUAL DE USUARIO MANUEL UTILISATEUR MANUALE UTENTE USER MANUAL...
- Página 3 ESPAÑOL Receptor Satélite HD PVR mini MANUAL DE USUARIO...
-
Página 4: Tabla De Contenido
CONTENIDOS PRECAUCIONES DE SEGURIDAD ................3 PROTECCIÓN MEDIOAMBIENTAL ................4 PANEL FRONTAL ......................5 PANEL TRASERO ......................5 CONEXIÓN DEL SISTEMA ................... 6 MANDO A DISTANCIA ....................7 OPERACIONES BÁSICAS ................. 8 1.1 E STB ....................9 NCENDER EL 1.2 P ......................... - Página 5 ACTUALIZAR ....................20 EPG ........................21 CAS ........................21 AJUSTES DE RED ................... 21 TEMPORIZADOR AVANZADO ................ 22 RADIO ....................... 23 FOTO ......................... 23 MUSICA ......................23 VIDEO ....................... 24 TIEMPO ......................25 YOUTUBE ......................25 JUEGOS ......................26 ESPECIFICACIONES ..................27...
-
Página 6: Precauciones De Seguridad
PRECAUCIONES DE SEGURIDAD CAUTION: El signo de admiración dentro El rayo con punta de flecha Advertencia: de un triángulo equilátero Dentro de las Naciones Unidas Para reducir el riesgo de pretende alertar al usuario sobre triángulo equilátero, Tiene la descarga eléctrica, no abra la funcionamiento y mantenimiento finalidad de avisar al usuario de unidad. -
Página 7: Protección Medioambiental
Protección del cable: Coloque el cable de alimentación fuera del camino, en el que no se pueda pisar. Por favor tenga atención especial a los cables en los enchufes, tomacorrientes y en el punto donde salen del aparato. Entrada de objetos y líquido: Nunca coloque objetos de ningún tipo dentro de este STB a través de las aberturas, ya que podrían tocar puntos de tensión peligrosos o cortocircuitar piezas que podrían resultar en un incendio o una descarga eléctrica. -
Página 8: Panel Frontal
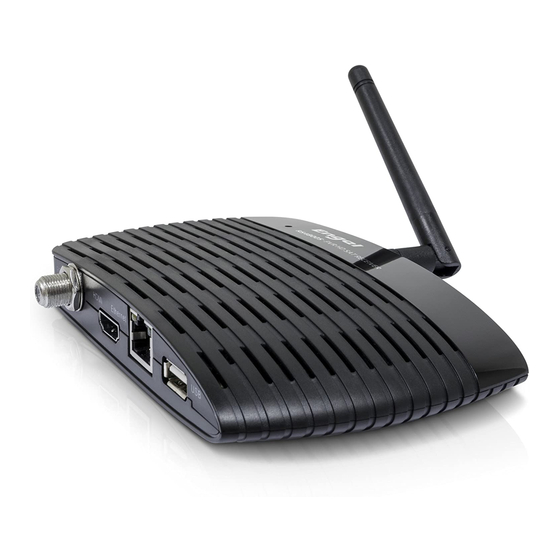
Panel Frontal 1. Entrada DC: Rango de entrada 12V/1.5A 2. Antena Wifi:modelo con wifi integrado Puerto RS 232 SERIAL: Para transferir los datos a otro STB o PC mediante un cable RS-232 Puerto IR:Conecte el cable IR Panel Trasero Consulte el diagrama anterior para todas las posibles conexiones del receptor No conecte la unidad a la toma de corriente hasta que se hayan realizado y verificado todas las conexiones. -
Página 9: Conexión Del Sistema
Conexión del sistema Hay cuatro maneras de conectar el receptor a su sistema de televisión existente. Le recomendamos que utilice uno de los siguientes casos para el mejor resultado: 1. Si usted tiene un televisor de alta definición, se debe utilizar un cable HDMI para un mejor resultado. Enchufe un extremo del cable a la toma HDMI del receptor y el otro extremo a la toma correspondiente en su televisor. -
Página 10: Mando A Distancia
Mando a Distancia... - Página 11 1. POWER: Para encender / apagar la alimentación del receptor. 2. TV/STB:Para cambiar entre TV y STB. 3. MUTE: Para silenciar o restablecer el sonido 4. TV/RADIO: Para cambiar entre TV y radio. 5. teclado numérico: para seleccionar TV / Canal de radio e introduzca los parámetros de programación de las teclas numéricas y para introducir el carácter de las teclas alfabéticas.
-
Página 12: Operaciones Básicas
1. Operaciones Básicas Encender el STB En primer lugar, pulse el botón POWER para encender la unidad. Cuando se utiliza el STB primero, no jugará el primer canal en la lista de canales por defecto. Si no se utiliza la primera STB, STB reproducirá el mismo canal que la última vez antes de apagar. Power 1. -
Página 13: Nformación
1.11 Información En pantalla completa, pulse la tecla [Info] para abrir la pantalla de información en la ventana se muestran los parámetros del canal actual. 1.12 1. El STB cuenta con una guía electrónica de programas (EPG) para ayudarle a navegar a través de todas las posibles opciones de visualización. -
Página 14: Teletexto
1.15 Página Arriba/Página Abajo En la lista de canales, pulse [Página + / -] para mover el cursor a la página siguiente o anterior en el menú o la lista de canales. 1.16 Teletexto 1. Pulse la tecla [TTX] en pantalla completa, se puede abrir la página de teletexto en el canal que tiene la información del teletexto. -
Página 15: Zoom
1.19 Zoom 1 La tecla [ZOOM] le permite ampliar una zona determinada en las imágenes 2. Pulse la tecla [ZOOM] de nuevo, la imagen se ampliará gire como x2, x4, x6 3 En la imagen "x2 ~ x6", utilizando [Arriba / Abajo / Arriba / Abajo] para mover el área central de la imagen que quieres ver. - Página 16 Pulse el botón verde para mostrar el menú encontrará canal rápido Pulse el botón amarillo para mostrar la lista de canales con todos los canales clasificados por el nombre del proveedor. Pulse el botón azul para ver la lista satélite con todos los canales 2.
-
Página 17: Canales
2.1.1 Canal Al seleccionar el menú "Canal" y, - Puede mover la selección apretando [Ch. Up / Dn] para seleccionar el editor de canales de radio, TV editor de canales NOMBRE [Tecla Rojo]: Para editar el nombre de los canales LOCK [Tecla Verde]: Para bloquear los canales que desea bloquear. - Página 18 Puede pulsar la tecla ROJA para establecer SAT / tp Director Pulse la tecla verde para comenzar la búsqueda de canales Pulse la tecla azul para actualizar transpondedor de la red 1. Satélite: En este artículo, pulse [Volumen + / Abajo] puede cambiar Satélites y pulse la tecla [OK] para entrar en la lista de satélites para que usted pueda seleccionar directamente.
- Página 19 Scan Manual Se pueden encontrar los sub-menús de Satélite, Transpondedor, Polaridad, NIT, programa, barra de señal de calidad, etc y pulse la tecla verde para comenzar la búsqueda de canales por los parámetros actuales 1. Satélite: Seleccione el satélite que desea buscar el canal 2.
-
Página 20: Búsqueda De Satélite
Búsqueda de Satélite Al seleccionar "Encontrar Satélite" menú - Puede utilizar [Vol + / -] para cambiar satélite y transpondedor - Puede configurar el tono Beep ON o en OFF 2.1.3 Ajuste de Sistema Si pulsa [Menú] y seleccionando la opción "Sistema" y mueva el Arriba / Abajo para seleccionar: Idioma, ajuste OSD, tiempo, configuración del televisor, Bloqueo, actualización y configuración de Backup... - Página 21 Tiempo Al entrar en el menú Timer, se puede ver: tiempo de sueño, la zona horaria y el uso GMT. Puede configurar temporizador. Cuando se establece un temporizador para dormir y llega el momento, el sistema entrará automáticamente en modo de espera. Se cambiará...
-
Página 22: Actualización & Copia De Seguridad
de los canales bloqueados se mostrará un mensaje emergente en la pantalla y pida la contraseña. 3. Bloqueo del menú: Para entrar al menú, debe introducir la contraseña. Actualización & Copia de Seguridad Si pulsa [Menú] y seleccionando la opción "Sistema" y pulse la tecla OK para ingresar y actualizar la copia de seguridad de menú... -
Página 23: Multimedia
Internet PING Al entrar en el menú "PING Internet", verá una pantalla como la siguiente Establezca la opción Modo pulso para 5times o calle para siempre Establecer el tiempo de Ping por 1 ~ 10 seg. Establecer Ping objetivo de String y Number Cuando el resaltado de la Carrera de Ping, pulse la tecla OK para ejecutar la función PING 2.1.4 Multimedia... -
Página 24: Epg
Cuando el cursor en la actualización de la imagen, pulse la tecla OK para configurar la imagen de actualización Mueva el cursor sobre el menú de actualización, el archivo de actualización, aparecerá en el menú de la izquierda, debe seleccionar el archivo correcto (el formato como * SSU), cuando el cursor en el archivo de actualización, pulse la tecla OK para iniciar la actualización del USB 2. -
Página 25: Temporizador Avanzado
Al entrar en el menú "Red Local Setting", Puede seleccionar el modo de red por cable o red inalámbrica, cuando el cursor en la interfaz de red y presione Vol + / - para cambiar Cuando la pantalla de estado de la red conectarse, puede seleccionar DHCP o introducir la dirección IP manualmente. -
Página 26: Radio
Radio Básicamente, el funcionamiento de la "Lista de Canales de Radio" es igual a "Lista de Canales de TV", pero hay un punto diferente: En el modo "Lista Canales Radio", no hay ninguna información de vídeo. Foto Si desea ver los archivos de fotos que están almacenadas en el dispositivo USB, seleccionar el icono de archivo en el menú... -
Página 27: Video
Vídeo Si quieres disfrutar de ver los contenidos de película, que se almacenan en el dispositivo USB, seleccionar los elementos en el menú Multimedia. La pantalla muestra los archivos de vídeo compatibles almacenados en el dispositivo USB Nota: Si no hay ningún dispositivo de memoria USB (como el disco duro o memoria USB) se inserta en el receptor de este menú... -
Página 28: Tiempo
12. Tiempo 13. Al entrar en el menú de tiempo, asegúrese de que la red está conectada 14. Pulse izquierda / derecha para cambiar la ciudad 15. Pulse la tecla AMARILLA para ajustar la información de la ciudad 13. Youtube Cuando la corriente en el icono de YouTube, pulse en la entrada tecla OK al menú... -
Página 29: Juegos
14. Juegos Al entrar en el menú "Juego", podrás ver varios juegos como Tetris y Othello. En el menú del juego, podrás ver varios juegos, incluyendo Gobang, boxman, tetris... -
Página 30: Especificaciones
15. Especificaciones Sintonizador Demodulator Mode QPSK,8PSK,16APSK Frequency Range 950~2150MHz RF Input Connector F-Female Video Video Decoding ISO/IEC 11172-2 MPEG1,ISO/IEC 13818-2 MPEG2 MP@HL,ISO/IEC 14496 MPEG4 compliant Support SP@L3 to ASP@L5,ISO/IEC 14496-10 AVC high profile@level 4.1 main profile@level 4.1 Video Output CVBS(video format @ 576i or 480i) HDMI 1.3(video format default @ Auto), support HDCP Video Resolution 1080p/i 720p/i 576p/i 480p/i... - Página 31 FRANÇAIS Récepteur Satellite HD PVR mini MANUEL UTILISATEUR...
- Página 32 TABLE DES MATIERES PRECAUTION ........................ 3 PROTECTION DE L’ENVIRONNEMENT ..............4 FACE AVANT ........................ 5 FACE ARRIERE ......................5 CONNECTER VOTRE SYSTEME ................. 5 TELECOMMANDE ......................6 FONCTIONS DE BASE ..................8 1.1 A .................. 9 LLUMER VOTRE RECEPTEUR 1.2 A .....................
- Página 33 MISE A JOUR ....................20 GESTION DE STOCKAGE ................21 EPG ........................21 CAS ........................22 REGLAGES RESEAUX ..................22 PROGRAMMATION ..................23 RADIO ....................... 23 PHOTO ......................23 MUSIQUE ......................24 FILM ........................24 METEO ......................25 YOUTUBE ......................26 JEUX .........................
-
Página 34: Precaution
SAFETY PRECAUTION CAUTION: The exclamation point within an The lightning flash with Warning: equilateral triangle is intended to arrowhead symbol, within an To reduce the risk of electric alert the user to important equilateral triangle, is intended shock, don't open the cabinet. operating and maintenance to alert the user to "dangerous Refer servicing to qualified... -
Página 35: Environment Protection
Object and Liquid Entry: Never put objects of any kind into this STB through openings, as they may touch dangerous voltage points or short-out parts that could result in a fire or electric shock. Never spill any liquid on the STB. Note: Moisture may be formed on the lens In the following conditions: Ø... -
Página 36: Face Avant
Face Avant 1. Entrée DC: 12V/1.5A 2. Antenne Wifi:intégrée 3. Port Série RS 232: Transférer des données d’un autre STB ou du PC via câble RS-232. 4. Port IR:Connecter le câble IR Face Arrière Ne pas brancher votre récepteur à la prise de courant avant d’avoir fait et vérifié les autres connexions. Votre configuration peut varier en fonction du modèle. -
Página 37: Connexion De Votre Système
Connexion de votre Système Il existe quatre façons de brancher votre récepteur à votre téléviseur. Nous vous recommandons de choisir l’une des deux manières suivantes pour les meilleurs résultats: Si vous avez une télévision Haute Définition, vous devrez utiliser un câble HDMI pour le meilleur résultat. -
Página 38: Telecommande
Télécommande... - Página 39 1. POWER: Pour allumer/éteindre le récepteur. 2. MUTE: Pour couper ou remettre le son 3. TV/RADIO: Pour basculer entre la TV et la RADIO. 4. TOUCHE NUMÉRIQUES: Pour choisir une chaîne TV/Radio et entrer les paramêtres de programmation et entrer les caractères alphabétiques. 5....
-
Página 40: Fonctions De Base
1. Fonctions de Base Allumer votre récepteur Tout d’abord, appuyer sur la touche Power pour allumer le récepteur. Lors de la première utilisation du récepteur, celui-ci affichera la première chaîne de la liste des chaînes. Si ce n’est pas la première utilisation, le terminal affichera la dernière chaîne visionnée. Power Appuyer sur la touche [Power] pour mettre en veille. -
Página 41: Nformation
1.11 Information En plein écran, appuyer sur la touche [INFO] pour ouvrir la fenêtre d’information, celle-ci affiche les paramètres de la chaîne en cours. 1.12 Le récepteur dispose du Guide Electronique des Programmes (EPG) pour aider à la navigation des chaînes et de toutes les options de visionnages possibles. -
Página 42: Monter/Descendre Une Page
1.15 Monter/Descendre une page Dans la liste des chaînes, Appuyer sur [Page +/-] pour déplacer le curseur à la page suivante ou précédente dans le menu. 1.16 Télétexte Appuyer sur [TTX] en plein écran, pour ouvrir la page du télétexte si il est disponible. Si la chaîne ne dispose pas du télétexte, cela affichera “Pas d’information Télétexte”. -
Página 43: Zoom
1.19 Zoom La touche [ZOOM] permet d’agrandir une certaine zone de l’image. Appuyer de nouveau sur [ZOOM], l’image sera agrandi dans l’ordre x2, x4, x6 Dans une image en “x2 ~ x6”, utiliser les touches [Ch Up/Dn] et [Vol +/-] pour déplacer la zone que vous souhaitez regarder. - Página 44 Appuyer sur la touche [Verte] pour afficher le menu Recherche rapide. Appuyer sur la touche [Jaune] pour afficher la liste précédente avec toutes les chaînes. Appuyer sur la touche [Bleue] pour afficher la liste Satellite de toutes les chaînes...
-
Página 45: Menu Principal
2. Menu Principal Lorsque vous appuyez sur [MENU], les 16 icônes apparaîtra sur votre TV, où vous pourrez faire tous les réglages: Menu Principal, Mise à Jour, Gestion de Stockage, EPG, CAS, Réglages Réseau, Radio, Photo, Musique, Film, PVR, Météo, Youtube, Jeux, Outils. - Página 46 2.1.2 Installation Appuyer sur [Menu], puis sur [Vol+/-] pour déplacer la surbrillance sur Installation. Lorsque la surbrillance est sur Réglage Satellite, appuyer sur [OK] pour entrer dans ce menu. Sur la liste des satellites, appuyer sur [OK] pour régler le dit satellite avec sa LNB Appuyer sur [Rouge] pour ouvrir Réglage SAT/Tp Appuyer sur [Vert] pour lancer la recherche de chaîne Appuyer sur [Bleue] pour mettre à...
-
Página 47: Recherche Manuelle
Antenne Motorisé Type Moteur Type: DiSEqC1.2/USALS Réglages Moteur: Si vous choisissez “DiSEqC1.2”, les “Longitude Locale / Latitude Locale” ne sont pas disponible. Il affichera l’écran suivant: Lorsque la surbrillance est sur l’option Mode,Utiliser [Volume +/-] pour régler la fonction Moteur Recherche SAT Automatique, vous trouverez les sous-menus : Satellite, Transpondeur, Polarité, NIT, Programme, Mode recherche,choisir recherche,Qualité... -
Página 48: Configuration Systeme
- [Rouge]: Pour éditer le nom et la longitude du satellite. - [Verte]: Pour démarrer la recherche de ce satellite - [Jaune]: Pour ajouter un satellite [Bleue]: Pour supprimer un satellite. Chercher Satellite En choisissant le menu “Chercher Satellite” Utiliser [Vol+/-] pour changer le Satellite et le Transpondeur Vous pouvez régler le Beep Tone ON ou OFF 2.1.3 Configuration Système... -
Página 49: Réglages Osd
Langue Dans le menu “Langue”, vous pouvez choisir la langue OSD, Audio et des sous-titres Langue OSD: La langue des Menus, choisir entre: Anglais, Français, Allemand, Russe, Arabe, Portugais, Turque, Espagnol, Polonais, Italien et etc. Langue Audio: Certaines chaînes proposent plus d’une langue audio; cette fonction permet de choisir la première langue audio. - Página 50 Sortie Vidéo: Régler le mode de sortie vidéo entre RCA(CVBS) /SCART(CVBS) /SCART(RGB) /YCBCR(YUV) Résolution Tv: Régler la résolution entre alternativement 576P <-> 720P <-> 1080i. Sortie Audio Numérique: Régler le mode de sortie audio numérique pour le SPDIF et HDMI. Les options sont LPCM et BS, LPCM signifie que le système décodera pas les données des pistes audio AC3 ou PCM pour être en LPCM, l’audio numérique décodeur ou TV HDMI sera en LPCM audio.
-
Página 51: Réglage D'USine
Réglage d’Usine Quand vous entrerais dans ce menu : Cela affichera un message d’avertissement disant “L’opération restaurera les valeurs d’usines et effacera les chaînes ajoutées, continuer?”. Si vous choisissez “Oui”, tous les paramètres sront réinitialisé à leur valeur par défaut. Soyez prudent avec l’utilisation de cette fonction. -
Página 52: Mise A Jour
3. Mise à Jour Ce menu est disponible lorsqu’une clé USB est connecté. Une fois le curseur sur Mise à jour par fichier,appuyer sur OK. Déplacer le curseur sur le menu Mise à Jour, le fichier de mise à jour s’affichera sur le menu de gauche, vous devrez choisir le bon fichier (au format *SSU), une fois le curseur sur le fichier,appuyer sur OK pour démarrer la mise à... -
Página 53: Cas
6. Cas Nous fournissons une fente CA pour l’utilisateur. Le récepteur a été fabriqué avec un module smartcard avec système CONAX. En utilisant une carte fournit par un opérateur dans ce système, il est possible de regarder certaines chaînes cryptées avec ce système. Ce menu montre les informations détaillés au sujet de la carte insérée dans le module. -
Página 54: Programmation
8. Programmateur Choisir l’option “Régler programmation” et choisir une programmation(s), puis appuyer sur [OK] pour ouvrir le menu programmation. L’information sur l’heure actuelle s’affiche sur la première colonne. Mode de Prog.: Il y a plusieurs modes de programmation, entre Éteint, une fois, Quotidien Type de chaîne et Numéro: Pour choisir la chaîne à... -
Página 55: Musique
11. Musique En appuyant sur [Menu] et en choisissant l’icône “Musque”, vous entrerez dans le menu musique. Dans celui-ci, vous pourrez choisir vos fichiers musicaux (MP3) et les écouter. Appuyer sur la touche ROUGE pour afficher le menu option, pour régler le mode de lecture. Appuyer sur la touche VERTE pour régler l’affichage de la liste dans le mode Dossier Appuyer sur la touche JAUNE pour régler l’affichage de... -
Página 56: Meteo
Déplacer le curseur sur le fichier vidéo, puis appuyer sur OK pour démarrer la lecture. Vous pouvez faire une avance rapide, retour rapide et rechercher avec les touches de la télécommande. FB (retour rapide) et FF (avance rapide) supporte le x2, x4, x8, x16, x32 PLAY / PAUSE: pour mettre en pause ou reprendre la lecture. -
Página 57: Youtube
14. Youtube Lorsque vous êtes sur l’icône YouTube, appuyer sur OK pour entrer dans ce menu, assurez-vous d’être connecté au réseau. Appuyer sur la touche BLEUE pour changer de fichier vidéo et de Liste de Groupe Appuyer sur la touche JAUNE pour afficher les options du menu. 15. -
Página 58: Specifications
17. Spécifications Tuner Démodulateur QPSK,8PSK,16APSK Bande de Fréquence 950~2150MHz Connecteur RF F-Femelle Vidéo Décodeur Vidéo ISO/IEC 11172-2 MPEG1,ISO/IEC 13818-2 MPEG2 MP@HL,ISO/IEC 14496 MPEG4 compliant Support SP@L3 to ASP@L5,ISO/IEC 14496-10 AVC high profile@level 4.1 main profile@level 4.1 Sortie vidéo CVBS (format vidéo @ 576i or 480i) HDMI 1.3 (format vidéo par défaut @ Auto), supporte HDCP Résolution Vidéo 1080p/i 720p/i 576p/i 480p/i... - Página 59 ITALIANO Ricevitore Satellitare HD PVR Mini MANUAL UTENTE...
- Página 60 INDICE PRECAUZIONE ALL’USO ..................3 AMBIENTE ........................4 PANNELLO FRONTALE ....................5 PANNELLO POSTERIORE ................... 5 CONNESSIONI ......................5 TELECOMANDO ......................6 OPERAZIONI DI BASE ..................9 ......................9 CCENZIONE ....................9 LIMENTAZIONE ..................... 9 ANALI SU GIÙ ....................9 OLUME SU GIÙ...
- Página 61 AGGIORNAMENTI .................... 20 GESTIONE MEMORIA ..................21 EPG ........................21 CAS ........................21 IMPOSTAZIONI RETE ..................21 ADV TIMER ....................... 22 RADIO ....................... 23 FOTO ......................... 23 MUSICA ......................24 FILM ........................24 METEO ......................25 YOUTUBE ......................25 GAME ........................ 26 STRUMENTI ......................
-
Página 62: Safety Precaution
SAFETY PRECAUTION CAUTION: Il simbolo del fulmine con la Attenzione: Il punto esclamativo all'interno di punta a freccia all'interno di un Per ridurre il rischio di scosse un triangolo equilatero serve ad triangolo equilatero, avverte elettriche, non aprire avvisare l'utente di importanti l'utente di "tensione pericolosa"... -
Página 63: Ambiente
Protezione del cavo di alimentazione: Posizionare il cavo di alimentazione in modo che , non possa essere calpestato. Si prega di prestare attenzioni speciali a cavi e spine, delle prese e del punto in in cui fuoriescono dall'apparecchio. Oggetti e liquidi: Non appoggiare mai oggetti di alcun tipo all'interno del RICEVITORE attraverso le aperture, in quanto potrebbero toccare punti di tensione o provocare cortocircuiti con il rischio di incendi o scosse elettriche. -
Página 64: Pannello Frontale
Pannello Frontale 1. Alimentazione in ingresso: 12V/1.5A 2. Antenna Wifi:Wifi built-in 3. PORTA SERIALE RS 232: Per trasferimento dati da RICEVITORE(ricevitore) o PC via cavo RS-232 4. Porta IR:Cavo di collegamento IR Panello Posteriore Si prega di fare riferimento al diagramma di cui sopra per tutte le possibili connessioni del vostro ricevitore Non collegare l'apparecchio alla presa di corrente prima di aver effettuato tutti gli altri collegamenti e controllato. -
Página 65: Collegamento Del Sistema
Collegamento del sistema Ci sono quattro modi per collegare il ricevitore al sistema TV esistente. Si consiglia di utilizzare uno dei seguenti casi per il miglior risultato: 1. Se si dispone di un televisore ad alta definizione, è necessario utilizzare un cavo HDMI per il miglior risultato. -
Página 66: Telecomando
Telecomando... - Página 67 1. POWER: Per accendere e spegnere il ricevitore 2. TV/RICEVITORE:Per passare tra TV e RICEVITORE. 3. MUTE: Per disattivare o ripristinare l'audio Per passare tra TV e RADIO. 4. TV/RADIO: 5. Tastiera Numerica: Per selezionare TV / Canale radio e inserire i parametri di programmazione con i tasti numerici e di inserire il personaggio con i tasti alfabetici 6....
-
Página 68: Operazioni Di Base
1. Operazioni di Base 11.1 Accendere RICEVITORE In primo luogo, premere il tasto di alimentazione per accendere l'unità. Quando viene utilizzato il RICEVITORE la prima volta, si dovrà programmare la ricerca della lista canali predefinita. Se il RICEVITORE non viene utilizzato per la prima volta, RICEVITORE riprodurrà lo stesso canale dell’... -
Página 69: Nformazioni
1.11 Informazioni A schermo intero, premere il tasto [INFO] per aprire la schermata delle informazioni, nella finestra con i parametri del canale corrente 1.12 1 Il RICEVITORE ha una Guida Elettronica Programmi (EPG) per aiutarti a navigare attraverso tutti i canali e possibili opzioni di visualizzazione. -
Página 70: Eletext
1.15 Pagina Su/Pagina Giù Nella lista canali, premere [Pagina + / -] per spostare il cursore alla pagina successiva o precedente del menu o lista dei canali. 1.16 Teletext 1 Premere il tasto [TTX] a schermo intero, è possibile aprire la pagina del teletext sul canale che ha informazioni televideo. -
Página 71: Menu
1.19 Zoom Il tasto [ZOOM] permette di ingrandire una determinata area sulle immagini Premere il tasto [ZOOM] ancora una volta, l'immagine si ingrandirà ruotano come x2, x4, In immagine "x2 ~ x6", usando [Su / Giù / Su / Giù] per spostare l'area centro dell'immagine che si desidera vedere. -
Página 72: Menu Principale
Premi il tasto Giallo per visualizzare la lista precedente di tutti I canali. Premi il tasto Blu per visualizzarla lista di tutti i canali del satellite 2. Menu Principale Premendo il tasto [MENU] sul telecomando, le 16 icone appariranno sul tuo schermo TV dove è possibile configurare tutte le impostazioni: Menu Principale, Aggiornamento, Gestione Memoria, EPG, CAS, Impostazioni di Rete, Radio, Foto, Musica, Film,... -
Página 73: Nstallazione
- Sarà visualizzata una finestra di dialogo per chiedervi di inserire la password. La password predefinita è "0000". Se si immette la password corretta, è possibile vedere un "segno di blocco" nel lato destro del canale evidenziato. -Quindi salvare e uscire dal menu, il RICEVITORE chiederà di inserire la password quando si desidera vedere il canale bloccato. - Página 74 DiSEqC1.0/1.1: Puoi usare il tasto [Volume Su/ Volume Giù] per cambiare le opzioni . Puoi selezionarle diverse opzioni: Disabilita / LNB1 / LNB2 / LNB3 / LNB4 22K: Puoi usare il tasto [Volume Su/ Volume Giù] per accendere e spegnere “ON / Off”. Quando è...
-
Página 75: Ricerca Manuale
Ricerca Manuale 1、 Troverai i sotto-menu per Satellite, Transponder, Polarità, NIT, Programma, Qualità del segnale, Barre e ecc e premere il tasto verde per avviare la ricerca dei canali con i parametri attuali 1. Satellite: Selezionare il satellite sul quale si desidera cercare il canale 2. -
Página 76: Mpostazione Sistema
Trova Satellite Selezionando il menu “ Trova satellite” Puoi usare i tasti [Vol+/-] per passare da Satellite a Transponder Puoi impostare il tono Beep ON o OFF 2.1.3 Impostazione Sistema Premendo [MENU] e selezionando la voce "sistema", e spostare la / tasto UP giù per selezionare Lingua, Impostazione OSD, Tempo, Installazione TV, Blocco Parentale, Aggiornamento e l'Impostazione di fabbrica di Backup... - Página 77 Time Entrando nel Menu Timer, puoi selezionare: tempo di spegnimento (sleep time)、Time Zone e GMT Quando si imposta un timer di spegnimento e il tempo arriva, il sistema entrerà automaticamente in modalità standby. Passerà alla modalità tra Sleep Timer Off / 15/30/45/60/90/120 minuti Impostazione GMT : Seleziona On o Off.
-
Página 78: Impostazioni Di Fabbrica
Controllo Parentale Modifica password: per cambiare la password. È possibile inserire la nuova password in questo decoder usando direttamente i tasti numerici. Inserire 4 numeri, ripetere i 4 numeri inseriti per confermare la nuova password. La password pre impostata dalla fabbrica è "0000". Blocco Canale: Per entrare ai canali bloccati, è... -
Página 79: Strumenti
Internet PING Entrando nel menu "Internet PING", vedrete una schermata come a lato Impostare l'opzione Modalità Ping per 5 volte o per sempre Impostare il tempo di ping da 1 ~ 10 sec. Impostare l’ Obiettivo Ping per stringa e numero Quando è... -
Página 80: Gestione Memoria
Posiziona il cursore sul file da aggiornare , premere il tasto OK per impostare l'aggiornamento Spostare il cursore sul menu di aggiornamento, il file di aggiornamento viene visualizzato nel menu a sinistra, è necessario selezionare il file corretto (il formato come * SSU), quando il cursore è sul file di aggiornamento, premere il tasto OK per avviare l'aggiornamento USB. -
Página 81: Impostazioni Rete
Note: Tutte le informazioni contenute in questo menu e sottomenu proviendono dalla scheda inserita. Se qualcosa è sbagliato, potrebbe essere un problema della scheda. Dopo aver inserito la scheda correttamente, in qualsiasi momento, una casella messaggio apparirà sullo schermo con un messaggio di rilevamento della scheda, nel menu "info sulle carte"... -
Página 82: Radio
Sveglia Giorno della settimana: Per inserire la vostra giornata sveglia. Tempo di accensione: Per introdurre l'orario di accensione. Una volta che il tempo è scaduto, non importa ciò che il sistema è in modalità standby o in modalità di riproduzione, il sistema passa automaticamente al canale desiderato e iniziare a giocare Durata: Dopo aver impostato un tempo per... -
Página 83: Musica
12. Musica Premere [MENU] e selezione l'icona "Musica", è possibile accedere al menu "Musica". Nel menu "Musica", è possibile scegliere il file musicale (file MP3) e ascoltare della musica. Premere il tasto ROSSO per visualizzare il menu delle opzioni, è possibile impostare la modalità di riproduzione Premere il tasto VERDE per impostare la visualizzazione dei file in modalità... -
Página 84: Meteo
Si può avanzare e retrocedere , velocemente, utilizzando I tasti del telecomando FB (indietro veloce) e FF (avanzamento veloce) i tasti supportano x2, x4, x8, x16, x32 PLAY / PAUSE tasti: per mettere in pausa e riprodurre il file quando si preme play / pausa tasto. Tasto STOP: Per interrompere la riproduzione del file. -
Página 85: Game
Quando l'icona è su YouTube, premere il tasto OK sul menu di YouTube, accertarsi che la rete sia collegata Premere il tasto Blu per passare file video e la lista di gruppo Premere il tasto Giallo per visualizzare le opzioni del menu 16. -
Página 86: Specifiche
18. Specifiche Tuner Demodulator Mode QPSK,8PSK,16APSK Frequency Range 950~2150MHz RF Input Connector F-Female Video Video Decoding ISO/IEC 11172-2 MPEG1,ISO/IEC 13818-2 MPEG2 MP@HL,ISO/IEC 14496 MPEG4 compliant Support SP@L3 to ASP@L5,ISO/IEC 14496-10 AVC high profile@level 4.1 main profile@level 4.1 Video Output CVBS(video format @ 576i or 480i) HDMI 1.3(video format default @ Auto), support HDCP Risoluzione Video 1080p/i 720p/i 576p/i 480p/i... - Página 87 ENGLISH mini PVR HD Satellite Receiver USER MANUAL...
- Página 88 CONTENTS SAFETY PRECAUTION ....................3 ENVIRONMENT PROTECTION ..................4 FRONT PANEL ......................5 REAR PANEL ........................ 5 CONNECTING YOUR SYSTEM ..................6 REMOTE CONTROLLER ....................7 BASIC OPERATIONS ..................9 1.1 T STB ....................... 9 URN ON 1.2 P ......................... 9 OWER 1.3 C ................
- Página 89 UPGRADE ......................20 EPG ........................21 CAS ........................21 NETWORK SETTING ..................21 ADV TIMER ....................... 22 RADIO ....................... 23 PHOTO ......................23 MUSIC ....................... 23 MOVIE ....................... 24 WEATHER ......................25 YOUTUBE ......................25 GAME ........................ 25 SPECIFICATIONS .................... 27...
-
Página 90: Safety Precaution
SAFETY PRECAUTION CAUTION: The exclamation point within an The lightning flash with Warning: equilateral triangle is intended to arrowhead symbol, within an To reduce the risk of electric alert the user to important equilateral triangle, is intended shock, don't open the cabinet. operating and maintenance to alert the user to "dangerous Refer servicing to qualified... -
Página 91: Environment Protection
Object and Liquid Entry: Never put objects of any kind into this STB through openings, as they may touch dangerous voltage points or short-out parts that could result in a fire or electric shock. Never spill any liquid on the STB. Note: Moisture may be formed on the lens In the following conditions: Ø... -
Página 92: Front Panel
Front Panel 1. DC Input: 12V/1.5A input Range 2. Wifi antenna:built-in wifi model RS 232 SERIAL PORT: To transfer the data to another STB or PC by RS-232 cable IR Port:Connect the IR cable Rear Panel Please refer to the diagram above for all possible connections of your receiver Do not connect the unit to the mains socket until all other connections have been made and checked. -
Página 93: Connecting Your System
Connecting Your System There are four ways to connect the receiver to your existing TV system. We recommend using one of the following cases for the best result: If you have a high definition television set, you should use a HDMI cable for best result. Plug one end of the cable into the HDMI socket on the receiver and the other end into the matching socket on your television. -
Página 94: Remote Controller
Remote Controller... - Página 95 1. POWER: To switch ON/OFF the receiver power supply. 2. TV/STB:To switch between TV and STB. 3. MUTE: To mute or restore the sound 4. TV/RADIO: To switch between TV and RADIO. 5. NUMBER KEYPAD: To select TV/Radio channel and enter to programming parameters by the numeric keys and to input the character by the alphabetical keys.
-
Página 96: Basic Operations
1. Basic Operations Turn on STB First, press the Power to turn on the unit. When the STB is first used, there will play the first channel from the default Channel List. If the STB is not first used, STB will play the same channel as last time before turning off. Power Press [Power] Key can enter the Standby state In Standby state, press [Power] Key again can call back the unit and go on play the previous... -
Página 97: Epg
1.11 Information In full screen, press [INFO] key can open information screen, in the window shows the parameters of current channel. 1.12 The STB has an Electronic Program Guide (EPG) to help you navigate channels through all the possible viewing options. The EPG supplies information such as channel listings and starting and ending times for all available channels. -
Página 98: Page Up/Page Down
1.15 Page Up/Page Down In Channel list, press [Page +/-] key to move up the cursor to the next or previous page in the menu or channel list. 1.16 Teletext Press [TTX] key in full screen, you can open teletext page on the channel which has teletext information. -
Página 99: Zoom
1.19 Zoom The [ZOOM] key allows you to magnify a certain area on the images Press [ZOOM] key again, the image will enlarge rotate as x2, x4, x6 In “x2 ~ x6” image, using [Up/ Down/ Up/ Down] keys to move the image center area you want to see. -
Página 100: Main Menu
Press Green Button to display the fast find channel menu Press Yellow Button to display Channel list with all channel sorted by provider name. Press Blue Button to display Satellite list with all channel 2. Main Menu When pressing the [MENU] on the RCU, the 16 icons will appear on your TV screen where you can configure all your settings :Main Menu,Upgrade,Storage Manage,EPG, CAS,... - Página 101 System Setting:Factory Setting, Upgrade&Backup, Parental control, TV setup, Time, OSD setting, Language Tool:Device Removed 2.1.1 Channel By selecting “ Channel” menu, You can move highlight by press [Ch Up/Dn] key to select Radio channel editor、TV channel editor NAME [Red Key] : To edit the channels name LOCK [Green Key] : To lock the channels which you want to lock.
- Página 102 When the focus on the satellite list, you can press OK key to setting which satellite will be select with You can press RED key to set SAT/tp Manager Press Green key to start channel search Press blue key to update transponder from network Satellite: In this item, press [Volume Up/ Volume Down] key can switch Satellites and press [OK] key can enter satellite list for you to select directly.
-
Página 103: Manual Scan
6、 Scan select:single sat、all sat 7、 Signal Intensive / Quality Bar : They show the strength and quality of signal from LNB. Manual Scan you can find sub-menus for Satellite, Transponder, Polarity, NIT, program ,Signal Quality Bar and etc. and press Green key to start channel search by current parameters Satellite: Select the satellite what you want to search the channel... -
Página 104: System Setup
Satellite Find By selecting “ satellite find” menu You can use [Vol+/-] key to switch Satellite and Transponder You can set Beep tone ON or OFF 2.1.3 System Setup By pressing [Menu] and selecting “system” item, and move the UP/Down key to select Language, OSD setting, time, TV setup, Parental Lock, Update&Backup Factory setting Language... - Página 105 Time When you entry to Timer Menu, you can see: sleep time、Time Zone and GMT usage can set sleep timer. When you set a sleep timer and the time arrive, the system will enter to standby automatically. it will switch the mode between Sleep Timer Off /15/30/45/60/90/120 minutes.
-
Página 106: Factory Setting
Channel Lock :In order to enter to the locked channels, you should input the password. The locked channels mark will show up a popup message on the screen and ask for the password. Menu Lock : In order to enter to the menu, you should input Password. Update&Backup By pressing [Menu] and selecting “System”... -
Página 107: Multimedia
Internet PING When you enter “Internet PING” menu, you will see a screen like below Set Ping Mode option for 5times or forever Set Ping time out by 1~10sec. Set Ping Target by String and Number When the highlight on the Ping Run, press OK key to run PING function 2.1.4 Multimedia When you entry to Multimedia menu, you can select... -
Página 108: Epg
When the cursor on the Image upgrade,press OK key to set image upgrade Move the cursor on the Upgrade Menu, the upgrade file will display on the left menu, you must select the correct file(the format like *SSU),when the cursor on the upgrade file,press OK key to start USB upgrade 4. -
Página 109: Adv Timer
When you enter “Network Local Setting” menu, You can select Wired network or wireless network mode, when the cursor on the network interface and press Vol+/- key to switch When the network status display connect ,you can select DHCP or input the IP address manually. The default setting for network is DHCP and it will be able to automatically obtain network settings. -
Página 110: Radio
Radio Basically, the operation of “Radio Channel List” is same as “TV Channel List”, but there is one point different: In “Radio Channel List” mode, there is no video information. Photo If you want to view Photo files which are stored in your USB device, select Photo icon in the main menu. -
Página 111: Movie
Movie If you want to enjoy to watch Movie contents, which are stored in your USB device, select each item in the Multimedia menu. The screen shows up the supported Movie files stored in your USB device Note: If no USB Memory Device (like HDD or USB Memory Stick) is inserted to the receiver this menu is not available. -
Página 112: Weather
12. Weather 13. When you entry to the weather menu, please make sure the network is connected 14. Press Left/Right key to switch city 15. Press YELLOW key to setting the city information 13. Youtube When the current on the YOUTUBE icon, press OK key entry to the YOUTUBE menu, please make sure the network is connected Press Blue key to switch video file and Group list Press Yellow key to display option menu... - Página 113 When you enter “Game” menu, you will see several games including Tetris and Othello. On the Game menu , you will see several games, including Gobang,boxman,tetris...
-
Página 114: Specifications
15. Specifications Tuner Demodulator Mode QPSK,8PSK,16APSK Frequency Range 950~2150MHz RF Input Connector F-Female Video Video Decoding ISO/IEC 11172-2 MPEG1,ISO/IEC 13818-2 MPEG2 MP@HL,ISO/IEC 14496 MPEG4 compliant Support SP@L3 to ASP@L5,ISO/IEC 14496-10 AVC high profile@level 4.1 main profile@level 4.1 Video Output CVBS(video format @ 576i or 480i) HDMI 1.3(video format default @ Auto), support HDCP Video Resolution 1080p/i 720p/i 576p/i 480p/i... - Página 115 ENGEL SYSTEMS, S.L. Sabino de Arana, nº 58 bajos - 08028 Barcelona - SPAIN...