Tabla de contenido
Publicidad
Idiomas disponibles
Idiomas disponibles
Enlaces rápidos
FRIGGITRICE ELETTRICA
ELECTRIC FRYER
ELEKTRISCHE FRITEUSE
FRITEUSE ÉLECTRIQUE
FREIDORA ELÉCTRICA
MANUALE D'USO E INSTALLAZIONE
BEDIEN- UND INSTALLATIONSHANDBUCH
MANUEL D'UTILISATION ET D'INSTALLATION
USE AND INSTALLATION MANUAL
MANUAL DE USO E INSTALACIÓN
0G0FR3ED
1G0FR4ED
Italiano
English
Deutsch
Français
Español
Ed.0
05/2012
3143010
IT
GB
DE
FR
ES
Publicidad
Capítulos
Tabla de contenido

Manuales relacionados para Angelo Po 0G0FR3ED


Resumen de contenidos para Angelo Po 0G0FR3ED
- Página 1 FRIGGITRICE ELETTRICA ELECTRIC FRYER 0G0FR3ED ELEKTRISCHE FRITEUSE 1G0FR4ED FRITEUSE ÉLECTRIQUE FREIDORA ELÉCTRICA MANUALE D’USO E INSTALLAZIONE USE AND INSTALLATION MANUAL BEDIEN- UND INSTALLATIONSHANDBUCH MANUEL D’UTILISATION ET D’INSTALLATION MANUAL DE USO E INSTALACIÓN Italiano English Deutsch Français Español Ed.0 05/2012 3143010...
-
Página 3: Tabla De Contenido
INDICE rif. capitoli pag. 0 INFORMAZIONI PER IL LETTORE ........2 1 INFORMAZIONI GENERALI ..........2 2 INFORMAZIONI TECNICHE..........3 3 SICUREZZA................ 5 PARTE 4 USO E FUNZIONAMENTO..........6 5 MANUTENZIONI ..............9 6 GUASTI ................11 7 MOVIMENTAZIONE E INSTALLAZIONE ......12 8 REGOLAZIONI.............. -
Página 4: Informazioni Per Il Lettore
INFORMAZIONI PER IL LETTORE Per rintracciare facilmente gli argomenti specifici di parte: contiene tutte le informazioni neces- interesse, consultare l’indice analitico posto all’inizio sarie ai destinatari omogenei, cioè tutti gli del manuale. operatori esperti e autorizzati a movimentare, Questo manuale è suddiviso in due parti. trasportare, installare, mantenere, riparare e demolire l’apparecchiatura. -
Página 5: Informazioni Tecniche
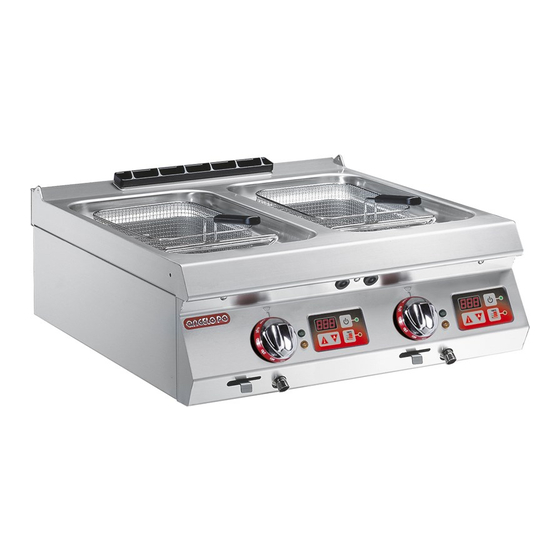
è prodotta in più versioni (vedi figura). tura cibi, nell'ambito della ristorazione professionale. 0G0FR3ED (9 lt) 1G0FR4ED (9 lt+9 lt) IDM-39614400100.tif Organi principali A)Vasca di frittura; realizzata in acciaio inox. B)Apertura di sfiato; per evacuare il calore gene- rato dalle resistenze. -
Página 6: Dati Tecnici
DATI TECNICI Vedi tabelle e “Scheda allacciamenti” in fondo al manuale. DISPOSITIVI DI SICUREZZA Anche se l’apparecchiatura è completa di tutti i di- spositivi di sicurezza, in fase di installazione e al- lacciamento essi dovranno, se necessario, essere integrati con altri in modo da rispettare le leggi vi- genti in materia. -
Página 7: Accessori A Richiesta
ACCESSORI A RICHIESTA A richiesta l’apparecchiatura può essere corredata dei seguenti accessori. A)Filtro olio. B)Raccoglitore olio. C)“Kit” cestelli (KCFR9V). IDM-39604000400.tif SICUREZZA NORME PER LA SICUREZZA Il costruttore, in fase di progettazione e costruzione, Per mantenere l’igiene e proteggere gli alimenti lavo- ha posto particolare attenzione agli aspetti che pos- rati da tutti i fenomeni di contaminazione, è... -
Página 8: Uso E Funzionamento
NORME PER LA SICUREZZA SULL'IMPATTO AMBIENTALE Ogni organizzazione ha il compito di applicare delle Sicurezza per lo smaltimento di Rifiuti di Appa- procedure per individuare e controllare l'influenza recchiature Elettriche ed Elettroniche (Direttiva che le proprie attività (prodotti, servizi, ecc.) hanno RAEE 2002/96) sull'ambiente. -
Página 9: Descrizione Comandi
DESCRIZIONE COMANDI Indice spegnimento C B A Indice attivazione apparecchiatura Sull’apparecchiatura sono disposti i comandi per at- )Spia alimentazione elettrica; accesa segnala tivare le funzioni principali. che il pannello di controllo è in stand-by. A)Manopola di comando; per attivare e disattivare )Pulsante impostazione temperatura;... -
Página 10: Filtraggio Olio
2 - Agire sull'interruttore automatico sezionatore Spegnimento 1 - Ruotare la manopola (A) in senso antiorario per disattivare l'allacciamento alla linea elettrica (pos. b) per disattivare l'alimentazione elettrica. principale. AVVIAMENTO E ARRESTO COTTURA Per l'avviamento e l'arresto procedere nel modo in- dicato. -
Página 11: Inattività Prolungata Dell'APparecchiatura
INATTIVITÀ PROLUNGATA DELL’APPARECCHIATURA Se l'apparecchiatura rimane inattiva per un lungo zone limitrofe; tempo, procedere nel modo indicato: 3 - cospargere con un velo d’olio alimentare le su- 1 - agire sull’interruttore sezionatore dell’apparec- perfici in acciaio inox; chiatura per disattivare l’allacciamento alla linea 4 - eseguire tutte le operazioni di manutenzione;... - Página 12 – gli accessori (vedi pag. 10) Ogni 100 ore di esercizio fare eseguire, da opera- – l’apparecchiatura e l’ambiente circostante (vedi tori esperti e autorizzati, le seguenti operazioni: pag. 10). – verifica efficienza termostato di sicurezza; – verificare efficienza impianto elettrico. RACCOMANDAZIONI PER LA PULIZIA Considerando che l’apparecchiatura è...
-
Página 13: Guasti
GUASTI RICERCA GUASTI L'apparecchiatura, prima della messa in servizio, è dall’utilizzatore, per tutti gli altri è richiesta una pre- stata preventivamente collaudata. Le informazioni cisa competenza tecnica o particolari capacità e di seguito riportate hanno lo scopo di aiutare l'iden- quindi devono essere eseguiti esclusivamente da tificazione e correzione di eventuali anomalie e di- personale qualificato con esperienza riconosciuta e... -
Página 14: Movimentazione E Installazione
MOVIMENTAZIONE E INSTALLAZIONE RACCOMANDAZIONI PER LA MOVIMENTAZIONE E INSTALLAZIONE Importante Eseguire la movimentazione e l’installazio- Colui che è autorizzato ad eseguire queste ne rispettando le informazioni fornite dal operazioni dovrà, se necessario, organizza- costruttore, riportate direttamente sull’im- re un “piano di sicurezza” per salvaguarda- ballo, sull’apparecchiatura e nelle istruzioni re l’incolumità... -
Página 15: Installazione Apparecchiatura
INSTALLAZIONE APPARECCHIATURA Tutte le fasi di installazione devono essere conside- rate, sin dalla realizzazione del progetto generale. Prima di iniziare tali fasi, oltre alla definizione della zona di installazione, colui che è autorizzato ad ese- guire queste operazioni dovrà, se necessario, attua- re un “piano di sicurezza”... -
Página 16: Allacciamento Elettrico
Per le apparecchiature in batteria sono disponibili,a richiesta, diversi kit di allestimento: D)Kit per installazione “su vano” E)Kit per installazione “a ponte” ALLACCIAMENTO ELETTRICO Importante Cautela - Avvertenza L’allacciamento deve essere effettuato Prima di eseguire qualsiasi intervento disatti- da personale autorizzato e qualificato, vare l’alimentazione elettrica generale. -
Página 17: Ripristino Apparecchiatura
TRASFORMAZIONE ALIMENTAZIONE ELETTRICA L’apparecchiatura viene fornita con tensione di fun- zionamento a 400V/3N (segnalata dall’adesivo ap- 400V/3N plicato sulla targhetta di identificazione) ed è possibile effettuare la trasformazione a 230V/3, come di seguito indicato. 230V/3 Cautela - Avvertenza Prima di eseguire qualsiasi intervento disatti- vare l’alimentazione elettrica generale. -
Página 18: Collaudo Apparecchiatura
COLLAUDO APPARECCHIATURA 1 - verificare che la tensione di rete sia conforme a Importante quella dell’apparecchiatura; Prima della messa in servizio, deve essere 2 - agire sull’interruttore automatico sezionatore eseguito il collaudo dell'impianto, al fine di per verificare il collegamento elettrico; valutare le condizioni operative di ogni sin- 3 - verificare il corretto funzionamento dei dispositi- golo componente ed individuare le eventuali... - Página 19 CONTENTS ref. chapters page 0 INFORMATION FOR THE READER ........2 1 GENERAL INFORMATION ..........2 2 TECHNICAL INFORMATION..........3 3 SAFETY ................5 PART 4 USE AND OPERATION ............6 5 SERVICING ................ 9 6 FAULT ................11 7 HANDLING AND INSTALLATION ........12 8 ADJUSTMENTS..............
-
Página 20: Information For The Reader
INFORMATION FOR THE READER To find the specific topics of interest to you quickly, part: contains all the information necessary refer to the index at the start of the manual. for special categories of reader, i.e. all skilled This manual is subdivided into two parts. operators authorised to handle, transport, in- part: contains all information necessary stall, service, repair and scrap the appliance. -
Página 21: Procedure For Requesting Service
The appliance is produced in several versions to pliance, is designed and produced for frying foods meet varying user requirements (see dia- in the professional catering sector. gram). 0G0FR3ED (9 lt) 1G0FR4ED (9 lt+9 lt) IDM-39614400100.tif Main Parts A)Frying well; in stainless steel. - Página 22 TECHNICAL DATA See tables and “Connection chart” at the back of the manual. SAFETY DEVICES Although the appliance is complete with all safety devices, during installation and connection addition- al devices must be added if necessary to comply with the relevant legal requirements. A)Safety thermostat;...
-
Página 23: Optional Accessories
OPTIONAL ACCESSORIES The appliance can be equipped with the following accessories on request. A)Oil filter. B)Oil drain container. C)Set of baskets (KCFR9V). IDM-39604000400.tif SAFETY SAFETY REGULATIONS During design and construction, the constructor has To maintain hygiene and protect the food processed paid special attention to factors which may cause risks from all forms of contamination, all elements in di- to the health and safety of the people interacting with... -
Página 24: Use And Operation
ENVIRONMENTAL IMPACT SAFETY REGULATIONS Every organisation is obliged to apply procedures to The Safe Disposal of Waste from Electrical and Elec- identify and monitor the effects of its operations tronic Equipment (WEEE Directive 2002/96/EC) (products, services, etc.) on the environment. Important The procedures for identifying significant environ- Do not dump pollutant material in the envi-... -
Página 25: Description Of Controls
DESCRIPTION OF CONTROLS Off marker C B A Appliance on marker The appliance is fitted with the controls for use of its )Temperature setting button: during program- main functions. ming, increases the temperature. A)Control knob: turns the appliance's electricity )Temperature setting button: supply on and off. -
Página 26: Filtering Oil
2 - Turn off the appliance's circuit breaker to dis- Switching off 1 - Turn the knob (A) anti-clockwise (pos. b) to turn connect it from the electrical mains. off the electricity supply. STARTING AND STOPPING COOKING To start and stop the appliance, proceed as follows. Starting 1 - Switch on the appliance (see page 7). -
Página 27: Servicing
LENGTHY APPLIANCE DOWNTIMES If the appliance is to be out of use for a lengthy pe- 3 - spread a film of edible oil over the stainless steel riod, proceed as follows: surfaces; 1 - cut off the mains electricity supply using the ap- 4 - carry out all the servicing procedures;... - Página 28 Every 100 working hours have skilled, authorised – check that the electrical system is in good work- personnel carry out the following operations: ing order. – check that the safety thermostat is working cor- rectly; RECOMMENDATIONS FOR CLEANING Since the appliance is used for preparing foods for should be washed in a dishwasher human consumption, special care must be paid to everything relating to hygiene, and the appliance...
-
Página 29: Fault
FAULT TROUBLESHOOTING The appliance has been tested before being put into lems himself, but for others specific technical service. The information provided below is intended knowledge or skill is required, and so they must only to assist in the identification and correction of any be carried out by qualified staff with recognised ex- anomalies and malfunctions which might occur dur- perience acquired in the specific sector of operation. -
Página 30: Handling And Installation
HANDLING AND INSTALLATION RECOMMENDATIONS FOR HANDLING AND INSTALLATION Important When handling and installing the appliance If necessary, the person authorised to carry comply with the information provided by out these operations must organise a "safe- the constructor directly on the packaging, ty plan"... -
Página 31: Installation Of The Appliance
INSTALLATION OF THE APPLIANCE All installation stages must be considered right from production of the general layout. Before start- ing these stages, as well as deciding the place of installation, if necessary, the person authorised to carry out these operations must organise a "safety plan"... -
Página 32: Electrical Connection
A variety of optional installation kits are available for arranging appli- ances in banks: D)Over cupboard installation kit E)Bridge installation kit ELECTRICAL CONNECTION Important Caution - warning The connection must be made by au- Before doing any work, cut off the mains elec- thorised, skilled personnel, in accord- tricity supply. -
Página 33: Resetting The Appliance
CONVERSION OF ELECTRICITY SUPPLY The appliance is supplied at an operating voltage 400V/3N (indicated on the sticker applied to the da- 400V/3N taplate); conversion to 230V/3 can be carried out as described below. Caution - warning 230V/3 Before doing any work, cut off the mains elec- tricity supply. -
Página 34: Testing Of The Appliance
TESTING OF THE APPLIANCE 1 - check that the mains voltage is the same as that Important of the appliance; Before it is put into service, the system 2 - operate the appliance's circuit-breaker to check must be tested to check the operating con- the electrical connection;... - Página 35 INHALTSVERZEICHNIS Ref. Kapitel Seite 0 INFORMATIONEN FÜR DEN LESER ........ 2 1 ALLGEMEINES..............2 2 TECHNISCHE INFORMATIONEN........3 3 SICHERHEIT ..............5 1. TEIL 4 GEBRAUCH UND BETRIEB..........6 5 WARTUNG................9 6 DEFEKTE................11 7 HANDHABUNG UND INSTALLATION ......12 8 EINSTELLUNGEN ............
-
Página 36: Informationen Für Den Leser
INFORMATIONEN FÜR DEN LESER Konsultieren Sie das Sachregister, das am Anfang des 2. Teil: Diese Informationen wenden sich an eine Handbuchs zu finden ist, um leichter unter bestimmten bestimmte Zielgruppe. Sie sind für erfahrene Be- Themen von besonderem Interesse nachschlagen zu diener bestimmt, die für Handhabung, Transport, können. -
Página 37: Kundendienst Anfordern
Das Gerät wird bedarfsabhängig in verschiedenen bezeichnet – wurde zum Frittieren von Speisen kon- Versionen hergestellt (siehe Abbildung). zipiert und gebaut und ist für Restaurationsbetriebe bestimmt. 0G0FR3ED (9 lt) 1G0FR4ED (9 lt+9 lt) IDM-39614400100.tif Hauptorgane A)Frittierbecken; aus Edelstahl. B)Entlüftungsöffnung; zum Ablass der von den Wi- derständen erzeugten Wärme. - Página 38 TECHNISCHE DATEN Siehe Tabelle und „Anschlussschema“ am Ende des Handbuchs. SICHERHEITSVORRICHTUNGEN Das Gerät wird zwar mit sämtlichen planmäßigen Sicherheitsvorrichtungen geliefert, es kann jedoch notwendig sein, während Installation und Anschluss ggf. weitere ergänzende Maßnahmen zu ergreifen, um den Anforderungen der einschlägigen geltenden Gesetze zu entsprechen.
-
Página 39: Optionales Zubehör
OPTIONALES ZUBEHÖR Auf Wunsch kann das Gerät mit folgenden Zubehör- teilen ausgestattet werden: A)Öfilter. B)Ölsammler. C)“Satz” Körbe (KCFR9V). IDM-39604000400.tif SICHERHEIT SICHERHEITSVORSCHRIFTEN Der Hersteller hat bei Entwicklung und Fertigung die- Sämtliche Wartungsarbeiten, die präzise Fachkenntnis- ses Produkts besondere Sorgfalt auf Aspekte verwen- se oder besondere Fähigkeiten erfordern, dürfen aus- det, die eine Gefahr für die Sicherheit und die schließlich... -
Página 40: Gebrauch Und Betrieb
SICHERHEITSVORSCHRIFTEN IN HINBLICK AUF DIE UMWELTBELASTUNG Alle Betriebe müssen den Einfluss, den ihre Tätig- Sicherheit bei der Entsorgung von Elektro- und keiten (Produkte, Dienstleistungen usw.) auf die Elektronik-Altgeräten (WEEE-Richtlinie 2002/96/ Umwelt haben, durch geeignete Verfahren bestim- men und steuern. Die Verfahren zur Bestimmung der signifikanten Wichtig Auswirkungen auf die Umwelt müssen die nachste- Umweltschädliche Stoffe dürfen nicht in die... -
Página 41: Beschreibung Der Bedienelemente
BESCHREIBUNG DER BEDIENELEMENTE Anzeige Ausschaltung C B A Anzeige Einschaltung des Geräts Das Gerät ist mit Bedienelementen zur Aktivierung der dass sich die Kontrolltafel in Stand-by befindet. wichtigsten Funktionen ausgestattet. )Taste für die Temperaturwahl; bei der Pro- A)Schalter; um die Stromzufuhr des Gerätes zu ak- grammierung erhöht sie die Temperatur. - Página 42 brechen. Ausschalten 1 - Den Schalters (A) gegen den Uhrzeigersinn 2 - Mit dem Trennschalter den Anschluss an das (Pos. b) drehen, um die Stromzufuhr zu unter- Hauptstromnetz herstellen. STARTEN UND STOPPEN DER GARUNG Für das Starten und Stoppen auf die angegebene Weise vorgehen.
-
Página 43: Wartung
LÄNGERER STILLSTAND DES GERÄTS Verfahren Sie folgendermaßen, falls das Gerät län- 3 - Tragen Sie eine hauchdünne Schicht Lebens- gere Zeit nicht eingesetzt werden soll: mittelöl auf die Edelstahlflächen auf. 1 - Das Gerät mit seinem Trennschalter vom 4 - Führen Sie sämtliche Wartungsarbeiten aus. Hauptstromnetz trennen. - Página 44 – Das Gerät und die angrenzenden Zonen (siehe Bedienern ausgeführt werden: S. 10). – Funktionsprüfung des Sicherheitsthermostats. – Funktionstüchtigkeit der Stromanlage prüfen. Nach jeweils 100 Betriebsstunden müssen fol- gende Arbeiten von erfahrenen und autorisierten EMPFEHLUNGEN FÜR DIE REINIGUNG Da das Gerät zur Zubereitung von Speisen für den einer Geschirrspülmaschine ausführen Menschen eingesetzt wird, ist besondere Sorgfalt auf die Hygiene geboten.
-
Página 45: Defekte
DEFEKTE FEHLERSUCHE Vor der Inbetriebnahme wurde das Gerät einem me können vom Benutzer selbst behoben werden, vorläufigen Testlauf unterzogen. Die im Folgenden alle anderen erfordern präzise Fachkenntnisse oder aufgeführten Informationen sollen Ihnen dabei hel- besondere Fähigkeiten und dürfen daher aus- fen, eventuelle Anomalien oder Funktionsstörun- schließlich von qualifiziertem Personal mit nach- gen, die während des Betriebs auftreten können,... -
Página 46: Handhabung Und Installation
HANDHABUNG UND INSTALLATION EMPFEHLUNGEN FÜR HANDHABUNG UND INSTALLATION Wichtig Beachten Sie die Hinweise des Herstellers, Die für diese Operationen autorisierte Person die direkt auf der Verpackung, auf dem Gerät wird bei Bedarf einen „Sicherheitsplan“ auf- selbst oder in der Gebrauchsanweisung zu stellen müssen, um die Unversehrtheit der di- finden sind, wenn Sie das Gerät handhaben rekt an dem Vorgang beteiligten Personen zu... -
Página 47: Installation Des Geräts
INSTALLATION DES GERÄTS Es müssen sämtliche Phasen der Installation, schon von der Umsetzung des allgemeinen Projekts an, be- rücksichtigt werden. Die für diese Operationen autori- sierte Person wird vor Einleitung dieser Phasen den Installationsstandort bestimmen und bei Bedarf einen „Sicherheitsplan“ aufstellen, um die Unversehrtheit der direkt am Vorgang beteiligten Personen zu ge- währleisten und die gesetzlichen Bestimmungen zu befolgen, dies betrifft insbesondere die Vorschriften... - Página 48 Für die in Reihe aufgestellten Ge- räte sind auf Anfrage verschiedene Ausstattungssätze lieferbar. D)Einbausatz für die Montage auf Unterschrank E)Einbausatz für Brückenmontage STROMANSCHLUSS Wichtig Vorsicht – Achtung Der Anschluss muss von autorisiertem Vor Ausführung irgendeines Eingriffs die Fachpersonal in Einklang mit den ein- Hauptstromversorgung unterbrechen.
-
Página 49: Rücksetzen Des Geräts
UMSCHALTUNG DER SPANNUNGSVERSORGUNG Das Gerät wird mit Betriebsspannung 400 V/3N ge- liefert (siehe das Klebeschild auf dem Typenschild) 400V/3N und eine Spannungsumschaltung auf 230 V/3 ist möglich, wie nachstehend angegeben. Vorsicht – Achtung 230V/3 Vor Ausführung irgendeines Eingriffs die Hauptstromversorgung unterbrechen. 1 - Die Blende (A) abmontieren. -
Página 50: Einstellungen
TESTLAUF ZUR ABNAHME DES GERÄTES 1 - Sicherstellen, dass die Netzspannung der Nennspannung des Geräts entspricht. Wichtig Vor der Inbetriebnahme muss ein Testlauf der 2 - Den Trennschalter betätigen, um den Stroman- Anlage durchgeführt werden, um den Be- schluss zu überprüfen. triebszustand jeder einzelnen Komponente 3 - Eine Funktionsprüfung der Sicherheitseinrich- zu überprüfen und eventuelle Anomalien zur... -
Página 51: Index Analytique
INDEX réf. chapitres page 0 INFORMATIONS POUR LE LECTEUR ......2 1 INFORMATIONS GENERALES.......... 2 2 INFORMATIONS TECHNIQUES ........3 3 SECURITE ................5 PARTIE 4 UTILISATION ET FONCTIONNEMENT ......6 5 ENTRETIEN................ 9 6 PANNES ................11 7 MANUTENTION ET INSTALLATION........ 12 8 REGLAGES .............. -
Página 52: Informations Generales
INFORMATIONS POUR LE LECTEUR Pour retrouver facilement les sujets qui vous inté- partie: elle contient toutes les informations ressent, consulter l’index analytique au début du nécessaires aux destinataires homogènes, manuel. Ce manuel est divisé en deux parties. c’est-à-dire tous les opérateurs experts et partie: elle contient toutes les informations autorisés à... -
Página 53: Demande D'ASsistance
été conçue et fabriquée pour la friture réalisé en plusieurs versions (voir figure). d'aliments dans le domaine de la restauration pro- fessionnelle. 0G0FR3ED (9 lt) 1G0FR4ED (9 lt+9 lt) IDM-39614400100.tif Organes principaux A)Cuve de friture; en acier inox. - Página 54 DONNEES TECHNIQUES Voir tableaux et “Fiche des raccordements” à la fin du manuel. DISPOSITIFS DE SECURITE Même si l’appareil est complet de tous les disposi- tifs de sécurité, lors de l’installation et du raccorde- ment, ils devront, si nécessaire, être intégrés avec d’autres pour respecter les lois en vigueur.
-
Página 55: Accessoires Sur Demande
ACCESSOIRES SUR DEMANDE Sur demande l'appareil peut être équipé des acces- soires suivants. A)Filtre de l’huile. B)Récipient de recueil de l’huile. C)“Kit” paniers (KCFR9V). IDM-39604000400.tif SECURITE NORMES DE SECURITE Le fabricant, lors de la conception et de la fabrication, Pour maintenir l’hygiène et protéger les aliments de a fait très attention aux aspects qui peuvent provo- tous les phénomènes de contamination, il faut net- quer des risques à... -
Página 56: Utilisation Et Fonctionnement
NORMES POUR LA SÉCURITÉ SUR L'IMPACT ENVIRONNEMENTAL Chaque organisation a pour but d’appliquer des pro- Sécurité pour l’élimination des déchets d’équi- cédures pour trouver et contrôler l'influence des pro- pements électriques et électroniques (Directive pres activités (produits, services, etc.) DEEE 2002/96/CE) l’environnement. -
Página 57: Description Des Commandes
DESCRIPTION DES COMMANDES Index extinction C B A Symbole d’activation de l’appareil Sur l’appareil sont disposées les commandes pour )Voyant alimentation électrique; allumé, il signale activer les fonctions principales. que le panneau de contrôle est en stand-by. A)Manette de commande; pour activer et désacti- )Bouton de sélection de la température, lors de ver l’alimentation électrique de l'appareil. -
Página 58: Filtrage De L'HUile
2 - Agir sur l'interrupteur sectionneur automatique Extinction 1 - Tourner la manette (A) en sens anti-horaire (pos. pour désactiver le branchement à la ligne élec- b) pour désactiver l'alimentation électrique. trique principale. MISE EN MARCHE ET ARRÊT DE LA CUISSON Pour la mise en marche et l'arrêt, procéder comme indiqué. -
Página 59: Conseils D'UTilisation
INUTILISATION PROLONGEE DE L’APPAREIL Si l'appareil reste inactif pendant longtemps, procé- limitrophes; der comme suit: 3 - étaler un voile d’huile alimentaire sur les surfa- 1 - agir sur l'interrupteur sectionneur de l’appareil ces en acier inox; pour désactiver le branchement à la ligne élec- 4 - exécuter toutes les opérations d’entretien;... -
Página 60: Recommandations Pour Le Nettoyage
Tous les 100 heures de fonctionnement faire fai- – vérifier l'efficacité du thermostat de sécurité; re, par des opérateurs experts et autorisés, les opé- – vérifier l'efficacité de l'installation électrique. rations suivantes: RECOMMANDATIONS POUR LE NETTOYAGE Etant donné que l’appareil est utilisé pour la prépa- conseillé... - Página 61 PANNES DEPANNAGE Avant sa mise en service, l’appareil a été essayé. pour tous les autres il faut une compétence techni- Les informations reportées ci-après ont pour but que précise ou des capacités particulières; ils doi- d’aider à l'identification et à la correction d’éven- vent donc être exécutés exclusivement par du tuels pannes et dysfonctionnements qui pourraient personnel qualifié...
-
Página 62: Manutention Et Installation
MANUTENTION ET INSTALLATION RECOMMANDATIONS POUR LA MANUTENTION ET L’INSTALLATION Important Effectuer la manutention et l’installation en Celui qui est autorisé à effectuer ces opéra- respectant les informations fournies par le fa- tions devra, si nécessaire, organiser un “plan bricant, reportées directement sur l’emballa- de sécurité”... -
Página 63: Mise En Place De L'APpareil
MISE EN PLACE DE L’APPAREIL Toutes les phases de mise en place doivent être pri- ses en considération, dès la réalisation du projet gé- néral. Avant de commencer ces phases, outre la définition de la zone de mise en place, celui qui est autorisé... -
Página 64: Branchement Électrique
Pour les appareils en batterie, diffé- rents kits d’installation sont disponi- bles, sur demande: pour installation « sur D)Kit soubassement » E)Kit pour installation « en pont » BRANCHEMENT ÉLECTRIQUE Important Attention Le branchement doit être fait par du per- Avant toute intervention, couper l’alimenta- sonnel autorisé... -
Página 65: Rétablissement Des Fonctions De L'APpareil
TRANSFORMATION DE L'ALIMENTATION ÉLECTRIQUE L'appareil est fourni avec tension de fonctionne- ment à 400V/3N (signalée par l'adhésif appliqué sur 400V/3N la plaque d'identification) et il est possible d'effec- tuer la transformation à 230V/3 comme indiqué ci- après. 230V/3 Attention Avant toute intervention, couper l’alimenta- tion électrique générale. -
Página 66: Remplacement De Pieces
ESSAI DE L’APPAREIL 1 - vérifier que la tension de réseau corresponde à Important celle de l’appareil; Avant la mise en service, l’essai de l’installa- 2 - agir sur l’interrupteur sectionneur automatique tion doit être fait pour évaluer les conditions pour vérifier le branchement électrique;... - Página 67 ÍNDICE ref. capítulos pág 0 INFORMACIONES PREVIAS ..........2 1 INFORMACIONES DE CARÁCTER GENERAL ....2 2 INFORMACIONES DE CARÁCTER TÉCNICO ....3 3 SEGURIDAD ............... 5 PARTE 4 USO Y FUNCIONAMIENTO ..........6 5 MANTENIMIENTO .............. 9 6 AVERÍAS................11 7 DESPLAZAMIENTO E INSTALACIÓN ......
-
Página 68: Informaciones Previas
INFORMACIONES PREVIAS Para ubicar fácilmente los temas específicos de in- parte: contiene todas las informaciones ne- terés, consúltese el índice analítico que se encuen- cesarias para destinatarios homogéneos, esto tra al inicio del manual. es, todos los operadores expertos y autoriza- Este manual comprende dos partes. -
Página 69: Modalidad Para Requerir Asistencia
(véase figura). profesional. 0G0FR3ED (9 lt) 1G0FR4ED (9 lt+9 lt) IDM-39614400100.tif Órganos principales A)Cuba de freído; fabricada en acero inox. -
Página 70: Datos Técnicos
DATOS TÉCNICOS Véase tabla y “Ficha de enlaces” al final del manual. DISPOSITIVOS DE SEGURIDAD Aunque el equipo cuente con todos los dispositivos de seguridad, en los casos en que así lo determinen las le- yes vigentes en materia, se deberá complementar con otros dispositivos en las fases de instalación y enlace. -
Página 71: Accesorios Bajo Pedido
ACCESORIOS BAJO PEDIDO Bajo pedido, el equipo puede ser suministrado con los accesorios que a continuación se indican. A)Filtro aceite. B)Recogedor aceite. C)“Kit” cestos (KCFR9V). IDM-39604000400.tif SEGURIDAD NORMAS DE SEGURIDAD Durante las fases de diseño y producción el fabricante ha Para mantener la higiene y proteger los alimentos tra- prestado especial atención a los factores que pueden bajados respecto de cualquier fenómeno de contami-... -
Página 72: Normas De Seguridad Relativas Al Impacto Ambiental
NORMAS DE SEGURIDAD RELATIVAS AL IMPACTO AMBIENTAL Toda organización tiene el deber de aplicar procedimien- Eliminación segura de los residuos de aparatos tos que le permitan conocer y controlar la influencia de eléctricos y electrónicos (Directiva RAEE 2002/ sus propias actividades (productos, servicios, etc.) en el 96/CE) ambiente. -
Página 73: Descripción Mandos
DESCRIPCIÓN MANDOS Índice apagado C B A Índice de activación Índice apagado aparato Para activar las funciones principales, en el equipo )Testigo alimentación eléctrica; su encendido indi- se han instalado los siguientes mandos: ca que el panel de control se encuentra en stand-by. A)Mando de control;... -
Página 74: Puesta En Marcha Y Detención Del Ciclo De Cocción
2 - Opere con el interruptor automático aislador Apagado 1 - Gire el mando (A) en sentido antihorario (pos. b) para desactivar la conexión a la línea eléctrica para interrumpir la alimentación eléctrica. principal. PUESTA EN MARCHA Y DETENCIÓN DEL CICLO DE COCCIÓN Para la puesta en marcha y detención proceda de la manera que a continuación se indica. -
Página 75: Período Prolongado De Inactividad Del Equipo
PERÍODO PROLONGADO DE INACTIVIDAD DEL EQUIPO En caso de que el equipo deba permanecer inactivo 3 - esparcir sobre las superficies de acero inoxidable durante un período prolongado de tiempo, se debe- una capa delgada de aceite comestible; rán efectuar las siguientes operaciones: 4 - efectuar todas las operaciones de manteni- 1 - con el interruptor aislador del aparato desactive miento;... -
Página 76: Recomendaciones Para Efectuar La Limpieza
Cada 100 horas de servicio operadores expertos – control de la eficiencia del termostato de seguridad; y autorizados deben efectuar las siguientes opera- – controle la eficiencia del sistema eléctrico. ciones: RECOMENDACIONES PARA EFECTUAR LA LIMPIEZA Atendida la circunstancia de que el equipo es utili- se aconseja utilizar lavavajillas zado para la preparación de productos alimenticios –... -
Página 77: Averías
AVERÍAS LOCALIZACIÓN DE CAUSAS DE AVERÍA Antes de la puesta en servicio, el equipo ha sido so- ser resueltos por el usuario, pero otros requieren metido a prueba de funcionamiento. una competencia técnica precisa o determinadas Las siguientes informaciones tienen por objeto faci- capacidades, razón por la cual deben ser resueltos litar la identificación y corrección de eventuales exclusivamente por personal calificado con expe-... -
Página 78: Desplazamiento E Instalación
DESPLAZAMIENTO E INSTALACIÓN RECOMENDACIONES PARA EL DESPLAZAMIENTO Y LA INSTALACIÓN Importante Efectuar el desplazamiento e instalación La persona autorizada para efectuar estas respetando las indicaciones proporciona- operaciones deberá, si fuera necesario, or- das por el fabricante, reproducidas directa- ganizar un “plan de seguridad”, a fin de sal- mente sobre el embalaje, en el equipo y en vaguardar la incolumidad de las personas las instrucciones de uso. -
Página 79: Instalación Del Equipo
INSTALACIÓN DEL EQUIPO Durante la realización del proyecto general, deben ser consideradas todas las fases de la instalación. Antes de comenzar dichas fases, además de esta- blecer la zona de instalación, la persona autorizada a efectuar estas operaciones deberá, si fuera nece- sario, aplicar un “plan de seguridad”... -
Página 80: Conexión Eléctrica
En el caso de equipos en batería se encuentran disponibles, bajo pedi- do, los siguientes kits: D)Kit para la instalación "en mueble" E)Kit para la instalación "de puente" CONEXIÓN ELÉCTRICA Importante Precaución - advertencia La conexión eléctrica deberá asignarse Antes de realizar cualquier operación se de- al personal autorizado y experto, que berá... -
Página 81: Reactivación Aparato
TRANSFORMATION DE L'ALIMENTATION ÉLECTRIQUE L'appareil est fourni avec tension de fonctionne- ment à 400V/3N (signalée par l'adhésif appliqué sur 400V/3N la plaque d'identification) et il est possible d'effec- tuer la transformation à 230V/3 comme indiqué ci- après. 230V/3 Precaución - advertencia Antes de realizar cualquier operación se deberá... -
Página 82: Prueba De Funcionamiento Del Equipo
PRUEBA DE FUNCIONAMIENTO DEL EQUIPO 1 - verifique que la tensión de red sea aquélla re- querida para el aparato; Importante Antes de la puesta en servicio debe efectuar- 2 - accione el interruptor automático aislador para con- se la prueba de funcionamiento del sistema, a trolar la eficiencia de la conexión eléctrica;... -
Página 83: Anexos
ALLEGATI - ANNEXES - ANLAGEN - ANNEXES - ANEXOS SCHEDA ALLACCIAMENTI (0G0FR3ED) - CONNECTION CARD (0G0FR3ED)- ANSCHLUSSSCHEMA (0G0FR3ED) - FICHE DES RACCORDEMENTS (0G0FR3ED)- FICHA DE ENLACES (0G0FR3ED) Modello Dati elettrici - Electrical data - Daten zur Elektrik Vasca Potenza Model Données électriques - Datos eléctricos... - Página 84 SCHEDA ALLACCIAMENTI (1G0FR4ED) - CONNECTION CARD (1G0FR4ED)- ANSCHLUSSSCHEMA (1G0FR4ED) - FICHE DES RACCORDEMENTS (1G0FR4ED) FICHA DE ENLACES (1G0FR4ED) Modello Dati elettrici - Electrical data - Daten zur Elektrik Vasca Potenza Model Données électriques - Datos eléctricos Well Power Modelle Becken Leistung Tensione - Voltage Frequenza - Frequency...
- Página 85 SCHEMA ELETTRICO (0G0FR3ED) - ELECTRIC DIAGRAM (0G0FR3ED) SCHALTBILD(0G0FR3ED) - SCHÉMA ÈLECTRIQUE (0G0FR3ED) ESQUEMA ELÉCTRICO (0G0FR3ED) 1) Morsettiera - Terminal board - Klemmenleiste - Bornier - Tablero de bornes Tarjeta electrónica 2)Commutatore accensione - On/Off switch - Ein-Aus-Schalter - Commutateur al-...
- Página 86 SCHEMA ELETTRICO (1G0FR4ED) - ELECTRIC DIAGRAM (1G0FR4ED) SCHALTBILD (1G0FR4ED) - SCHÉMA ÈLECTRIQUE (1G0FR4ED) ESQUEMA ELÉCTRICO (1G0FR4ED) 1) Morsettiera - Terminal board - Klemmenleiste - Bornier - Tablero de bornes 15)Microinterruttore resistenza destro - Right heating element microswitch - Re- 2)Commutatore accensione destro - Right switch - Rechter Ein-/Ausschalter - chter Mikroschalter Widerstand - Microcontact résistance droit - Microinterruptor Commutateur allumage droit - Conmutador de encendido lado derecho resistencia lado derecho...