Publicidad
Enlaces rápidos
®
SuperSlide
5 ft. -8 ft.
Closet Organizer
1/4 ft. (6 mm)
Philips Head
01-11535-00
3/19
Organisateur SuperSlide®
de 152 à 244 cm pour la
Garde-Robe
BEFORE YOU BEGIN
a. Remove product from packaging and carefully inspect all parts. (See
b. Please read all instructions carefully before beginning.
AVANT DE COMMENCER
a. Retirer le produit de l'emballage et en examiner soigneusement toutes
b. Veuillez lire avec soin toutes les directives avant de commencer
ANTES DE EMPEZAR
a. Saque el producto del paquete y cuidadosamente inspeccione todas
b. Lea todas las instrucciones cuidadosamente antes de empezar.
Installation Instructions
Instructions d'Installation
Instrucciones de Instalación
Organizador de Clóset
SuperSlide
Parts List below.)
les pièces (voir Liste des Pièces ci-dessous).
l'installation.
las piezas. (Vea la lista de piezas abajo).
TOOLS AND MATERIALS
OUTILS ET MATÉRIAUX
HERRAMIENTAS Y MATERIALES
5636/55636/75636
®
de 1,52 a 2,44
Publicidad

Manuales relacionados para ClosetMaid 5636


Resumen de contenidos para ClosetMaid 5636
- Página 1 Installation Instructions Instructions d’Installation Instrucciones de Instalación 5636/55636/75636 Organisateur SuperSlide® Organizador de Clóset ® SuperSlide 5 ft. -8 ft. ® de 152 à 244 cm pour la SuperSlide de 1,52 a 2,44 Closet Organizer Garde-Robe BEFORE YOU BEGIN a. Remove product from packaging and carefully inspect all parts. (See Parts List below.)
-
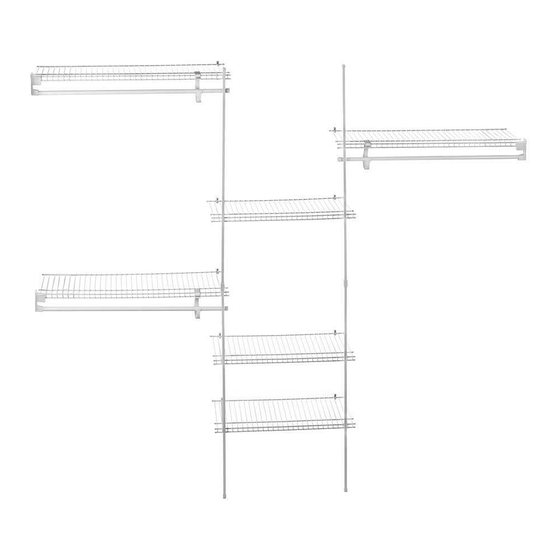
Página 2: Lista De Partes
PARTS LIST a. Storage shelves—long (3) 02-45640 b. Storage shelves—short (3) 02-45640 c. Support posts (4) 01-00699 d. Shelf end caps (48) 01-00603 e. Wall clips (21) 01-40971 f. SuperSlide wall brackets (3) 01-40980 g. Post end caps (4) 01-00244 h. - Página 3 STEP 1/ÉTAPE 1/ETAPA 1 Prepare Hardware a. Determine top of each pole by locating hole closest to end. b. Attach an endcap to top of one pole and bottom of other pole. Repeat for Bottom second set of poles. c. Use pole connector to join bottom of one pole and top of other pole. Haut Parte Parte...
- Página 4 STEP 3/ÉTAPE 3/ETAPA 3 Mesurer et Ajuster Medidas y Ajustes Measure and Fit Cet organisateur de garde-robe convient à un mur Este organizador de clóset ha sido diseñado para This closet organizer is designed to fit a d’une garde-robe d’une largeur de 2,44 m. Il n’est caber en una abertura de 2,44 m máximo.
-
Página 5: Tipos De Paredes
STEP 4/ÉTAPE 4/ETAPA 4 Determine Wall Type Determine wall type. Then, install shelves (see "STEP 5-Install Shelves") according to the specific wall type instructions below: a. Drywall and Plaster— Pins are required for installation in standard drywall (most drywall is 1/2 in. to 5/8 in. thick). Drill 1/4 in. holes into wall and use supplied pins. - Página 6 Install Shelves (Cont.) shelf étagère c. While holding side wall bracket in place on shelf, place a level repisa onto shelf. Raise or lower shelf until shelf is level. Be sure side wall bracket is straight on front lip of shelf and use a pencil to mark hole locations.
- Página 7 STEP 6/ÉTAPE 6/ETAPA 6 Install Support Posts a. Hold assembled support post (with holes facing wall) at end of long shelves on left or right side. (Be sure hole closest to end of support post is at top.) Slide a post clip through shelf wires (as shown) and secure to post with 1/2 in.screw.
- Página 8 © 2019 ClosetMaid LLC Ocala, FL 34478-4400 1-800-874-0008 (USA, Canada) www.closetmaid.com...