Tabla de contenido
Publicidad
Idiomas disponibles
Idiomas disponibles
Enlaces rápidos
Beurer GmbH • Söfl inger Str. 218 • D-89077 Ulm (Germany)
Tel.: +49 (0) 7 31 / 39 89-144 • Fax: +49 (0) 7 31 / 39 89-255
www.beurer.de • Mail: kd@beurer.de
BM 20
D Blutdruckmessgerät
Gebrauchsanweisung ............................ 2 –10
G Blood pressure monitor
Instruction for Use ................................11–18
F Tensiomètre
Mode d'emploi ......................................19 – 27
E Tensiómetro
Instrucciones para el uso ....................28 – 36
I Misuratore die pressione
Instruzioni per l'uso ............................. 37– 45
T Bilgisayarli tansiyon ölçer
Kullanma Talimatı .................................46 – 53
r Прибор для измерения артериального
давления на предплечье
Инструкция по применению .............54 – 63
Q Pomiar ciśnienia krwi
Instrukcja obsługi .................................64 – 72
0483
Publicidad
Tabla de contenido

Manuales relacionados para Beurer medical BM 20


Resumen de contenidos para Beurer medical BM 20
- Página 1 BM 20 D Blutdruckmessgerät Gebrauchsanweisung ......2 –10 G Blood pressure monitor Instruction for Use ........11–18 F Tensiomètre Mode d’emploi ........19 – 27 E Tensiómetro Instrucciones para el uso ....28 – 36 I Misuratore die pressione Instruzioni per l’uso ......37– 45 T Bilgisayarli tansiyon ölçer...
-
Página 2: Wichtige Hinweise
DEUTSCH Sehr geehrte Kundin, sehr geehrter Kunde, • Zwischen zwei Messungen sollten Sie 5 Minuten warten! • Die von Ihnen selbst ermittelten Messwerte können nur zu wir freuen uns, dass Sie sich für ein Produkt unseres Sorti- Ihrer Information dienen – sie ersetzen keine ärztliche Unter- mentes entschieden haben. - Página 3 • Nehmen Sie die Batterien aus dem Gerät heraus, wenn Hinweise zur Aufbewahrung und Pflege diese verbraucht sind oder Sie das Gerät länger nicht benut- • Das Blutdruckmessgerät besteht aus Präzisions- und zen. Elektronik-Bauteilen. Die Genauigkeit der Messwerte So vermeiden Sie Schäden, die durch Auslaufen entstehen und Lebensdauer des Gerätes hängt ab vom sorgfältigen können.
-
Página 4: Messung Vorbereiten
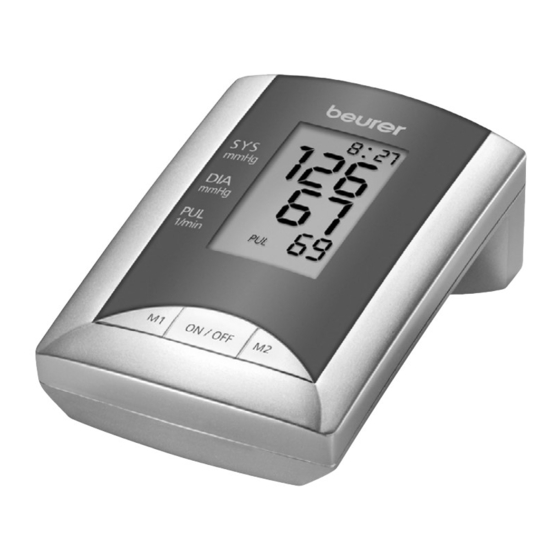
3. Gerätebeschreibung Anzeigen auf dem Display: 1 Speicherplatz nummer 2 Uhrzeit und Datum 3 Systolischer Druck 4 Diastolischer Druck 5 Symbol Puls 6 Ermittelter Pulswert 7 Symbol Batterie- wechsel 8 Benutzerspeicher 9 Benutzerspeicher 10 Aufpumpen , Luft ablassen M1 ON/OFF M2 A Manschette F Display B Manschettenschlauch... - Página 5 ung eingelegt werden. Es dürfen keine wiederaufladbaren • Mit der Taste M1 können Sie grundsätzlich einzustellende Akkus verwendet werden. Werte erhöhen, mit M2 können Sie Werte verkleinern. Stel- • Schließen Sie den Batteriefachdeckel wieder sorgfältig. Nun len Sie also die Jahreszahl ein und bestätigen Sie die Ein- können Sie das Datum und die Uhrzeit einstellen.
-
Página 6: Blutdruck Messen
vom Blutdruckmessgerät. Sobald Sie das Netzteil ausste- Stecken Sie nun den Manschetten- cken, verliert das Blutdruckmessgerät Datum und Uhrzeit. schlauch in den Anschluss für den Die gespeicherten Messwerte bleiben jedoch erhalten. Man schetten stecker. 5. Blutdruck messen Bitte bringen Sie das Gerät vor der Messung auf Raumtem- Achtung: Das Gerät darf nur mit der Original-Manschette peratur. - Página 7 Blutdruck messen zur Speicherung zugewiesen. Das entsprechende Symbol oder erscheint im Display. • Legen Sie, wie zuvor beschrieben, die Manschette an und • Schalten Sie das Blutdruckmessgerät mit der Ein /Aus-Taste nehmen Sie die Haltung ein, in der Sie die Messung durch- aus.
- Página 8 7. Speicherwerte abrufen und löschen Taste jedoch weiterhin gedrückt, bis die Anzeige komplett erlischt. Speicherwerte abrufen • Um einen gesamten Benutzerspeicher zu löschen, müs- Sie können die Speicherwerte der 2 Benutzerspeicher abrufen sen Sie den entsprechenden Benutzerspeicher auswählen. und die Durchschnittswerte anzeigen lassen. Es wird der Durchschnitt angezeigt und mit symbolisiert.
-
Página 9: Technische Angaben
Für ca. 300 Messungen, je nach Höhe dauer des Blutdrucks bzw. Aufpumpdruck 10. Technische Angaben Zubehör Aufbewahrungstasche, Gebrauchsanwei- Modell-Nr. BM 20 sung, 4 „AA“-Batterien LR6 Messmethode Oszillometrisch, nicht invasive Blutdruck- Schutzklasse Interne Versorgung, IPX0, kein AP oder messung am Oberarm... - Página 10 11. Netzteil gebenen Kundenservice-Adresse anfordern oder am Ende der Gebrauchsanweisung nachlesen. Modell Nr. 8194047/02 • Das Gerät entspricht der EU-Richtlinie für Medizinprodukte Eingang 100 V – 240 V ~, 50/60 Hz 93/42/EC, dem Medizinproduktegesetz und den europä- Ausgang 6 V, 600 mA, nur in Verbindung mit Beurer ischen Normen EN1060-1 (nicht invasive Blutdruckmess- Blutdruckmessgeräten geräte Teil 1: Allgemeine Anforderungen) und EN1060-3...
-
Página 11: Getting To Know Your Instrument
ENGLISH Dear Customer, • The readings that you take may only be used for information purposes – they are not a substitute for a medical examina- Thank you for choosing one of our products. Our name stands tion! Discuss your results with the doctor. Never use them to for high-quality, thoroughly tested products for the applica- make medical decisions independently (e.g. - Página 12 – You should protect the device from impact, moisture, dirt, Repair and disposal major temperature fluctuations and direct exposure to the • Batteries do not belong in domestic refuse. Used batteries sun’s rays. should be disposed of at the collection points provided. –...
-
Página 13: Device Description
3. Device description Icons in the display: 1 Memory space number 2 Time and date 3 Systolic pressure 4 Diastolic pressure 5 Pulse symbol 6 Calculated pulse value 7 Battery replacement symbol 8 User memory 9 User memory 10 Inflate , release air M1 ON/OFF M2 A Cuff F Display... - Página 14 • Replace the battery cover carefully. Now you can set the • Now set the month using the M1 and M2 buttons. Confirm date and time. using the on/off button. • Now set the day using the M1 and M2 buttons. Confirm Changing batteries using the on/off button.
-
Página 15: Measuring Blood Pressure
5. Measuring blood pressure 22 to 32 cm. A larger cuff for upper arm circumferences from 32 to 42 cm is available from retailers or the service address Please ensure the device is at room temperature before meas- under order no. 162.093. uring. -
Página 16: Displaying And Deleting Measurements
• When the measurement has been taken, the pressure dis- • Using the on/off button, switch off the blood pressure moni- sipates very quickly. The pulse, the systolic and diastolic tor. The measurement result is then saved to the selected blood pressure are displayed. - Página 17 . Hold the memory button M1 or M2 10. Specifications depressed until the display starts blinking and keep the but- ton depressed until the display completely clears. Model No. BM 20 Method of Oscillometric, non-invasive blood pressure 8. Error recovery Measurement...
-
Página 18: Mains Part
Operating +10 °C to +40 °C, ≤ 85 % RH Supplier Ansmann AG Temperature Protection This device is double isolated and protected Storage- -5 °C to +50 °C, ≤ 85 % RH against short circuit and overload by a pri- Temperature mary thermal fuse. -
Página 19: Premières Expériences
FRANÇAIS Chère cliente, cher client, • Avant chaque mesure, reposez-vous pendant env. 5 minutes ! Nous sommes heureux que vous ayez choisi un produit de • Patientez 5 minutes entre deux mesures ! notre assortiment. Notre nom est synonyme de produits de •... - Página 20 • Les piles ne doivent être ni rechargées ni réactivées par Remarques relatives à la conservation et à l’entretien d’autres méthodes ni démontées ni jetées dans le feu ni • L’appareil de mesure de la tension artérielle est constitué court-circuitées. de pièces électroniques, de grande précision.
-
Página 21: Description Du Tensiomètre
3. Description du tensiomètre Affichages à l’écran : 1 Numéro de mémoire 2 Heure et date 3 Pression systolique 4 Pression diastolique 5 Symbole Pouls 6 Valeur du pouls mesu- rée 7 Symbole Changement de piles 8 Mémoire utilisateur 9 Mémoire utilisateur M1 ON/OFF M2 10 Gonflage , Dégonflage... - Página 22 • Refermez soigneusement le couvercle du compartiment des • La touche M1 vous permet d’augmenter les valeurs lors du piles. Vous pouvez alors régler la date et l’heure. réglage et M2, de les diminuer. Réglez l’année et confirmez votre choix à l’aide de la touche Marche /Arrêt. Remplacement des piles •...
-
Página 23: Mesure De La Tension Artérielle
5. Mesure de la tension artérielle Attention : L’appareil ne doit être utilisé qu’avec le brassard d’origine. Avec manchette pour tours de bras de 22 à 32 cm. Veuillez amener l’appareil à température ambiante avant la Sous le numéro de commande 162.093, un brassard de taille mesure. - Página 24 • Après une vérification automatique où tous les éléments de ron. Dans ce cas, le résultat de la mesure est aussi sauve- l’affichage défilent, la mesure commence. Pendant le gon- gardé dans la mémoire utilisateur sélectionnée. flage du brassard, l’icône s’affiche.
- Página 25 7. Consulter et supprimer les valeurs Suppression des données sauvegardées enregistrées Il vous est possible de supprimer certaines données ou l’en- semble des données sauvegardées. Sélectionner les données sauvegardées • Pour supprimer certaines données, sélectionnez d’abord la Vous pouvez sélectionner les données sauvegardées dans les donnée en question et appuyez sur la touche de mémoire deux mémoires utilisateurs et afficher leur moyenne.
-
Página 26: Fiche Technique
Température de -5 °C à +50 °C à une humidité relative 10. Fiche technique stockage autorisée de ≤85 % N° de modèle BM 20 Alimentation 4 piles 1,5 V AA (alcalines LR6) Méthode de Mesure de la pression artérielle oscillo- électrique mesure métrique, non-invasive au bras... - Página 27 Classification Pièce d’utilisation de type BF Isolé /classe d’isolation 2 Appareil à alimentation électrique Boîtier et cou- Le boîtier de l’adaptateur permet d’évi- interne, classe de sécurité II (valable vercles de pro- ter tout contact des pièces qui sont ou pour l’adaptateur ca/cc et pour l’en- tection peuvent être sous tension (doigt, aiguille,...
-
Página 28: Conocer El Aparato
ESPAÑOL Estimados clientes: • Los valores medidos por Vd. sirven solamente para su infor- mación; ellos no sustituyen los exámenes médicos. Nunca Es un placer para nosotros que usted haya decidido adquirir tome Vd. propias decisiones médicas basadas en los valo- un producto de nuestra colección. - Página 29 • Saque las pilas del aparato, si están agotadas o si el apa- Indicaciones para el almacenamiento y limpieza rato no se va a usar durante un espacio de tiempo mayor. • El tonómetro consta de componentes de precisión y com- De esta manera se evitan daños que podrían ser causados ponentes electrónicos.
-
Página 30: Descripción Del Aparato
3. Descripción del aparato Indicaciones en la pantalla: 1. Posición de graba- ción en la memoria 2. Hora y fecha 3. Presión sistólica 4. Presión diastólica 5. Símbolo de pulso 6. Pulso medido 7. Símbolo de cambio de las pilas 8. - Página 31 • Cerrar cuidadosamente el compartimiento de las pilas con • Con la tecla M1 puede aumentar los valores que se van a la tapa. A continuación puede ajustarse la fecha y la hora. ajustar; con la M2 puede reducir dichos valores. Introduzca el año y confirme pulsando la tecla de encendido y apagado.
-
Página 32: Medir La Presión Sanguínea
nuación del tensiómetro. En cuanto desconecte la fuente de Conecte el tubo del manguito a la alimentación, el tensiómetro perderá la fecha y la hora. Sin conexión respectiva en el aparato. embargo, los valores de medición almacenados se conser- van. 5. - Página 33 Medir la presión sanguínea usuario utilizada en último lugar. En la pantalla aparece el símbolo o bien • Coloque usted el brazalete tal como se ha descrito ante- • Apague el aparato con la tecla de encendido y apagado. De riormente y tome la posición en que desea llevar a cabo la este modo, el resultado de la medición se almacena en la medición.
-
Página 34: Consulta Y Borrado De Los Valores Guardados
7. Consulta y borrado de los valores Borrar valores almacenados guardados Usted puede borrar individualmente los valores almacenados o bien todos juntos. Activar valores almacenados • Para borrar individualmente los valores seleccione pri- Usted puede activar los valores almacenados en ambas mero el valor almacenado y mantenga pulsado el botón memorias de usuario y visualizar los valores medios de memoria M1 o bien M2. -
Página 35: Limpieza
10. Especificaciones técnicas Temperatura de -5 °C a +50 °C; ≤ 85 % de humedad relativa Modelo No. BM 20 almacenamiento Método de Medición oscilométrica, no invasiva, de la permitida medición presión presión sanguínea en el brazo... - Página 36 Clasificación Aplicación Tipo BF Carcasa La carcasa del adaptador actúa como pro- Aparato con fuente de alimentación interna, y cubierta tección frente a las partes sometidas, o clase de protección II (de aplicación para la protectora que pueden verse sometidas, a la corriente fuente de alimentación AC/DC y el aparato (dedo, agujas, gancho de seguridad).
-
Página 37: Avvertenze Importanti
ITALIANO Gentile cliente, • Mantenere un intervallo di circa 5 minuti fra due misurazioni! • I valori misurati dall’utente possono servire solo a titolo siamo lieti che abbia scelto un prodotto della nostra gamma. informativo – essi non sostituiscono le visite mediche! Ana- Il nostro nome è... - Página 38 durata in servizio dell’apparecchio dipendono dall’accura- • Non utilizzare batterie di tipo e marca diversi oppure batte- tezza con la quale viene usato. rie con differenti capacità. Utilizzare preferibilmente batterie – Proteggere l’apparecchio da urti, umidità, polvere e spor- alcaline. cizia, forti variazioni della temperatura e raggi diretti del Indicazioni sulla riparazione e sullo smaltimento sole.
-
Página 39: Descrizione Dell'aPparecchio
4. Descrizione dell’apparecchio Indicazioni sul display: 1 Numero posizione di memoria 2 Ora e data 3 Pressione sistolica 4 Pressione diastolica 5 Icona battito car- diaco 6 Battito cardiaco rilevato 7 Icona sostituzione delle batterie 8 Memoria utente M1 ON/OFF M2 9 Memoria utente 10 Pompaggio , scarico aria... - Página 40 • Richiudere accuratamente il coperchio del vano batterie. • Utilizzare il pulsante M1 per incrementare i valori da impo- Ora è possibile impostare la data e l’ora. stare e il pulsante M2 per ridurli. Impostare quindi la cifra dell’anno e confermare l’immissione con il pulsante On/Off. Sostituzione delle batterie •...
-
Página 41: Misurazione Della Pressione Sanguigna
5. Misurazione della pressione sanguigna Attenzione: l’apparecchio deve essere utilizzato unicamente con il bracciale originale. Il bracciale è adatto per una circon- Prima della misurazione portare l’apparecchio a temperatura ferenza braccio tra 22 e 32 cm. ambiente. Con il numero di ordinazione 162.093 è possibile ordinare Applicare il bracciale presso i negozi specializzati, o presso l’indirizzo del servizio Applicare il bracciale al braccio libero... - Página 42 Misurazione della pressione sanguigna alla memoria utilizzata per l’ultima misurazione. Sul display compare il simbolo • Applicare il bracciale come descritto precedentemente e • Accendere il misuratore di pressione con il pulsante On/ assumere la posizione nella quale si desidera effettuare la Off.
-
Página 43: Risoluzione Di Anomalie
7. Ricerca e cancellazione dei valori La visualizzazione comincia a lampeggiare. Continuare a tenere premuto il tasto fino a che la visualizzazione non sia memorizzati completamente cancellata. Richiamo dei dati memorizzati • Per cancellare il contenuto di un’intera memoria occorre È... -
Página 44: Dati Tecnici
10. Dati tecnici Alimentazione Batterie 4 x 1,5 V AA (alcaline tipo LR6) Modello N° BM 20 Durata funziona- Per circa 300 misurazioni, a seconda del Metodo di Misurazione oscillometrica, non invasiva mento batterie... - Página 45 11. Adattatore frequenza possono influenzare questo apparecchio. Per informazioni più dettagliate, rivolgersi all’Assistenza clienti Modello n. 8194047/02 oppure consultare la parte finale delle istruzioni per l’uso. Ingresso 100 V – 240 V ~, 50/60 Hz • L’apparecchio è conforme alla direttiva EU concernente Uscita 6 V, 600 mA, solo in abbinamento con sfig- i prodotti medicali, alla legge sui prodotti medicali e alle...
-
Página 46: Önemli Bilgiler
TÜRKÇE Sayın Müşterimiz, • Kendi ölçtüğünüz değerler sadece sizin bilgi edinmenize yarar; bir doktor kontrolünün yerini tutmaz! Ölçüm değerle- İmalatımız olan bir ürünü tercih etmenizden dolayı memnu- rinizi doktorunuzla gözden geçiriniz, bu değerlere istinaden niyetimizi belirtmek isteriz. Adımız, Isı, Ağırlık, Kan Basıncı, kesinlikle herhangi bir tıbbi karara varmayınız (örn. - Página 47 Böylelikle, pillerden akan sıvı maddelerin sebep olabile- Muhafaza, bakım ve koruma ile ilgili bilgiler ceği zararları önlemiş olursunuz. Bütün pilleri daima aynı • Tansiyon cihazı, hassas ve elektronik ünitelerden oluşmak- zamanda değiştiriniz. tadır. Ölçüm değerlerinin doğruluğunun ve hassaslığının yanı • Farklı tipte piller, farklı marka piller veya farklı kapasitelere sıra, cihazın ömrü...
- Página 48 3. Alet Tanımı Ekrandaki görüntüler: 1 Hafıza yeri numarası 2 Saat ve tarih 3 Sistolik basınç 4 Diyastolik basınç 5 Nabız sembolü 6 Tespit edilen nabız değeri 7 Pil değiştirme sem- bolü 8 Kullanıcı hafızası 9 Kullanıcı hafızası 10 Havayla şişirme , M1 ON/OFF M2 havayı...
- Página 49 • Pil yuvasının kapağını tekrar dikkatlice kapatınız. Artık, tarih • Şimdi M1 ve M2 tuşlarıyla ayı ayarlayın. Açma/kapama düğ- ve saat ayarlarını yapabilirsiniz. mesiyle onaylayın. • Şimdi M1 ve M2 tuşlarıyla günü ayarlayın. Açma/kapama Pillerin Değiştirilmesi düğmesiyle onaylayın. Pil Değiştirme Göstergesi yanıp sönerse, piller hali •...
-
Página 50: Tansiyonun Ölçülmesi
5. Tansiyonun ölçülmesi Üst kol genişliği 32 ile 42 cm. arasındaki insanlara yönelik büyük bir manşet, 162.093 sipariş numarası altında, bu tür malzemele- Lütfen cihazı ölçümden önce oda sıcaklığına getiriniz. rin satıldığı yerlerden veya Servis adresinden tedarik edilebilir. Manşetin takılması Doğru konuma geçilmesi Manşeti, açık olan sol üst kola sarınız. - Página 51 • M1 veya M2 hafızaya kaydetme tuşuna basmak suretiyle caktır. Bu durumda da, ölçüm değeri, seçilmiş olan kullanıcı istenilen kullanıcı hafızasını seçiniz. Herhangi bir kullanıcı hafızasına kaydedilecektir. hafızasını seçmemeniz halinde, ölçüm sonucu, en son kul- Not: İstediğiniz zaman Açma/Kapama düğmesine basarak lanılan kullanıcı...
-
Página 52: Hata Giderme
M1 veya M2 hafıza tuşunu, gösterge 10. Teknik bilgiler yanıp sönmeye başlayıncaya kadar basılı tutunuz ve tuşu, gösterge tamamen silinene kadar basılı tutunuz. Model numarası BM 20 Ölçme metodu Üst koldan, osilometrik, invasiv olmayan 8. Hata giderme tansiyon ölçümü... - Página 53 İzinli çalıflma ısısı +10 °C den + 40 °C kadar, Üretici Ansmann AG ≤ 85 nispi hava nemi Koruma Cihazın çift koruyucu izolasyonu vardır ve İzinli muhafaza ısısı -5 °C den +50 °C kadar, bir hata durumunda cihazın elektrik şebe- ≤...
-
Página 54: Важные Указания
РУССКИЙ Многоуважаемый покупатель! 2. Важные указания Мы рады тому, что Вы выбрали товар из нашего ассорти- Указания по применению мента. Изделия нашей компании являются • Всегда измеряйте кровяное давление в одно и то же изделиями высочайшего качества, используемые время суток, чтобы обеспечить сравнимость результа- для... - Página 55 исчезают. Однако данные измерений, сохраненные в • Запрещается заряжать или реактивировать батарейки памяти аппарата, останутся. иными способами, разбирать их, бросать в огонь или • Автоматика отключения выключает аппарат в целях эко- замыкать накоротко. номного использования батареек, если в течение одной •...
-
Página 56: Описание Аппарата
(Waste Electrical and Electronic Equipment). По всем Индикация на дисплее: вопросам по утилизации обращайтесь в соответствую- 1 Номер ячейки памяти щую коммунальную службу. 2 Время и дата 3 Систолическое 4. Описание аппарата давление 4 Диастолическое давление 5 Символ пульса 6 Измеренное значе- ние... - Página 57 Заряжаемые аккумуляторные батарейки использовать Для настройки даты и времени действуйте следующим нельзя. образом: • Аккуратно закройте крышку батарейного отсека. Теперь • После установки/замены батареек нажмите любую можно установить правильную дату и время. кнопку, после этого замигает индикация года. • При помощи кнопки M1 Вы можете увеличивать значе- Замена...
-
Página 58: Измерение Кровяного Давления
рения артериального давления. Блок питания должен Заверните свободный конец манжеты подключаться к сетевому напряжению, указанному на плотно, но не слишком, вокруг руки и табличке на оборотной стороне устройства. зажмите замок на липучках. Манжета • Затем воткните сетевой штекер блока питания в розетку. должна... - Página 59 • Измерения можно проводить в положении сидя или измерения будет занесен в выбранный раздел памяти в положении лежа.Следите при этом, чтобы манжета для данного пользователя. Если Вы забудете выключить находилась на уровне сердца. аппарат, он автоматически отключится примерно через • Чтобы не исказить результаты измерения, следует вести 3 минуты.
- Página 60 6. Таблица для классификации значений кровяного давления (единица измерения – мм. рт. столба) для взрослых: Область Систолическое Диастолическое Диапазон значений (определяемый показатель) артериальное давление артериальное давление Гипотония (Пониженное кровяное давление) ниже 105 ниже 60 необходимо наблюдение врача Диапазон нормальных значений от 105 до 120 от...
-
Página 61: Технические Данные
ния измерения (на экране высвечивается • неправильно вставлена соединительная трубка манжеты 10. Технические данные (на экране высвечивается Модель № BM 20 • во время установки батарейки была нажата кнопка Методы измерения Осциллометрическое неинвазивное «вкл./выкл.», измерение кровяного давления на • нагнетание воздуха продолжается дольше 20 секунд (на... - Página 62 Диапазон Давление в манжете: 0 – 300 мм рт. ст., Срок службы Примерно для 300 измерений, в измерения систолическое: 50 – 250 мм рт. ст., батарейки зависимости от величины артери- диастолическое: 40 –180 мм рт. ст., ального давления и, соответственно, пульс: 40 –160 ударов...
- Página 63 • Аппарат соответствует требованиям европейского нор- Срок эксплуатации изделия: мин 5 лет мативного акта по медицинским изделиям, 93/42/EC Фирма изготовитель: Бойрер Гмбх, Закона о медицинских изделиях, а также европейских Софлингер штрассе 218, стандартов EN1060-1 («Неинвазивные аппараты для 89077-УЛМ, Германия измерения кровяного давления», часть 1: «Общие тре- Фирма-импортер: OOO БОЙРЕР, 109451 г.
-
Página 64: Ważne Wskazówki
POLSKI Szanowni Klienci, • Uzyskane wartości służą wyłącznie do własnej informacji – w żadnym wypadku nie zastępują badania lekarskiego! bardzo dziękujemy za wybór jednego z naszych wyro- Wyniki należy omówić z lekarzem, nie uzasadniać nimi w bów. Nazwa naszej firmy oznacza wysokiej jakości wyroby, żadnym wypadku własnych decyzji w leczeniu (np.: leków i dokładnie sprawdzone w zakresie zastosowań... - Página 65 • Wyciągnąć baterie z urządzenia, kiedy są wyczerpane lub Wskazówki do przechowywania i pielęgnacji kiedy urządzenie nie będzie przez dłuższy czas używane. W • Aparat do mierzenia ciśnienia krwi składa się z podzespo- ten sposób unika się szkód, powstających w wyniku wylania łów precyzyjnych i elektronicznych.
-
Página 66: Opis Urządzenia
3. Opis urządzenia Wskazania na wyświetlaczu: 1 Numer pozycji w pamięci 2 Godzina i data 3 Ciśnienie skurczowe 4 Ciśnienie rozkurczowe 5 Symbol tętna 6 Zmierzone tętno 7 Symbol wymiany baterii 8 Pamięć użytkownika 9 Pamięć użytkownika M1 ON/OFF M2 10 Pompowanie , wypuszczanie powie- trza... - Página 67 • Dokładnie zamknąć pokrywę baterii. Teraz można ustawić • Za pomocą przycisku M1 można zwiększyć, a za pomocą datę i zegar. M2 zmniejszyć ustawianą wartość. Ustaw odpowiedni rok i zatwierdź wprowadzoną wartość przyciskiem Wł./Wył. Wymiana baterii • Za pomocą przycisków M1 i M2 ustaw miesiąc. Potwierdź W chwili pojawienia się...
-
Página 68: Pomiar Ciśnienia Krwi
niomierza. Po odłączeniu zasilacza od sieci nastąpi skaso- Uwaga: Urządzenie może być użytkowane tylko z oryginalną wanie daty i godziny. Zapisane wyniki pomiarów zostaną opaską. Mankiet przeznaczony jest do obwodu ramienia od jednak zachowane. 22 do 32 cm. Po numerem zamówienia 162.093 dostępny jest w handlu 5. - Página 69 • Wyłącz urządzenie za pomocą przycisku Wł./Wył. W ten wyświetlaczu pojawia się symbol . Ciśnienie jest podwyż- sposób wynik pomiaru zostanie zapisany w wybranej szane do poziomu 180 mmHg. pamięci użytkownika. W przypadku pozostawienia włączo- • Po wykryciu tętna na wyświetlaczu zacznie migać symbol nego urządzenia, po 3 minutach następuje jego automa- tętna tyczne wyłączenie.
-
Página 70: Usuwanie Usterek
pierwszy pojawia się wynik ostatniego pomiaru. Poszcze- 8. Usuwanie usterek gólnym wartościom przyporządkowane są kolejne numery Komunikaty o usterkach mogą się pojawić: w pamięci od 1 do 30. Po ok. 4 sekundach pojawia się data • podczas poruszania się w momencie pomiaru (na wyświe- wykonania danego pomiaru, a po kolejnych 4 sekundach –... -
Página 71: Dane Techniczne
10. Dane techniczne Zasilanie 4 baterie 1,5 V AA (alkaliczne typu LR6) elektryczne Nr modelu BM 20 Żywotność baterii Na ok. 300 pomiarów, w zależności od Metoda pomiaru Oscylometryczny, nieinwazyjny pomiar wysokości ciśnienia lub ciśnienia pom- ciśnienia krwi na przedramieniu... - Página 72 ogólne) i EN1060-3 (urządzenia do nieinwazyjnego pomiaru Ochrona Urządzenie posiada podwójną izolację ciśnienia krwi część 3: Uzupełniające wymogi dla elektro- ochronną oraz wbudowane zabezpiecze- mechanicznych systemów pomiaru ciśnienia krwi). nie termiczne, które odłącza je od sieci w przypadku awarii. Przed rozpoczęciem pracy z adapterem należy upewnić...
-
Página 73: Electromagnetic Compatibility Information
Guidance and manufacturer’s declaration – electromagnetic emission The BM 20 is intended for use in the electromagnetic environment specifi ed below. The customer of the user of the BM 20 should assure that it is used in such an environment. - Página 74 Guidance and manufacturer’s declaration – electromagnetic immunity – for all EQUIPMENT and SYSTEMS Guidance and manufacturer’s declaration – electromagnetic immunity The BM 20 is intended for use in the electromagnetic environment specifi ed below. The customer or the user of BM 20 should assure that it is used in such an environment.
- Página 75 Guidance and manufacture’s declaration – electromagnetic immunity – for EQUIPMENT and SYSTEMS that are not LIFE-SUPPORTING Guidance and manufacture’s declaration – electromagnetic immunity The BM 20 is intended for use in the electromagnetic environment specifi ed below. The customer or the user of BM 20 should assure that it is used in such an environment.
- Página 76 Recommended separation distances between portable and mobile RF communications equipment and the BM 20 The BM 20 is intended for use in an electromagnetic environment in which radiated RF disturbances are controlled. The customer or the user of the BM 20 can help prevent electromagnetic interference by maintaining a minimum distance between portable and mobile RF commu- nications equipment (transmitters) and the BM 20 as recommended below, according to the maximum output power of the communications equipment.